


An infernalryan Skyrim Modding Guide
Overview
This guide will provide instructions for the initial setup of Skyrim VR. I will cover how to bring the most recent game files (e.g. 'masters') and Creation Club content from Skyrim Special Edition over (if applicable), as well as essential mod installations, whether you choose to use a Wabbajack mod pack, prefer the manual approach, or a combination of both. These steps may vary slightly from those you may have seen before, but they will provide arguably the best possible initial setup to support your modding journey.
This guide is for Skyrim VR for Steam. For the Skyrim SSE/AE version of this guide, click here. For the Skyrim SSE/AE GOG version of this guide, click here.
Guide Contents:
1 Install Skyrim VR
First things first, Skyrim VR needs to be installed. By default, Steam installs all games into C:\Program Files (x86)\Steam\steamapps\common. DO NOT DO THIS! If Skyrim VR is currently installed here, you will have to move it. Set up an alternate installation location with the steps below (if you haven't already), and either install or move an existing installation there. I have provided these steps below, but the full official guide from Steam can be found here.
1.1 Add a Steam library folder
Skip to section 1.2 if you have done so already, otherwise, follow these steps to create a new location which can be selected for your game installations within Steam.
1.2 Install latest version
Unlike Skyrim SSE/AE, there is only one version of Skyrim VR used by the larger playerbase (1.4.15), and it is extremely unlikely it will ever be updated. The good news is that there is no need to perform a "downgrade" with Skyrim VR. This makes initial setup considerably easier. Follow only one of the two options and their associated step(s) below (expand their respective 'Spoiler' tag).1.2.1 Option 1: New installation
If you do not currently have Skyrim VR installed, simply run the installer from within Steam. Be sure to select an alternate installation location and DO NOT install in Program Files. This will install the latest version of Skyrim VR. Skip to section 2 when done.
1.2.2 Option 2: Existing installation
For existing installations, there are a couple of steps you want to complete before proceeding.
1.2.2.1 Purge mods (Vortex)
Skip to section 1.2.2.2 if you have never previously used Vortex Mod Manager, otherwise, if it is still installed, you will need to check to ensure the program does not have any mods deployed to the SkyrimVR folder. If it does, this could cause Vortex to complain that changes were made outside of the program the next time you open it, requiring you to manually resolve each issue.
1.2.2.2 Move Skyrim VR out of Program Files folder
Skip to section 1.2.2.3 if Skyrim is not installed here, otherwise, you will need to move it (you don't need to perform a complete uninstall). You can do this using Steam's "Move" feature. To use this option do the following:
1.2.2.3 Delete and Verify Integrity of Files
Next we will ensure that all files are stock Skyrim VR files and any previous modding activities, if applicable, are undone.
2 (Optional) Prepare SSE game files
Skip to section 3 if you do NOT have Skyrim Special Edition, otherwise, you will want to use its latest game files (.esm, .esl, .bsa) to ensure maximum compatibility with newer mods (i.e., "best of both worlds"). These are essentially mod files themselves, so even older versions of Skyrim and Skyrim VR have no issues running them (there are a couple of exceptions which we will address, one specific to Skyrim VR as well as on extremely important exception with the plugin version which we will get to in section 3 (Final setup) below). We will want to save these files for later.
2.1 Download latest Skyrim SSE game files
In this step we're going to download the latest version of Skyrim SSE. Don't worry if you have an active Skyrim SSE/AE game/mod list as we can use the Steam console to do this, which will not overwrite anything in your Skyrim SSE/AE game folder. Follow only one of the four options listed based on your specific conditions (expand their respective 'Spoiler' tag).2.1.1 Option 1: Skyrim SSE owned but not installed
If you own Skyrim SSE and it is not installed, the easiest way to obtain the latest game files is to install the game. Simply run the installer from within Steam. Be sure to select an alternate installation location and DO NOT install in Program Files. This will install the latest version of Skyrim SSE.
2.1.2 Option 2: Skyrim SSE installed and already the latest version
If Skyrim SSE is installed and is already updated to the latest version (whether you are modding this or not), no action is required. You will know the game is fully up-to-date if the 'Play' button in Steam For Skyrim SSE does NOT say 'Update'.
2.1.3 Option 3: Skyrim SSE installed and NOT the latest version
If your Skyrim SSE instance is "downgraded" (for modding purposes or personal preference), we will want to utilize the Steam console to grab the updated master files so that we do not interfere with your existing install. Follow the instructions below.
2.1.3.1 Open Steam console
2.1.3.2 Download latest version
At the time of writing, the version listed (1.6.1170) is the latest version of SSE/AE. If this has changed and this guide has not yet been updated, please refer to my Skyrim Manifest List to see if the newer version exists there, and if not, how to determine the proper commands for the latest version yourself. Note that we don't need depot 489833 (the .exe file) because we're only pulling the .esm, .esl, and .bsa files for our purposes.
'Depot download complete : "C:\Program Files\Steam\steamapps\content\app_489830\depot_489831" (1 files, manifest 2289561010626853674)'
2.1.3.2.1 Version 1.6.1170 commands
Run the following in the Steam console.
2.1.3.3 Merge depot folders
Once the depot downloads are done, we want to merge the two folders to simplify later steps.
2.2 Master game files
These are the updated master game files that we will be saving for later.
2.2.1 Prepare master files
2.3 Creation Club content
Skyrim VR technically does not have Creation Club content (since it is based off of SSE, and not Anniversary Edition), but we can still use these files (Survival Mode has a small exception which we will get to later). Follow the steps below.
2.3.1 Prepare Anniversary Upgrade content files
Skip to section 2.3.2 if you did NOT purchase the Anniversary Upgrade DLC, otherwise, proceed if you wish to bring this content over. This step can be a bit tricky. If you own the Anniversary Upgrade and want to bring these files over, but don't already have them downloaded, you will have to launch Skyrim SSE version 1.6.1130 or above and download them from the in-game store (Bethesda servers are not reachable on versions earlier than this!). This can be problematic if you are currently running a modded and/or "downgraded" version of Skyrim SSE already. If your version is lower than 1.6.1130, you are out of luck without performing an upgrade (with optional re-downgrade). Additionally, some users will mod their interface files to remove access to the Creations/Creation Club store menus. I cannot account for all of these variables. If you are currently running a modded SSE setup and/or have already downloaded these into your SSE/AE game instance, I will assume you know how and where to locate these files, if applicable, otherwise, I have provided steps to download these from the in-game store. Follow only one of the two options below depending on your specific scenario (expand their respective 'Spoiler' tag).2.3.1.1 Option 1: Locate existing files
If you have already downloaded all of the Anniversary Upgrade files, follow the steps below.
2.3.1.2 Option 2: Download files from Skyrim SSE
If your Skyrim SSE installation is running at least version 1.6.1130, you can download the files directly in-game.
2.3.2 Prepare Creation Club content files
2.4Remove Skyrim SSE files (optional)
If you used the Steam console to download these files, or had to install Skyrim SSE to grab updated files and do not wish to keep it installed, follow these steps to remove and/or clean up applicable files. Skip to section 3 if this does not apply to your specific case, otherwise, follow only one of the two options and their associated step(s) below (expand their respective 'Spoiler' tag).2.4.1Option 1: Uninstall Skyrim SSE
2.4.2Option 2: Steam depot files
2.5Remove Anniversary Upgrade SSE files (optional)
If you already had Skyrim SSE installed and downloaded the Anniversary Upgrade files specifically for this Skyrim VR modlist, and wish to remove them from your SSE installation folder, refer to my Skyrim Game Files List and remove all applicable files from the 'Anniversary Upgrade' section that you do not wish to keep.
3 Final setup
Your Skyrim VR game folder is now ready, but before you start modding, you will need to install and/or verify the following essential mods with your Mod Manager. See below.
3.1 Install Mod Manager
Skip to section 3.2 if you intend to use a Wabbajack mod pack since this will typically come pre-built with a portable version of Mod Organizer 2 (so this decision will have been made for you). For everyone else, the two options are Vortex and Mod Organizer 2. Nexus Mod Manager (NMM) has been sunset and is no longer supported, so do NOT attempt to use that with modern Skyrim modding. If you need help deciding between Vortex and MO2, there are several threads on this on the internet. Personally, I prefer MO2, and believe that what appears initially to be a steeper learning curve inevitably reveals itself to be a bit more intuitive overall, especially for larger mod lists, with the main benefit being you can keep your /Data folder (and root folders with Root Builder) completely free of files and/or links. Ultimately this is up to you, and my guides will support both applications. Install your Mod Manager of preference and then proceed.
3.1.1 Install Root Builder for MO2
Skip to section 3.2 if NOT using MO2. Unlike Vortex, MO2 does not have the native ability to manage files in the <SkyrimVR game folder>, only the /Data folder. This functionality is provided by the Root Builder plugin, allowing you to leave the entire <SkyrimVR game folder> in "pristine, vanilla condition!", and the steps to set it up are quite simple. All the remaining steps for MO2 in this guide assume this is installed. Follow the instructions below by expanding the 'Spoiler' tag.
3.2 Install core mods
Before you start adding your own mods to your mod list, you will want to set up core mods which will serve as the foundation for any future mods added. For Wabbajack, this is an entire mod list which you can later build off of, whereas if you are looking to create your mod list manually from scratch, there are several mods which should be installed first. Follow only one of the two options and their associated step(s) below (expand their respective 'Spoiler' tag).3.2.1 Option 1: Wabbajack mod pack
If using Wabbajack, simply download the Wabbajack modlist file, open it with Wabbajack for download, and follow any specific instructions on the mod pack page to configure. Be sure the mod pack is compatible with your selected game version. Skip to section 3.3 when done.
3.2.2 Option 2: Custom mod list
Follow the instructions below to download the listed essential mods.
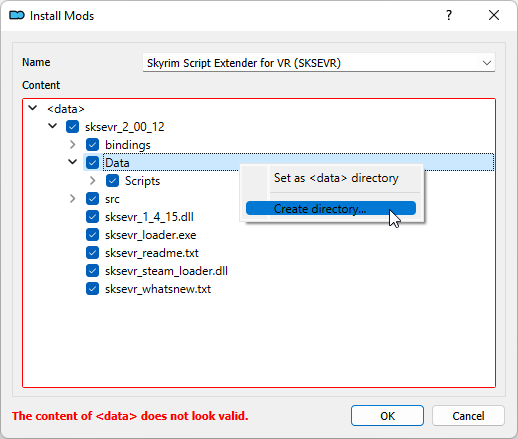
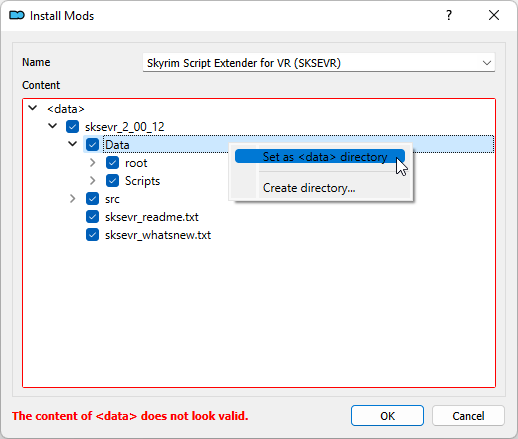
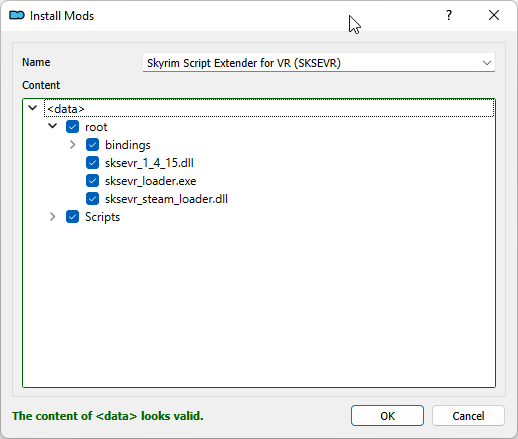
3.2.2.1 Skyrim Script Extender (SKSE)
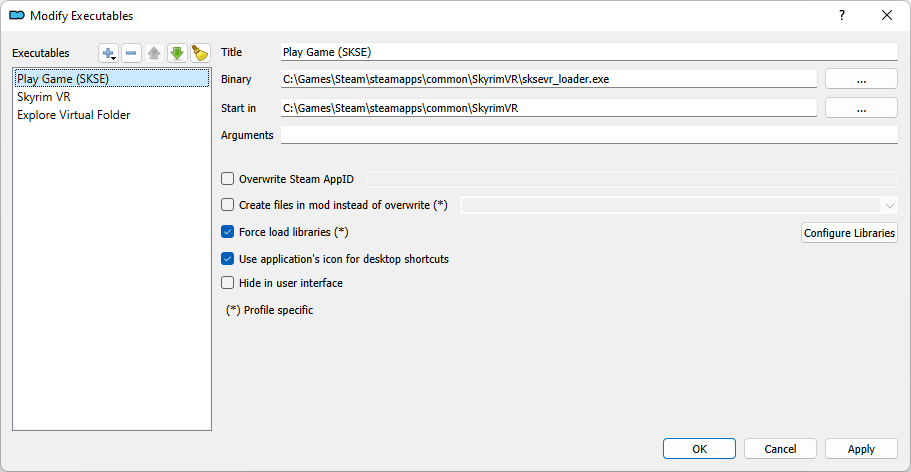
SKSE is installed differently depending on the Mod Manager chosen. In general, we are doing the same thing for each: downloading, enabling, and then telling the Mod Manager to launch Skyrim VR with the SKSE launcher when we run the game. Follow only one of the two options based on your Mod Manager of choice (expand their respective 'Spoiler' tag).
3.2.2.1.1 Option 1: Vortex
3.2.2.1.2 Option 2: Mod Organizer 2

3.2.2.2 Address Library
This process is the same for both Vortex and MO2, and should download automatically into your Mod Manager.
3.2.2.3 Engine Fixes VR
Skip to section 3.3 if you do not wish to install this. While not required, this mod fixes a lot of game bugs and additionally allows achievements when mods are enabled, which most people want. This mod is installed differently depending on the Mod Manager chosen. Follow only one of the two options based on your Mod Manager of choice (expand their respective 'Spoiler' tag).
3.2.2.3.1 Option 1: Vortex
3.2.2.3.2 Option 2: Mod Organizer 2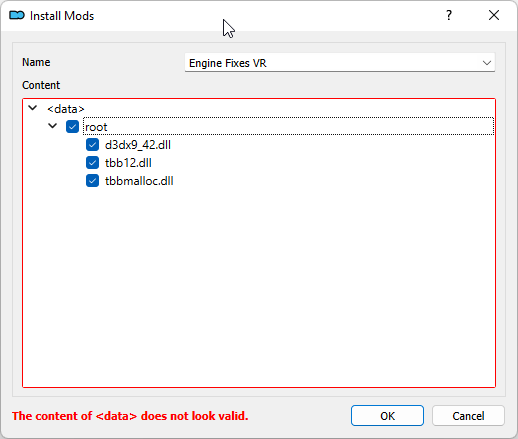

3.3 Install ESL Support for VR
Because some mods (including the updated masters we prepared earlier) use the new plugin header version 1.71 which came with the Skyrim SSE 1.6.1130 update, you must install this mod (or ensure your Wabbajack mod pack has it installed, if you went that route) otherwise you will likely suffer an immediate CTD when launching the game with any such mods enabled. Despite the name (providing long-awaited ESL support for Skyrim VR), this mod also includes a fix which allows Skyrim VR to load mods with the new header version, similar to what Backported Extended ESL Support provides for Skyrim SSE/AE.
3.4 Install prepared masters
Skip to section 3.5 if you did not prepare SSE masters earlier, otherwise, proceed. Follow only one of the two options based on your Mod Manager of choice (expand their respective 'Spoiler' tag).3.4.1 Option 1: Vortex
3.4.2 Option 2: Mod Organizer 2
3.5 Install prepared Creation Club content
Skip to section 3.6 if you did not prepare SSE Creation Content earlier, otherwise, proceed. There are several options on how to perform this listed below in the order of most to least recommended. Follow only one of the options and their associated step(s) below, based on your preference (expand their respective 'Spoiler' tag).3.5.1 Option 1: Curation Club plugin (MO2 only)
The Curation Club plugin will separate all Creation Club content into their own individual mods within MO2 automatically with a single click so that you can easily toggle them on or off, depending on preference. This option is for MO2 users only since it is a plugin specifically for that application. NOTE – This plugin requires MO2 version 2.5 or greater so will not work on version 2.4.4 or below.
3.5.1.1 Install Curation Club for MO2
Skip to section 3.5.1.2 if the Curation Club plugin is already installed, otherwise, proceed with the steps below.
3.5.1.2 Run Curation Club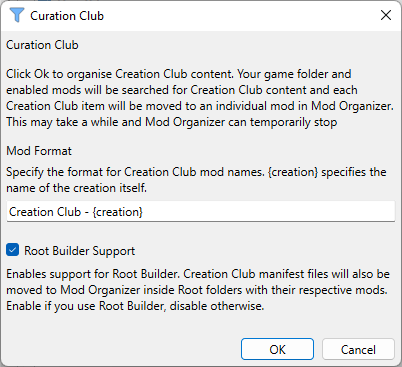
3.5.2 Option 2: AE Creation Club File Organizer
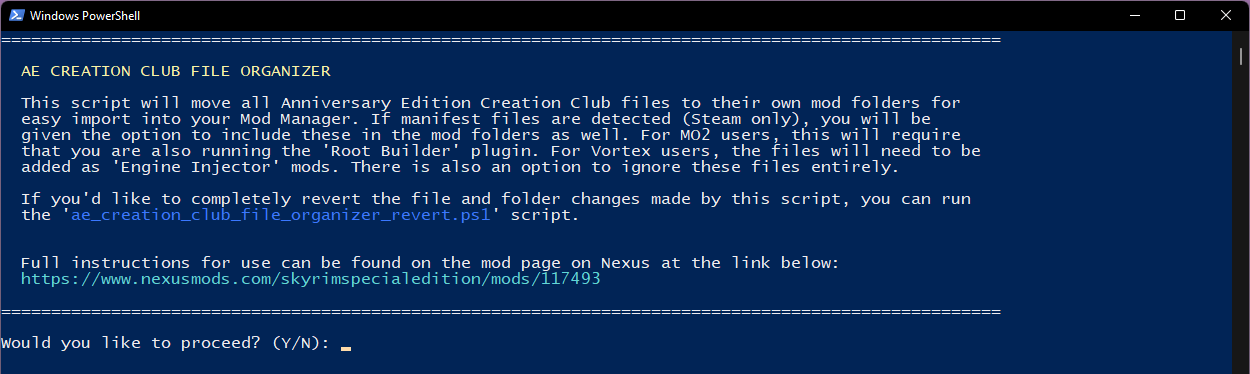
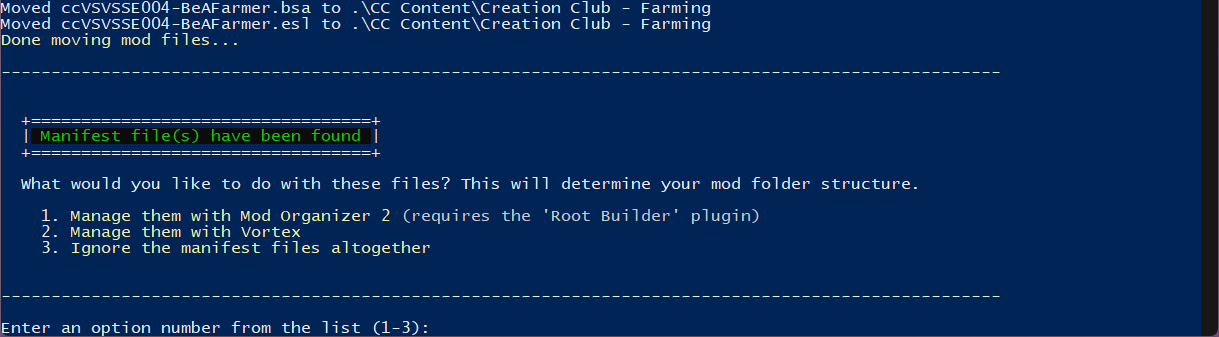
This is a PowerShell script that I wrote which provides the exact same functionality as the Curation Club plugin, but does not require MO2 (which means Vortex users can also use it). It works on a file and folder level (rather than a mod level within your Mod Manager), so should never break as a result of future Mod Manager and/or Skyrim game updates.
3.5.2.1 Download and install scripts
3.5.2.2 Open PowerShell and run the script
In order to execute the script, we have to launch PowerShell a certain way to ensure we bypass the system's execution policy (otherwise the script will not run). This will affect the current instance only, so when PowerShell is closed, the current system policy will be reinforced again.


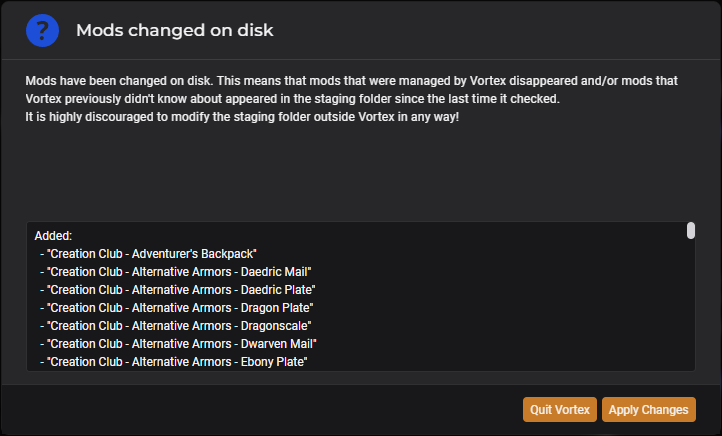
3.5.2.3 Import mods into Mod Manager
The next step is to import these folders into your Mod Manager. Follow only one of the two options based on your Mod Manager of choice (expand their respective 'Spoiler' tag).
3.5.2.3.1 Option 1: Vortex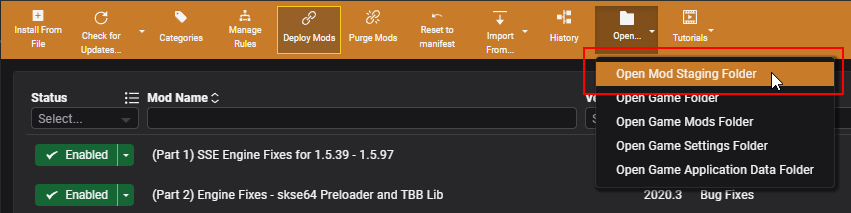
3.5.2.3.2 Option 2: Mod Organizer 2
3.5.3 Option 3: Anniversary Edition Content Picker mod
This mod provides an easy-to-use FOMOD installer with names and descriptions for each Creation Club mod, allowing you to easily decide which mod(s) you want to actually install and use. The only downside here is that you cannot simply enable and disable mods at will, you have to re-run the installer to select which content you'd like. This comes with a little bit less granularity than the above options, and also requires an additional 3.5GB of space (with all Anniversary Upgrade content) since a copy of the files also needs to remain in the.zip file/installer so that the reinstall can be re-run at another time. That said, if you have the space, the inline descriptions can be of huge benefit when selecting which content to enable.
3.5.3.1 Prepare mod installation files
This mod is special in that you need to unpack it, add files to it, then repack it before it can be installed. The steps below provide instructions for this process.
3.5.3.2 Install the mod
Follow only one of the two options based on your Mod Manager of choice (expand their respective 'Spoiler' tag).
3.5.3.2.1 Option 1: Vortex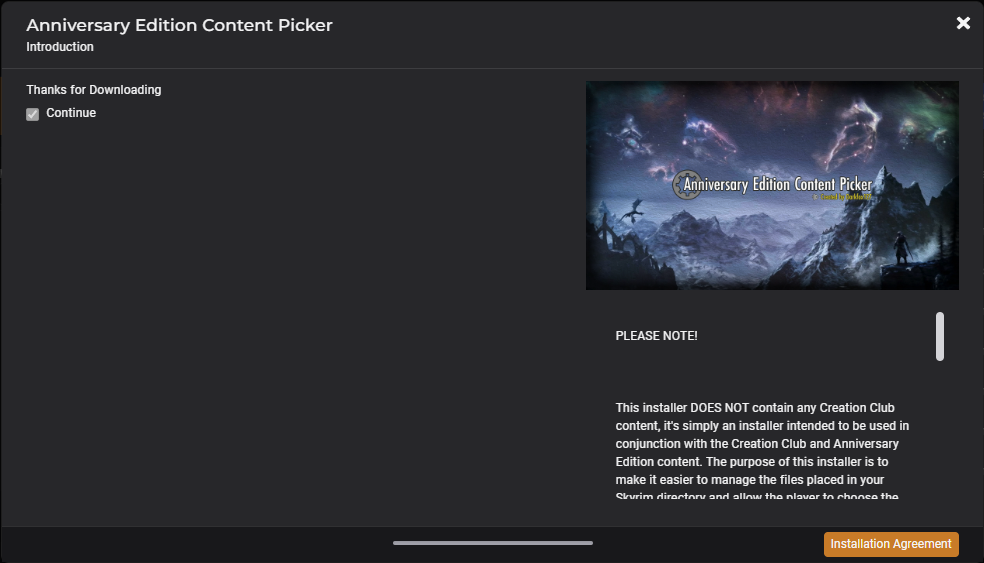
3.5.3.2.2 Option 2: Mod Organizer 2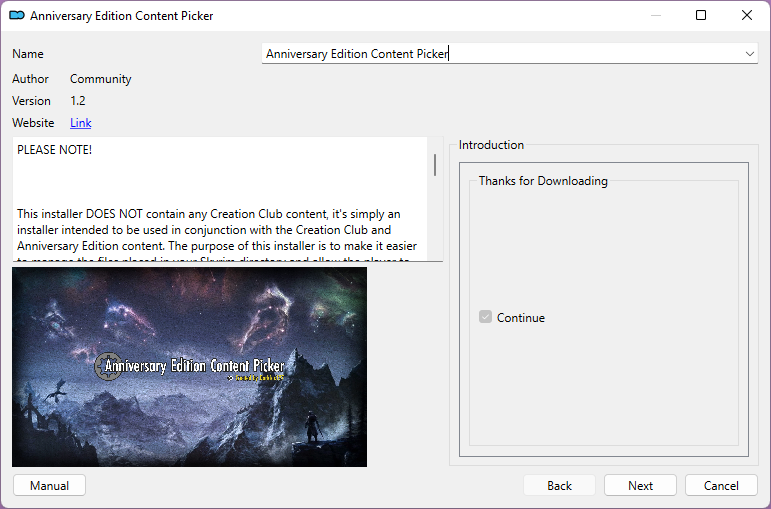
3.5.4 Option 4: Do not manage with Mod Manager
If you do not wish to manage these files with your Mod Manager (and keep them all enabled), follow the steps below. You can always choose to perform one of the other options above at a later time.
3.6 Installing Unofficial Patches
The following patches are recommended due to the number of mods which also require them as masters, however, these require some consideration depending on the game version and/or CC content options you have chosen above. If you decide to install these, follow the steps below.
3.6.1 Unofficial Skyrim Special Edition Patch (USSEP)
Skip to section 3.6.2 if using a Wabbajack mod pack as the proper version should have already been included in your mod pack. For everyone else, see below for download links for your specific setup requirements.
3.6.2 Unofficial Creation Club Patches
Skip to section 3.7 if you did NOT prepare SSE and CC content earlier, if you do NOT own the Anniversary Upgrade, or are using a Wabbajack mod pack, as the proper version(s) should have already been included, if applicable. For everyone else, see below for download links for your specific setup requirements.
3.7 Additional Mods
The mods below are recommended but optional, and should all simply need to be downloaded via Mod Manager links and installed/activated unless otherwise noted. This is by no means an extensive list, but those listed are typically seen as 'essential' mods and/or bug fixes. Be sure to check the mod requirements before downloading and installing, and install their prerequisite(s) where applicable. Some of these may or may not be included with all Wabbajack packs.
3.8 Download latest Microsoft Visual C++ Redistributable
Unlike SSE, Engine Fixes VR does not require this (which we installed earlier), but since many other mods do, you may want to have the latest redistributable installed. This is a windows installer so is not something even a Wabbajack install can provide for you automatically.
4 Run the game!
After all of this prep work, you're finally ready to test launching the game from your Mod Manager. We will launch the game and verify SKSE is working.
4.1 Launch Skyrim
Note that when using Mod Managers, you MUST launch the game via their respective SKSE loader location. This is how you will launch the game each and every time you wish to play (with mods). Follow only one of the two options based on your Mod Manager of choice (expand their respective 'Spoiler' tag).4.1.1 Option 1: Vortex

4.1.2 Option 2: Mod Organizer 2
4.2 Verify SKSE is running
Once in the game, you will need to make sure SKSE is loaded properly. If it is not, you will need to revisit the steps above to ensure you are launching with the SKSE launcher, and additionally review steps in section 3.2.2.1.2 for MO2 users to ensure folders have been set up correctly for Root Builder. Note that you will need access to a keyboard as we will be using the console. Follow the steps below.
5 Further reading
See below for some last minute information and recommendations before proceeding with your modding setup.
5.1 Compatibility and troubleshooting
I have created a separate guide on compatibility and troubleshooting which covers many topics to help you prevent, identify, and fix common problems. While I recommend reading this at some point to gain a better understanding of possible issues you may encounter through the course of your playthrough, the topics below cover more immediate compatibility notes specific to Skyrim VR.
5.1.1 Skyrim VR and survival mode mods
As mentioned previously, CC Survival Mode is not fully compatible with Skyrim VR. Keeping it enabled and turning it on in-game won't cause any crashes, but many of the features simply won't work since Skyrim VR is running a (much) older version of the Skyrim game engine which does not have access to some functionality added in version 1.5 required to fully support the mod. Since these are engine-level features, they can not all simply be "fixed" with other mods. The misconception is that keeping Survival Mode enabled will cause CTDs (which is why many users omit this mod from their mod list entirely) but this is simply not the case. It is in-fact highly recommended that you keep the mod enabled (so you can use the latest version of USSEP), but just never enable it when prompted in-game. Below are the features that do NOT work with CC Survival Mode, along with comments as to whether other mods can correct and/or workaround these limitations for Skyrim VR.
Even mods which use the survival "spoof" (such as Sunhelm) suffer from these limitations. Sunhelm in particular can work around some of the limitations above (except for the sleep to level up feature), but is hindered by its inability to display values from the 'warmth' system since it uses the same system as CC Survival Mode. While the game/mod still acknowledges objects with this property (clothing, food, etc.), there will be no way to display it directly on the user interface, so the mod author has implemented a system for VR users that will display your warmth rating when armor is equipped and unequipped as a status message. Additionally, using the 'Continuance' power now also shows your total warmth rating. This makes the experience playing with a survival mod like this less than optimal. Conversely, a mod like Frostfall (which uses its own custom warmth and coverage systems) has no such issues, but this mod places survival at the forefront which may feel like a hindrance to some. These are just a couple of examples, so in general, you will want to review any survival and/or basic needs mods (and their requirements) to see specifically what VR compatibility is before installing them.
5.1.2 Skyrim VR and Wabbajack
Skyrim VR only received ESL support via this mod on December 15, 2023. Prior to this, the hard plugin limit of 255 was enforced, and all Wabbajack packs released prior to this date were stuck with this limitation, forcing many mod pack authors to utilize some tricks to ensure their plugin count did not exceed this number. One such trick is through the creation of merged plugins and/or patches. For example, if you have 5 dialog overhaul mods, you could merge them into a single mod and save 4 plugin slots, etc.. While this is a completely valid method of reducing plugin count, where compatibility issues arise is when attempting to build upon this initial mod list by installing your own mods which require a mod as a master that has already been merged in your pack. As this mod no longer technically "exists" in your load order (it has been merged into a new mod with a new name), you cannot install those mods without some effort of restoring the original mod(s), making sure they don't conflict with other mods in the load order, removing those records from the merged plugin, etc.. Additionally, many Wabbajack packs are missing compatibility patches due to this plugin limit, and/or it is not clear whether they exist due to merging, etc.. All of this said, my personal recommendation would be to avoid any Wabbajack packs released without ESL support in mind as they are much more difficult to expand upon, and are much more likely to be missing compatibility patches.
5.2 Have fun!
Lastly, be sure to have fun! Many people consider modding Skyrim a game in itself, and spend more time modding Skyrim than playing Skyrim. Just remember that many countless hours have been put into creating the mods you are downloading, so taking a second to ENDORSE those mods really goes a long way. You can do this easily within your Mod Manager with selected mods (via a 'thumbs up' icon in Vortex, or by right-clicking and selecting 'Endorse' in MO2).
5.3 Other Guides
See my guides page on Nexus for other helpful Skyrim modding guides.
5.4 Changelog
See below for changes made to this document.
Skyrim Initial Setup (VR)
While every attempt was made to keep this guide short and to the point, I have added additional context to some of the steps where I felt appropriate, and there may be information, and/or steps/sections which may not apply to your specific case. This has resulted in the guide growing larger than anticipated, but do not be overwhelmed! I have added spoiler tags where possible, and steps that may not apply have been noted and can be skipped entirely.
Soft copy is also available for download from the files tab. Please consider ENDORSING if you found this guide helpful!
In this guide, there are several references to your ' <SkyrimVR game folder>' as well as your Skyrim ' /Data' folder. These folders refer to your specific Skyrim VR installation folder and its /Data folder inside. For example, if you install Skyrim VR into the C:\Games\Steam folder, your <SkyrimVR game folder> would refer to C:\Games\Steam\steamapps\common\SkyrimVR, and the /Data folder would refer to C:\Games\Steam\steamapps\common\SkyrimVR\Data.
IMPORTANT NOTE – Never install Skyrim VR into the C:\Program Files (x86) or C:\Program Files folders! Many mods and plugins cannot function when games are installed here and/or may cause crashes as they are system protected folders. A new Steam library folder must be added and Skyrim VR must be installed there to prevent these issues.
Spoiler:
Show
Spoiler:
Show
If you are still having issues, or receive an error that indicates issues already existed prior to starting this guide, you may simply need to stop managing the game via Vortex. Do this by navigating to the 'Games' tab, clicking the 3 vertical dots on the Skyrim VR game, and selecting 'Stop Managing'. If you are STILL having issues, you may simply need to uninstall Vortex altogether.
Spoiler:
Show
Some popular mods require these updated files due to referencing records only found in newer (SSE/AE) versions of them (and not the Skyrim VR version, for example), which could cause issues and/or CTDs if they are not found. Two such examples of popular mods doing this are JK's Castle Dour and JK's Sinderion's Field Laboratory, which both use a record from a recent version of update.esm which does not exist in the 1.4.15 (or even SSE 1.5.97) files, making the mod incompatible with a base Skyrim VR or SSE 1.5.97 install. To get around this, we will later copy these updated master files into our Mod Manager along with applicable AE Creation Club content. This also makes compatibility with mods such as USSEP much easier. This is what is effectively known as the "best of both worlds" (using an older Skyrim game version with the latest master files + CC content).
Spoiler:
Show
Spoiler:
Show
Spoiler:
Show
Spoiler:
Show
You will know it has completed when you see the text that says (example):
Spoiler:
Show
The Anniversary Edition was released in November of 2021, and as a free upgrade to existing Skyrim Special Edition owners, it provides 4 DLC mods (Survival Mode, Saints and Seducers, Rare Curios, and Fishing). Additionally, it has an optional paid DLC upgrade (referred to as the Anniversary Upgrade) which contains 70 community mods. The Anniversary Upgrade is purchasable on its own, or together with Skyrim Special Edition in a bundle called "The Elder Scrolls V: Skyrim Anniversary Edition". When referring to the 'Anniversary Upgrade', I am referring to this paid DLC content, regardless of how it was purchased.
Spoiler:
Show
Spoiler:
Show
Spoiler:
Show
Spoiler:
Show
IMPORTANT NOTE – Whether you plan to use a pre-built Wabbajack mod pack, manually download and install mods, or a combination of both, to ensure maximum compatibility with newer mods, you will need to download and install the Skyrim VR ESL Support plugin (this is because in addition to enabling ESL support it includes a patch for the 1.71 plugin version update). Failure to install this and/or lack of inclusion in your Wabbajack mod pack WILL RESULT IN A CTD at game launch. DO NOT SKIP THIS. These steps are found later in this section.
Spoiler:
Show
Your Nexus account should be connected to your installed Mod Manager. Additionally, all steps below assume Nexus downloads (nxm links) have been associated with the program so that mods are automatically downloaded to the proper folder when using the 'Mod Manager Download' buttons on nexusmods.com. This should be automatic following installation, but if this association changes, MO2 will ask at startup, and Vortex will reclaim this automatically. Follow your chosen Mod Manager's installation guide for more information on either topic above.
Spoiler:
Show
Spoiler:
Show
Spoiler:
Show
Spoiler:
Show
Spoiler:
Show
Spoiler:
Show
Spoiler:
Show
On December 5, 2023, Bethesda released the Creations update for Skyrim Special Edition. Not only did this break compatibility with SKSE mods, it also broke compatibility with plugins (.ESP, .ESL, .ESM) by incrementing their header versions from 1.70 to 1.71. Attempting to use a version 1.71 plugin on an old game build will likely crash. So why did they do this? To expand the maximum number of new records in an ESL from 2048 to 4096 (source).
Spoiler:
Show
Spoiler:
Show
IMPORTANT NOTE – If using Wabbajack, determining what Creation Club content to bring over will depend 100% on the requirements of the mod pack itself. Since I cannot account for all possibilities, be sure to enable ONLY the content which the Wabbajack pack requires in the steps below.
Spoiler:
Show
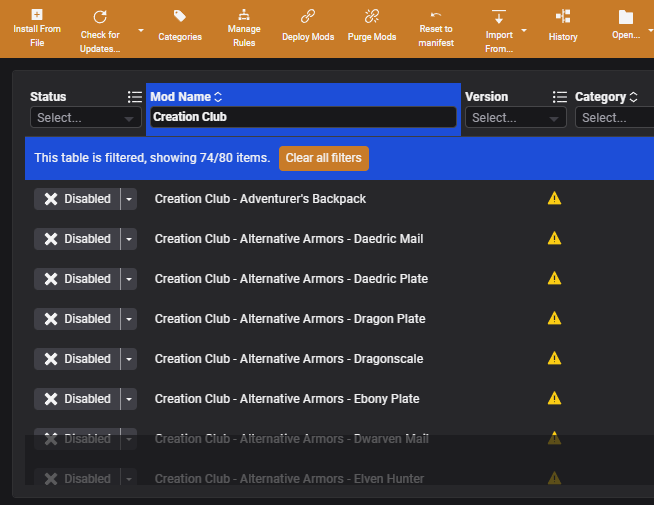
If Creation Club files are left in the Skyrim VR /Data folder, they cannot be enabled or disabled with your Mod Manager at all. Even if you copy the files directly into a "mod" that can be managed by your Mod Manager, many (but not all) of the Creation Club mods cannot simply be toggled on and off in the plugin list for some reason. Mod Organizer 2 can get around this by allowing you to 'hide' and 'unhide' files themselves in the mod's 'Filetree' list, but Vortex has no native ability to do so. This requires Vortex users to either delete files which cannot be toggled off or manually copy each mod to its own respective mod entry in the 'Mods' tab. There are 70 Anniversary Upgrade mods alone, so this is both tedious and even confusing given it must be done by filename, which may not be intuitive. It is for this reason that following the steps in this section is (highly) recommended. The final option below will allow you to keep these mods unmanaged, if desired.
Spoiler:
Show
Spoiler:
Show
Spoiler:
Show
Spoiler:
Show
Spoiler:
Show
Spoiler:
Show
Spoiler:
Show
Spoiler:
Show
Spoiler:
Show
There are misconceptions with this mod and Skyrim VR specifically due to the lack of knowledge surrounding Survival Mode compatibility. Since the latest versions of USSEP require all 4 free AE creation Club DLC content, it is incorrectly assumed that because of this CC Survival Mode incompatibility, this version is off limits to VR users. While it is true there are some issues with CC Survival Mode and Skyrim VR, even when the mod is enabled in-game, these are not likely to cause a CTD. This means if the mod is never enabled via the in-game prompt (or permanently suppressed by a mod such as Survival Mode Prompt Removed), we can enjoy the benefits of having the mod enabled in our modlist (without actually enabling its functionality) so that other mods that depend on it, such as USSEP, can also work properly without having to perform any strange compatibility patching procedures, etc.. As long as updated game masters have been brought over to your Skyrim VR installation, the latest version of USSEP will work fine, and is recommended. There are other versions available for those that have slightly different setups or opted out of bringing masters over, which are also listed below.
Spoiler:
Show
This mod fixes many bugs with the Anniversary Upgrade Creation Club content, and has a few other mods which use it as masters. The issue is that as of version 7.8, this mod has converted to an all-in-one model (single plugin). If you have disabled ANY of the Anniversary Upgrade CC content, using the all-in-one version will result in missing master(s), and likely CTDs. To get around this, you will need to instead download version 7.7, which has a FOMOD installer allowing you to select individual plugins for each CC content mod, enabling fixes for only the mods you have installed. The downside to this is that version 7.7 will receive no further updates from the mod author.
Spoiler:
Show
Spoiler:
Show
Please leave a comment with any issues or suggestions!
97 comments
Below are some items that will require guide updates. I am listing them here for reference and will remove them when the guide is updated.
Loose Stings
BethINI PIE
Popular Mod UpdatesUSSEP and LOTD now require _ResourcePack.esl and _Resourcepack.bsa master files. If you intend on using either of these mods and are downgrading, you will need to also ensure you keep these files when following the process to upgrade Skyrim game masters. Thanks @davemcknz, @Schinkennudel, and @ddsonic28 for this info.- Updated in version 1.17.9Mod versions
Please let me know in comments below if there are any other updates that are required.
I will try to update to see if everything looks normal in game, as well.
Additionally, after some review (since last update of this guide), I've found that many mod lists for VR, including FUS (which is designed as a good base to build upon) use version 4.2.5b of USSEP, and either manually patch the Skyrim masters to support this version or include the Skyrim Vr USSEP patch for USSEP 4.2.5b mod here on Nexus. This means there MAY be compatibility issues trying to use updated SSE masters with the latest USSEP in the lists that do this due to their current set of manual patches/etc.. I've already heard of one user that got an infinite load screen when updating SSE masters and/or USSEP for VR. If it's not possible for even the most basic VR wabbajack modlists, it's going to present potentially serious conflicts if trying to add newer mods that rely on updated SSE master records, etc. More testing is needed, but for now, my suggestion is to add mods at your own risk, and ALWAYS check for errors in xEdit (which will reveal missing records/etc.).
I actually plan on creating a new Wabbajack guide separate from the initial setup guides to focus on steps tailored to those users.
Hope this helps!
Edit: I also tried just deleting the contents of the folder and my game still wouldn't start
I just got into vr and have been trying to mod skyrim vr, this guide has helped a lot!
So I had a modded sse game going. When going through your guide I did the
game masters, and 4 required CC items. I made the folders, imported them
using vortex, all went well.
I am getting an error in vortex "plugin dependencies unfulfilled" between skyui-vr and skse-vr. it says skse is required...I have it installed. was even able to check it when the game loaded up. any thoughts?never mind. this is a issue with skyui. I will sort it out there
Thanks!
So I went through and reinstalled everything again fresh this morning. the last problem I am running into is a warning in loot, about Ussep. Its saying its not the right version for VR.
I am using the latest sse master files, and the four cc contents. having added the masters files, I should be using the latest up to date ussep? or is it ok to use the 4.2.5b ussep, and the vr patch for it? my concern here is that its for 1.5.9 and not 1.6 or above.
I swear I fixed this on yesterdays attempt, but cant for the life of me figure it out today....again brain mush.
Thanks again!
I always thought they were tagging the exe version. Returning to skyrim modding after years. learning all sorts of new things.
Thank you again for this fantastic guide!
Let me know if I can send you some beer money.
That said, I am not instructing installation of that many mods, and very few have file conflicts anyway, so you can probably retrofit these instructions to work without a mod manager. I wish you luck after that!
Am I still running VR 1.4.15 or am I now on AE 1.6?
EDIT: The executable is still 1.4.15, so I guess that answers my own question?
Hope this helps!