Other user's assetsAll the assets in this file belong to the author, or are from free-to-use modder's resources
Upload permissionYou are not allowed to upload this file to other sites under any circumstances
Modification permissionYou must get permission from me before you are allowed to modify my files to improve it
Conversion permissionYou are not allowed to convert this file to work on other games under any circumstances
Asset use permissionYou must get permission from me before you are allowed to use any of the assets in this file
Asset use permission in mods/files that are being soldYou are not allowed to use assets from this file in any mods/files that are being sold, for money, on Steam Workshop or other platforms
Asset use permission in mods/files that earn donation pointsYou are not allowed to earn Donation Points for your mods if they use my assets
Console modding permissionThis mod won't work on consoles or would not be acceptable on Bethesda.net according to their rules
Author notes
This author has not provided any additional notes regarding file permissions
File credits
See bottom of modpage
Donation Points system
This mod is opted-in to receive Donation Points
Guide Page updates (Last updated 4/11/2024) -
4/11/2024 - Removed obsolete Optimax and replaced it with OVT Full Version. Added VRAMr. Lots of page cleanup since Nexus broke large spoiler blocks, might still be remnants. Will improve further on
11/29/2023 - Replaced BethIni with BethIni Pie and removed LOD mod
10/16/2023 - Added Optimax
9/22/2023 - Added Disk Cache Enabler
9/15/2023 - Removed Performout and replaced with PhyOp, added another mod from the Baka series
8/6/2023 - Added Long Loading Times Fix
5/25/2023 - Added Fallout 4 DLSS Upscaler
2/23/2023 - Fixed my brain and reverted my thoughts on BakaScrapHeap, as well as IOR. Added some black magic from Doodlezoid
8/26/2022- Removed Shadow boost fix from the last section, and instead updated and replaced it with Shadow Boost FO4. Added Rikintosh's Performout.
1/15/22 - Tossed aside my recommendations for Boston FPS fix as well as FO4FI fps fix for Previsibines Repair Pack, a precombine mod that I've found best FPS and compatibility with. Also added Lucid Institute and the MCM booster to recommended mods.
9/14/21 - Updated Buffout Config to be compatible with the latest version. Changed some elements of the guide and updated the headers.
7/8/21 - MASSIVE Change to the format of the guide, making it much easier to read. The wall of text is now gone, and I'm really happy with how it turned out. Let me know your guy's thoughts.
6/8/21 - Added Fallout Priority Plugin
6/1/21 - Added extra information for Buffout 4, as now I know have experimented with it enough to find a stable config that should be friendly with everyone's game. Also added Shadowboost Fix to the bottom of the guide. Removed Vulcan Renderer.
2/26/21 - Added the amazing environment mods from ShadowofTheWind, which I have been using lately, really loving them. Removed recommendations of some mods, mainly Buffout 4 and Script Limit extender. Miscellanious fixes and legibility tweaks. Too much damn underlining XD
12/6/20 - Removed the necessity of downloading my file, everything under main files is now obsolete because the latest update to HFPS Fix includes a properly configured config file for everyone. Thanks to everyone who's continued to leave comments and feedback till now! I'm not going to see sunlight for the next couple months or so, thanks to the long awaited release of Cyberpunk. I will be off of modding Fallout 4 and Skyrim until then, and I'm also going to explore how moddable 2077 is.
11/1/2020 - Added and replaced a few mods, introduced new Vulcan Renderer at the bottom of guide
8/7/20 - Big revision to a main portion of the guide, more mods, added tweaks, refinement, etc. Added extra file to Files tab.
Video Showcase
We made it to hot! You guys are incredible :D
I've been on a mission, a quite incessant one, to optimize this ridiculously dated engine Bethesda is using for this game. (I mean it's not like it's a fundamentally flawed engine, it's just that they do little to improve it with each release of a new title. Let's hope this "Creation Engine 2" we saw in the Starfield teaser actually harbors more than a fancy new name). After close to two years of trying to do that, I wanted to share my findings with the community, and help those who are struggling. I found that they're not many optimization guides for FO4 that go super in-depth, and most are outdated by this point, so I undertook that burden and created this. I've tried to balance this for newer modders as well as veterans. Throughout the guide, you'll find that most tweaks/ mods don't really get you from 30 fps to 123, but all of them together leads to buildup in performance. This is all but definitive, as many mod authors are trying to create mods and or INI tweaks that may make themselves present in the future, so I will do my damnedest to update this guide when that happens. I know it looks long, but atleast try to give it a look, I put some screenshots every now and then for some eye candy, for those of you that like a modern and tactical Fallout. Now without further ado, let's begin.
Also as a little disclaimer before we begin, this guide does its best to maintain visual fidelity as well as crank performance to the absolute max, so if you're looking for a high performance game that still looks good, this guide is for you!
The tabs are setup in chronological order. However, a strict order doesn't necessarily need to be followed. Click the Spoiler buttons to reveal that section of the guide. Have fun, read well, and best of luck with your setups!
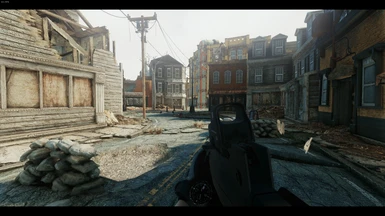
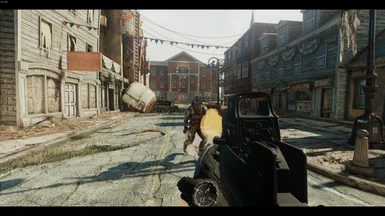
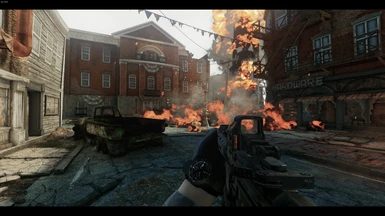
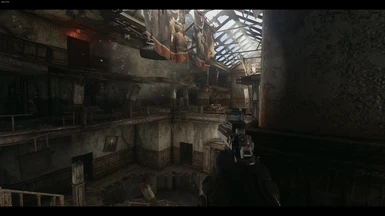
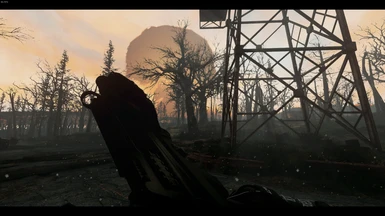
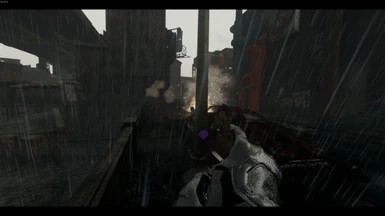
Credits: Screenshot by me, SAS and CTSFO armor by ZARGE, respectively, and AAR weapon by Ardent
Spoiler:
Show
Before you start anything, please make sure to uninstall the Official Bethesda HD Texturepack! It is unnecessarily massive and covers a minuscule amount of objects in this game. Your textures will look 1000 times better with mods like Luxors HD and is much much smaller.
First of all, I highly recommend you guys to start off with a clean, new, freshly-installed game. I also advise to follow guides like BiRaitBec's or similar, I'm using the prior myself. However, it is very important that you disregard any guide's section on FPS optimization and stability, as this guide will have you fully covered in that aspect.
If you don't like guides and want a barebones method on how to setup for a modded FO4, then you can follow these steps below.
1. Download and setup F4SE: Open up the archive and drag everything to the root Fallout4 Folder, where the executable (.exe) is located.
2. Launch the game and exit, this will create your INI's that we will need to configure for later.
3. In your "My Documents/My Games/ Fallout4 folder" you should see that there are two INI's, Fallout4 and Fallout4Prefs.
4. Now create a new blank Text document and name it "Fallout4Custom" and change the file type from .txt to .ini.
5. Open the new INI file and and make sure it is blank, save and close. Make sure to always launch the game from "F4SE.exe" going forward.
Spoiler:
Show
Congrats, that's the setup pretty much done, below are the programs needed for later that we will use, so have them downloaded and handy.
BethIni Pie - For proper INI tweaking. After Downloading, extract where you wish and start the program, select Fallout 4 as the Game and select a preset for the tweaks. I usually just save and exit at that point.
Fallout 4 ENB Binaries - Used for memory allocation, can also be optionally used to vastly improve the game's lighting and postprocessing effects. Download the latest version, .428 at the time of 6/6/20.
Do NOT use Private Profile Redirector, as it conflicts with some ENB performance tweaks and causes other absurd issues. Startup time is no longer an issue thanks to Boris' latest update to the binaries.
Spoiler:
Show
From the ENBseries archive you downloaded, you're going to want to open it and open the Wrapper Folder. Drag the following files into the Root directory where the executables are:
- d3d11.dll - d3d_compiler_46e.dll - enblocal.ini
Optional (Recommended) - Now you can choose to download the dozens of ENB presets found on Nexus, whether it be Visceral, PRC, or Film Workshop. I'm using an early release version of L00's Enhancer ENB paired with NAC-X (also in development), which can both be found in their Discord. However, a very important thing you make sure you don't do, is overwrite your enblocal file when replacing or setting up new ENBs!
ENB Installation for Newbies
Credits to Alex Landis for this video
In the ENBlocal.ini file: Despite popular belief, I have tested out the game running with forced memory size set to true and the Video MB set to 8096. But as someone mentioned in my posts, it actually harms overall performance. So I decided to test it myself and it actually helped my FPS by around 5 frames. So if your ENB comes with this set to true, make sure it is false.
Some people may benefit from turning this value to true, so play around with the VideoMemory size and the Force value and see which one is the most fitting for you.
Thanks to BenReirimanu, we now have a successor to the old Boston FPS fix. This being:
Basically does what BFPS fix did, but it is being updated and maintained much more frequently. To install it simply use a mod manager and activate the mod like any other. For maximum compatibility and less risk of occlusion bugs, place this plugin at the very bottom of your load order.
Alternative Precombines Mod Spotlight: ShadowofTheWind's Mods
Spoiler:
Show
Screenshots were not taken by me! All credits go to The Black Pearl Discord Server's gallery
Synopsis:
Have you ever wanted to completely overhaul the game's environments? Lush Forests? Snowy Tundras? Dry Deserts? Well ShadowoftheWind has got you covered! He has been putting in incredible work towards creating these new mods, as well as optimizing other old classics such as Rustbelt Flora. By optimizing, I mean rebuilding all of the world's meshes so that you don't have to worry about a thing. No Boston FPS Fix needed! All the user needs to do is to put his plugins at the bottom of the loadorder, and it should be smooth sailing. Please, I can't recommend enough to check his mods out on his official discord server.
Also, make sure to use either this or Boston FPS Fix, not both.
-= INI Specific Settings and Performance Mods =- *IMPORTANT*
Navigate to your My Games/Fallout 4 folder and find both the Fallout4.ini and Fallout4Custom.ini.
Open the Fallout4.INI first, and find these settings:
I was informed that these settings are not present by default in the configs, which is good! They are automatically set to 1 when they are created by the game, so if you see these lines present with anything other than 1 (like set to 0), be sure to switch it back! Otherwise, leave them out of both the Fallout4.ini and Fallout4custom.ini.
Thanks to Luxor and DarkDominion for this info!
Mods to Look Out For
Natural 2K Face textures - Causes massive stuttering, and will make your gave shortly freeze when any NPC spawns. Trust me, not worth it.
Unless...
You create an archive of the loose textures. There's a tutorial here, but I'm sure that there is a packed version of the mod available. I wasn't aware of this earlier, my bad!
ELFX, Ultimate Interior Lighting Overhaul, etc. - Any mods that add more lighting effects and dynamic shadows in interiors will tank your frames in large indoor locations. For example, with ELFX installed, the interior entrance to Converga was giving me 40 frames give or take, which I usually run 100+ fine without any lighting mods. For ELFX, there is an optional patch here that removes a lot of its dynamic shadows to gain a good chunk of FPS back.
Flora FX Overhaul - Looks absolutely awesome, but really only works with the vanilla trees anyway. The particles this spawns from trees is a lot for the engine to handle. If you can take - 10 or so FPS outdoors in the wilderness it's up to you.
Scrap Everything, or mods that break precombined meshes - These will override the settings we just tweaked in the config files, so don't use them. If you're unsure, scan the description of the mod again or ask in the posts, it me be referenced there. Rsiyo's Locations is a mod that I use that does not break any combines, and is highly recommended. The "Expanded" series of mods tanks my FPS and does break combines and so the SpiffySkyTrooper's several landscape mods like Rustbelt Flora and Desperados Overhaul, so be warned. A great forest mod I use is DeathByKitty's "A Forest" mod, released without editing worldspace cells and keeping precombines intact.
And lastly, do not use Baka scrapheap Script "Memory Extender"! As someone once told me, "you can fill as much water as you like into an already full cup, but it will be wasted and overflow". Basically, this mod aims to to allocate more memory towards the engine's scripts. But it is pointless because the game can only process the game as fast as the FPS. Don't get tricked by shiny bells and whistles!
This has been corrected as of 2/23/2023, BakaScrapHeap is completely safe and recommended to use!
More mods that will help
Before all of these, in September of 2020 a revolutionary mod was released for Fallout 4. From those who brought you SSE Engine Fixes for Skyrim SE, comes Buffout 4, a comprehensive F4SE Plugin that fixes numerous bugs in the game Engine, resulting in far fewer crashes. It even adds proper crash logging, so posting your crash problems becomes 10 times easier! While it may not necessarily boost performance, it is now a must-have for everyone who plays this game. Please download and endorse it!
Some things to consider: While Buffout has many internal fixes for the game's engine, it also supports a memory tweak that switches the game to use OS allocators instead of the conventional system. I have personally found that these settings do more harm than good, causing increased crashes across a 5 hour test-run. I have provided a pre-configured file for the mod in the files section of this page, which allows the user to enjoy the bug and stability fixes without OS allocators, which has brought me the most stable results after hours of testing.
For Best Texture balance and big performance gains, use the classic:
VRAMr is an automated utility to optimise your texture files in your Wabbajack, Nexus Collection or personal and unique load order
It has a lengthy install process but it should be worth your while for low VRAM GPUs
Read the Two main files and choose which one fits your setup!
Fallout 4 Upscaler - Absolutely revolutionary mod that adds DLSS upscaling capabilities to the neolithic engine, and also adds Performance and Ultra Performance Options like you're used to. Doesn't work with ENB, but the version on Patreon does. That is the best $5 you will ever spend.
Baka Scrapheap - Despite my previous thoughts on this mod, this really does help with script intensive loadorders. Increases sample size to help with freezing and scriptlag, but it may not work as well with everyone's game. Important: If Using with Buffout 4, disable Buffout's memory allocators (my file should have these disabled)
Baka MaxPapyrusOps - From the page itself: "Fallout 4 shares the same built-in limitation of 100 operations per task in Papyrus. This mod ports the Max Operations Per Task patch from Papyrus Tweaks NG that raises it to a user set value. By default, it's set to 500 (5x Vanilla), but you can set it to pretty much whatever arbitrary value you'd like in BakaMaxPapyrusOps.toml."
Disk cache enabler - Moves frequently accessed data into disk cache, thus being stored in RAM and not merely dropped. Eliminates stutter, reduces wear on HDD's. Also good for SSD's.
High FPS Physics Fix - Great mod for users like me who try and get this game to run at a higher refresh rate and framerate. It should be fully compatible out-of-the-box. If you want, tweak the ini inside your F4SE folder and change settings at your own discretion. Also makes Load Accelerator obsolete.
Sprint Stuttering Fix - Your final and definitive solution to all the annoying stutters and camera jitters with sprinting. It's a simple F4SE plugin that increases the memory cap on the game's sprinting to avoid jitters on uneven surfaces. Compatible with everything including Raw Input. Long Loading Times Fix (New) - Made by the same author as the prior mod, this halves and on some occasions nearly chops loading times to the quarter of their usual times. Effortless install, but saves hours of time.
Canary Save File Monitor - Not necessarily a performance booster, but has saved me from inevitable corrupt saves. It simply monitors your save file for data loss and warns you when you load the game, so you can avoid wasting time playing on a corrupt save and roll back immediately.
A new corpse cleaner has been added to the files, download it to reduce corpse despawn time (24 in-game hours to 1) in order to increase performance and reduce save game bloat.
Fallout Priority - Allows Fallout to get a majority of the CPU usage and minimizes lag caused by other programs. This helped stabilize my FPS as well as reduced input lag. No more manually going into the Task Manager every time and setting the exe to High Priority!
Lucid Institute - Greatly increases performance in the Institute without stripping away the lights nor the aesthetic, highly recommended if your playthrough involves frequently visiting the area.
MCM Booster - Magically boosts MCM startup time to near instant.
Shadow boost FO4 (Script Extender) - Amazing mod that can dynamically adjust in-game graphics settings to fit the desired framerate of the user. Absolutely essential if you don't like to worry about exiting the game repeatedly perfecting ini tweaks. Uses F4SE, and despite the name it can tweak more than just the shadow quality and distance on the go.
NVIDIA Reflex Support - Nearly halves render latency in game, making things just feel more fluid and responsive. DoodleZoid doing sorcery as usual
That's it for this section. I'm not even going to lie, this is the most impactful section of this guide. If this doesn't help, I don't know what will.
[/spoiler]
Before we start, those of you experiencing game-breaking crashes that are super frequent are likely using the game's NVIDIA weapon debris, which doesn't play nicely with the newer NVIDIA GPUs (10 series and above). You have two options, either disable the feature completely or use this mod, which will allow you to use it without anymore crashing, but the downside is that it disables their collision, so it won't look as cool. I personally use the latter.
Now to Bethesda INI Tweaker...
Open BethINI.exe from your folder we created earlier, and choose Fallout 4 from the dropdown menu.
In the main or "Basic" tab of the program, you'll want to pick either High, Medium, or Low, I'll trust that you know you're own PC's capabilities, so I'll leave you to decide. But there is very important thing to disable, this game's V-Sync (iPresentInterval)! It was made for 30 FPS consoles, and that doesn't translate well for PCs. So take my word that this setting needs to stay off.
Move to the "Details" tab and make sure Decal Quantity is set to low, If you use mods like Enhanced Blood Textures you want to make sure this is set to either High or Ultra.
Field of View - This part will kinda suck. I know everyone and their mothers wants a higher Field of View over Bethesda's default claustrophobic 70, but it comes with a drawback. Increasing FOV, greatly decreases Frames Per Second. Sucks, right? Yep. More FOV means more things in view, meaning more things for this engine to render, which is bad. So your choice on this one, I personally go with around 80-85, 90 is too much of a hit. There is however a new mod - FPS Boost-Free FOV- that increases the view range of the skeleton instead of the acutal FOV, meaning less rendering, more FPS, and greater spacial awareness. If you aren't sold yet, it is even compatible with body replacers like CBBE, so give it a shot!
Particles (a.k.a IMaxDesired) - I've found setting this value to less than 600 helps FPS remain stable in large firefights, specially when using particle mods like EPO.
For the sake of a clearer image, and a slight performance boost in combat, use Blur Killer.
Short quote from its modpage: This mod clears almost all effects more complex than color shifts from Imagespace Modifiers (temporary visual effects used by things like explosions or getting hit). Blur, eye adapt speed adjustments, bloom, and depth of field are all set to default values. All of these effects are still technically possible if triggered by other means, so you'll maintain HDR effects and depth of field if you have them enabled in your .ini files, they just won't trigger or be amplified temporarily anymore. Color shifts still apply where they were used, so most effects will still be noticeable but not as intrusive.
View Distance category - Object Detail fade should be set to "Low" or "Poor", helps out in cities and towns. Decals can remain High or Ultra.
Grass section - Especially on lower end systems, grass could have a pretty significant impact on FPS. Make sure Grass Diversity is max at 15 and Density is either:
20 - Densest, hardest-impacting FPS
40 - Dense, may have a different impact system based, loss of 2-4 FPS
60 - Lease Dense, what I use, not much of a flora guy. FPS will not decrease.
When using different grass mods, adjust density accordingly. For example, Grass density at 20 is not that dense for Grasslands, but much too dense for True Grass, etc.
Shadows and Godrays - Skip down to the Godray / Shadows section of a guide, we'll have a talk later.
Once finished, head back to the Basic Tab, check Recommended Tweaks, and hit "Save and Exit".
Spoiler:
Show
These two upcoming sections vary quite a bit per setup, so please pay attention. They could potentially give you a 10 FPS boost to what you already have.
Open your Fallout4Prefs.ini, I'm sure you where to find it by now.
We're going to have a look at some different settings.
Particulary:
fDirShadowDistance= fShadowDistance=
and
iShadowMapResolution=
The top two go in tandem, what you set to one you must set the other.
For fDirShadowDistance and fShadowDistance, here are your options.
= 2000 - The setting I use and is best for even low end systems, could give you maximum framerate boost in dense areas if you're okay with Shadows rendering not too far away from you.
= 3000 - This setting is for those who want a boost, but prefer to have shadows seen from farther away, a.k.a don't want shadow popins. Not as much of a boost than 2000.
= 5000 - For "Performance Screen-Archers", it won't really help. +4 FPS, give or take.
For iShadowMapResolution, set to 2048 for Sharper Shadows up close, or 1024 for blurrier shadows and a 1-2 FPS Boost.
Now, make sure to edit these values:
fBlendSplitDirShadow= to 96.0000 fMaxFocusShadowMapDistance= to 450.0000 iDirShadowSplits= to 3 iMaxFocusShadows= to 3 iMaxFocusShadowsDialogue= to 3 uiOrthoShadowFilter= to 3 uiShadowFilter= to 3
Spoiler:
Show
This will be the shortest section of the guide. You decide whether:
I think I have a pretty decent machine, and can handle Godrays.
If so, use the Ultra Godrays Fix, will help immensely with different scenarios involving them.
Or if you think you can't handle rays, or want to squeeze out every last frame, simply go to BethINI Details section and disable them. Done.
Spoiler:
Show
These are some "Desperate Measure" tweaks I recommend you use if you're game is still struggling to maintain your ideal framerate.
1. Ugrids and Exterior Cell Buffer
Despite people claiming that messing with Ugrids causes weird shit related to quests and dialogue, I've found through a 12 hour playthrough for there to be abosultely nothing wrong. Everything was working as it should, and decreasing Ugrids actually helped my frames a bit.
So if you want to do this, simply head to your Fallout4Custom INI and find the [General] section.
Add/ tweak these following settings:
uExterior Cell Buffer=(set to 16 for more fps, set to 9 for even more) uGridsToLoad= (set to 3, more fps. set to 2 for even more)
Save and exit.
2. Thread tweaks.
An idea ported over from my old guide, I found out that disabling certain Multi Threaded based rending helped out my performance, for some odd reason. Feel free to try it out. Go to your Fallout4Custom INI and add/find:
They are default set to 1 (enabled), but I found that setting them to 0 helps framerate stability, while others reported to me that it did fuck-all. So hey who knows, it might help your game.
3. Decreasing resolution
Another big one. I play on a 144hz 1440p moniter, most games on 2560×1440 Resolution. But with Fallout 4 specifically, playing at a normal 1080p gave an overall boost of around 8-11 frames per second. So what I'm trying to say is that if you can find your moniter's ratio, (mine being 16:9), and decrease the resolution down 1 increment, you could find quite a boost in FPS if you're willing to sacrifice the sharpness of the image. I had a workaround for blurrier resolutions on my monitor, which was to increase Sharpness of my ENB and tweak TAA to make it less blurry, found here.
Thank you for all the time you've given to read this, I hope your game is even more stable and has increased from 40 fps to 41 atleast :]
Make sure to check out R Type Final II If you're into shoot'em up sidescrollers, one of my favorite franchises of all time!
Mod Credits for Screenshots:
Addendum: Cerruti1889 for the settlement objects, sorry for not crediting you earlier! I think I've done a pretty okay job at crediting the amazing mod authors who made them. Otherwise it goes as follows: Ardent for most armor/weapon mods I use, the gloves shown in the last screen are from his amazing work combined with a retexture. L00 for their amazing ENB and weather, this game looks fucking beautiful thanks to you. ZARGE for your armor ports, bless your kind heart. Warfighter for your gun mods, fight through the hate brother <3 And BORIS for ENB series. And yea, Bugthesda for this poorly optimized dumpster fire of Fallout 4