


0 of 0

About this mod
Total HUD control. Move HUD elements around. Hide them when not needed. And even add new HUD elements. One HUD combines my three previou HUD mods: iHUD, aHUD and pHUD into one single easy to install mod.
- Requirements
- Permissions and credits
-
Translations
- Spanish
- Polish
- German
- Changelogs
What is oHUD?
One HUD (oHUD) is the final coming together of all my HUD mods. For those of you who enjoyed using all three, but wished they would just come in one handy mod, this is it. When you install this you get three mods listed in MCM: Immersive HUD, Adjustable HUD and Extra HUD (formerly know as Primary Needs HUD).
1. The aim of Immersive HUD is to provide the immersive feel you get from having no HUD, whilst keeping the usefulness of having one. It takes the permanantly visible HUD elements such as HP, AP, radar etc, and hides them when not needed. Hence the motto: HUD when you need. HIDE when you don't.
2. The aim of Adjustable HUD is to let you set up your HUD as you like it. Don't like the compass where it is? No problem. Just move it. Too many brackets? Get rid of some. And that is pretty much it.
3. The aim of Extra HUD is to add a lot of other useful HUD elements including a clock, primary needs, encumbrance and more.
NOTE: The DT it displays is the DT of your armor. The game has an unreliable system for reporting actual DT values and until I find a reliable answer, this number will basically tell you the condition of your armor.
So how does Immersive HUD work?
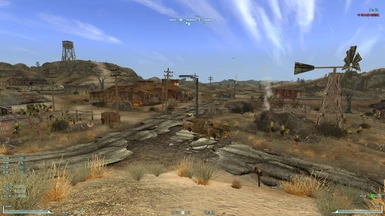
By default, your HUD will be blank after you load your game, and once the usual quest update messages fade away your screen will be clear and uncluttered. Great for those screenshots and immersive gameplay moments. But you need to see your HUD for some reason? No problem. Just press the 'i' key, and your HUD will appear. Press it again, and it is gone.
But that is not all. The Immersive HUD attempts to make even this task easier for you by automatically switching the HUD elements on and off as needed. For example the crosshair will appear when you draw your weapon. The HitPpoint area will appear when you drop below half health etc.
And once they appear, do you have to make them go? Not at all. They will disapear after a short delay (6 seconds default).
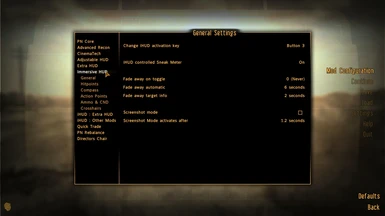
Now I realise not everyone has identical needs, and so Immersive HUD provides a host of custom options. This mod has a fully funtional MCM menu, allowing you to change every setting to your own personal needs. You can even change the activation key to another, or even a mouse button.
Requirements
This mod requires The Mod Configuration Menu (MCM) for full functionality.
This mod NEEDS NVSE!
You almost certainly need to use UIO - User Interface Organizer for this mod. It is possible to manually install HUD elements, but I do not support it.
Will it work with MTUI and Darnified UI?
YES, but for Darns UI it must be the latest version (see the link in the supported UI/mods section) and you will need the optional Darnfied Patch.
What about HUD elements added by other mods?
I have tried to cover all that I could find, but contact me if you find a mod that you feel needs iHUDification.
Installation
1. Download and install with a mod manager (such as NMM)
2. When prompted to overwrite files ALWAYS CLICK YES!-
3. If you are using the Darnified UI also download the Darnified Patch from the optional section under files.
4. If you have not already installed UIO, do so!
Installation of HUD mods after One HUD is installed
If you install any of the supported mods below after One HUD please do NOT overwrite any of the oHUD files. If you do so by accident, just uninstall oHUD and reinstall it. It should fix any HUD elements that were not being hidden.
What mods work well with this one?
1. Grenade Hotkey.
2. Project Nevada.
3. Selective Fire.
4. HUD Extended.
5. Powered Power Armor.
6. Flashlight NVSE.
7. IMCNNV - Imps More Complex Needs.
8. Advanced Recon Thermal Nightvision.
9. Radar HUD.
10. Arwen NV Realism Tweaks.
What is it compatible with?
1. MTUI v 1
2. Darnified UI
3. Shiloh DS - Clean Pipboy Screen
4. PipWare UI New Vegas Edition
5. SimpleHUD
6. Unified HUD Project
Recommended Installation Order
It is important to install One HUD after Darns UI and any mods the require iHUDification:
1. Activate Darnified UI or any other UI overhaul mod such as MTUI.
2. Activate Project Nevada
3. Activate Mod Configuration Menu (MCM)
4. Activate all other HUD altering mods (see above list).
5. Activate One HUD (oHUD) *.
Troubleshooting
Problem : Missing compass (or other element)
Fix : Try going into the Adjustable HUD section of the Mod Configuration menu and resetting the position of that element. It should reappear.
Problem : Cannot (or will not) use UIO.
Fix : No idea why you cannot use it but I am leaving the old version with the scripted installer in the old section of the files. Use that with NMM or FOMM and run Unified HUD afterwards.