


0 of 0
About this mod
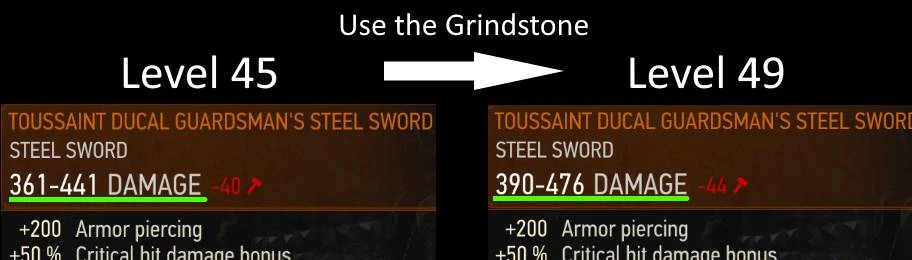
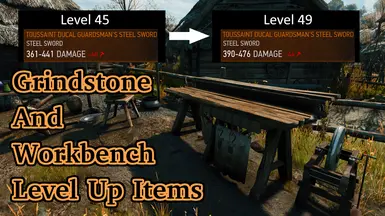
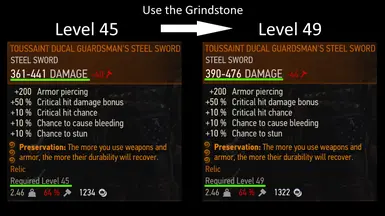
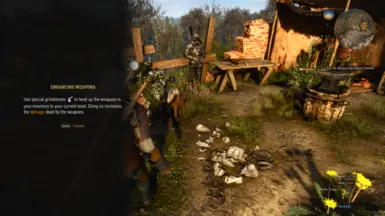
Using the Grindstone and Workbench (Armorer's Table) will level up weapons and armor in your inventory to Geralt's current level.
- Requirements
- Permissions and credits
-
Translations
- Turkish
- Polish
- French
- Changelogs
- Donations
Available in both Next-Gen and Old-Gen. (Details of supported versions can be found on the FILES tab.)
OVERVIEW
I didn't like the way Grindstone and Workbench worked in the vanilla game, so I decided to completely redesign them.
At the same time, we also succeeded in resolving some of the dissatisfaction with the leveling system.
DETAILS
COMPATIBILITY
CHANGELOGS
Starting with v3.1.0, the changed files are now clearly indicated.
INSTALLATION
TRANSLATION
OTHERS
OVERVIEW
I didn't like the way Grindstone and Workbench worked in the vanilla game, so I decided to completely redesign them.
At the same time, we also succeeded in resolving some of the dissatisfaction with the leveling system.
- Using the Grindstone and Workbench (Armorer's Table) will level up weapons and armor in your inventory to Geralt's current level.
- Buffs that were in the vanilla game have been discontinued.
- The Runeword "Preservation" effect has been changed as it is no longer useful.
- The damage scaling feature of Aerondight has been removed as it is no longer necessary.
DETAILS
Spoiler:
Show
Effects of Grindstone and Workbench
Mechanism for leveling up items
Effect of Runeword "Preservation"
Effects of Aerondight
Other Notes
- Buffs that were in the vanilla game have been discontinued.
- You can use Grindstone and Workbench even if you don't have any weapons or armor equipped.
- Grindstone will level up the equipped weapons and all weapons in your inventory to Geralt's current level. (Bolts cannot be leveled up.)
- Workbench will level up the equipped armor and all armor in your inventory to Geralt's current level.
- As your weapon and armor levels increase, the damage value of your weapon and the armor value of your armor will increase.
- The following items can be designated as excluded from level-up in the options menu. (If the options menu is not loaded correctly, everything will be Include and Off.)
- Unequipped Items (Default: Include)
- Quest Item (Default: Exclude)
- Secondary Weapon (Default: Exclude)
- Non Combat Clothing (Default: Exclude)
- Crossbow (Default: Exclude)
- Items lower than the specified rarity. (Default: Off)
Mechanism for leveling up items
- Every 3% increase in the crossbow's attack power (expressed in % and used as a multiplier to the bolt's damage value) increases the level by one level.
- For every 10 levels, the attack power required to increase one level increases by 3%.
- Once you reach level 200, the attack power required to level up will not increase, but will remain fixed at +60% per level. (The maximum level is 100, so you will never reach level 200 unless you use a mod that increases the level cap.)
In The Witcher 3, the level of equipment is determined by the attack power (damage value) or defense power (armor value) of the equipment.
This mod increases the level of weapons by adding attack power and armor by adding defense power.
The power added to equipment is saved in your save data and will not disappear even if you uninstall the mod.
In the case of the crossbow, the proportional relationship between attack power and level was distorted, and the maximum level was fixed at 32, so it was necessary to change the calculation formula for level scaling.
If you set Crossbow to “Include” from the options menu, the calculation formula will change to the following:
In order to ensure that the relationship between the initial level and attack power of each crossbow does not change significantly from vanilla, it was necessary to make the increase in attack power per level greater as the level increases, rather than a simple proportional relationship.
Effect of Runeword "Preservation"
- Vanilla: Workbench (Armorer's Table) and Grindstone bonuses never expire.
- Mod: The more you use weapons and armor, the more their durability will recover.
Effects of Aerondight
- Vanilla: Killing an enemy with a fully charged Aerondight will reset the charge and give you a permanent enhancement.
- Mod: Killing an enemy with a fully charged Aerondight will not give you a permanent enhancement, it will remain fully charged.
- Vanilla: The moment Aerondite is given a permanent enhancement, a lightning effect will occur.
- Mod: When you attack while fully charged, a lightning effect will occur.
- Fixed a mistranslation of Aerondight's description in Japanese.
- If you have already permanently enhanced Aerondight, you can unenhance the equipped Aerondite and the Aerondight in your inventory by typing FmrckGsWb_Aerondight() in the debug console.
If you have not yet installed the debug console, you can download it from the link below.
Killing an enemy while fully charged no longer results in a permanent enhance.
A lightning effect (visual and sound effects) will now occur every time you attack an enemy while fully charged.
Others
Other Notes
- The problem with this mod is that you can easily increase the price of items. Since there is a large difference between the item's selling price and buying price, the effect of this problem is minor, but if you still want to fix it, we recommend using it together with Deleveled Gear Buying Selling Servicing Prices. (Even in the case of v4.04, you should be able to use the files for v4.03.)
COMPATIBILITY
Spoiler:
Show
Complete Animations Redux
Mods that change Aerondight's effects
Mods that change equipment durability
- Download the optional file compatibility patch and overwrite the Grindstone And Workbench Level Up Items and Complete Animations Redux files.
- If you do not apply the patch, the Grindstone and Workbench animations will not play.
Compatibility patch features:- You will be able to play the Grindstone and Workbench animations.
- Animation for crossbow will be added. (The same animation will be played regardless of whether you set it to original or alternate.)
- If you have a levelable weapon in your inventory but not equipped, using Grindstone will automatically equip the levelable weapon and return you to your original equipment when the animation ends. (If the automatic equipment change fails due to some bug, the message Error CAR will be displayed.)
- Grindstone And Workbench Level Up Items and Complete Animations Redux become dependencies, and an error will occur if both are not installed. If you uninstall one of them, please revert the remaining one to the original unpatched file.
- (Old-Gen Only) Since the ingameMenu.ws in Complete Animations Redux for Old Gen v2.3.0 did not use the Community Patch - Base, I created an ingameMenu.ws file that uses the Community Patch - Base and included it in this compatibility patch.
Mods that change Aerondight's effects
- Compatible with mods that only change Aerondight's stats.
- Probably not compatible with mods that change Aerondight's unique buff abilities.
- If you want to prioritize the operation of other mods, please delete the following files from this mod.
- ...\content\scripts\game\gameplay\damage\damageManagerProcessor.ws
- ...\content\scripts\game\gameplay\effects\effects\other\aerondight.ws
- ...\content\scripts\game\gui\_old\components\guiTooltipComponent.ws
Mods that change equipment durability
- You can avoid conflicts by disabling this feature by turning on Disable Runeword "Preservation" from the options menu.
- Script merging may be difficult in the Old-Gen version, so in that case please delete the following files from this mod.
- Mods\modGsWbOG_MrCK\content\scripts\game\components\inventoryComponent.ws
- Mods\modGsWbOG_MrCK\content\scripts\game\components\inventoryComponent.ws
- Script merging may be difficult in the Old-Gen version, so in that case please delete the following files from this mod.
CHANGELOGS
Starting with v3.1.0, the changed files are now clearly indicated.
Spoiler:
CAR Patch Version 3.1.0
Version 3.1.0
CAR Patch Version 1.2.0
Version 2.4.1
Version 2.4.0
Version 2.3.0
Version 2.2.0
Version 2.1.0
Version 2.0.2
Version 2.0.1
Version 2.0.0
Version 1.1.1
Version 1.1.0
Version 1.0.1
Version 1.0.0
Show
CAR Patch Version 3.1.0
- Compatible with v3.1.0 of the main file.
- Animation for crossbow will be added.
- Make CAR's ingameMenu.ws compatible with Community Patch - Base.
Modified Files (Next-Gen)- Mods/modGsWbNG_MrCK/content/scripts/mrckLocal/GsWb.ws
Modified Files (Old-Gen)- Mods/modGsWbOG_MrCK/content/scripts/mrckLocal/GsWb.ws
- Mods/modGsWbNG_MrCK/content/scripts/mrckLocal/GsWb.ws
Version 3.1.0
- You can now specify items that will not be affected by level-up in the options menu.
- You can now level up your crossbow.
- It is now possible to exclude items with a rarity lower than a specified value from leveling up.
- Cleaned up the code to make it less likely to conflict with other mods.
- The Next-Gen version now only supports the latest version of the game (v4.04_REDkit_Update_2).
Edits to the w3strings files (Next-Gen and Old-Gen)- All texts have had "sword" replaced with "weapon".
- 1087334
- 1084981
- 1208837 (jp only)
- 2118595000
- 2118595002
- 2118595004
- 2118595006
- Changed Error 02 to Error CAR and made the error message more specific.
- 2118595010
- 2118595010
- 2118595011 to 2118595023
IDs of edited texts:
Added IDs:
Modified Files (Next-Gen)- Mods/modGsWbNG_MrCK/content/scripts/game/gameplay/damage/damageManagerProcessor.ws
- Mods/modGsWbNG_MrCK/content/scripts/game/gameplay/interactive/repairItem.ws
- Mods/modGsWbNG_MrCK/content/scripts/mrckLocal/GsWb.ws
Deleted Files (Next-Gen)- Mods/modGsWbNG_MrCK/content/scripts/game/components/inventoryComponent.ws
Added Files (Next-Gen)- Mods/modGsWbNG_MrCK/content/scripts/mrckLocal/GsWb_NG.ws
- bin/config/r4game/user_config_matrix/pc/modGsWbNG_MrCK.xml
Modified Files (Old-Gen)- Mods/modGsWbOG_MrCK/content/scripts/game/components/inventoryComponent.ws
- Mods/modGsWbOG_MrCK/content/scripts/game/gameplay/interactive/repairItem.ws
- Mods/modGsWbOG_MrCK/content/scripts/mrckLocal/GsWb.ws
Added Files (Old-Gen)- Mods/modGsWbOG_MrCK/content/scripts/game/gameParams.ws
- Mods/modGsWbOG_MrCK/content/scripts/game/gui/main_menu/ingameMenu.ws
- Mods/modGsWbOG_MrCK/content/scripts/mrckLocal/GsWb_OG.ws
- bin/config/r4game/user_config_matrix/pc/modGsWbOG_MrCK.xml
- All texts have had "sword" replaced with "weapon".
CAR Patch Version 1.2.0
- Complete Animations Redux v2.3.0 support
Version 2.4.1
- Fixed a bug that prevented weapons from leveling up when a secondary weapon was equipped when applying the Complete Animations Redux compatibility patch.
- Added new error messages to w3strings.
Version 2.4.0
- Improved compatibility with Complete Animations Redux.
Version 2.3.0
- Fixed a bug where level 1 items could not be leveled up.
Version 2.2.0
- Added a function to level up only the equipped item.
- The folder structure has been simplified slightly to make installation easier.
Version 2.1.0
- If an item is enhanced but its level does not increase, the enhancement of that item will now be canceled and an error message will be displayed.
Version 2.0.2
- Fixed an issue where some weapons were incorrectly excluded.
Version 2.0.1
- Improved tooltips for Aerondight.
Version 2.0.0
- Changed the effect of Aerondight.
- Fixed an issue where non-combat uniforms were not being excluded properly.
- Cleaned up code in local files.
- No longer compatible with game versions 4.0.0 to 4.0.2.
Version 1.1.1
- Fixed an issue where some items could be strengthened indefinitely if the player's level was over 95.
- Eliminated the variation in the amount of reinforcement for each level.
Version 1.1.0
- Non-combat clothing, such as shirts, no longer level up.
Version 1.0.1
- English translation fix.
Version 1.0.0
- Initial Release
INSTALLATION
Spoiler:
Show
Automatic Install
Manual Install
Uninstall
The power added to equipment is saved in your save data and will not disappear even if you uninstall the mod.
Update
Menu Organizer
The in-game menu can only properly display up to 9 entries at a time.
Therefore, if you want to use 10 or more mods that have in-game menus, you will need to install Menu Organizer.
Mod Limit Fix (For Old-Gen v1.32/1.31)
How to Merge Scripts
- Use The Witcher 3 Mod Manager. (I have not tested with other mod managers.)
- Download the main file and drop it into The Witcher 3 Mod Manager to install.
- Use Script Merger to merge conflicts with other mods.
Manual Install
- Download the main file, unzip it, and drop the "bin" and "Mods" folder inside it into your game's main directory. (The game's main directory is the directory where folders such as "bin", "content", and "dlc" are located.)
- Enabling mod options (For Next Gen v4.00+ only): Edit "dx11filelist.txt" and "dx12filelist.txt" located in " ...\'Game Directory'\bin\config\r4game\user_config_matrix\pc" and add "modGsWbNG_MrCK.xml;" to the list. Menu Filelist Updater allows you to automate this step.
- Use Script Merger to merge conflicts with other mods.
Uninstall
The power added to equipment is saved in your save data and will not disappear even if you uninstall the mod.
- Delete files you added to the game.
- Re-merge conflicts using the Script Merger.
- There will be no adverse effects if you leave the xml file names added to "dx11filelist.txt" and "dx12filelist.txt". (They will be automatically deleted if you uninstall with The Witcher 3 Mod Manager.)
Update
- Uninstall the old version. (No script merging is required.)
- Install the new version. (Script merging required.)
- Check the CHANGELOGS for files that have been deleted, renamed, or changed directories, and remove them from the old installed versions.
- Drop the new version folder into the game's main directory, overwriting the existing files.
- Re-merge conflicts using the Script Merger.
Method 1: Reinstall
Method 2: Overwrite
Menu Organizer
The in-game menu can only properly display up to 9 entries at a time.
Therefore, if you want to use 10 or more mods that have in-game menus, you will need to install Menu Organizer.
Mod Limit Fix (For Old-Gen v1.32/1.31)
- If you want to use a lot of mods with Old-Gen v1.32/1.31, you will need Mod Limit Fix.
How to Merge Scripts
Spoiler:
Show
First, read the Script Merger instruction page carefully and follow its instructions.
When Script Merger loads the files, they will be listed as shown in the image below.

On the left, conflicting mods are listed by file.
On the right, merged mods are listed by file.
If you do not merge, the file of the mod with the highest priority (the mod shown in darker color in the conflict list) will be loaded. (Priority can be set in the The Witcher 3 Mod Manager.)
Select the files you want to merge and click the "Create Selected Merge" button.
Depending on the mod, the mod author may instruct you not to merge conflicts, so please check the instructions carefully before merging.
If manual merging is required, a window similar to the image below will pop up.

In the upper row, the conflict locations of three files, A, B, and C from the left, are displayed.
A is the vanilla file, B and C are conflicting mod files.
The code of the merged file is displayed at the bottom.
If you select "B" and/or "C" from the top toolbar, the code from the selected files will be added to the merged file. (In the image above, both B and C are selected in that order.)
Click the "Go to Next Unsolved Conflict" button to the left of "A" on the toolbar to display the next conflict location.
Once all conflicts have been merged, close the window and save.
How to Choose B or C
It is better to select both B and C to enable all mod functions.
However, if two mods change the exact same part, you will have to choose one.
When doing so, be careful not to break the format of the code. Even if you don't have any coding knowledge, you should be able to see that the code is written according to some rules. Don't break it.
Look at the C code in the image above.
The parts in red are different from vanilla, the parts in yellow are conflicting parts, and the parts in gray are already included in the merged file.
The part between {} is a code block, and the block title is written at the top or left side of the block.
If you do not select C at the end, the title that is supposed to be attached to the gray code block will be lost, so it will deviate from the mod's expectations.
Therefore, I chose the codes in the order of B and C.
If selecting both B and C breaks the code, select only one.
Alternatively, you might be able to avoid using the toolbar buttons and instead merge them correctly by copying the code from the conflicting files and pasting it into the appropriate part of the code in the merged file.
List of Codes to Watch Out for:
{}:
event:
function:
return:
if():
else:
var:
//:
/**/:
When Script Merger loads the files, they will be listed as shown in the image below.
On the left, conflicting mods are listed by file.
On the right, merged mods are listed by file.
If you do not merge, the file of the mod with the highest priority (the mod shown in darker color in the conflict list) will be loaded. (Priority can be set in the The Witcher 3 Mod Manager.)
Select the files you want to merge and click the "Create Selected Merge" button.
Depending on the mod, the mod author may instruct you not to merge conflicts, so please check the instructions carefully before merging.
If manual merging is required, a window similar to the image below will pop up.
In the upper row, the conflict locations of three files, A, B, and C from the left, are displayed.
A is the vanilla file, B and C are conflicting mod files.
The code of the merged file is displayed at the bottom.
If you select "B" and/or "C" from the top toolbar, the code from the selected files will be added to the merged file. (In the image above, both B and C are selected in that order.)
Click the "Go to Next Unsolved Conflict" button to the left of "A" on the toolbar to display the next conflict location.
Once all conflicts have been merged, close the window and save.
How to Choose B or C
It is better to select both B and C to enable all mod functions.
However, if two mods change the exact same part, you will have to choose one.
When doing so, be careful not to break the format of the code. Even if you don't have any coding knowledge, you should be able to see that the code is written according to some rules. Don't break it.
Look at the C code in the image above.
The parts in red are different from vanilla, the parts in yellow are conflicting parts, and the parts in gray are already included in the merged file.
The part between {} is a code block, and the block title is written at the top or left side of the block.
If you do not select C at the end, the title that is supposed to be attached to the gray code block will be lost, so it will deviate from the mod's expectations.
Therefore, I chose the codes in the order of B and C.
If selecting both B and C breaks the code, select only one.
Alternatively, you might be able to avoid using the toolbar buttons and instead merge them correctly by copying the code from the conflicting files and pasting it into the appropriate part of the code in the merged file.
List of Codes to Watch Out for:
{}:
- The part between {} is treated as one block.
event:
function:
- If the title of a code block between {} starts with "function" or "event", the block is treated as one section.
- When a section is loaded, the code is loaded in order from the top, and the section ends when "return" is loaded or all the code is loaded.
return:
- Finish that section. The code after the next ";" will not be loaded.
if():
- Only if the condition in parentheses is met will the code written next be loaded.
else:
- Used following an "if" statement. Code written next to "else" will only be loaded if the condition of the "if" statement is not met.
var:
- If a line of code within a section begins with "var", that code must be placed at the beginning of the section.
//:
/**/:
- The part to the right of "//" or the part between "/*" and "*/" is commented out and will not be loaded into the game.
TRANSLATION
Spoiler:
Show
- All language files other than Japanese are written in English using machine translation.
- If you want to create your own translations, edit the w3strings files in the mod's content folder with The Witcher3 String Editor NextGen.
- Alternatively, you can edit the csv file in the mod's content folder with a text editor, then use Mod Translation Guide and Gui for w3stringsx to encode the csv file into a w3strings file.
- <> is HTML tag. You can use this to adjust the font size for each language.
- <<>> is WS tag. This tag will be replaced by another string by the Witcher script.
- Once you've created your translation, we'd appreciate it if you could share it with us by uploading it to Nexus.
OTHERS
- If you like this mod, please support it by clicking the "Recommend" and "Vote" buttons at the top of this page!
- Please also check out the other mods I've created.
- If you have any questions or comments, feel free to post them on the POSTS tab.
- I won't respond to every post, but someone else may do so for you.
- While I don't respond to every supportive or kind comment, they truly encourage me to keep working on mods. Thanks so much!