


0 of 0
About this mod
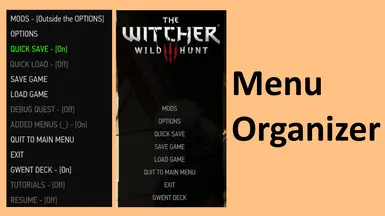
Organize your menu however you like!
- Requirements
- Permissions and credits
-
Translations
- Turkish
- Polish
- Korean
- Changelogs
- Donations
Former name: Infinite Mod Menus
DETAILS
PURPOSE OF THE MOD
FEATURES OF THE MOD
ORGANIZE THE MODS MENU
ORGANIZE THE ENTIRE MENU
ELIMINATES THE NEED FOR PREFIXES
OTHER FEATURES
OPTIONS MENU OF THE MOD
CUSTOMIZATION
COMPATIBILITY
CHANGELOGS
Starting with v2.1.1, the changed files are now clearly indicated.
INSTALLATION
TRANSLATION
OTHERS
DETAILS
PURPOSE OF THE MOD
Spoiler:
Show
DISPLAY MORE THAN 9 MOD MENUS!
ORGANIZE YOUR MENU HOWEVER YOU LIKE!
MAKING OPTION MENUS IS NOW EASIER!
The Witcher 3's options menu can only properly display 9 entries (+"back") at a time, and displaying more than that causes a bug.
However, there are so many great mods for The Witcher 3 that your mod menu will quickly grow past 9.
Menu Strings, provided by wghost81, is a great common resource for solving this problem, but it requires some tedious editing of xml files (and w3strings files, if you're a perfectionist) and can be confusing for beginners.
That's where this mod comes in!
By simply installing Menu Organizer, you are completely free from the limit on the number of entries in your mod menu, without any additional steps.
What's more, it can also be used in conjunction with Menu Strings. (It also supports the Mods Menu Category by ElementaryLewis.)
ORGANIZE YOUR MENU HOWEVER YOU LIKE!
There have been mods in the past that organize menus to make them easier to use, but there was no function that allowed users to organize menus as they wished.
Menu Organizer introduces various GUIs available in the game to the options menu, allowing you to organize the menu with intuitive operations.
It also adds new menu items such as quicksave, quickload, and debug quests.
MAKING OPTION MENUS IS NOW EASIER!
In the vanilla game, localization keys for strings used in options menus required the proper use of four prefixes: "panel_", "preset_", "preset_value_", and "option_", which was confusing to newbie mod developers.
Additionally, the preset headers required the path to the mod menu location in addition to "preset_", which made it impossible to get the strings right when Menu Strings was introduced.
Menu Organizer does away with this mechanism, allowing strings to be obtained regardless of the presence or absence of prefixes.
FEATURES OF THE MOD
ORGANIZE THE MODS MENU
Spoiler:
Show
DISPLAY INFINITE NUMBER OF MOD MENUS

Depending on the number of entries in your mod menu, a new page will automatically be created to organize the menu, so there is no longer a limit to the number of entries.
In the options menu of this mod, choose one of the following two organization methods:
REORDER MOD MENUS
CATEGORIZE MOD MENUS

Depending on the number of entries in your mod menu, a new page will automatically be created to organize the menu, so there is no longer a limit to the number of entries.
In the options menu of this mod, choose one of the following two organization methods:
- Page circulation (Default setting)
- We'll add a button to go to the next page and display eight entries per page.
- The last page adds a button to return to the first page.
- Recommended for those who don't have a large number of mod menus.
- Folder Hierarchy
- Create a folder hierarchy according to the number of entries, and store nine entries in one folder.
- The color intensity of an entry represents the depth of the folder hierarchy within it.
- Recommended for those who have a large number of mod menus.
REORDER MOD MENUS
- Mod menus are automatically sorted alphabetically. You can disable this feature by turning off "Sort mod menus alphabetically" in the options menu of this mod.
- You can also write your own mod list to sort the mods however you like. See the CUSTOMIZATION section for details on how to do this.
CATEGORIZE MOD MENUS
- When used in conjunction with Menu Strings or Mods Menu Category, you can organize your mod menus into 9 categories (14 categories available when combined with both).
- In addition to the traditional method of editing the xml file, you can also use the method of writing the mod list for each category in the ws file of this mod. See the CUSTOMIZATION section for details on how to do this.
ORGANIZE THE ENTIRE MENU
Spoiler:
From this mod's options menu, you can organize the entire menu however you like.
Notes
Show
From this mod's options menu, you can organize the entire menu however you like.
- You can change the order of the menu and the number of entries per page. (If your menu spans multiple pages, they will be organized using a page circulation method.)
- Some menus can be hidden.
- MY REWARDS, INSTALLED, and CREDITS can be grouped together in the CONTENTS folder.
- CONTROL SETTINGS, CONTROLLER SCHEME, and KEY BINDINGS can be grouped together in the CONTROLS folder.
- The option to turn DLC on and off can be separated from GAMEPLAY.
- MODS menu can be separated from OPTIONS menu.
- Expansion DLC logos can be hidden. (You can also hide only the text.)
- The following new menu items have been added:
- QUICK SAVE
- QUICK LOAD (You can also set it so that autosaves are not included in the load target.)
- DEBUG QUEST (Note that if you start a debug quest during gameplay, you will lose any unsaved progress.)
Notes
- In this mod, the menu that appears when you start the game is called the "Main Menu", and the menu that appears when you press the ESC key during gameplay is called the "Game Menu". (This mod does not touch the hub menu that appears when you press the Enter key.)
- In some cases, such as when the Mods menu is separated from the Options menu, menu titles will not display correctly.Fixing this would significantly reduce compatibility with other mods, so we'll leave it as is.

ELIMINATES THE NEED FOR PREFIXES
Spoiler:
Good news for those of you who have had your preset headers destroyed by editing xml file! Just install this mod and it will be fixed.

FEATURES FOR MOD DEVELOPERS
Show
Good news for those of you who have had your preset headers destroyed by editing xml file! Just install this mod and it will be fixed.
FEATURES FOR MOD DEVELOPERS
- The string is called according to the vanilla mechanism.
- If the string was not returned, add the prefix to the localization key and call the string again.
- If the string was not returned, remove the prefix to the localization key and call the string again.
- If the string was not returned, displays the localization key without the prefix.
- If the localization key cannot be obtained, displays "error: no text".
Mechanism for obtaining localized strings (for cases other than preset header)
This mod calls the localized strings in the following steps, so you can get the strings with or without the prefix:
- If the option group's "displayName" ends with _p, the string is called using the part between .p_ and _p as the localization key and prefixing it with "preset_".
- If the string was not returned, remove the prefix and call the string again.
- If the string was not returned, it will follow the vanilla mechanism to get the string. (The prefix "preset_" is used.)
- If the string was not returned, remove the prefix and call the string again.
- If the string was not returned, Remove the category ID following "Mods_" from your localization key and call the string again with the prefix "preset_".
- If the string was not returned, remove the prefix and call the string again.
- If the string was not returned, it will display "Presets".
Mechanism for obtaining localized strings (for preset header)
You can use any localization key by adding ".p_localizationKey_p" to the end of the "displayName" in the option group.

The localized string in the preset header is called according to the following steps:
If the localized strings for a preset header are provided in the w3strings file, the strings will appear in the preset header even if there are no presets.
- In vanilla, both preset names and option value names use the same prefix "preset_value_", but in this mod a new prefix "mrckimm_option_value_" has been added to distinguish between the two.
- When retrieving the option value name, "mrckimm_option_value_" is first used as a prefix, and if the string cannot be retrieved then "preset_value_" is used as the prefix.
- Options of one group cannot be divided and displayed on multiple pages.
- If you put options from different groups on the same page, the only presets displayed will be from the last group loaded.
- You cannot use a preset to change options in different groups, even if they are on the same page.
- I recommend giving each string you use in your options menua unique localization key, and avoiding sharing it with strings you use elsewhere.
That way, translators can choose the font size that best suits the display area of each string.
Added new prefix "mrckimm_option_value_"
Tips on options menu specifications:
OTHER FEATURES
Spoiler:
DISPLAY MENU PATH FOR THE MENU ORGANIZER

You can use this console command to show the path of a specific mod menu: FmrckIMM_Path( Mod Menu ID )
CHANGES RELATED TO “displayName” FOR OPTION GROUP
Show
DISPLAY MENU PATH FOR THE MENU ORGANIZER
- With the Options Menu open, press Z (keyboard), Y (Xbox), or Triangle (PS) to display the menu path for the Menu Organizer.
- A hint will be displayed when you open the options menu, but it will disappear by turning off "Display hint about menu path" in the options menu of this mod.
You can use this console command to show the path of a specific mod menu: FmrckIMM_Path( Mod Menu ID )
- See the CUSTOMIZATION section on how to find the Mod Menu ID of a specific mod.
- You won't be able to use debug console at the main menu, so you'll need to load a save and start the game.
- If you have not yet installed the debug console, you can download it from the link below.
CHANGES RELATED TO “displayName” FOR OPTION GROUP
- Fixed a vanilla bug where the game would freeze if "displayName" contained consecutive ".". In this mod, consecutive "." are treated as one ".".
- Case is no longer sensitive.
- If the mod menu name cannot be obtained, the Mod Menu ID taken from the "displayName" will be displayed instead of being blank.
OPTIONS MENU OF THE MOD
Spoiler:
Show
- When you select a preset, a popup will appear asking if you want to apply the changes. (This feature is only available in the options menu of this mod.)

- If you change any settings in this mod, you will need to close the options menu to apply the changes.
CUSTOMIZATION
Spoiler:
HOW TO FIND THE MOD MENU ID OF A SPECIFIC MOD

HOW TO CHECK THE MOD MENU ID IN-GAME

REORDER MOD MENUS

CATEGORIZE MOD MENUS

POINTS TO NOTE
Show
- You can organize your mod menu by editing IMM_Settings.ws in "modMenuOrganizerNG_IMM_MrCK\content\scripts\mrckLocal" and writing a list of Mod Menu IDs.
- I recommend using VSCode and its extension WitcherScript IDE for editing ws files.
HOW TO FIND THE MOD MENU ID OF A SPECIFIC MOD
- From the option menu xml files in "...\'Game Directory'\bin\config\r4game\user_config_matrix\pc", select the file of the mod you want to know the Mod Menu ID for.
- Open the xml file in a text editor and find the line that starts with "<Group" (usually it's line 3).
- In the "displayName" written in that line, the part written between Mods. and the next . is the Mod Menu ID. (If there is no next ., up to ”)
- If the ID provided by Menu Strings is written next to Mods., skip it and use the ID written after the next . as Mod Menu ID.
- If the Mod Menu ID does not work but the Mod Menu is visible in-game, search the xml file for "<Group" to find a different Mod Menu ID.
- For Menu Organizer, the Mod Menu ID is TmrckIMM.
HOW TO CHECK THE MOD MENU ID IN-GAME
- In the options menu for this mod, select Mods Menu Settings > Mod Category Settings to open a pop-up menu, then press Z to display the list of mod menus.
- The ID is displayed to the right of the /.
- The ID will be displayed in lowercase, but this is not a problem as it is case insensitive.
REORDER MOD MENUS
- If you write a list of Mod menu IDs in FmrckIMM_ModCategoryContents_0 in IMM_Settings.ws, the display order of the Mod menus will follow that list.
- Add + and " before and after the Mod Menu ID to write +"Mod Menu ID+".
CATEGORIZE MOD MENUS
- Enter the Mod Menu ID into one or more of FmrckIMM_ModCategoryContents_1 - 14 in IMM_Settings.ws and turn on "Categorize mod menus" from this mod's options menu to organize your mods by category.
- Mod menus that are not categorized anywhere are automatically categorized into FmrckIMM_ModCategoryContents_0.
- You can see which number corresponds to which category by looking at FmrckIMM_ModCategoryName.
- If you turn on "Ignore xml edits with Menu Strings" from the options menu of this mod, the ID you added to "displayName" according to the instructions in Menu Strings will be ignored and only the list in IMM_Settings.ws will be used.
- If the same Mod Menu ID is listed in multiple categories, it will be classified into the category with the highest priority according to the following priority.
1>2>3>4>...>xml>0 (1 is the highest, 0 is the lowest) - If you do not have the w3strings files for Menu Strings and Mods Menu Category, the category names will not be displayed correctly.
POINTS TO NOTE
- The text to the right of // will be commented out and will not be loaded into the game, so you can use this to leave notes or disable part of the list.
- If a compilation error occurs when starting the game and the error message says Error [modmenuorganizerng_imm_mrck]mrcklocal\imm_settings.ws, this means that there was a mistake in editing IMM_Settings.ws.

COMPATIBILITY
Spoiler:
Show
Mods Confirmed to Be Incompatible
CHANGELOGS
Starting with v2.1.1, the changed files are now clearly indicated.
Spoiler:
Version 2.1.1
Version 2.1.0
Version 2.0.1
Version 2.0.0
Version 1.0.1
Version 1.0.0
Show
Version 2.1.1
- Fixed a bug that caused quick load to not work.
Modified Files (Next-Gen)- Mods\modMenuOrganizerNG_IMM_MrCK\content\scripts\mrckLocal\IMM_NG.ws
Modified Files (Old-Gen)- Mods\modMenuOrganizerOG_IMM_MrCK\content\scripts\mrckLocal\IMM_OG.ws
- Mods\modMenuOrganizerNG_IMM_MrCK\content\scripts\mrckLocal\IMM_NG.ws
Version 2.1.0
- Added a function to hide unused categories in the Mod Category Settings popup.
- The spelling mistake where "load" was erroneously written as "lode" has been corrected. Accordingly, the key(str) of the following id in the w3strings file has been changed.
- 2118587139
- 2118587143
- 2118587191
- Fixed some Japanese translations.
Version 2.0.1
- Fixed a bug that caused the Mods menu to be unorganized when Categorized Mod Menuswas turned off.
Version 2.0.0
- The mod name has been changed from Infinite Mod Menus to Menu Organizer.
- It is now possible to organize the entire menu, not just the Mods menu.
- Now supports categorizing mod menus by "Mods Menu Category".
- When selecting an optional preset, a popup will now appear asking if you want to apply the changes.
- The button to return to the first page is now always available, even in Old Gen.
- The entry limit can now be set to 9 even when using the Page Circulation method.
- In order to standardize the specifications throughout the game, the prefix ##, which indicates that the string could not be retrieved correctly, has been changed to #.
- I forgot to mention on the description page the function to display text in the preset header even when the preset does not exist, so I added that function to the description page.
- Fixed a bug that caused MRCKIMM_BACK to appear in the Mods menu.
- Fixed a bug that caused the menu to be organised incorrectly if the Mods category name contained a period.
- Added a large number of localized strings to the w3strings file.
- Among the existing texts, the texts with the following ids have been changed and need to be retranslated.
- 2118587114
- 2118587129
- 2118587130
- Several other minor improvements have also been made.
Version 1.0.1
- Improved the procedure for obtaining preset header strings.
Version 1.0.0
- Initial release.
INSTALLATION
Spoiler:
Show
Automatic Install
Manual Install
Uninstall
Update
Mod Limit Fix (For Old-Gen v1.32/1.31)
How to Merge Scripts
- Use The Witcher 3 Mod Manager. (I have not tested with other mod managers.)
- Download the main file and drop it into The Witcher 3 Mod Manager to install.
- If asked "Do you wish to keep your current key?", select "No to All".
- Use Script Merger to merge conflicts with other mods.
Manual Install
- Download the main file, unzip it, and drop the "bin" and "Mods" folder inside it into your game's main directory. (The game's main directory is the directory where folders such as "bin", "content", and "dlc" are located.)
- Add key bindings:Using a text editor, add the contents of "input.txt" that comes with the mod to "input.settings" located in "...\%userprofile%\Documents\The Witcher 3".
- Enabling mod options (For Next Gen v4.00+ only): Edit "dx11filelist.txt" and "dx12filelist.txt" located in " ...\'Game Directory'\bin\config\r4game\user_config_matrix\pc" and add "modMenuOrganizerNG_IMM_MrCK.xml;" to the list. Menu Filelist Updater allows you to automate this step.
- Use Script Merger to merge conflicts with other mods.
Uninstall
- Delete files you added to the game.
- Re-merge conflicts using the Script Merger.
- There will be no adverse effects if you leave the key bindings added to "input.settings".
Update
- Uninstall the old version. (No script merging is required.)
- Install the new version. (Script merging required.)
- Check the CHANGELOGS for deleted and renamed files and files whose directory structure has changed, and remove them from the old installed versions.
- Drop the new version folder into the game's main directory, overwriting the existing files.
- If the contents of input.txt have been changed, edit input.settings to apply the changes.
- Re-merge conflicts using the Script Merger.
If you are using a self-edited IMM_Settings.ws, create a backup file of it.
Method 1: Reinstall
Method 2: Overwrite
Finally, open the new IMM_Settings.ws and copy and paste the Mod list from the backed up IMM_Settings.ws. (If you are updating from v2.0.0 or later, IMM_Settings.ws has not been changed, so you can continue to use the old IMM_Settings.ws.)
Mod Limit Fix (For Old-Gen v1.32/1.31)
- If you want to use a lot of mods with Old-Gen v1.32/1.31, you will need Mod Limit Fix.
How to Merge Scripts
Spoiler:
Show
First, read the Script Merger instruction page carefully and follow its instructions.
When Script Merger loads the files, they will be listed as shown in the image below.

On the left, conflicting mods are listed by file.
On the right, merged mods are listed by file.
If you do not merge, the file of the mod with the highest priority (the mod shown in darker color in the conflict list) will be loaded. (Priority can be set in the The Witcher 3 Mod Manager.)
Select the files you want to merge and click the "Create Selected Merge" button.
Depending on the mod, the mod author may instruct you not to merge conflicts, so please check the instructions carefully before merging.
If manual merging is required, a window similar to the image below will pop up.

In the upper row, the conflict locations of three files, A, B, and C from the left, are displayed.
A is the vanilla file, B and C are conflicting mod files.
The code of the merged file is displayed at the bottom.
If you select "B" and/or "C" from the top toolbar, the code from the selected files will be added to the merged file. (In the image above, both B and C are selected in that order.)
Click the "Go to Next Unsolved Conflict" button to the left of "A" on the toolbar to display the next conflict location.
Once all conflicts have been merged, close the window and save.
How to Choose B or C
It is better to select both B and C to enable all mod functions.
When doing so, be careful not to break the format of the code. Even if you don't have any coding knowledge, you should be able to see that the code is written according to some rules.
Look at the C code in the image above.
The parts in red are different from vanilla, the parts in yellow are conflicting parts, and the parts in gray are already included in the merged file.
The part between {} is a code block, and the block title is written at the top or left side of the block.
If you do not select C at the end, the title that is supposed to be attached to the gray code block will be lost, so it will deviate from the mod's expectations.
Therefore, I chose the codes in the order of B and C.
If selecting both B and C breaks the code, select only one.
Alternatively, you might be able to avoid using the toolbar buttons and instead merge them correctly by copying the code from the conflicting files and pasting it into the appropriate part of the code in the merged file.
List of Codes to Watch Out for:
{}:
event:
function:
return:
if():
else:
var:
//:
/**/:
When Script Merger loads the files, they will be listed as shown in the image below.
On the left, conflicting mods are listed by file.
On the right, merged mods are listed by file.
If you do not merge, the file of the mod with the highest priority (the mod shown in darker color in the conflict list) will be loaded. (Priority can be set in the The Witcher 3 Mod Manager.)
Select the files you want to merge and click the "Create Selected Merge" button.
Depending on the mod, the mod author may instruct you not to merge conflicts, so please check the instructions carefully before merging.
If manual merging is required, a window similar to the image below will pop up.
In the upper row, the conflict locations of three files, A, B, and C from the left, are displayed.
A is the vanilla file, B and C are conflicting mod files.
The code of the merged file is displayed at the bottom.
If you select "B" and/or "C" from the top toolbar, the code from the selected files will be added to the merged file. (In the image above, both B and C are selected in that order.)
Click the "Go to Next Unsolved Conflict" button to the left of "A" on the toolbar to display the next conflict location.
Once all conflicts have been merged, close the window and save.
How to Choose B or C
It is better to select both B and C to enable all mod functions.
When doing so, be careful not to break the format of the code. Even if you don't have any coding knowledge, you should be able to see that the code is written according to some rules.
Look at the C code in the image above.
The parts in red are different from vanilla, the parts in yellow are conflicting parts, and the parts in gray are already included in the merged file.
The part between {} is a code block, and the block title is written at the top or left side of the block.
If you do not select C at the end, the title that is supposed to be attached to the gray code block will be lost, so it will deviate from the mod's expectations.
Therefore, I chose the codes in the order of B and C.
If selecting both B and C breaks the code, select only one.
Alternatively, you might be able to avoid using the toolbar buttons and instead merge them correctly by copying the code from the conflicting files and pasting it into the appropriate part of the code in the merged file.
List of Codes to Watch Out for:
{}:
- The part between {} is treated as one block.
event:
function:
- If the title of a code block between {} starts with "function" or "event", the block is treated as one section.
- When a section is loaded, the code is loaded in order from the top, and the section ends when "return" is loaded or all the code is loaded.
return:
- Finish that section. The code after the next ";" will not be loaded.
if():
- Only if the condition in parentheses is met will the code written next be loaded.
else:
- Used following an "if" statement. Code written next to "else" will only be loaded if the condition of the "if" statement is not met.
var:
- If a line of code within a section begins with "var", that code must be placed at the beginning of the section.
//:
/**/:
- The part to the right of "//" or the part between "/*" and "*/" is commented out and will not be loaded into the game.
TRANSLATION
Spoiler:
Show
- All language files other than Japanese are written in English using machine translation.
- If you want to create your own translations, edit the w3strings files in the mod's content folder with The Witcher3 String Editor NextGen.
- Alternatively, you can edit the csv file in the mod's content folder with a text editor, then use Mod Translation Guide and Gui for w3stringsx to encode the csv file into a w3strings file.
- <> is HTML tag. You can use this to adjust the font size for each language.
- <<>> is WS tag. This tag will be replaced by another string by the Witcher script.
- Once you've created your translation, we'd appreciate it if you could share it with us by uploading it to Nexus.
OTHERS
- If you like this mod, please support it by clicking the "Recommend" and "Vote" buttons at the top of this page!
- Please also check out the other mods I've created.
- If you have any questions or comments, feel free to post them on the POSTS tab.
- I won't respond to every post, but someone else may do so for you.
- While I don't respond to every supportive or kind comment, they truly encourage me to keep working on mods. Thanks so much!