


0 of 0


About this mod
A guide which is designed from the ground up to get the best looking graphics for Fallout 4 in 2022. The game has been released in 2015, and many, many mods have been released since then. This guide tries to aim for the best looking graphics for modern PC's. Now with Wabbajack auto-installer!
- Requirements
- Permissions and credits
- Changelogs
- Donations
***** UPDATE 07-MAY-2024 *******
I am sorry to inform this Wabbajack is out of date and I will not be updating this anytime soon anymore. Please stick and browse other Fallout 4 modlists and guides, or browse Wabbajack directly.
I am really sorry about this, but I went trough some horrible shit the last 2 years that I kinda lost my appetite to mod anymore.
What also doesn't help is apparently an incredible toxic Fallout 4 modding community when the game gets updated and it breaks modlists.
So thanks for the supporters over the years, you have been amazing! And a big middle finger to the haters.
This Ultimate Graphics Guide is also available for Skyrim Special Edition/Anniversary Edition here!

----------------------------------------------------------------------------------------------------------------------------------------------------

The 2.0 version is now released with Wabbajack auto-installer!
Version 2.0 is a major improvement over the old 1.2 version, with the following features:
- Better graphics and ENB.
- Better framerate and stability. Super smooth FPS/performance in comparison with the old modlist.
- Better LOD. Also built in LOD in the Modlist.
- No more external tools needed for tweaking. Everything is done already in the built in Mo2 ini files.
- Better overview of what has been installed with modlist spacers in MO2.
- Easier to install own mods. Also easier to de-select the mods you don't want. (like modern weapons/armors)
Fixes:
- Fixed micro stutters when switching weapons.
- Fixed performance drain in some cities.
- Fixed LOD inconsistency.
- Fixed stability and many CTD issues.
Want to see which mods are included first before installing? I have an Excel list in the files section with all mods, load orders, links, etc from this list.
Also remember you can disable all mods you don't like in the end like modern weapons/armors with just a simple mouse click. But also Armorsmith Extended or Armor Keywords since all these mods seems to be a very hot discussion all the time in the comment section / Discord. Tip for mod makers: Dont make it a hard requirement please!
-----------------------------------------------------------------------------------------------------------------------------------------
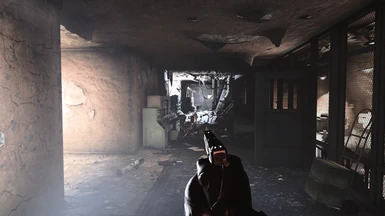
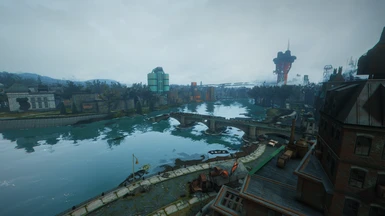
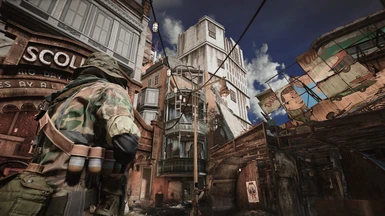
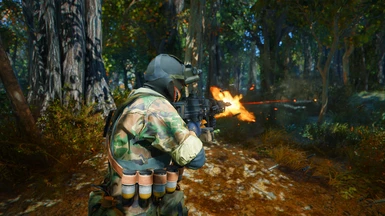
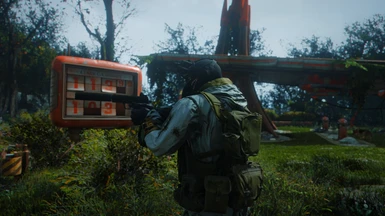
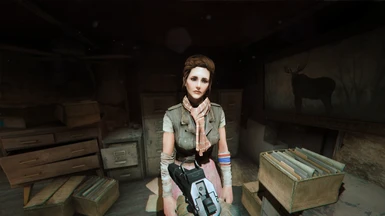
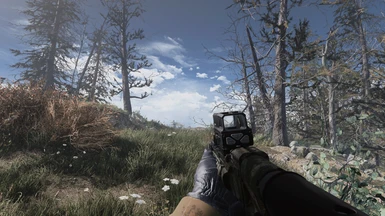
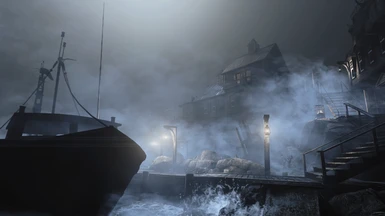
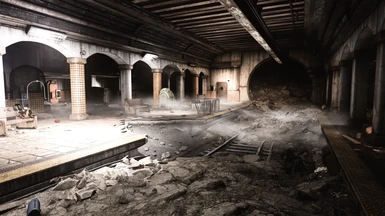
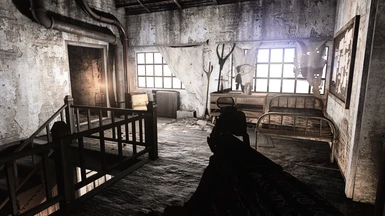
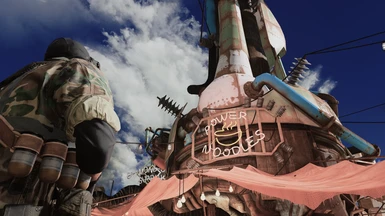
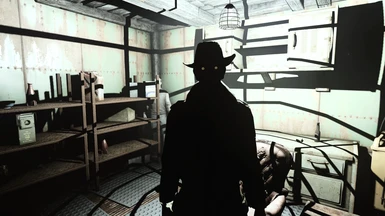
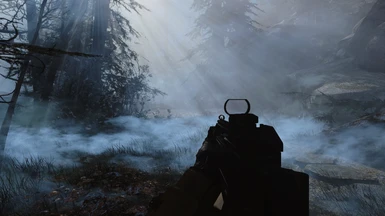
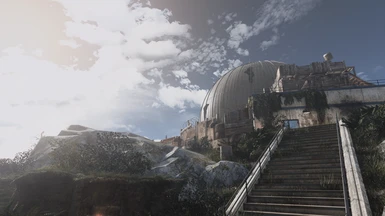
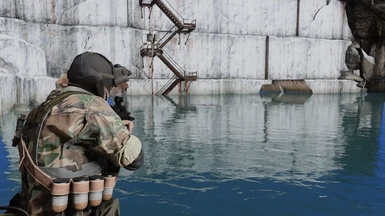
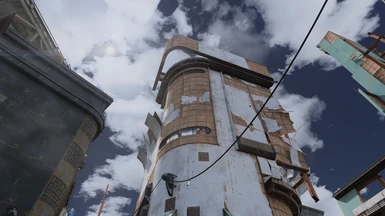
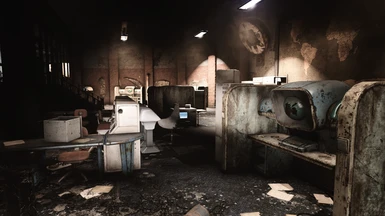
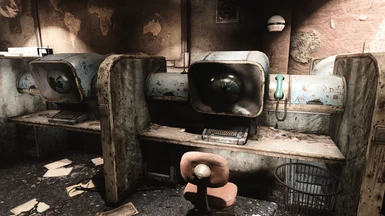
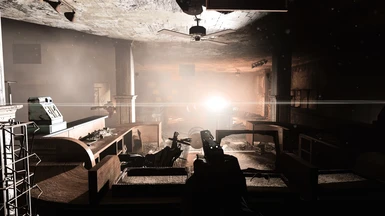
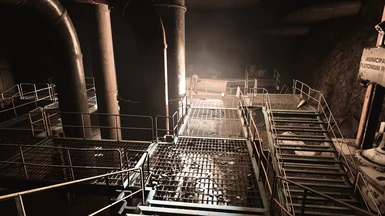
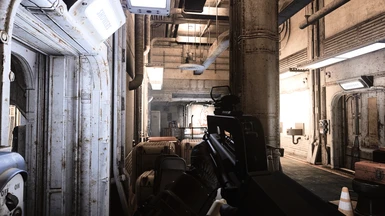
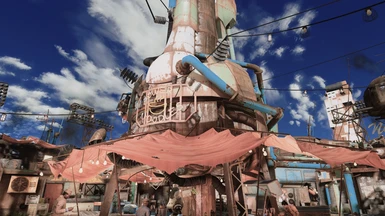
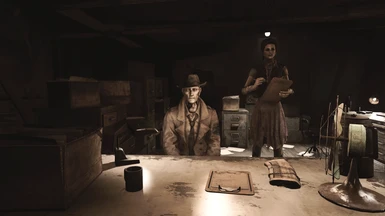
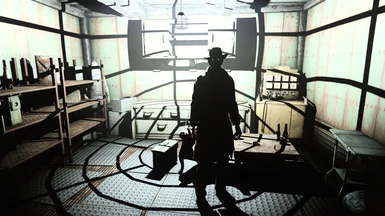
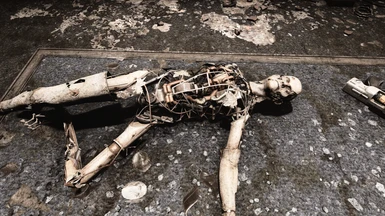
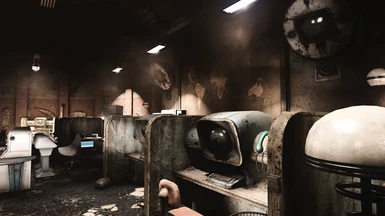
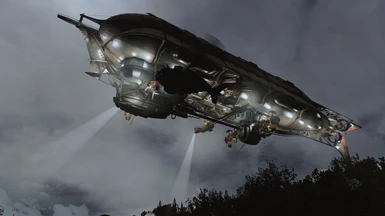
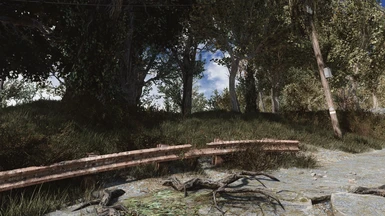
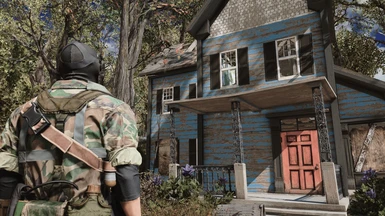
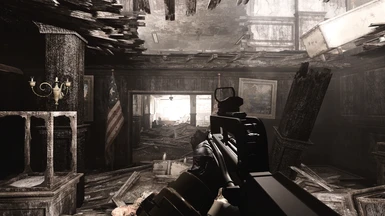
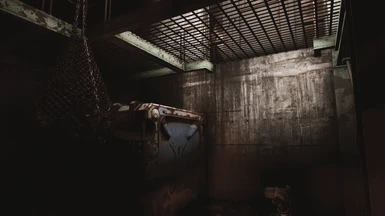
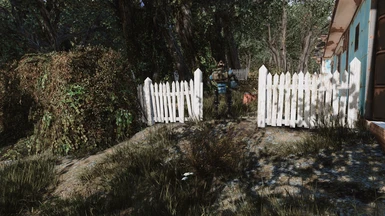
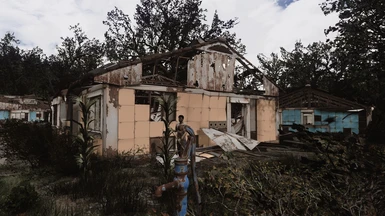
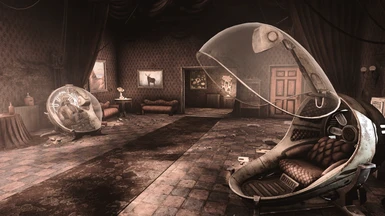
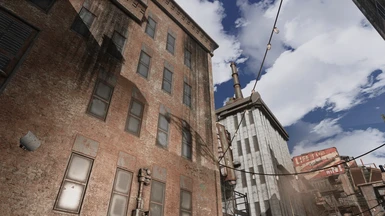
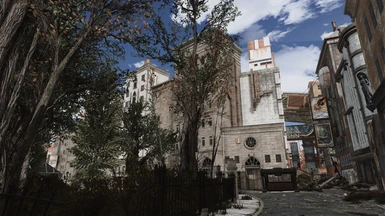
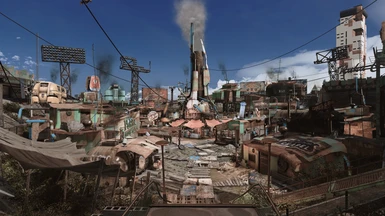
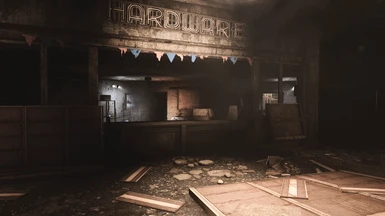
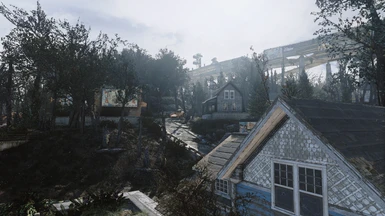
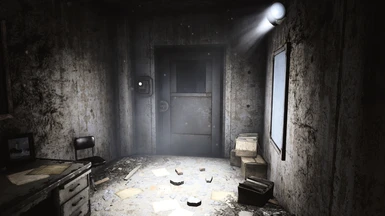
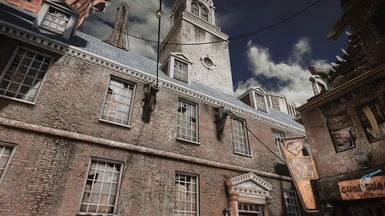
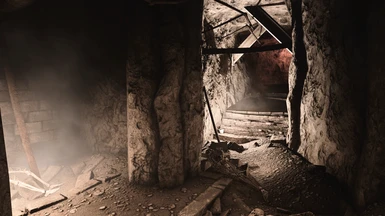
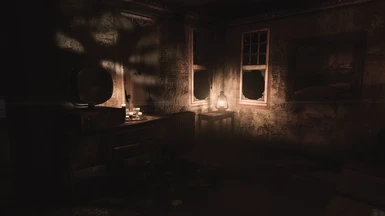
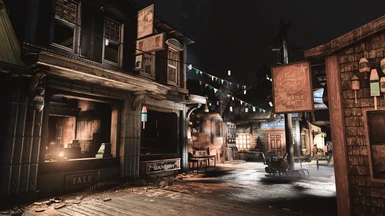
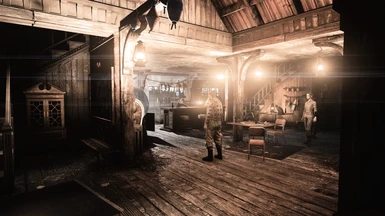
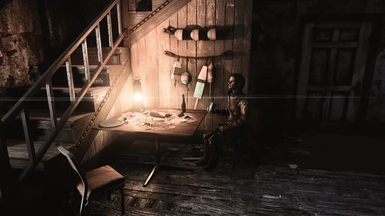
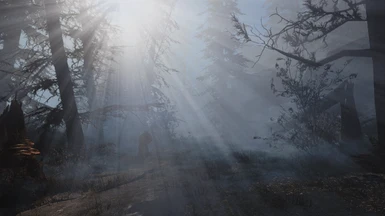
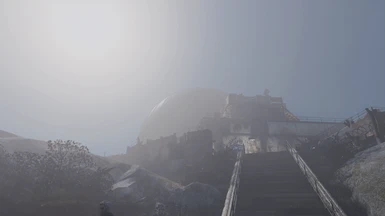
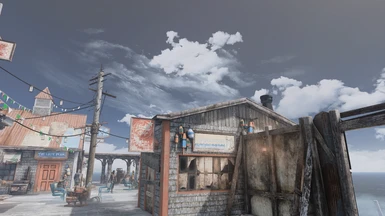
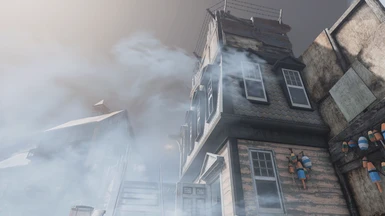
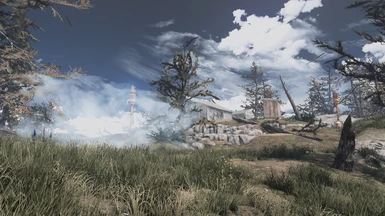
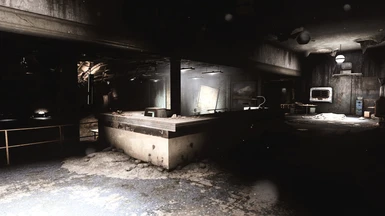
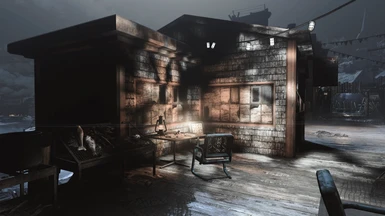
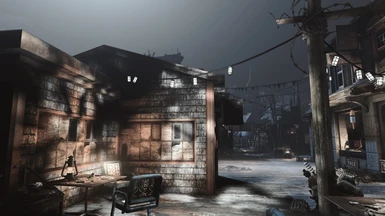
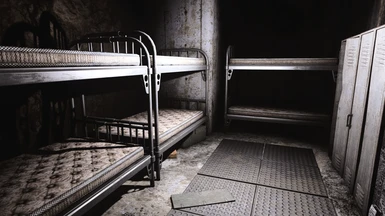
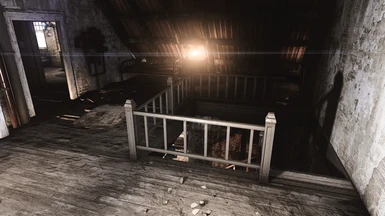
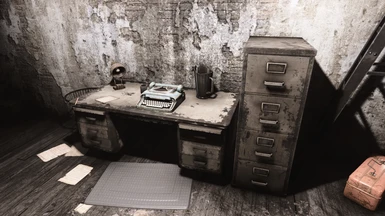
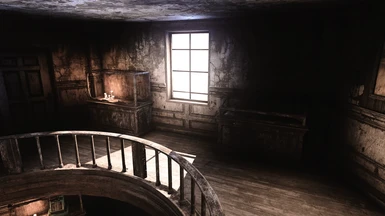
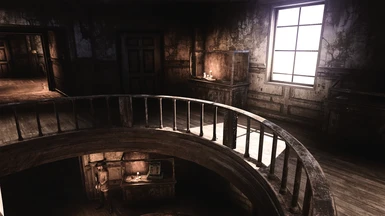
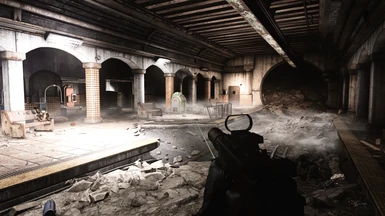
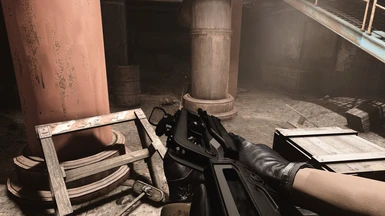
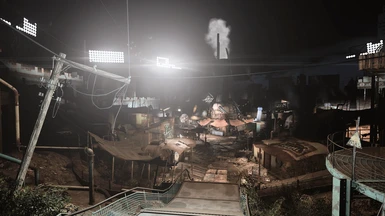
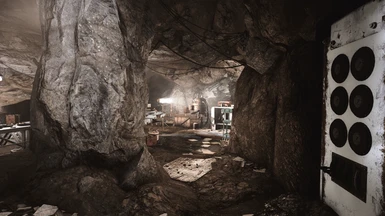
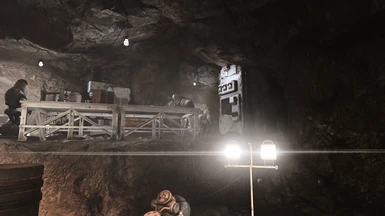
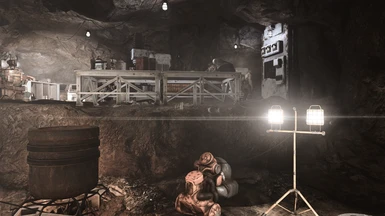
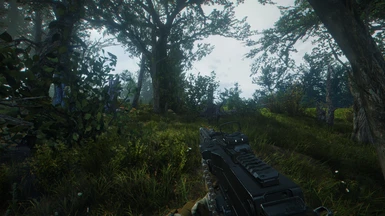
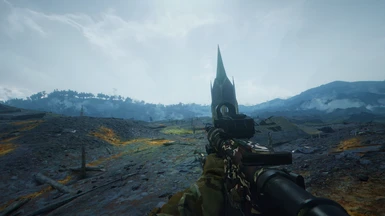
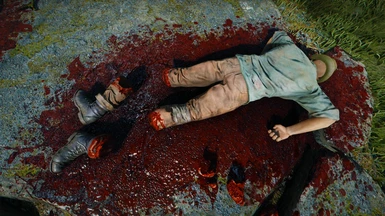
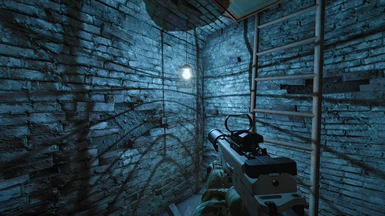
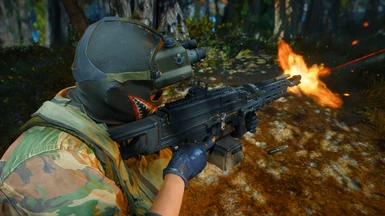
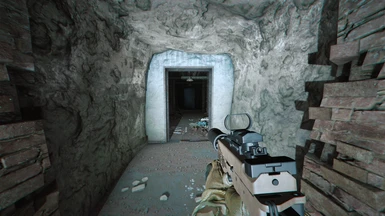
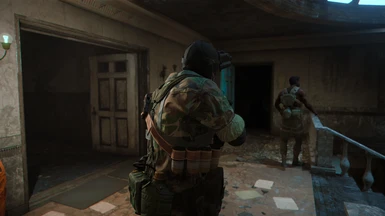
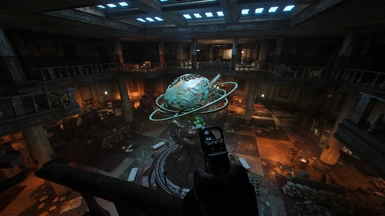
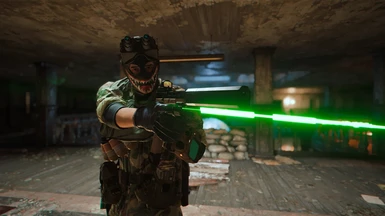
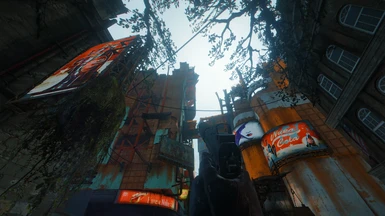
Please click and open the thumbnail screenshots to get a better view on the texture quality!
Wabbajack auto-installer? What is that?
Wabbajack is a tool that lets you install automated pre generated big mod lists.
Normally before Wabbajack the manual installs always took a huge amount of time since people had to download every individual mod, and I had to explain how to do the full guide install mod by mod. This Wabbajack list is an auto installer for more or less 98% of the entire modlist we are going to use, so this means the install/modding effort has been drastically reduced compared with the previous tutorials! After the Wabbajack only a few manual steps have to be done which can be done in 5-10 mins.
Welcome to 2022/2023!
It is pretty hard to believe, but Fallout 4 already dates back from 10 November 2015, so in 2023 that makes this game 8 years old already!
I was never really impressed with Fallout 4's original graphics and animations, and now 7/8 years further I think this game really needs a 2022 graphics overhaul to keep up. It is a good moment to start modding now in 2022/2023, since a lot of great mods have been released in the last 2 years or so which really can provide next gen graphics like we have seen in modded Fallout 4.
As an experienced Skyrim modder, the world of Fallout 4 was pretty new for me, but there are also many, many similarities when it comes to modding. You have Mo2, script extenders, ENB's, texture mods, lighting mods, weather mods, Body/NPC mods, etc etc. However there are still some differences that are not that straight forward, and I had to Google a lot of issues myself during the installation of some mods. I hope with this 2022 ultimate graphics tutorial to save you from all the troubleshooting, and allow you to simply just follow instructions from this guide. Apart from a written guide, every part also has video tutorials!
Did you also follow my Skyrim 2022 Ultimate graphics guide? Good news! This Fallout 4 2022/2023 Ultimate Graphics guide now also has an automated Wabbajack installer!
Some End Result videos:
Modlist review by DroppedIceCream :

This tutorial requires the Fallout 4 base game + All DLC !
Recommended/minimal system specs:
CPU: Recent(ish) i5 with decent clockspeed
RAM: 16GB
GPU: GTX 1080 ti
(or something similar from AMD. Note that in general AMD has a harder time running ENB's and other mods than Intel/Nvidia.)
HDD/SSD: +-150GB
Tested and works on Windows 10 and 11
So note that this guide is mostly focused on graphics/texture quality, and requires a good modern pc!
So yes, you do read this correctly! for guaranteed 60+ FPS with all these mods/ENB/ and 4k textures a GTX 1080ti is Recommended! And this is for 1080p/1440p. For 4k I would even recommended a RTX 2080 or better! I want to point this out on forehand to prevent disappointing framedrops on older hardware. Indoor locations are usually smooth as butter, but outdoor areas with a lot of vegetation could sometimes be very performance heavy with this mod list.
If you have not have these recommended specs, then see if you are happy with the framerate. A GTX 1070 in example might get 60 fps indoors, and 45+ outdoors. (For me personally that would be fine, but again that is up to you.)

(Info about the author for the ones who care)
I am Roderick, (PredCaliber), born in 1986, and I am from The Netherlands. I have been playing videogames since the end of 80's, and modding games and creating stuff with its editor since the first Unreal back in 1998. I am probably mostly known from my Youtube channel which is also mostly still based on Skyrim Modding, with a lot of other content during the years. If you are interested, check out the YT channel here.
I have always been creating Skyrim (SE) mod lists every year, and it seems I am one of the few who also does create tutorial videos to completely explain how to install/configure everything from the mod lists. These videos became very popular, and that is mostly what made my Youtube channel grew to what it is today (62k subs and 6000 Discord members at the time of writing. 01/Jan/2022) I bought Fallout 4 at the release, but to be honest I was not really impressed when playing it. 6 years later in the end of 2021, I finally decided to REALLY start trying modding Fallout 4 which was familiar terrain for me because of Skyrim modding, and for the first time I non stop played the game! With graphics (and weapon) mods, this game feels so much different.

New to modding or just lazy?
This video covers all the instructions!
Preparation
Make sure your Fallout4 is clean before you start! (If this is your first time modding, you can skip this.)
Steps to uninstall properly:
Get rid of your current mod manager
Make sure to first uninstall all mods from your mod manager you are using. (Nexus, Vortex, or Mod Organizer). In case of Mod Organizer(2) the other data you want to have removed might be located in: X*:\Users\*your User*\AppData\Local\ModOrganizer Where X is your Windows drive, (usually C) and *your User* is your windows user account. In my case: C:\Users\PredCaliber\AppData\Local\ModOrganizer
Get a clean version of your Fallout 4.
Go to your Steam, right-click Fallout 4 and select uninstall. Delete the remaining stuff in your \Steam\steamapps\common\Fallout 4 folder. (Save the screenshots if you created some ;) )
Delete old ini files
Go to your X:\Users\*your user*\Documents\My Games\Fallout4 , and delete everything there. If you do NOT have the Steam version, just to be sure to make a back-up of your save game folder. If you have the Steam version Steam should automatically create a backup of your save games in the cloud.
Installing Fallout 4 clean
Then once you have a clean sheet and no trace of an old modded Fallout 4, you can now safely install Fallout 4 again from Steam. Please do not install it in X:\Program Files (x86) or any C:\Windows folder!
Start Fallout 4 at least once + Fallout 4 launcher settings
Set everything to max settings in the Fallout 4 launcher, and start Fallout 4 at least 1 time to generate ini files.
Start the game at least once to create required .ini config files. If you have used mods before this tutorial, you most likely have a modded save game as well. If so, then preferably start a new game to be sure you wont get any compatibility issues. Use that new empty save game to test your mods until the end of the tutorial to be 100% sure you can easily troubleshoot if something might go wrong. (At the end of the tutorial feel free to load your old savegames of course.)
Installing the Wabbajack list
Experienced modders, just follow the steps below. New modders, lazy people, and everyone else, just watch the video at the start of the tutorial. Its easier!
Installing Wabbajack
Download the Wabbajack setup file here.
Download the Wabbajack list from the files section on this modpage. (Download link in a new tab here)
Create a new folder somewhere, where you will download and save the Wabbajack.exe.
Please note: Don't create the folder in the Fallout 4 game folder, Program files (x86), C:\Program Files, C:\Users or C:\Windows. Create a shortcut to this folder on your desktop, and create a shortcut to your Fallout 4 game folder as well for quick access. (So your game folder is the \Steam\steamapps\common\Fallout 4 folder. )
Then run the downloaded Wabbajack.exe.
Locate Fallout 4 and when ready to install the Wabbajack, click on the big 'install from disk'' button to download the modlist file. In Installation Location select an empty folder that is NOT under C:\Program Files, C:\Users, or C:\Windows.
Do not install this list in your Steam folder, Fallout 4, or a folder that contains Wabbajack.exe.
The downloads location will auto filled in. This can be changed if preferred, then click the button with the Play Arrow to begin the process.
Accept the Nexusmods API request if asked, after that Wabbajack will now automatically download and install every necessary mod.
If you don't have Nexus Premium, you'll have to manually click download with mod manager for all the mods, but Wabbajack will still install them. When Wabbajack completes you will see either a green Installation Complete screen or a red Installation Failed screen. If successful, proceed with the manual steps after Wabbajack section, if it fails then don't worry and please note the following below:
If your Wabbajack install fails:
It for sure is possible and even normal sometimes that the Wabbajack install fails a couple of times which can be a bit frustrating. This can happen for example because a certain mod link times out or is temporarily not available to connect. But don't worry, everything is cached so you don't have to start all over again with indexing/compiling if Wabbajack fails. Usually the issue is fixed by just restarting Wabbajack, and run the installer again. Good tip is to go to the settings menu, (its the little gear icon in the upper right corner next to the version nr) and check the box: Use network workaround (slow) . This is more reliable and helps for a lot of people. If you are still experiencing errors when installing, click the logout button for NexusMods in the settings menu, wait 5 seconds, and log back in. The last thing you can try is a PC reboot and then try the above steps again.
Once finally successful, you should see a complete screen like this:

DONT START THE GAME YET, IT WILL CRASH WITHOUT THE NEXT STEPS AND MANUAL MODS! SO MAKE SURE TO FOLLOW THE BELOW SECTION FIRST!!!!!!!
Manual steps after Wabbajack
Experienced modders, just follow the steps below. New modders, lazy people, and everyone else, just watch the video. Its easier!
Open the following :
1: Your Fallout4 main game folder located at \Steam\steamapps\common\Fallout 4
2: The MO2 program in the installed files from the Wabbajack, called ModOrganizer.exe , and create a shortcut to it
3: Create a folder somewhere, and name it manual mods.
1: Installing Fallout 4 Script Extender (F4SE)
Download F4SE from here, and install it like you normally would install F4SE. (Watch the video if you don't know how)
2: ENB files
Download the following mods, and copy the files to your main game folder:
- Download the ENB binaries here, then open the archive and copy and paste d3d11.dll and d3dcompiler_46e.dll to your main game folder.
- Download Reactor ENB for Fallout 4 here. Also here copy the files from the archive to your main game folder.
3: Last steps
- Reboot your PC just to be sure to have cleaned everything from your Windows tasks and RAM.
- Make a shortcut to your ModOrganizer2.exe from the installed Wabbajack list, since this is the file we are going to use from now on.
- Launch the Fallout 4 launcher again in MO2, and make sure all settings are back at max again.
- From now on, only start your game from there with F4SE. If you dont know what I am talking about, check the video tutorial.
Good practice now is to make sure to disable Steam overlay, and make sure you put the Fallout 4 auto-update on hold. The reason for this is that F4se and some other mods will stop working, and need to be updated again, and that can take days. Yikes! So, make sure to disable updates in Steam. Do that by going to Steam, rightclick Fallout 4 , select properties, updates, and select only update this game when I launch it. We will launch game only with F4SE from MO2, Steam does not see that as a 'game launch' since Fallout4.exe or Fallout4 laucher.exe are not being launched.
Setting ''only update this game when I launch it'' in Steam:

Thats it!

Liked my list? Then please either endorse this page, or subscribe on my Youtube channel!
If you really like it a lot, then you can also leave a small donation :)

Below the old manual tutorial if you want to read it for legacy reasons. Please note: This is old and not supported/needed anymore!!!
--------------------------------------------------------------------------------------------------------------------------------------------------------------------------------------------------------------------------------------------
Legacy/ Old Not needed anymore


Any all in one download pack like you had on the Skyrim:SE/AE tutorial?
Unfortunately I am not going to do an all in one's anymore since I had a mod maker complain about it, and apparently some people got (false) ISP warning from downloading the AIO torrents. I don't want to risk any potential lawsuit, (you never know how crazy people can be) so better safe than sorry.) Hope you will understand this!
Explanation about the tutorial
Ah yes, we have a tutorial to do haven't we? Well, let me explain how it works. Every part is categorized in the below categories. Every category has a written explanation, and there is also a Youtube video explanation. It is recommended to follow the videos for your own ease, and you are more sure you are not forgetting anything. Experienced modders can of course just download and install the mods.
I will not handle animations or gameplay mods. These can be very subjective, so feel free to add them on top of this mod list. However I think that the more recent realistic weapons already make a huge difference in the Fallout 4 experience, so I would definitely recommended those!
If you liked my tutorial, and if you would recommend it to other people please don't forget to endorse it! Thank you! :)

Tutorial modding order:
Can I support/thank you?
That would be greatly appreciated! To give you an idea, I literally spent 100th of hours for this guide. that includes mod picking and sorting, the tutorial writing here on Nexus Mods, checking mod compatibility, thoroughly stability testing for the final game, and doing everything over again by recording tutorials how to explain in video tutorials to do the full installation. Not to mention the almost full time job I have with support for this on YouTube, this page, and Discord. :) So a small donation would greatly be appreciated! Donations can be done here.
If you don't want to spend any money, then please consider subscribing on my Youtube channel here. That will help me out big time as well!


This is the most boring but also the most essential part. Once you have completed this, the rest will be relatively simple. So lets get this over with!
Best practice is to always start with a fresh and clean install of Fallout 4. If you have never modded your Fallout 4 then great! You are good to go. If you already did mod Your Fallout 4 make sure to properly uninstall everything.
Steps to uninstall properly:
If you dont want to completely uninstall your Fallout 4, you can Google ''how to make Fallout 4 vanilla again'', but its recommended to uninstall it completely.
Installing Fallout 4 clean:
Then once you have a clean sheet and no trace of an old modded Fallout 4, you can now safely install Fallout 4 again from Steam. Please do not install it in X:\Program Files (x86)!!! Any other folder is fine.
Mod Organizer 2 And non MO2 manageable mods
Do you already have Mo2 installed because of Skyrim Special Edition? Then you can simply just Fallout 4 as a new game from Mo2! I however would still recommend to download MO2 and install it as a portable extra version purely for Fallout 4. Its the best way to keep both games separated. If you also want to do that, follow the below steps.
Now do the following:
FO4Edit-use FO4EDIT to clean your plugins.
While it is highly recommended to clean your plugins with Fo4edit, I have to be honest that I did not do it for my Fallout 4 since it is not as super heavily modded as my Skyrim:SE is. I now have over 70 hours in my modded Fallout 4, and crashes are very rare for me. I think most crashes I actually got are from me being a lazy and stubborn pig, and constantly using the quick save function. (DONT BE LIKE ME! ALWAYS USE MANUAL SAVES, AND DONT USE THE QUICK SAVE FUNCTION!) To be honest I dont know the exact technical reason behind it, but I have seen modders mention multiple times that using quick save with a modded Fallout 4 is a very bad idea and can screw up your entire save game eventually.
Regarding FO4EDIT, feel free to skip it like me if you dont have crashes, but if you are going to add a ton more mods on top of this modlist, or you start getting more crashes, Use FO4Edit to clean your plugins. (Not making a good example doing it like this, In the end best practice is of course to clean your masterfiles. :$ )
BethINI- Ini Tweaks
Download the Main (stand alone) file, and extract the download to your created modding tools folder. Then run the BethINI.exe and select Fallout 4.
Select Ultra Preset and Recommended Tweaks, then follow these screenshots. However notice that Ultra settings can have a lot of FPS impact, so if you encounter FPS dips in the end lower to high settings. Normally ultra settings should not be a problem with high end specs, but I think the hi-res textures and other mods we are going to install later hit hard on FPS for some reason in combination with ultra settings. So again, if you do notice ultra settings hits too hard on FPS, use high settings instead!
Follow the below screenshots, and adjust where necessary.
1: Make sure you change the ''Mod Organizer'' path to your Mod Organizer location! For the rest, check the other settings.

2: Set your resolution, select ultra or high preset, select Bethini Presets, and select Recommended Tweaks as well.

3: Field of view is recommended to set to 90 or 100, most other settings will be determined by high or ultra preset settings. Motion blur, depth of field, and bokeh can activated but will mostly be overwritten anyway by the ENB presets later on. Godrays and lens flares are optional, but look nice in combination with the ENB effects imo. Up to you. You can drop shadow resolution from 4096 to 2048 to improve FPS.

4: These settings/sliders are based on your high or ultra preset. Slow on FPS even in high settings? You can try to lower some values in the sliders here. Do not mess around with uGridsToLoad unless you are only recording or screenshotting since this can make the game unstable!

5: Grass settings. Leave them for now, or adjust them later if you want to install/mess around with a specific grass mod.


Now that we finally have setup Fallout 4, we can start adding more essential mods and fixes in MO2. A lot of things might be familiar for Skyrim(SE) modders already as well like it probably was as well in part 1. Download Install the mods in the below order, and just download the main file unless instructed otherwise.
Installing mods (Mod Organizer 2 manageable mods)
We can now finally start with adding mods to MO2! This will be the same process we are going to do a lot from now on, so pay attention. For every mod this is the way: Download the mods manually to the mods folder you did create somewhere at the start of the tutorial. Best practice is to put numbers in front off the mods so you know in which order you need to install everything if you are losing track of all your downloaded mods.
So in example: (Mods are from Skyrim:SE, but MO2 works the same for Fallout4)

Then:

After that, activate the mod in the left panel, and after that activate the .esp (if available) in the right plugins section of MO2.
So got that? Then lets start installing the following mods with MO2!
So a great moment now to test your Fallout 4 and create a new (temporary) game to use for the rest of this tutorial!
With the Start Me Up - Alternate Start and Dialogue Overhaul mod, now start a new game, and create a new save. Use that new empty save game to test your mods until the end of the tutorial to be 100% sure you can easily troubleshoot if something might go wrong. (At the end of the tutorial feel free to load your old savegames of course.)

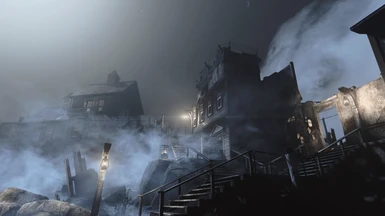
Good, all the basic and boring stuff is out of the way, time to add the mods that will make the biggest difference in graphics!
This includes installing ENB and Reshade. During these 7 years of Fallout 4 modding, there are many, many ENB/reshades available nowadays with also many, many options and looks. The biggest criticism at Youtube Showcases in general is usually always ENB related. Some want a more realistic look, some want a more fantasy look, some want a more dark ENB, and some want a more light/vibrant ENB. Bottom line, its usually very hard to please everyone with 1 ENB/weather combination!!! So I would like to point out, if you really want to install a different ENB/weather mod combination than on the list, please do that since it is your game.
However, If you want to have the exact same graphics as on the screenshots and videos, then please follow the below instructions and mods!
So, what are we going to install then if its hard to please everyone?
I checked a lot of modern ENB/Reshade combinations for Fallout 4 the last couple of months, and I can say I really like this one from LK the most from what I have seen so far. A good thing with NAC-X, (A mod we are going to install as well) is that you can actually change the look and feel of the game even more with different looks / presets if you like. Give a more realistic or fantasy feeling can be achieved with built in filters and even weather effects!
So lets get to work:
- ENB binariesDownload the latest version, and only copy d3d11.dll and d3dcompiler_46e.dll to your Fallout 4 main game folder.
- ReShade Download the latest version, and run the .exe file. Once done select click here to select a game and manage its ReShade installation. Then
click on browse , and browse to your Fallout 4.exe. For rendering API, select: Direct3D 10/11/12.
- NAC-X Legacy Edition A weather overhaul mod, but much, much more than that! Can be installed with MO2.
- Aeonic 2021 - FO4 PhotorealismCopy all files in the Fallout 4 main game folder. Overwrite when asked in Windows.
- Fallout 4 - LK ENB & ReShade Same as above, copy all files in the Fallout 4 main game folder. (you can skip the screenshots)
Mirror link (if above link is down)
Overwrite when asked in Windows. Take notice its a Mega.NZ link, if the link is down because of bandwidth check our Discord here for mirrors.
I know Its a bit strange and unusual to install 2 ENB/Reshades (Aeonic and LK ENB/Reshade) , but apparently Aeonic is a required file for LK ENB/Reshade according to its readme file. For that, lets just install Aeonic first as requested by the LK ENB's readme file.
Texture overhauls
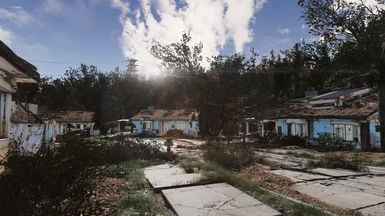
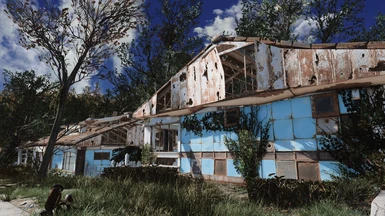
Texture overhauling is going to be a bit different than normal. We are not going to use many multiple texture overhaul mods for landscape, buildings, interior, etc, but this time just 1 big mod which contains over 60GB of fantastic 4k HD textures! The Fallout 4 HD Overhaul mod by luxor8071 is just a fantastic all in one HQ texture pack, which for me has the best looking textures and covers pretty much EVERYTHING. So the downside, yes, its around 60GB! So be prepared if you have a slow download speed. :'(
Visible Galaxy 4k and FrameworkRequired for the Fallout 4 HD Overhaul mod, download and install first
Fallout 4 HD Overhaul Download and install all main files, and also the Galaxy Milky Way 8k Skystars 4k mod from optional files
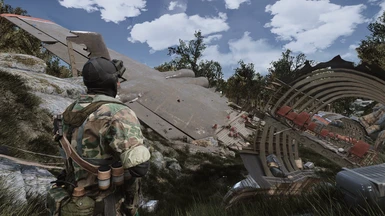
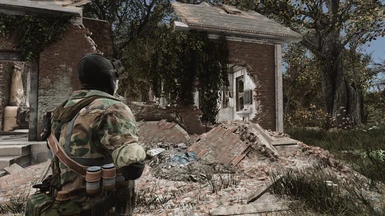
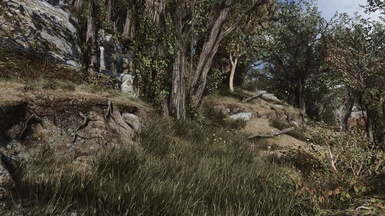
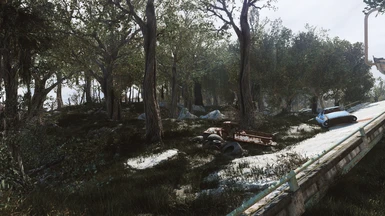
Landscape overhauls
If you like the original vanilla landscape, and you don't want to change this for lore reasons, then you can skip the following landscape options. (However, I go for: ''A forest'' and ''grasslands'' since I really like the combination)
Option 1: No Mods. As described above, Install nothing and leave the landscape as it is in the vanilla game. (Textures from the landscapes are overhauled already. Please note that you need to compile the LOD's yourself if you want to use this option!)
Option 2: My pick, because I think it just looks great! Keep in mind, it will also result in more big forest areas which some might not find lore friendly. The all in one LOD pack I did generate for this mod list is also based on this pick!!
A Forest
Grasslands
Option 3:Probably the most lore friendly outdoor overhaul, but also a bit boring in my opinion. Please note that you need to compile the LOD's yourself if you want to use this option!)
Boston Natural Surroundings
Option 4: A very lush and green overhaul. Not really lore friendly. Check screenshots first Made by luxor8071. (the same author as the Fallout 4 HD Overhaul)
Luxor's Summer
**Update 22/01/2022**: Luxor contacted me, and explained me that the LODS are actually included in the mod! So no need for LOD generation!
Do you prefer a different landscape overhaul? Then go ahead and pick yours!
Now lets run the game, and lets do the following. Please make sure that at first startup with ENB and Reshade, the game can show a black screen during startup for 1 min or so! Please be patient!
In game press the 'Home' key at your keyboard to open the Reshade menu, and select "LK-ReShade-Preset-2021-10.ini" in the ReShade menu.
In the MCM menu, we now need to set a hotkey to open the NAC-X menu. Then open the NAC-X menu, and load the built-in patch for ENB.
Good news is that we are now done already for 95% with our graphic/visual mods! So this will give you a good idea what you can expect for FPS performance.

Creature overhauls, weapons, armor, and NPC overhauls.
Wasteland Creatures Redone Covers most creatures already. Select everything except Deahclaws
Deathclaws HD remastered
For me personally I did not find any real other interesting creature texture overhauls that has not been covered already by the Fallout 4 HD Overhaul or Wasteland creatures redone mod.
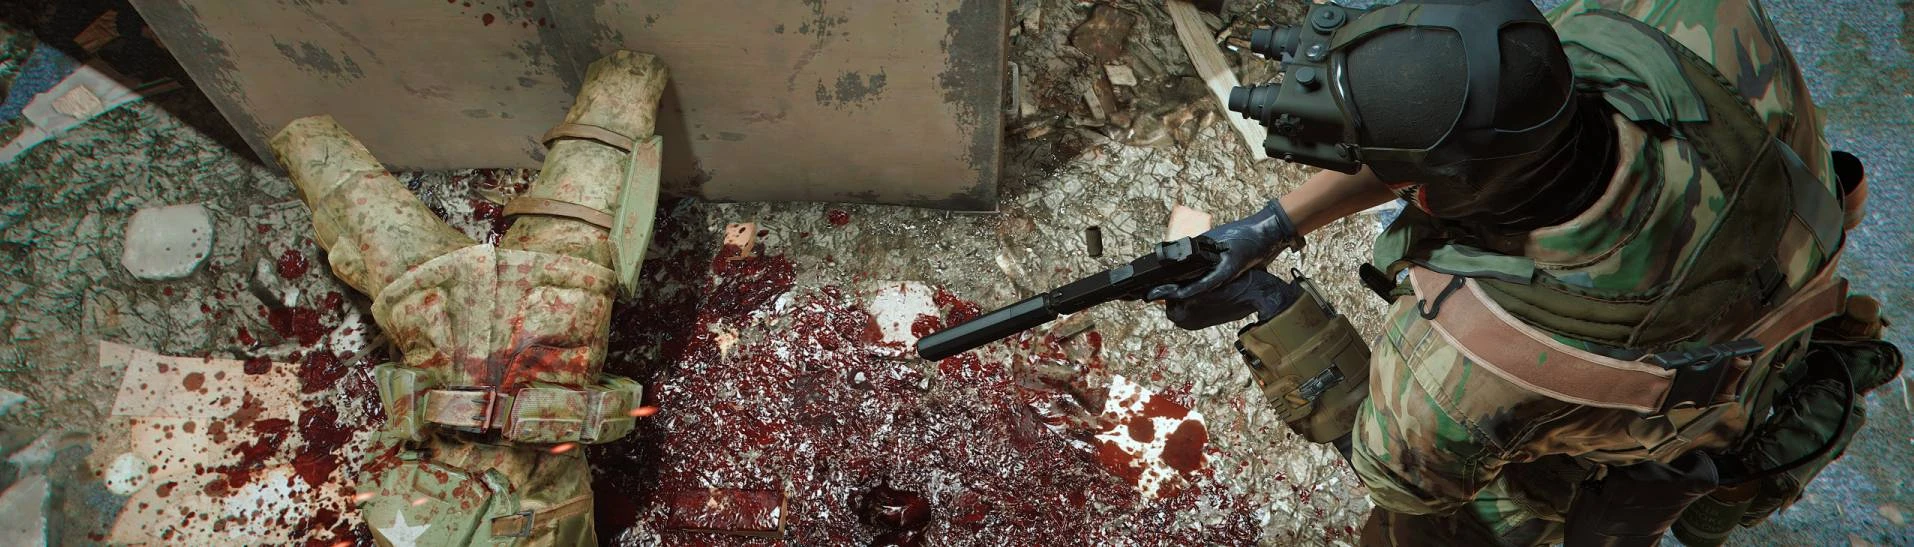
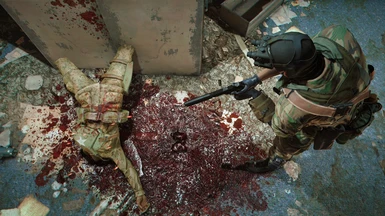
Enhanced Blood Textures Download and install the main and update file.
Below NPC's mods are for females only, and are optional.
In my opinion Fallout 4 vanilla NPC's don't have such ugly potato faces and bodies as Skyrim NPC's have. So if you don't care about (female) NPC's, its fine to skip the below mods.
Skyrim had the Bijinn overhaul mods which were all beautiful all in one replacers! With Fallout 4 we unfortunately need to install a couple of more mods first, but the Wasteland Heroines Replacer is also a great all in one for female NPC's! Male NPC's look ok enough for me in Fallout 4, so I wont be installing any mods for them. If you want to install some male NPC mods, go ahead of course.
Appealing Moles
Commonwealth Cuts - KS Hairdos - ApachiiSkyHair
deLuxe Makeup Download both files
Female Neck Tweaks Download Editor's Choice v2
The Eyes Of Beauty Fallout Edition Download the all in one edition
Valkyr Female Face and Body Textures Download the main body texture, and a matching face texture for your player.
Please note, if you want to install the CBBE Body type, you need to do that first and then use this body texture instead! Use the face texture still from Valkyr.
Or find a mirror for the deleted FSM Body Textures - CBBE Texture Mashup mod. (removed from Nexus)
Then download and install Wasteland Heroines Replacer and Presets All in One. (The regular main file with DLC).
It is possible that some of the above mods still get updates, and its easy to have a newer .esp plugin which is not compatible with this mod. For that make sure that the .esp file on the right is not giving a red ! mark, else it is missing required master files, and its not working correctly anymore. Hover over with your mouse cursor over the plugin to see what is missing. Make sure to fix this first before launching the game, or else this will crash the game for sure! I will try to have the install info as up to date as best as I can.
Armors and weapons (for players and NPC's)

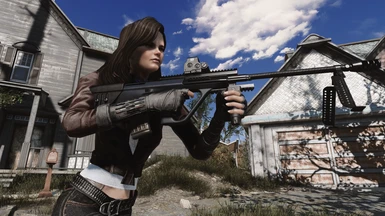
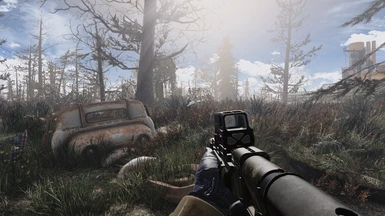
Guns, guns, guns!
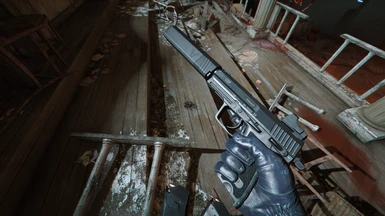
The custom armors, but especially custom gun mods we nowadays have for Fallout 4, make all the difference in the world for playing this game in 2022! For me Fallout 4 just plays WAY better with these modern gun mods, and the animations/sounds/reloads are WAY more satisfying than the potato vanilla versions. So even while these mods are optional, do yourself a favor and install them!
Starting with armors:
Armor and Weapon Keywords Community Resource (AWKCR) - Update 22/Jan/2022 apparently this mod is not needed anymore nowadays and is actually more bloatware than it does any good. So you can skip this mod! Thanks to user TheGodFormerlyKnownAsJohnX for explaining this to me.
Armorsmith ExtendedDownload the main version
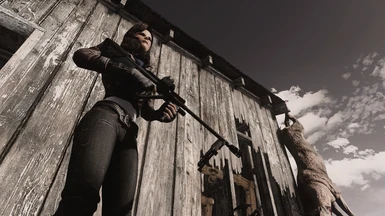
All below armors are very cool HQ lore friendly armors! Check the screenshots to see what they look like.
BOCW Outfit Pack
Biohazard Suit
Private Military Company - PMC
CROSS InstituteExpeditionarySuit
Cod Modern Warfare 2 Rangers Armor
Just another Piper OutfitMuch more HQ and interesting outfit if you are going to have Piper around as a follower.
Make sure you select the correct body type you are using. (vanilla or CBBE)
More armors? Or if skimpy/non lore friendly armors are more your thing, start browsing at the Fallout 4 Nexus armors or clothing section!
Weapons:
All these weapon mods will work out of the box if you install the scopes framework mod and tactical reload mod.
Scopes Framework
Tactical Reload Tactical reload allows you to use the realistic way of reloading when there is at least 1 bullet in the chamber. This means that you have the correct reloading animations instead of 1 long. Download main version.
Are you using an AMD GPU? Then also install the AMD patch per weapon mod that offers this!
Combined Arms - Modern Weapon Pack Download the main file and the patch file
SIG MCX - Assault Rifle Download the main file, patch file, and tactical reload patch
Glock 19x - Pistol
HK G3 - Battle rifle Download the main file, patch file, and tactical reload patch
IMI Uzi - Smg Download the main and patch file
BT APC9 - MP9 Combo Download the main and patch file
FN SCAR-H - Battle rifle Download the main file, patch file, and tactical reload patch
LMT M203 - Grenade Launcher Download the main and patch file
Springfield Armory M1A
GIAT FAMAS
MW - MP5 Submod
MWM4 - M4A1 Download the main and the 2 patch files
More weapons? Then Start browsing at the Fallout 4 Nexus weapons section!

Installing LODS and final testing
We are reaching the end of this tutorial! But first there are a couple of things we need to do before we can finally jump into game.
The first thing is installing the LODS for the distant objects and landscape. The reason why you need custom LOD, is because else you get ugly vanilla LOD which pops into the modded objects/landscape once you are getting close. (Needless to say this looks very weird and breaks immersion a lot.)
While in the 2021 Skyrim Graphics tutorial all Mod LODS looked great, this time I had to really generate the LODs with help of the luxor8071's LOD generating guide. Good thing for you is that I did generate and pack the LOD already based on all the current mods, so I saved you that work. Please notice that he LOD is also based on The ''Option: A Forest + Grasslands'' combination Is your LOD still not that looking great? Than you can run the procedure yourself here.
PredCaliber 2022 tutorial LODs - Download and install with MO2.
**Update 22/Jan/2022**: Luxor contacted me, and explained me that the LODS are also included in his summer forest mod! So did you pick option 4: Luxor's summer forest mod, dont download this LOD pack, and also there is no need for LOD generation since they are included!
Making sure Steam does not perform any updates anymore
For some reason, Steam/Bethesda still sometimes apply a minor update from time to time on Fallout 4. Even when I have no idea what they did update, (can't find any patch notes about it) we don't want our Fallout 4 to be updated anymore! The reason for this is that F4SE and some other mods can stop working, and need to be updated again, and that can take days.
Yikes! So, make sure to disable updates in Steam. Do that by going to Steam, rightclick Fallout 4 , select properties, updates, and select only update this game when I launch it. We will launch game only with F4SE from MO2, Steam does not see that as a 'game launch' since Fallout.exe or Fallout laucher.exe are not being launched.
Setting ''only update this game when I launch it'' in Steam: (screenshot is from Skyrim:SE, but works the same way for Fallout 4)

Almost done! Doing some last checks ingame
It is best practice to reboot your PC one more time to prevent MCM and other issues. Then start Steam, and Mo2. Launch Fallout 4 with MO2/F4SE, and go ingame to your tutorial/test savegame. Lets perform the following checks:
Run around in the game to check FPS performance. City and outdoor areas usually have the biggest impact on FPS, and indoor locations should be smooth as butter. The easiest way to test everything, is with the following console commands. (Only do this in your test/tutorial save game since it is cheating obviously) To make your life easier, use the ~ key, and type in the following console commands:
tgm-God Mode
tdetect -NPC's and monsters AI will be disabled against you, and they will not interact/attack with you
tmm 1 -All map markers are visible, so you can fast travel to all places in the map.
Optional of course, and only do this in your tutorial/test save game!
All looks good, and runs solid? Great! Then load your old savegame or start a new one! :)
Having poor FPS? You might want to switch to ''high settings'' in the Bethini part in part 1. Still poor FPS? Then lower some of the sliders to see what difference it makes in game. If you have the recommended specs you should be fine.


Wohoo!! You have come a long way, but finally you can be proud of a fully modded Fallout 4! Now it is time to play the game instead of constantly modding it!
Questions? Want to hang out with an awesome community? Want to see and share your screenshots of the game? Then join our awesome Discord server! We would love to see you there!

Liked the guide? then leave a comment here or on Discord! Would be greatly appreciated!
And if you really liked, it you can donate with the button below. :) Thanks big time if you do!
I am sorry to inform this Wabbajack is out of date and I will not be updating this anytime soon anymore. Please stick and browse other Fallout 4 modlists and guides, or browse Wabbajack directly.
I am really sorry about this, but I went trough some horrible shit the last 2 years that I kinda lost my appetite to mod anymore.
What also doesn't help is apparently an incredible toxic Fallout 4 modding community when the game gets updated and it breaks modlists.
So thanks for the supporters over the years, you have been amazing! And a big middle finger to the haters.
This Ultimate Graphics Guide is also available for Skyrim Special Edition/Anniversary Edition here!
----------------------------------------------------------------------------------------------------------------------------------------------------
The 2.0 version is now released with Wabbajack auto-installer!
Version 2.0 is a major improvement over the old 1.2 version, with the following features:
- Better graphics and ENB.
- Better framerate and stability. Super smooth FPS/performance in comparison with the old modlist.
- Better LOD. Also built in LOD in the Modlist.
- No more external tools needed for tweaking. Everything is done already in the built in Mo2 ini files.
- Better overview of what has been installed with modlist spacers in MO2.
- Easier to install own mods. Also easier to de-select the mods you don't want. (like modern weapons/armors)
Fixes:
- Fixed micro stutters when switching weapons.
- Fixed performance drain in some cities.
- Fixed LOD inconsistency.
- Fixed stability and many CTD issues.
Want to see which mods are included first before installing? I have an Excel list in the files section with all mods, load orders, links, etc from this list.
Also remember you can disable all mods you don't like in the end like modern weapons/armors with just a simple mouse click. But also Armorsmith Extended or Armor Keywords since all these mods seems to be a very hot discussion all the time in the comment section / Discord. Tip for mod makers: Dont make it a hard requirement please!
-----------------------------------------------------------------------------------------------------------------------------------------
Please click and open the thumbnail screenshots to get a better view on the texture quality!
Wabbajack auto-installer? What is that?
Wabbajack is a tool that lets you install automated pre generated big mod lists.
Normally before Wabbajack the manual installs always took a huge amount of time since people had to download every individual mod, and I had to explain how to do the full guide install mod by mod. This Wabbajack list is an auto installer for more or less 98% of the entire modlist we are going to use, so this means the install/modding effort has been drastically reduced compared with the previous tutorials! After the Wabbajack only a few manual steps have to be done which can be done in 5-10 mins.
Welcome to 2022/2023!
It is pretty hard to believe, but Fallout 4 already dates back from 10 November 2015, so in 2023 that makes this game 8 years old already!
I was never really impressed with Fallout 4's original graphics and animations, and now 7/8 years further I think this game really needs a 2022 graphics overhaul to keep up. It is a good moment to start modding now in 2022/2023, since a lot of great mods have been released in the last 2 years or so which really can provide next gen graphics like we have seen in modded Fallout 4.
As an experienced Skyrim modder, the world of Fallout 4 was pretty new for me, but there are also many, many similarities when it comes to modding. You have Mo2, script extenders, ENB's, texture mods, lighting mods, weather mods, Body/NPC mods, etc etc. However there are still some differences that are not that straight forward, and I had to Google a lot of issues myself during the installation of some mods. I hope with this 2022 ultimate graphics tutorial to save you from all the troubleshooting, and allow you to simply just follow instructions from this guide. Apart from a written guide, every part also has video tutorials!
Did you also follow my Skyrim 2022 Ultimate graphics guide? Good news! This Fallout 4 2022/2023 Ultimate Graphics guide now also has an automated Wabbajack installer!
Some End Result videos:
Modlist review by DroppedIceCream :
This tutorial requires the Fallout 4 base game + All DLC !
Recommended/minimal system specs:
CPU: Recent(ish) i5 with decent clockspeed
RAM: 16GB
GPU: GTX 1080 ti
(or something similar from AMD. Note that in general AMD has a harder time running ENB's and other mods than Intel/Nvidia.)
HDD/SSD: +-150GB
Tested and works on Windows 10 and 11
So note that this guide is mostly focused on graphics/texture quality, and requires a good modern pc!
So yes, you do read this correctly! for guaranteed 60+ FPS with all these mods/ENB/ and 4k textures a GTX 1080ti is Recommended! And this is for 1080p/1440p. For 4k I would even recommended a RTX 2080 or better! I want to point this out on forehand to prevent disappointing framedrops on older hardware. Indoor locations are usually smooth as butter, but outdoor areas with a lot of vegetation could sometimes be very performance heavy with this mod list.
If you have not have these recommended specs, then see if you are happy with the framerate. A GTX 1070 in example might get 60 fps indoors, and 45+ outdoors. (For me personally that would be fine, but again that is up to you.)
(Info about the author for the ones who care)
I am Roderick, (PredCaliber), born in 1986, and I am from The Netherlands. I have been playing videogames since the end of 80's, and modding games and creating stuff with its editor since the first Unreal back in 1998. I am probably mostly known from my Youtube channel which is also mostly still based on Skyrim Modding, with a lot of other content during the years. If you are interested, check out the YT channel here.
I have always been creating Skyrim (SE) mod lists every year, and it seems I am one of the few who also does create tutorial videos to completely explain how to install/configure everything from the mod lists. These videos became very popular, and that is mostly what made my Youtube channel grew to what it is today (62k subs and 6000 Discord members at the time of writing. 01/Jan/2022) I bought Fallout 4 at the release, but to be honest I was not really impressed when playing it. 6 years later in the end of 2021, I finally decided to REALLY start trying modding Fallout 4 which was familiar terrain for me because of Skyrim modding, and for the first time I non stop played the game! With graphics (and weapon) mods, this game feels so much different.
New to modding or just lazy?
This video covers all the instructions!
Preparation
Make sure your Fallout4 is clean before you start! (If this is your first time modding, you can skip this.)
Steps to uninstall properly:
Get rid of your current mod manager
Make sure to first uninstall all mods from your mod manager you are using. (Nexus, Vortex, or Mod Organizer). In case of Mod Organizer(2) the other data you want to have removed might be located in: X*:\Users\*your User*\AppData\Local\ModOrganizer Where X is your Windows drive, (usually C) and *your User* is your windows user account. In my case: C:\Users\PredCaliber\AppData\Local\ModOrganizer
Get a clean version of your Fallout 4.
Go to your Steam, right-click Fallout 4 and select uninstall. Delete the remaining stuff in your \Steam\steamapps\common\Fallout 4 folder. (Save the screenshots if you created some ;) )
Delete old ini files
Go to your X:\Users\*your user*\Documents\My Games\Fallout4 , and delete everything there. If you do NOT have the Steam version, just to be sure to make a back-up of your save game folder. If you have the Steam version Steam should automatically create a backup of your save games in the cloud.
Installing Fallout 4 clean
Then once you have a clean sheet and no trace of an old modded Fallout 4, you can now safely install Fallout 4 again from Steam. Please do not install it in X:\Program Files (x86) or any C:\Windows folder!
Start Fallout 4 at least once + Fallout 4 launcher settings
Set everything to max settings in the Fallout 4 launcher, and start Fallout 4 at least 1 time to generate ini files.
Start the game at least once to create required .ini config files. If you have used mods before this tutorial, you most likely have a modded save game as well. If so, then preferably start a new game to be sure you wont get any compatibility issues. Use that new empty save game to test your mods until the end of the tutorial to be 100% sure you can easily troubleshoot if something might go wrong. (At the end of the tutorial feel free to load your old savegames of course.)
Installing the Wabbajack list
Experienced modders, just follow the steps below. New modders, lazy people, and everyone else, just watch the video at the start of the tutorial. Its easier!
Installing Wabbajack
Download the Wabbajack setup file here.
Download the Wabbajack list from the files section on this modpage. (Download link in a new tab here)
Create a new folder somewhere, where you will download and save the Wabbajack.exe.
Please note: Don't create the folder in the Fallout 4 game folder, Program files (x86), C:\Program Files, C:\Users or C:\Windows. Create a shortcut to this folder on your desktop, and create a shortcut to your Fallout 4 game folder as well for quick access. (So your game folder is the \Steam\steamapps\common\Fallout 4 folder. )
Then run the downloaded Wabbajack.exe.
Locate Fallout 4 and when ready to install the Wabbajack, click on the big 'install from disk'' button to download the modlist file. In Installation Location select an empty folder that is NOT under C:\Program Files, C:\Users, or C:\Windows.
Do not install this list in your Steam folder, Fallout 4, or a folder that contains Wabbajack.exe.
The downloads location will auto filled in. This can be changed if preferred, then click the button with the Play Arrow to begin the process.
Accept the Nexusmods API request if asked, after that Wabbajack will now automatically download and install every necessary mod.
If you don't have Nexus Premium, you'll have to manually click download with mod manager for all the mods, but Wabbajack will still install them. When Wabbajack completes you will see either a green Installation Complete screen or a red Installation Failed screen. If successful, proceed with the manual steps after Wabbajack section, if it fails then don't worry and please note the following below:
If your Wabbajack install fails:
It for sure is possible and even normal sometimes that the Wabbajack install fails a couple of times which can be a bit frustrating. This can happen for example because a certain mod link times out or is temporarily not available to connect. But don't worry, everything is cached so you don't have to start all over again with indexing/compiling if Wabbajack fails. Usually the issue is fixed by just restarting Wabbajack, and run the installer again. Good tip is to go to the settings menu, (its the little gear icon in the upper right corner next to the version nr) and check the box: Use network workaround (slow) . This is more reliable and helps for a lot of people. If you are still experiencing errors when installing, click the logout button for NexusMods in the settings menu, wait 5 seconds, and log back in. The last thing you can try is a PC reboot and then try the above steps again.
Once finally successful, you should see a complete screen like this:
DONT START THE GAME YET, IT WILL CRASH WITHOUT THE NEXT STEPS AND MANUAL MODS! SO MAKE SURE TO FOLLOW THE BELOW SECTION FIRST!!!!!!!
Manual steps after Wabbajack
Experienced modders, just follow the steps below. New modders, lazy people, and everyone else, just watch the video. Its easier!
Open the following :
1: Your Fallout4 main game folder located at \Steam\steamapps\common\Fallout 4
2: The MO2 program in the installed files from the Wabbajack, called ModOrganizer.exe , and create a shortcut to it
3: Create a folder somewhere, and name it manual mods.
1: Installing Fallout 4 Script Extender (F4SE)
Download F4SE from here, and install it like you normally would install F4SE. (Watch the video if you don't know how)
2: ENB files
Download the following mods, and copy the files to your main game folder:
- Download the ENB binaries here, then open the archive and copy and paste d3d11.dll and d3dcompiler_46e.dll to your main game folder.
- Download Reactor ENB for Fallout 4 here. Also here copy the files from the archive to your main game folder.
3: Last steps
- Reboot your PC just to be sure to have cleaned everything from your Windows tasks and RAM.
- Make a shortcut to your ModOrganizer2.exe from the installed Wabbajack list, since this is the file we are going to use from now on.
- Launch the Fallout 4 launcher again in MO2, and make sure all settings are back at max again.
- From now on, only start your game from there with F4SE. If you dont know what I am talking about, check the video tutorial.
Good practice now is to make sure to disable Steam overlay, and make sure you put the Fallout 4 auto-update on hold. The reason for this is that F4se and some other mods will stop working, and need to be updated again, and that can take days. Yikes! So, make sure to disable updates in Steam. Do that by going to Steam, rightclick Fallout 4 , select properties, updates, and select only update this game when I launch it. We will launch game only with F4SE from MO2, Steam does not see that as a 'game launch' since Fallout4.exe or Fallout4 laucher.exe are not being launched.
Setting ''only update this game when I launch it'' in Steam:
Thats it!
Liked my list? Then please either endorse this page, or subscribe on my Youtube channel!
If you really like it a lot, then you can also leave a small donation :)
Below the old manual tutorial if you want to read it for legacy reasons. Please note: This is old and not supported/needed anymore!!!
--------------------------------------------------------------------------------------------------------------------------------------------------------------------------------------------------------------------------------------------
Legacy/ Old Not needed anymore
Any all in one download pack like you had on the Skyrim:SE/AE tutorial?
Unfortunately I am not going to do an all in one's anymore since I had a mod maker complain about it, and apparently some people got (false) ISP warning from downloading the AIO torrents. I don't want to risk any potential lawsuit, (you never know how crazy people can be) so better safe than sorry.) Hope you will understand this!
Explanation about the tutorial
Ah yes, we have a tutorial to do haven't we? Well, let me explain how it works. Every part is categorized in the below categories. Every category has a written explanation, and there is also a Youtube video explanation. It is recommended to follow the videos for your own ease, and you are more sure you are not forgetting anything. Experienced modders can of course just download and install the mods.
I will not handle animations or gameplay mods. These can be very subjective, so feel free to add them on top of this mod list. However I think that the more recent realistic weapons already make a huge difference in the Fallout 4 experience, so I would definitely recommended those!
If you liked my tutorial, and if you would recommend it to other people please don't forget to endorse it! Thank you! :)
Tutorial modding order:
- Essential Tools And Setup
- Essential Mods And Fixes
- ENB And Big Overhauls
- Player And Creature Mods
- LODS, And Final Testing
Can I support/thank you?
That would be greatly appreciated! To give you an idea, I literally spent 100th of hours for this guide. that includes mod picking and sorting, the tutorial writing here on Nexus Mods, checking mod compatibility, thoroughly stability testing for the final game, and doing everything over again by recording tutorials how to explain in video tutorials to do the full installation. Not to mention the almost full time job I have with support for this on YouTube, this page, and Discord. :) So a small donation would greatly be appreciated! Donations can be done here.
If you don't want to spend any money, then please consider subscribing on my Youtube channel here. That will help me out big time as well!
This is the most boring but also the most essential part. Once you have completed this, the rest will be relatively simple. So lets get this over with!
Best practice is to always start with a fresh and clean install of Fallout 4. If you have never modded your Fallout 4 then great! You are good to go. If you already did mod Your Fallout 4 make sure to properly uninstall everything.
Steps to uninstall properly:
- Make sure to first uninstall all mods from your mod manager you are using. (Nexus, Vortex, or Mod Organizer). In case of Mod Organizer(2) the other data you want to have removed is located in: X*:\Users\*your User*\AppData\Local\ModOrganizer Where X is your Windows drive, (usually C) and *your User* is your windows user account. In my case: C:\Users\PredCaliber\AppData\Local\ModOrganizer (I am pretty sure you know what I am talking about andget the idea, so I will not refer to this anymore from now on. :) )
- Go to your Steam, right-click Fallout4 and select uninstall. Delete the remaining stuff in your \Steam\steamapps\common\Fallout4 folder. (Save the screenshots if you created some ;) )
- Go to your X:\Users\*your user*\Documents\My Games\Fallout4 , and delete everything there. If you do NOT have the Steam version, just to be sure to make a back-up of your save game folder. If you have the Steam version Steam should automatically create a backup of your save games in the cloud.
If you dont want to completely uninstall your Fallout 4, you can Google ''how to make Fallout 4 vanilla again'', but its recommended to uninstall it completely.
Installing Fallout 4 clean:
Then once you have a clean sheet and no trace of an old modded Fallout 4, you can now safely install Fallout 4 again from Steam. Please do not install it in X:\Program Files (x86)!!! Any other folder is fine.
- Start the launcher, and set everything to max settings in the launcher.
- Start the game at least once to create required .ini config files. If you have used mods before this tutorial, you most likely have a modded save game as well. Its better to start a new game, and create a temporary save game there. But you can skip that for now, since In the next part we are going to install a mod which lets you randomly start immediately somewhere on the map so you can skip the entire begin sequence of the game. So either do it now, or do it at the next part.
- Create a new folder somewhere where you will save your downloaded mods. This does not necessarily has to be the same drive where your game is installed. Create a shortcut to this folder on your desktop, and create a shortcut to your Fallout 4 game folder as well for quick access. (So that is the \Steam\steamapps\common\Fallout 4 folder. ) Keep both folders open during the tutorial, you are going to need them!
- Also create a new folder somewhere on the same drive where your Fallout 4 is installed, and name it 'modding tools'. We are going to place some modding tools there. Create a shortcut to your desktop as well. Also here not in X:\Program Files (x86)!!!
Mod Organizer 2 And non MO2 manageable mods
Do you already have Mo2 installed because of Skyrim Special Edition? Then you can simply just Fallout 4 as a new game from Mo2! I however would still recommend to download MO2 and install it as a portable extra version purely for Fallout 4. Its the best way to keep both games separated. If you also want to do that, follow the below steps.
- Download and install Mod Organizer 2 here. Run setup with default settings. Install it in your manually created modding tools folder. Its a bit confusing, but please note that from now on Mod Organizer 2 will save the installed mods by default in X*:\Users\*your User*\AppData\Local\ModOrganizer. Follow the rest of the installation menu. Watch or skip the tutorial at the end. Make sure you create a shortcut to the portable MO2 instance if you used a portable version, and name it something like Fallout 4 MO2 to keep things clear.
Total size will probably get about 80GB at the end, so please note that if you have installed everything on a SSD this can add up quite fast. . So make sure you have plenty of space available if you are using a smaller SSD! Its not needed to connect to Nexus if MO2 ask this. (we will add the mods ourself)
- Fallout 4 Script Extender (F4SE) - Download Current F4SE 1.10.163 - build: 0.6.21 7z archive , Open the archive, open the folder, and drag all files to your Fallout 4 main game folder. So your \Steam\steamapps\common\Fallout 4 folder. In MO2, (We will call Mod Organizer 2 MO2 from now on) click in the drop down menu in the upper right corner where Fallout 4, and the Fallout 4launcher are located, and click on edit. Click on the little plus icon, to ''add an executable'' and click ''add from file''. From there, browse to F4se_loader.exe.
So the location should be: \SteamLibrary\steamapps\common\Fallout 4\f4se_loader.exe
- It should look something like this, in this order of 1,2,3:

Now do the following:
- Close and restart MO2. Make sure to click the dropdown menu again, and select 'F4SE'. Start F4SE with the big orange 'run' button. Fallout4 should start now with F4SE. load your new started save game if created a new save game. If it loads without issues, great, close the game.
- From the drop down menu now select Fallout launcher, (not the main game) and run it. (Yes, again) Make sure that all settings are still on the highest settings and have not reset for some reason. Make sure you save the settings if they are changed back to default to the highest settings again.
- Switch back to F4SE, and create a shortcut to your desktop if you like. (Under the big 'run' button)
FO4Edit-use FO4EDIT to clean your plugins.
While it is highly recommended to clean your plugins with Fo4edit, I have to be honest that I did not do it for my Fallout 4 since it is not as super heavily modded as my Skyrim:SE is. I now have over 70 hours in my modded Fallout 4, and crashes are very rare for me. I think most crashes I actually got are from me being a lazy and stubborn pig, and constantly using the quick save function. (DONT BE LIKE ME! ALWAYS USE MANUAL SAVES, AND DONT USE THE QUICK SAVE FUNCTION!) To be honest I dont know the exact technical reason behind it, but I have seen modders mention multiple times that using quick save with a modded Fallout 4 is a very bad idea and can screw up your entire save game eventually.
Regarding FO4EDIT, feel free to skip it like me if you dont have crashes, but if you are going to add a ton more mods on top of this modlist, or you start getting more crashes, Use FO4Edit to clean your plugins. (Not making a good example doing it like this, In the end best practice is of course to clean your masterfiles. :$ )
BethINI- Ini Tweaks
Download the Main (stand alone) file, and extract the download to your created modding tools folder. Then run the BethINI.exe and select Fallout 4.
Select Ultra Preset and Recommended Tweaks, then follow these screenshots. However notice that Ultra settings can have a lot of FPS impact, so if you encounter FPS dips in the end lower to high settings. Normally ultra settings should not be a problem with high end specs, but I think the hi-res textures and other mods we are going to install later hit hard on FPS for some reason in combination with ultra settings. So again, if you do notice ultra settings hits too hard on FPS, use high settings instead!
Follow the below screenshots, and adjust where necessary.
1: Make sure you change the ''Mod Organizer'' path to your Mod Organizer location! For the rest, check the other settings.
2: Set your resolution, select ultra or high preset, select Bethini Presets, and select Recommended Tweaks as well.
3: Field of view is recommended to set to 90 or 100, most other settings will be determined by high or ultra preset settings. Motion blur, depth of field, and bokeh can activated but will mostly be overwritten anyway by the ENB presets later on. Godrays and lens flares are optional, but look nice in combination with the ENB effects imo. Up to you. You can drop shadow resolution from 4096 to 2048 to improve FPS.
4: These settings/sliders are based on your high or ultra preset. Slow on FPS even in high settings? You can try to lower some values in the sliders here. Do not mess around with uGridsToLoad unless you are only recording or screenshotting since this can make the game unstable!
5: Grass settings. Leave them for now, or adjust them later if you want to install/mess around with a specific grass mod.
Now that we finally have setup Fallout 4, we can start adding more essential mods and fixes in MO2. A lot of things might be familiar for Skyrim(SE) modders already as well like it probably was as well in part 1. Download Install the mods in the below order, and just download the main file unless instructed otherwise.
Installing mods (Mod Organizer 2 manageable mods)
We can now finally start with adding mods to MO2! This will be the same process we are going to do a lot from now on, so pay attention. For every mod this is the way: Download the mods manually to the mods folder you did create somewhere at the start of the tutorial. Best practice is to put numbers in front off the mods so you know in which order you need to install everything if you are losing track of all your downloaded mods.
So in example: (Mods are from Skyrim:SE, but MO2 works the same for Fallout4)
Then:
- Click on the ''install new mod from archive folder'
- Click on manual
- Make sure the folder/file structure looks good by checking the message: the content of <data> looks valid. In most cases this is not. Then you need to right-click the specific data folder, and choose 'set as data folder'. I would suggest you check the tutorial videos if you are unsure
After that, activate the mod in the left panel, and after that activate the .esp (if available) in the right plugins section of MO2.
So got that? Then lets start installing the following mods with MO2!
- Unofficial Fallout 4 PatchCan be skipped if you use the Horizon gameplay mod, since a lot will be included already.
- Mod Configuration Menu
- Address Library for F4SE Plugins
- Baka Wait AnywhereBrings back the good old ''wait'' key, so you can skip time anywhere like in Skyrim. Set the hotkey in the MCM menu.
- HUDFramework
- Immersive HUD - iHUD
- Weapon Debris Crash FixOnly needed for Nvidia RTX cards! Fixes the weapon debris CTD when using a NVIDIA RTX card.
- Reverb and Ambiance Overhaul Great audio overhaul, makes weapon sounds more realistic , and makes a huge difference! Download the all DLC file.
- Start Me Up - Alternate Start and Dialogue OverhaulDownload the Normal (short) dialogue prompts version. This mod does the same as Random Alternate Start for Skyrim (SE/AE), and will allow you to start a quick game, or just randomly start anywhere on the map. Great for testing Fallout4 Script Extender, and great to create a new (temporary) game for testing purposes.
Update: 22/Jan/2022: Better mod is: Start Me Up Redux. But If you just want a quick start, just skipping prewar scene to the vanilla story, the easiest mod would be: SKK Fast Start new game
So a great moment now to test your Fallout 4 and create a new (temporary) game to use for the rest of this tutorial!
With the Start Me Up - Alternate Start and Dialogue Overhaul mod, now start a new game, and create a new save. Use that new empty save game to test your mods until the end of the tutorial to be 100% sure you can easily troubleshoot if something might go wrong. (At the end of the tutorial feel free to load your old savegames of course.)
Good, all the basic and boring stuff is out of the way, time to add the mods that will make the biggest difference in graphics!
This includes installing ENB and Reshade. During these 7 years of Fallout 4 modding, there are many, many ENB/reshades available nowadays with also many, many options and looks. The biggest criticism at Youtube Showcases in general is usually always ENB related. Some want a more realistic look, some want a more fantasy look, some want a more dark ENB, and some want a more light/vibrant ENB. Bottom line, its usually very hard to please everyone with 1 ENB/weather combination!!! So I would like to point out, if you really want to install a different ENB/weather mod combination than on the list, please do that since it is your game.
However, If you want to have the exact same graphics as on the screenshots and videos, then please follow the below instructions and mods!
So, what are we going to install then if its hard to please everyone?
I checked a lot of modern ENB/Reshade combinations for Fallout 4 the last couple of months, and I can say I really like this one from LK the most from what I have seen so far. A good thing with NAC-X, (A mod we are going to install as well) is that you can actually change the look and feel of the game even more with different looks / presets if you like. Give a more realistic or fantasy feeling can be achieved with built in filters and even weather effects!
So lets get to work:
- ENB binariesDownload the latest version, and only copy d3d11.dll and d3dcompiler_46e.dll to your Fallout 4 main game folder.
- ReShade Download the latest version, and run the .exe file. Once done select click here to select a game and manage its ReShade installation. Then
click on browse , and browse to your Fallout 4.exe. For rendering API, select: Direct3D 10/11/12.
- NAC-X Legacy Edition A weather overhaul mod, but much, much more than that! Can be installed with MO2.
- Aeonic 2021 - FO4 PhotorealismCopy all files in the Fallout 4 main game folder. Overwrite when asked in Windows.
- Fallout 4 - LK ENB & ReShade Same as above, copy all files in the Fallout 4 main game folder. (you can skip the screenshots)
Mirror link (if above link is down)
Overwrite when asked in Windows. Take notice its a Mega.NZ link, if the link is down because of bandwidth check our Discord here for mirrors.
I know Its a bit strange and unusual to install 2 ENB/Reshades (Aeonic and LK ENB/Reshade) , but apparently Aeonic is a required file for LK ENB/Reshade according to its readme file. For that, lets just install Aeonic first as requested by the LK ENB's readme file.
Texture overhauls
Texture overhauling is going to be a bit different than normal. We are not going to use many multiple texture overhaul mods for landscape, buildings, interior, etc, but this time just 1 big mod which contains over 60GB of fantastic 4k HD textures! The Fallout 4 HD Overhaul mod by luxor8071 is just a fantastic all in one HQ texture pack, which for me has the best looking textures and covers pretty much EVERYTHING. So the downside, yes, its around 60GB! So be prepared if you have a slow download speed. :'(
Visible Galaxy 4k and FrameworkRequired for the Fallout 4 HD Overhaul mod, download and install first
Fallout 4 HD Overhaul Download and install all main files, and also the Galaxy Milky Way 8k Skystars 4k mod from optional files
Landscape overhauls
If you like the original vanilla landscape, and you don't want to change this for lore reasons, then you can skip the following landscape options. (However, I go for: ''A forest'' and ''grasslands'' since I really like the combination)
Option 1: No Mods. As described above, Install nothing and leave the landscape as it is in the vanilla game. (Textures from the landscapes are overhauled already. Please note that you need to compile the LOD's yourself if you want to use this option!)
Option 2: My pick, because I think it just looks great! Keep in mind, it will also result in more big forest areas which some might not find lore friendly. The all in one LOD pack I did generate for this mod list is also based on this pick!!
A Forest
Grasslands
Option 3:Probably the most lore friendly outdoor overhaul, but also a bit boring in my opinion. Please note that you need to compile the LOD's yourself if you want to use this option!)
Boston Natural Surroundings
Option 4: A very lush and green overhaul. Not really lore friendly. Check screenshots first Made by luxor8071. (the same author as the Fallout 4 HD Overhaul)
Luxor's Summer
**Update 22/01/2022**: Luxor contacted me, and explained me that the LODS are actually included in the mod! So no need for LOD generation!
Do you prefer a different landscape overhaul? Then go ahead and pick yours!
Now lets run the game, and lets do the following. Please make sure that at first startup with ENB and Reshade, the game can show a black screen during startup for 1 min or so! Please be patient!
In game press the 'Home' key at your keyboard to open the Reshade menu, and select "LK-ReShade-Preset-2021-10.ini" in the ReShade menu.
In the MCM menu, we now need to set a hotkey to open the NAC-X menu. Then open the NAC-X menu, and load the built-in patch for ENB.
Good news is that we are now done already for 95% with our graphic/visual mods! So this will give you a good idea what you can expect for FPS performance.
Creature overhauls, weapons, armor, and NPC overhauls.
Wasteland Creatures Redone Covers most creatures already. Select everything except Deahclaws
Deathclaws HD remastered
For me personally I did not find any real other interesting creature texture overhauls that has not been covered already by the Fallout 4 HD Overhaul or Wasteland creatures redone mod.
Enhanced Blood Textures Download and install the main and update file.
Below NPC's mods are for females only, and are optional.
In my opinion Fallout 4 vanilla NPC's don't have such ugly potato faces and bodies as Skyrim NPC's have. So if you don't care about (female) NPC's, its fine to skip the below mods.
Skyrim had the Bijinn overhaul mods which were all beautiful all in one replacers! With Fallout 4 we unfortunately need to install a couple of more mods first, but the Wasteland Heroines Replacer is also a great all in one for female NPC's! Male NPC's look ok enough for me in Fallout 4, so I wont be installing any mods for them. If you want to install some male NPC mods, go ahead of course.
Appealing Moles
Commonwealth Cuts - KS Hairdos - ApachiiSkyHair
deLuxe Makeup Download both files
Female Neck Tweaks Download Editor's Choice v2
The Eyes Of Beauty Fallout Edition Download the all in one edition
Valkyr Female Face and Body Textures Download the main body texture, and a matching face texture for your player.
Please note, if you want to install the CBBE Body type, you need to do that first and then use this body texture instead! Use the face texture still from Valkyr.
Or find a mirror for the deleted FSM Body Textures - CBBE Texture Mashup mod. (removed from Nexus)
Then download and install Wasteland Heroines Replacer and Presets All in One. (The regular main file with DLC).
It is possible that some of the above mods still get updates, and its easy to have a newer .esp plugin which is not compatible with this mod. For that make sure that the .esp file on the right is not giving a red ! mark, else it is missing required master files, and its not working correctly anymore. Hover over with your mouse cursor over the plugin to see what is missing. Make sure to fix this first before launching the game, or else this will crash the game for sure! I will try to have the install info as up to date as best as I can.
Armors and weapons (for players and NPC's)
Guns, guns, guns!
The custom armors, but especially custom gun mods we nowadays have for Fallout 4, make all the difference in the world for playing this game in 2022! For me Fallout 4 just plays WAY better with these modern gun mods, and the animations/sounds/reloads are WAY more satisfying than the potato vanilla versions. So even while these mods are optional, do yourself a favor and install them!
Starting with armors:
Armorsmith ExtendedDownload the main version
All below armors are very cool HQ lore friendly armors! Check the screenshots to see what they look like.
BOCW Outfit Pack
Biohazard Suit
Private Military Company - PMC
CROSS InstituteExpeditionarySuit
Cod Modern Warfare 2 Rangers Armor
Just another Piper OutfitMuch more HQ and interesting outfit if you are going to have Piper around as a follower.
Make sure you select the correct body type you are using. (vanilla or CBBE)
More armors? Or if skimpy/non lore friendly armors are more your thing, start browsing at the Fallout 4 Nexus armors or clothing section!
Weapons:
All these weapon mods will work out of the box if you install the scopes framework mod and tactical reload mod.
Scopes Framework
Tactical Reload Tactical reload allows you to use the realistic way of reloading when there is at least 1 bullet in the chamber. This means that you have the correct reloading animations instead of 1 long. Download main version.
Are you using an AMD GPU? Then also install the AMD patch per weapon mod that offers this!
Combined Arms - Modern Weapon Pack Download the main file and the patch file
SIG MCX - Assault Rifle Download the main file, patch file, and tactical reload patch
Glock 19x - Pistol
HK G3 - Battle rifle Download the main file, patch file, and tactical reload patch
IMI Uzi - Smg Download the main and patch file
BT APC9 - MP9 Combo Download the main and patch file
FN SCAR-H - Battle rifle Download the main file, patch file, and tactical reload patch
LMT M203 - Grenade Launcher Download the main and patch file
Springfield Armory M1A
GIAT FAMAS
MW - MP5 Submod
MWM4 - M4A1 Download the main and the 2 patch files
More weapons? Then Start browsing at the Fallout 4 Nexus weapons section!
Installing LODS and final testing
We are reaching the end of this tutorial! But first there are a couple of things we need to do before we can finally jump into game.
The first thing is installing the LODS for the distant objects and landscape. The reason why you need custom LOD, is because else you get ugly vanilla LOD which pops into the modded objects/landscape once you are getting close. (Needless to say this looks very weird and breaks immersion a lot.)
While in the 2021 Skyrim Graphics tutorial all Mod LODS looked great, this time I had to really generate the LODs with help of the luxor8071's LOD generating guide. Good thing for you is that I did generate and pack the LOD already based on all the current mods, so I saved you that work. Please notice that he LOD is also based on The ''Option: A Forest + Grasslands'' combination Is your LOD still not that looking great? Than you can run the procedure yourself here.
PredCaliber 2022 tutorial LODs - Download and install with MO2.
**Update 22/Jan/2022**: Luxor contacted me, and explained me that the LODS are also included in his summer forest mod! So did you pick option 4: Luxor's summer forest mod, dont download this LOD pack, and also there is no need for LOD generation since they are included!
Making sure Steam does not perform any updates anymore
For some reason, Steam/Bethesda still sometimes apply a minor update from time to time on Fallout 4. Even when I have no idea what they did update, (can't find any patch notes about it) we don't want our Fallout 4 to be updated anymore! The reason for this is that F4SE and some other mods can stop working, and need to be updated again, and that can take days.
Yikes! So, make sure to disable updates in Steam. Do that by going to Steam, rightclick Fallout 4 , select properties, updates, and select only update this game when I launch it. We will launch game only with F4SE from MO2, Steam does not see that as a 'game launch' since Fallout.exe or Fallout laucher.exe are not being launched.
Setting ''only update this game when I launch it'' in Steam: (screenshot is from Skyrim:SE, but works the same way for Fallout 4)
Almost done! Doing some last checks ingame
It is best practice to reboot your PC one more time to prevent MCM and other issues. Then start Steam, and Mo2. Launch Fallout 4 with MO2/F4SE, and go ingame to your tutorial/test savegame. Lets perform the following checks:
- MCM will probably go trough all the weapon menu mods. You can add items directly in your inventory to play around with.
- If not done already in the ENB section: Hotkey NAT-X , and run the ENB patch from NAC-X.
- In the MCM menu, set the Baka Wait Anywhere mod hotkey. (T was the default key in Skyrim and other Bethesda games)
- In the MCM menu, for the Immersive HUD mod, turn it on and you can set the hotkey in example to H. (great for playing/taking screenshots)
Run around in the game to check FPS performance. City and outdoor areas usually have the biggest impact on FPS, and indoor locations should be smooth as butter. The easiest way to test everything, is with the following console commands. (Only do this in your test/tutorial save game since it is cheating obviously) To make your life easier, use the ~ key, and type in the following console commands:
tgm-God Mode
tdetect -NPC's and monsters AI will be disabled against you, and they will not interact/attack with you
tmm 1 -All map markers are visible, so you can fast travel to all places in the map.
Optional of course, and only do this in your tutorial/test save game!
All looks good, and runs solid? Great! Then load your old savegame or start a new one! :)
Having poor FPS? You might want to switch to ''high settings'' in the Bethini part in part 1. Still poor FPS? Then lower some of the sliders to see what difference it makes in game. If you have the recommended specs you should be fine.
Wohoo!! You have come a long way, but finally you can be proud of a fully modded Fallout 4! Now it is time to play the game instead of constantly modding it!
Questions? Want to hang out with an awesome community? Want to see and share your screenshots of the game? Then join our awesome Discord server! We would love to see you there!
Liked the guide? then leave a comment here or on Discord! Would be greatly appreciated!
And if you really liked, it you can donate with the button below. :) Thanks big time if you do!