


0 of 0

About this mod
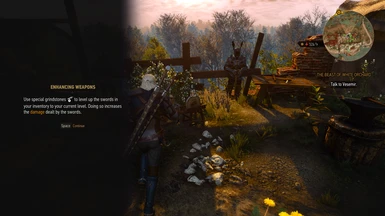
Using the Grindstone and Workbench (Armorer's Table) will level up all swords and armor in your inventory to Geralt's current level.
Buffs that were in the vanilla game have been discontinued.
Runeword "Preservation" restores item durability.
- Requirements
- Permissions and credits
-
Translations
- Polish
- Changelogs
- Donations
Available in both Next Gen and Old Gen. (Details of supported versions can be checked from the Main Files on the Files page.)
OVERVIEW
I didn't like the way Grindstone and Workbench worked in the vanilla game, so I decided to completely redesign them.
At the same time, we also succeeded in resolving some of the dissatisfaction with the leveling system.
DETAILS
CUSTOMIZATION
COMPATIBILITY
INSTALLATION
TRANSLATION
OTHERS
OVERVIEW
I didn't like the way Grindstone and Workbench worked in the vanilla game, so I decided to completely redesign them.
At the same time, we also succeeded in resolving some of the dissatisfaction with the leveling system.
- You can use Grindstone and Workbench even if you don't have any weapons or armor equipped.
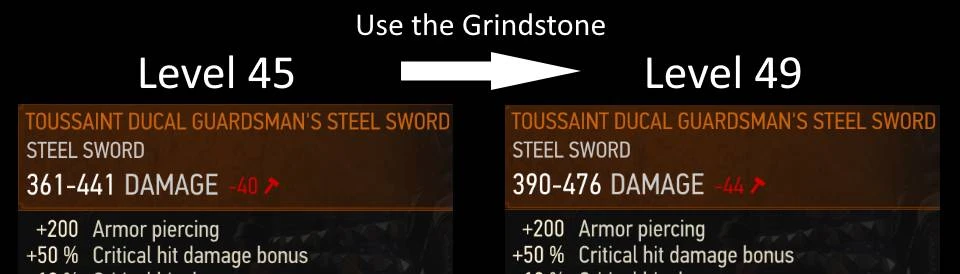
- Grindstone will level up the equipped swords and all swords in your inventory to Geralt's current level. (Excluding Secondary Weapons and Quest Items)
- Workbench will level up the equipped armor and all armor in your inventory to Geralt's current level. (Excluding non-combat clothes such as shirts)
- Buffs that were in the vanilla game have been discontinued.
- Changed the effect of Runeword "Preservation".
- Changed the effect of Aerondight.
DETAILS
Spoiler:
Show
Effect of Runeword "Preservation"
Vanilla: Armorer's Table and Grindstone bonuses never expire.
Mod: The more you use weapons and armor, the more their durability will recover.
Effect of Aerondight
Killing an enemy while fully charged no longer results in a permanent enhance.
A lightning effect (visual and sound effects) will now occur every time you attack an enemy while fully charged.
Others:
If you have not yet installed the debug console, you can download it from the link below.
If you do not need changes regarding Aerondight, please delete the following files from the mod.
Error 01
Other Notes
Vanilla: Armorer's Table and Grindstone bonuses never expire.
Mod: The more you use weapons and armor, the more their durability will recover.
Effect of Aerondight
Killing an enemy while fully charged no longer results in a permanent enhance.
- Vanilla: Killing an enemy with a fully charged Aerondight will reset the charge and give you a permanent enhancement.
- Mod: Killing an enemy with a fully charged Aerondight will not give you a permanent enhancement, it will remain fully charged.
A lightning effect (visual and sound effects) will now occur every time you attack an enemy while fully charged.
- Vanilla: The moment Aerondite is given a permanent enhancement, a lightning effect will occur.
- Mod: When you attack while fully charged, a lightning effect will occur.
Others:
- Fixed a mistranslation of Aerondight's description in Japanese.
- If you have already permanently enhanced Aerondight, you can unenhance the equipped Aerondite and the Aerondight in your inventory by typing FmrckGsWb_Aerondight in the debug console.
If you have not yet installed the debug console, you can download it from the link below.
If you do not need changes regarding Aerondight, please delete the following files from the mod.
- ...\content\scripts\game\gameplay\damage\damageManagerProcessor.ws
- ...\content\scripts\game\gameplay\effects\effects\other\aerondight.ws
- ...\content\scripts\game\gui\_old\components\guiTooltipComponent.ws
Error 01
- If the message Error 01 appears in the bottom left corner of the screen, an error has occurred with some item, and that item cannot be leveled up.
- The error is caused by not merging properly with other mods, or by using a mod that is incompatible with this mod.
Other Notes
- The problem with this mod is that you can easily increase the price of items. Since there is a large difference between the item's selling price and buying price, the effect of this problem is minor, but if you still want to fix it, we recommend using it together with Deleveled Gear Buying Selling Servicing Prices. (Even in the case of v4.04, you should be able to use the files for v4.03.)
CUSTOMIZATION
Spoiler:
Show
How to Level Up All Weapons and Armor

How to Level Up Only the Equipped Items

- Secondary weapons, quest items, and non-combat clothing such as shirts will not be leveled up.
- If you want to level up these items, open the file "...\content\scripts\mrckLocal\GsWb.ws" in the mod with a text editor and change true to false in line 3.
- Even with this edit, crossbows and bolts cannot be leveled up.
How to Level Up Only the Equipped Items
- If you want to prevent unequipped items in your inventory from being leveled up, open the file "...\content\scripts\mrckLocal\GsWb.ws" in the mod with a text editor and change true to false in line 8.
COMPATIBILITY
Spoiler:
Compatibility with other mods that change Aerondight's effects:
Show
- When used with Complete Animations Redux, Grindstone and Workbench animations are disabled.
Compatibility with other mods that change Aerondight's effects:
- Compatible with mods that only change Aerondight's stats.
- Probably not compatible with mods that change Aerondite's unique buff abilities.
- If you want to prioritize the behavior of other mods, please refer to the DETAILS section on the and remove files related to Aerondight from this mod.
INSTALLATION
Spoiler:
Show
Install
Uninstall
Mod Limit Fix (For Old Gen v1.32)
How to Merge Scripts
- Download the Main File, unzip it, and place the "Mods" folder inside it into your game's main directory. (The game's main directory is the directory where folders such as "bin", "content", and "DLC" are located.)
- If you want to use a mod manager, we recommend The Witcher 3 Mod Manager instead of Vortex.
- Use the Script Merger to merge conflicts with other mods.
Uninstall
- Delete files you added to the game.
- Re-merge conflicts using the Script Merger.
Mod Limit Fix (For Old Gen v1.32)
- If you want to introduce a large number of mods to Old Gen v1.32, you must use the Mod Limit Fix.
How to Merge Scripts
Spoiler:
Show
First, read the Script Merger instruction page carefully and follow its instructions.
When Script Merger loads the files, they will be listed as shown in the image below.

On the left, conflicting mods are listed by file.
On the right, merged mods are listed by file.
If you do not merge, the file of the mod with the highest priority (the mod shown in darker color in the conflict list) will be loaded.
Select the files you want to merge and click the "Create Selected Merge" button.
Depending on the mod, the mod author may instruct you not to merge conflicts, so please check the instructions carefully before merging.
In particular, please be careful as you are often instructed not to merge "Non-Bandled XML" and "Bundled Text".
If manual merging is required, a window similar to the image below will pop up.

In the upper row, the conflict locations of three files, A, B, and C from the left, are displayed.
A is the vanilla file, B and C are conflicting mod files.
The code of the merged file is displayed at the bottom.
If you select "B" and/or "C" from the top toolbar, the code from the selected files will be added to the merged file. (In the image above, both B and C are selected in that order.)
Click the "Go to Next Unsolved Conflict" button to the left of "A" on the toolbar to display the next conflict location.
Once all conflicts have been merged, close the window and save.
How to Choose B or C
It is better to select both B and C to enable all mod functions.
However, if two mods change the exact same part, you will have to choose one.
When doing so, be careful not to break the format of the code. Even if you don't have any coding knowledge, you should be able to see that the code is written according to some rules. Don't break it.
Look at the C code in the image above.
The parts in red are different from vanilla, the parts in yellow are conflicting parts, and the parts in gray are already included in the merged file.
The part between {} is a code block, and the block title is written at the top or left side of the block.
If you do not select C at the end, the title that is supposed to be attached to the gray code block will be lost, so it will deviate from the mod's expectations.
Therefore, I chose the codes in the order of B and C.
If the code is broken no matter how you select it, you may be able to solve the problem by deleting some of the merged code or by copying the conflicting code with "Ctrl + C" and sticking it inside the merged code with "Ctrl + V".
List of Codes to Watch Out for:
{}:
event:
function:
return:
if():
else:
var:
//:
/**/:
When Script Merger loads the files, they will be listed as shown in the image below.
On the left, conflicting mods are listed by file.
On the right, merged mods are listed by file.
If you do not merge, the file of the mod with the highest priority (the mod shown in darker color in the conflict list) will be loaded.
Select the files you want to merge and click the "Create Selected Merge" button.
Depending on the mod, the mod author may instruct you not to merge conflicts, so please check the instructions carefully before merging.
In particular, please be careful as you are often instructed not to merge "Non-Bandled XML" and "Bundled Text".
If manual merging is required, a window similar to the image below will pop up.
In the upper row, the conflict locations of three files, A, B, and C from the left, are displayed.
A is the vanilla file, B and C are conflicting mod files.
The code of the merged file is displayed at the bottom.
If you select "B" and/or "C" from the top toolbar, the code from the selected files will be added to the merged file. (In the image above, both B and C are selected in that order.)
Click the "Go to Next Unsolved Conflict" button to the left of "A" on the toolbar to display the next conflict location.
Once all conflicts have been merged, close the window and save.
How to Choose B or C
It is better to select both B and C to enable all mod functions.
However, if two mods change the exact same part, you will have to choose one.
When doing so, be careful not to break the format of the code. Even if you don't have any coding knowledge, you should be able to see that the code is written according to some rules. Don't break it.
Look at the C code in the image above.
The parts in red are different from vanilla, the parts in yellow are conflicting parts, and the parts in gray are already included in the merged file.
The part between {} is a code block, and the block title is written at the top or left side of the block.
If you do not select C at the end, the title that is supposed to be attached to the gray code block will be lost, so it will deviate from the mod's expectations.
Therefore, I chose the codes in the order of B and C.
If the code is broken no matter how you select it, you may be able to solve the problem by deleting some of the merged code or by copying the conflicting code with "Ctrl + C" and sticking it inside the merged code with "Ctrl + V".
List of Codes to Watch Out for:
{}:
- The part between {} is treated as one block.
event:
function:
- If the title of a code block between {} starts with "function" or "event", the block is treated as one section.
- When a section is loaded, the code is loaded in order from the top, and the section ends when "return" is loaded or all the code is loaded.
return:
- Finish that section. The code after the next ";" will not be loaded.
if():
- Only if the condition in parentheses is met will the code written next be loaded.
else:
- Used following an "if" statement. Code written next to "else" will only be loaded if the condition of the "if" statement is not met.
var:
- If a line of code within a section begins with "var", that code must be placed at the beginning of the section.
//:
/**/:
- The part to the right of "//" or the part between "/*" and "*/" is commented out and will not be loaded into the game.
TRANSLATION
Spoiler:
Show
- All language files other than Japanese are written in English using Google Translate.
- If you want to create your own translations, edit the csv file in the mod's content folder and encode it into a w3strings file.
- To encode, use w3strings encoder.
- If you are not familiar with the command prompt, we also recommend using DEEN -- W3strings Decoding and Encoding (PowerShell Tool).
- Once you've created your translation, we'd appreciate it if you could share it with us by uploading it to Nexus.
OTHERS
- If you like the mod, I would appreciate it if you could click the Endorse and Vote buttons at the top of this page.
- Please also check out the other mods I've created.
- If you have any questions or comments, please feel free to post them on the Posts page. I won't respond to every question, but other people may do so for you.