


0 of 0


")


About this mod
Removes the color filters from the game + DLC, making the colors more uniformly neutral with deeper blacks.
- Requirements
- Permissions and credits
- Changelogs
- Donations
tl;dr If you know what you're doing, just extract these to where your other texture mods reside.
✦ PREFACE

Please read the description and the FAQ in the Posts section. Your burning question is almost guaranteed to be answered in one of those places! 👍✨
This mod has no requirements. The requirements listed are mods that require this mod. The way Nexus lays that out is a bit confusing but if you look close at the headers you'll see.
This is a work-in-progress and is being refined as I'm playing through the game. I'm working on an alternate version that hand-picks and tweaks specific LUTs to restore some of the filmic vibe. Your patience is appreciated!
✦ DESCRIPTION
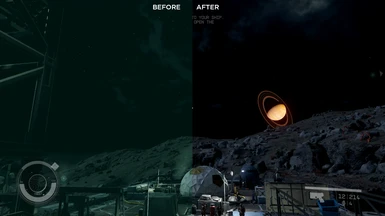
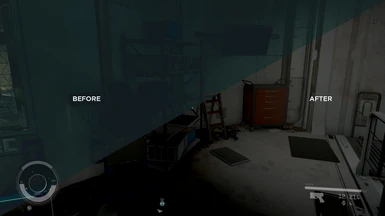
This mod simply replaces all of the color LUTs in the game with the base game's own neutral color LUT. The color filters in Starfield look great, but I had some trouble seeing in a few places so this was more of a utility thing on my part. It will also help you achieve nice deep blacks on an OLED TV. See bottom of description for bonus INI tweaks to blacken outer space as well.
This works especially good as a base for a ReShade preset.
If you're looking for an alternate set of Neutral LUTs to use as a base for a ReShade preset you can also check out TreyM's Base LUTs
✦ INSTALLATION
NOTE: Unlike previous games, textures for Starfield are loaded from your Documents folder rather than the \data\ folder unless you run other mods like Baka Disable My Games Folder. tl;dr just put these wherever your other texture mods are.
This is a great, simple video by Kaykrisify on YouTube covering the install.
1. Download and Extract Files (Standard Method)
- Extract files to c:\users\%userprofile%\Documents\My Games\Starfield\
- There is conflicting information out there about the process Game Pass users, please see comments for discussion, there are 3 or 4 solutions floating around that work for different people. Try the above path first. I do not have Game Pass and cannot troubleshoot but there are several posts in the comments section with successful methods.
1a. Alternate Method to Force \data\ Folder (Advanced Users - Please do not do this if you are new to modding)
There is a way to force the game to load textures from the data folder to make it work with Vortex, etc. but be careful as you can easily delete your Photo Mode photos! This requires moving the folder from My Documents to the game data folder, and changing where Photo Mode images are stored, as that will re-create the structure and start loading textures from the old folder again if it isn't re-assigned. Steps:
- Add the following line to StarfieldCustom.ini under [General]
[General]
bEnableMessageOfTheDay=0

[Display]
sPhotoModeFolder=Photos
- Move the contents of your "My Games\Starfield\Data" folder to the game's Data folder (i.e. \SteamLibrary\steamapps\common\Starfield\)
- Delete the Data folder in \My Games\Starfield\
2. Configure Your INI to Load Loose Files
In the same directory you extracted or moved files to in Step 1, you may find a file named StarfieldCustom.ini. If this file does not exist, you must create it using a text editor. Add the following lines to this file:
[Archive]
bInvalidateOlderFiles=1
sResourceDataDirsFinal=
If it's not working for you, some users have reported that adding those lines to the Starfield.INI that is present in the same folder as the Starfield EXE works. Make sure to add it under [Archive]
NOTE: Make sure Windows Explorer file extensions are turned on, so you can actually rename the file to StarfieldCustom.ini instead of StarfieldCustom.ini.txt! Here is a link on how to do that in Windows.
NOTE: Make sure there are no spaces, tabs, or other characters. It should appear exactly as above. If you are having trouble with the INI file, I've included an example INI file in the optional files download.
NOTE: Vortex installs to the \data\ folder by default and hasn't been updated to account for the strange \Documents\ method that the game currently uses. If you are having trouble using Vortex, follow the instructions above and do it manually. We're at the frontier of Starfield modding so it's going to take time for tools and things to get sorted out and smoothed out. Be patient.
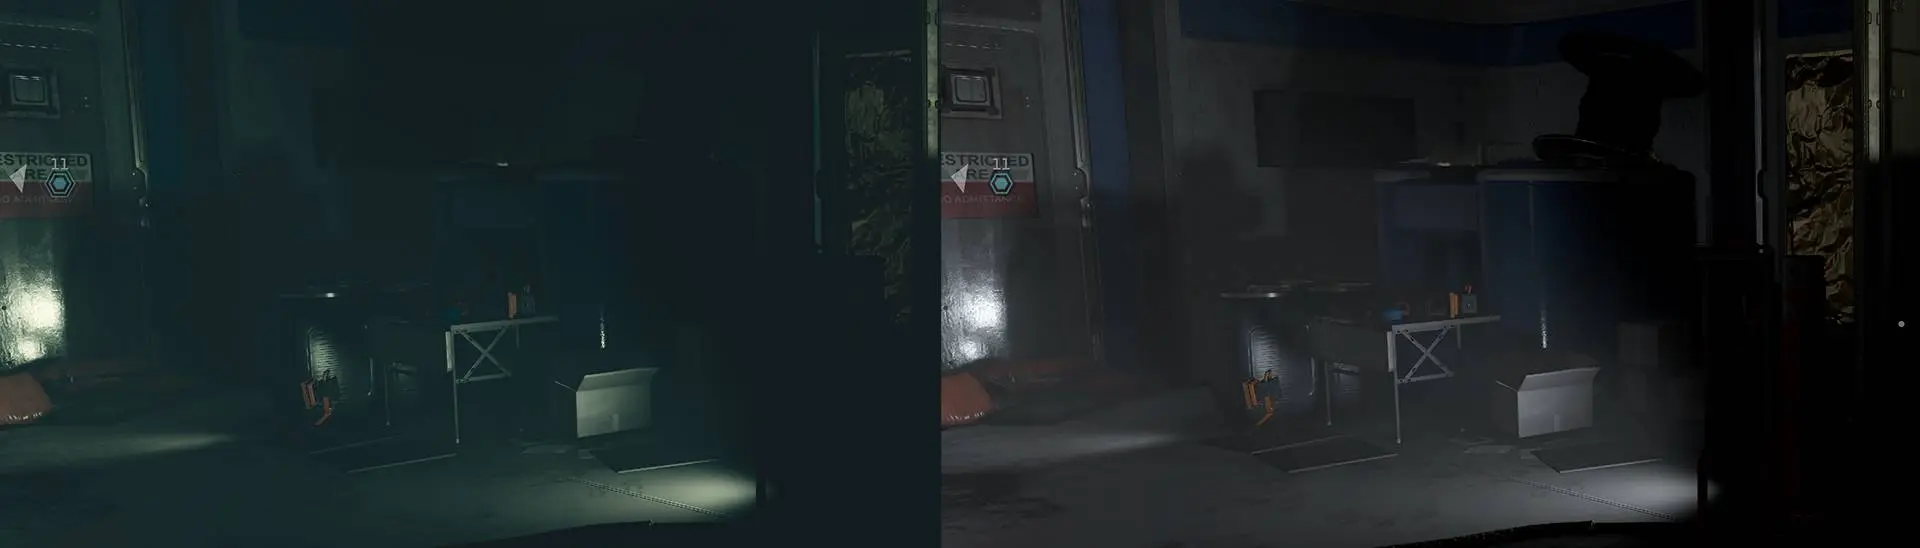
✦ BONUS DARK OUTER SPACE TWEAKS
Optionally, in addition to the neutral LUTs, you can make outer space appear much darker using these INI settings. These settings go into the same StarfieldCustom.INI that we worked on in the previous step. Please look at the later example images to show what this looks like. This does not affect the sky while on the planet's surface, only outer space.
You can increase fStarfieldStarBrightnessScale if the stars are too dim for your taste.
An secondary example StarfieldCustom.ini is included in the optional files with these tweaks.
StarfieldCustom.ini
[Display]
fSpaceGlowBackgroundScale=0.0
fStarIntensity=2500.0
fStarSystemFarViewDistance=10000000000.0
fStarfieldBackgroundScale=35.0
fStarfieldStarBrightnessScale=10.0
fStarfieldStarCoordScale=10.0
fSunScale=1.0
These are the vanilla values for reference
fSpaceGlowBackgroundScale=40.0
fStarIntensity=6000.0
fStarSystemFarViewDistance=10000000000.0
fStarfieldBackgroundScale=200.0
fStarfieldStarBrightnessScale=110.0
fStarfieldStarCoordScale=30.0
fSunScale=1.0
✦ BONUS GAMMA TWEAKS
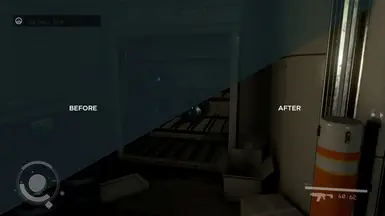
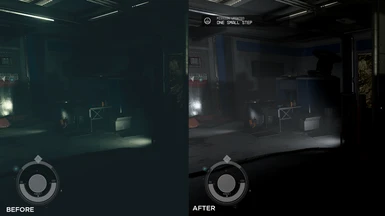
If you find that the dark areas / shadows of the game are now TOO dark, you can tweak your gamma settings to compensate. In StarfieldPrefs.ini (not StarfieldCustom, it would not work there for me) you can add the follow values and adjust to your taste. I put a before/after shot in the images.
This is kind of a band-aid until we get the CK / xEdit.
Under [Display] add the following line:
fGamma=2.6The vanilla value is 2.4. I went with 2.6 to bring some of those pitch-black areas up a little bit but you can adjust to taste. 5 will be completely bright and washed out. Be mindful because this can have a significant effect on the entire game's look.
✦ UNINSTALLATION
Simply delete the files that were extracted. These will be found in your respective install folder in \data\textures\effects\LUTs.
✦ MUSIC
I make synthwave / electronic / EDM music that goes great with Starfield and would love it if you had a listen and gave me a follow on Instagram!