


0 of 0


File information
Created by
LeastDegenAzuraEnjoyerUploaded by
LeastDegenAzuraEnjoyerVirus scan
Safe to use
About this mod
A simple tutorial on how to install mods in Starfield using Mod Organizer 2. Share with your friends or anyone having trouble and leave an endorsement if it helps!
- Permissions and credits
There are visual examples in the IMAGES section of this mod page to help you see what I am talking about.
All you need is Windows Explorer and Notepad (both come with Windows), with Steam open in the tray and a legitimate copy of Starfield.
DO NOT SKIP ANYTHING. READ IN FULL.
RUN THE GAME AT LEAST ONCE THROUGH STEAM THEN EXIT THE GAME.
THIS TUTORIAL ONLY SUPPORTS THE STEAM VERSION AND DOES NOT SUPPORT VORTEX, NMM, OR OTHER MOD MANAGERS OTHER THAN MO2. However Sections 2, 3 and 4 may have useful information for everyone.
Game Pass/Vortex users can try this tutorial on the r/starfieldmods subreddit. Or this one. Also see SFSE ASI Loader for Gamepass users.
BACK UP YOUR SAVES.
BACK UP YOUR GAME FILES.
"I've never done anything like this before and I'M SCARED!"
All we are going to do today is:
1. Install a Mod Manager
2. Install a Plugin for it to support the game we are modding
2. Install a script extender which many mods are dependant on
3. Create two files ourselves.
After that, it is just 6 clicks to install a mod into the manager, dropping a file in a folder, or editing text in a file.
Aaaaaaaaaaaaaaaaand BEGIN
0. Definitions
Modding video games, in the simplest terms, is software development. It is important to understand that the techniques and terms used when modding are not specific to game engines or Bethesda games. Software is in its most basic form just text characters assembled in languages, held in files, placed in folders. In the '80s and '90s when most computing was done in a command line (IE: DOS prompt or cmd/powershell) instead of a graphical user interface ("GUI", IE: Windows), users would need to type console commands to tell each file or folder what to do, for example, in order to allocate memory (RAM) to a program. This evolved into using a batch ("bat") to automate the execution of many console commands. Those commands would then trigger "functions" or "subroutines", which can be understood as the actual task the computer is carrying out.
So with that incredibly brief intro to computer science out of the way, lets get modding!
1. Setting Up Mod Organizer 2
YOU WILL FIRST REQUIRETHREE TWO PIECES OF SOFTWARE
Mod Organizer 2
https://www.nexusmods.com/skyrimspecialedition/mods/6194
https://www.nexusmods.com/starfield/mods/106
MO2 Starfield Plugin [NOTE: This Plugin may become redundant with future updates to MO2]
https://www.nexusmods.com/starfield/mods/681
The above plugin is no longer required as of version 2.5.0 of MO2
INSTALL THE ABOVE AS DIRECTED ON THE MODPAGES
READ PLEASE READALL 3 BOTH PAGES AND UNDERSTAND WHAT YOU ARE DOING.
THEN
Open MO2 and close the error you receive, if any.
Click the drop down menu on the top right and select <EDIT...> [ See IMAGE 1 ]
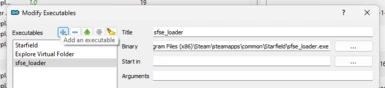
ADD the sfse_loader.exe (located in \Steam\steamapps\common\Starfield\sfse_loader.exe) to the launcher [ see IMAGE 2 ]
SELECT sfse_loader in the dropdown menu
This is where you will launch the game using the Run button once we are all done.
RUNNING THE GAME THROUGH STEAM OR WITH MO2 DIRECTED AT THE STARFIELD.EXE WILL BYPASS ALL YOUR MODS AND CONFIGS.
ALWAYS LAUNCH THROUGH MOD ORGANIZER 2 DIRECTED AT SFSE_LOADER USING THE RUN BUTTON.
You can add additional programs to MO2 in this manner and launch them from here like a game launcher. For example, I like to add programs I use to create mods here for quick access.
Before adding mods, we need to configure our game to allow for loose file validation, as well as setup a few other things with config files and bat scripts.
2. Creating a Custom .ini Config File
[ See IMAGE 3 and 4 ]
Go to C:\Modding\MO2\profiles\Starfield
Using Notepad (or any text editor) CREATE or EDIT StarfieldCustom.ini
Note: ENSURE EXTENSION LABELS ARE SHOWN in Windows Explorer so you dont end up with StarfieldCustom.ini.txt
Windows 10 and previous: Click View on the toolbar, then check "File Name Extensions" box
Windows 11: Click View on the toolbar, open the Show menu, then click "File Name Extensions"
You can also use MO2's built-in ini editor, which can be found by clicking the puzzle piece icon in the toolbar and selecting "INI Editor", Notepad++, or your preferred text editor.
Paste the following in the .ini, this is the bare MINIMUM FOR MODS TO WORK:
[Archive]
bInvalidateOlderFiles=1
sResourceDataDirsFinal=
This is going to allow the game to use loose files contained in the Starfield\Data\ directory to overwrite the vanilla archives inside Starfield - Textures.ba2, Starfield - Meshes01.ba2, etc. So when a mod author says "place my mod in data\blah\blah" this is what allows that to work at all. Mod Organizer 2 is going to handle our mod installation though, rather than placing those files manually.
If you wish to use a bat script (see Section 3), your StarfieldCustom.ini must have this line:
[General]
sStartingConsoleC ommand=bat NameOfYourBatGoesHereWithNoExtension
IMPORTANT: This line must be under the General section with THE SPACE BETWEEN THE 'C' AND THE 'O' IN THE WORD "COMMAND" REMOVED (this page is not allowing me to paste it, sorry about this confusion). There must be no space after the equals sign, there must be one space after the word bat, and the name of the bat must be exactly the same as your custom bat file without its file extension (IE: if you named your bat file poop.txt, the file would read =bat poop and not =bat poop.txt )
"But the modpage of the mod I'm installing says I should put it in \Documents\My Game\Starfield or the steam\steamapps\common\Starfield\Data folder. Where do I put it?"
MO2 uses a virtual file system to keep your game install clean. Thats why the StarfieldCustom.ini goes in C:\Modding\MO2\profiles\Starfield when using Mod Organizer 2
There are many commands you can populate your ini with, for example, under the [General] heading you can place:
SIntroSequence=0
uMainMenuDelayBeforeAllowSkip=0
bEnableMessageOfTheDay=0
bAlwaysActive=1
This will speed up booting the game, make the window always active even when minimized, and removing the message of the day in the top right of the main menu.
You can also change your FOV using the [Camera] section:
[Camera]
fFPWorldFOV=90
fTPWorldFOV=90
fFPPlayerFOV=90
If you would like to know more about ini configuration please see these resources:
https://www.nexusmods.com/starfield/mods/2871
https://stepmodifications.org/forum/topic/19019-starfield-default-values-for-all-known-valid-ini-settings/
MY PERSONAL POPULATED INI CAN BE FOUND IN THE FILES AND IMAGES SECTION OF THIS MODPAGE TO BE USED AS A TEMPLATE OR EXAMPLE.
3. Creating and Populating and merging sStartingCommand "bat script" Text Files
[ See IMAGE 5 and 6 ]
Go to the \steam\steamapps\common\Starfield folder
CREATE a txt file called BigBat.txt (or whatever you want, just dont forget it, and it must match the sStartingCommand=bat field of your StarfieldCustom.ini). You must place the .txt file in the same location as the Starfield.exe in the Steam install directory above.
YOU DO NOT HAVE TO CREATE A .BAT FILE.
"Then why do they call it a bat?"
"Bat" is an abbreviation that means batch. They are for executing a batch of commands one after the other.
"Ini" is an abbreviation for initialization and it lists the settings that should be applied when a piece of software is initialized or started.
Your StarfieldCustom.ini has an automated command (sStartingConsoleCommand) to run a .txt as a bat file when the game launches.
You can populate this txt file with a "bat script" of commands which will change the game at runtime.
Many mod pages on Nexus will tell you to place a file (IE: MadeUpSuperVendorFixerMod.txt) containing only one command (IE: setgs iDaysToRespawnVendor 2) into your steamapp\common\Starfield directory. YOU DO NOT NEED INDIVIDUAL TXT FILES FOR EACH BAT OR COMMAND. You can MERGE them into one! You can alternatively separate bat files with a semi-colon ; in your sStartingConsoleCommand,but I find this makes a mess of your steamapps\common\Starfield folder.
"Ok so I made an empty .txt file that I can name whatever I want... so what?"
Now we learn how to fill it. But first we should know when not to.
3a) Multiple TXT bat files and Understanding When To Merge bat Files
Some bat scripts DO REQUIRE THEIR OWN TXT FILE which you would place together with your merged/automated .txt in the \steam\steamapps\common\Starfield folder.
You can manually run bat files in game by going to the console (~) and typing
bat nameofbatfile
and then pressing enter, where "nameofbatfile" is the name of the bat file, with no extension
One example of a mod that requires multiple manually run bat files is Cruise Between Planets by busylancer/Xi Ling Youyou
In this mod, you select the ship by clicking it in console, then execute the "bat c" command to activate the mod, fly around, and then execute "bat qc" to deactivate it, allowing for a "super cruise" speed boost. This requires 2 bat files called c.txt and qc.txt respectively, which look like this:
c.txt:
; Cruising between planets
forceav spaceshipboostspeed 99999999999999999
tgm enable
sgtm 20
cgf "Debug.Notification" "cruise activated"
qc.txt:
; Cancel Cruising between planets
forceav spaceshipboostspeed 4
tgm disable
sgtm 1
cgf "Debug.Notification" "cruise inactivated"
Another example of this is a "gib.txt" file I use as a instant cheat mode for testing. I open console, run "bat gib" and i get one of everything, 1000 of all consumables, 99999999 carry-weight, 100 million credits, etc.
In these two scenarios, you would not want to merge their .txt files with BigBat.txt, as the two "Cruise" scripts cancel each other out if run automatically at startup, and the gib script is only for testing things before I load a previous save, not regular gameplay.
Anyway, back to our automated sStaringCommand bat!
3b) Adding Commands
In general, bat commands look like this:
setgs fEquippedArmorChanceToDrop 1.0
player.forceav WeapReloadSpeedMult 0.00
player.modav WeapReloadSpeedMult 0.75
...and so on
Above you can see that:
-the Game Setting is Set so that NPCs will drop their equipped armor 100% of the time
-the player's weapon reload speed multiplier is forced to 0
-the player's weapon reload speed multiplier is modified to +75%
NOTE: I have found that if the same type of command has different capitalization over multiple commands in the bat file (IE: one command as setgs and another as SetGS) that it will break the script. Be careful of formatting and keep command prefixes uniform across all commands of the same type.
I do not have all commands at my disposal. Understanding specific bat commands will take some discovery and learning on your part.
Here is most of them:
https://gist.github.com/eacpereira/25f00410b1940d04a24f8a49b0b1bf44
https://starfieldwiki.net/wiki/Starfield:Console#Commands
If you wish to use my settings my custom BigBat.txt can be found in the FILES and IMAGES section.
Deleting any entry will restore the vanilla state, and leaving the BigBat.txt file empty or deleting it entirely is perfectly fine.
NOTE: THE CUSTOM INI AND BAT FILES ARE BASED ON MY PERSONAL PREFERENCES AND SHOULD BE EDITED TO SUIT YOUR TASTES.
3c) Console Command Runner (CCR) "Mods" (theyre still scripts technically)
Console Command Runner or CCR is an SFSE plugin that allows bat scripts to be installed via mod manager. Install Console Command Runner itself by placing the .dll in \Steam\steamapps\common\Starfield\Data\SFSE\plugins\ and then any bat scripts like Baka NPCs Always Drop Their Equipped Armor (AKA: setgs fEquippedArmorChanceToDrop 1.0) can be replaced by easier to install mod manager compatible versions like Armor Drop Chance - CCR. CCR "mods" require no configuring of the ini and no .txt file creation as outlined in 4a, and instead just install via mod manager as outlined in 4b.
4. Choosing Your Mod List
You are now ready to choose your modlist!
At time of writing the most common types of Starfield mods on the Nexus are:
INI EDITS (C:\....\MO2\profiles\Starfield\StarfieldCustom.ini)
BAT SCRIPT EDITS (\steam\steamapps\common\Starfield\BigBat.txt)
REPLACERS: Textures (clothing, food, poster, guns, VASCO), audio, UI, and other assets (.dds, .wem, .ba2, etc inside a "data" folder structure)
ESP MODS (Starfield\data\mod_name.esp)
and SFSE plugins (Starfield\Data\SFSE\plugins\ModName.dll)
4a) ini and txt bat script edits
To install INI edits and bat scripts, copy the text from the mod pages provided ini or txt file and paste it into your ini or txt file.
In the case of ini edits, ensure the added lines are under the right section (General, Display, Controls, Camera, etc).
In the case of bat scripts, read the mod description carefully to decide whether to merge with your main automated bat file, or place an additional txt in the install folder (in which case, you would need to run the bat in console when in game, as outlined in section 3a). You should also check to see if a CCR version of the mod is available on the Nexus by reading the descriptions of both mods to determine if they are redundant.
4b) Mod Manager Installed Mods
[ See IMAGE 7-14 ]
To install other mods (custom skins, textures, load screen replacers, CCRs), simply hit Download With Mod Manager, Slow Download, open MO2, go to the Downloads tab on the right, double click the downloaded mod, RIGHT CLICK THE DATA FOLDER and assign the data folder to be the data folder, then activate the mod by clicking its checkbox on the left panel.
"The data folder to be the data folder? What?"
It is as simple as it sounds: you right click the data folder to make it the data folder. You should always have a file path with only one "data" folder. NO MORE, NO LESS.
IE: \data\textures\clothes\outfit_baseball_cap_01 = CORRECT
\data\data\textures\clothes\outfit_baseball_cap_01 = INCORRECT
\data\textures\data\clothes\outfit_baseball_cap_01 = INCORRECT
\profiles\Starfield\textures\clothes\outfit_baseball_cap_01 = INCORRECT
Note: Sometimes you will find mods that are not packaged correctly. If this happens, simply download the mod manually, create the proper file structure, then using 7zip or winrar create a new archive.
For example:
TextureMod.7z>\decals\impactdecals\impactdecalorganichit01_color.dds < Will not import to MO2 correctly (no data folder)
TextureModFixed.7z>\data\textures\decals\impactdecals\impactdecalorganichit01_color.dds < Works just fine
You can then click Install New Mod From Archive in the top left of MO2 and select the new fixed archive you created.
4c) ESPs
...
UPDATE: This tutorial was written very early after Starfields release, and is written to reflect that reality. With xEdit updating for Starfield support on November 4th 2023, the reality has now changed. Most ESP mods released after the week of the 4th should be safe to use, and many released before have probably be updated/cleaned with the software, or will be at some point by the author. If you are not confident with the information on the mod's page, back up your load order before use, or learn more about xEdit to see how you can check for dirty edits and also create mods yourself! It is a very powerful modding tool used across many BGS games. Just be sure to use Plugins.txt Enabler for best practice.
Below is the original tutorial unedited for contextual purposes and further reading.
...
ESP MODS CAN BREAK YOUR GAME. AVOID THEM UNTIL CREATION KIT IS RELEASED (or dont). Early adoption of ESP mods before Creation Kit's release can leave you with dirty edits in your save file which can corrupt and ruin tens or hundreds of hours of gameplay progression and roleplay. Its typically not worth it considering their limited functionality (due to being developed from the ground up without proper tools) and can often be supplemented with scripts or console commands.
ESPs are file archives in the same family as .esm and .ba2 files (IE: your vanilla game files) and are normally created through Creation Kit. ESP/ESM/ESL/BA2 files can also safely be created by xEdit once we have the base game's ESMs decoded fully, as they generate the esp/esm with the proper record headers. Odds are xEdit will be ready several months before the Creation Kit is live. XEdit is how you create most rebalance mods and how you resolve conflicts (its also how you identify dirty edits in the first place).
You can install ESP mods in the same manner as replacer mods, by simply adding them to MO2 and activating them (Section 4b), or manually adding them to the \Steam\steamapps\common\Starfield\Data directory.
You then must add the following line to your StarfieldCustom.ini:
[General]
sTestFile1=ModName.esp
where ModName is the name of the specific mod file with its extension (IE: ShipStorage.esp)
Each additional ESP requires its own line:
[General]
sTestFile1=ModName.esp
sTestFile2=ModNameExactly.esp
sTestFile3=ModNameExactlyAndExtension.esp
and so on
Again, this is not recommended, and Im simply explaining for the sake of being thorough.
YOUR SAVE FILE MAY BECOME CORRUPTED. YOU WERE WARNED.
4d) SFSE .dll Plugins
SFSE Plugins can be dropped in \Steam\steamapps\common\Starfield\Data\SFSE\plugins and do not require any other configuration, though some may be paired with an ini file for configuration (place it where the author advises). DLL mods can be very sensitive and will give errors or cause crashes if not installed properly, or if versions are mismatched. They can also break due to official game updates. You can use Starfield.exe Auto-Backup (SFSE) to ensure this never happens. With a backup of the Starfield.exe, you can always roll back and continue playing. You can also set Steam to Update On Launch so that the game never updates in the first place (since you are launching with SFSE_loader.exe, which we set up all the way back in section 1).
4e) Performance Settings
Some mod pages will provide a set of ini files to tweak the performance of the game. These replace the default display settings ini files (Low.ini, Medium.ini, High.ini and Ultra.ini) found in your install directory (C:\Program Files (x86)\Steam\steamapps\common\Starfield). Simply overwrite them using Windows Explorer. These types of mods cannot be installed with mod manager.
4f) Knowing the Difference
"How do I tell what kind of mod it is?"
You can Preview files in the Files tab of any Nexus mod page. [ See IMAGE 7 ]
Look at the file structure and file extensions and use your best judgment:
Examples:
NameOfMod.txt is probably a bat script.
NameOfMod\nameofmod.esp is an esp mod.
NameOfMod\Data\textures\clothes\some_ingame_aset_01\some_ingame_aset_01.xyz can probably be installed via MO2 as long as you make the data folder the data folder as explained in section 4b ("textures" could also be "interface", "SFSE", "video", etc and "clothes" may also be "decals", "effects", "weapons", etc).
NameOfMod\Data\SFSE\Plugins\ConsoleCommandRunner\NameOfMod.toml is a CCR "mod" (its really a script, but you install it into a mod slot in your mod manager)
NameOfMod\SFSE\Plugins\nameofmod.dll is a SFSE plugin and needs to be installed manually.
AND ALWAYS READ THE SPECIFIC MOD PAGE YOU ARE LOOKING TO INSTALL.
4g) FOMOD Installers
FOMOD installers are mods the are packaged specifically for use with mod managers, to allow the user to customize the mod during the install process.
For example, lets take a look at Immersive Lightsabers:
The mod is packaged as a FOMOD installer which you can see by its file Preview on Nexus as it contains many versions of the mod (wakizashi vs axe, blue/green/red, etc) in many "Data" folders.
You install it with Vortex or MO2 (section 4b) but before you select the data folder, it should pop up asking what preferences you want (what item to replace, the blade color, etc). You then simply hit Install after choosing your preferences and the installer does the rest. You can then activate the mod with the checkbox in the modlist.
If you want to install FOMOD mods manually for any reason, you have to open the archive and repackage it so you dont have a bunch of extra redundant files configured incorrectly in your Data folder (or mod manager virtual directory).
As always, the files structure is steam\steamapps\common\Starfield\Data\[the content of the mod goes here]
As you open the files in the download, youll find lots of folders named "Data". Copy them and paste them into one folder for the options you want (IE: pick ONE color and ONE weapon to replace, and move its Data folder, not ALL of them)
Lets say I want to replace the Wakizashi with a red light saber
My folders would look like this:
Data\meshes\weapons\wakizashi\wakizashi.nif
Data\sound\soundbanks\13841840.wem
Note: there are 7 sound files youll need in the soundbanks directory all with random number names like that ^ for all of the different sounds the weapon can
make (different materials, miss, sheath, unsheathe etc)
Once you have these 8 files (the .nif for the mesh and texture, then the 7 audio files for the one option you chose) in 2 folders ("weapons" and "soundbanks") under the data folder structure like so, just paste them into your data folder so that they merge and replace the .nif and sound files.
Note: FOMOD packages may have more or less files, these numbers and files are specific to this example with the light saber mod.
5. Support:
"I got an error when installing Mod Oragnizer!"
Literally do not worry about it.
"SFSE plugins wont work!"
Try moving them to C:\Program Files (x86)\Steam\steamapps\common\Starfield\Data\SFSE\plugins. Some .dll mods dont work in mod managers for reasons beyond my understanding, and may need to be installed manually. Make sure you have both the sfse_1_7_XX.dll and .exe files for SFSE itself in the install directory.
If you want to install SFSE and other Plugins via mod manager see Root Builder, KilLoader and Loose Root Data
"When I click on a mod another mod turns red! Theres a lightning bolt telling me things are being overwritten!"
This is a mod conflict. Conflict resolution is a topic for its own tutorial as it really depends on the case at hand. Dont use 2 mods that do the same thing (multiple Sarah jackets, or Mantis Armor replacers, the same poster, etc). You can move mods around in your load order until things are working (lower on the list overwrites the higher listings), and use Separators (which you can create by right clicking just below your load order in the left pane, and selecting Create A Separator) to stay organized. I have included screenshots of a load order for most common UI mods at the end of the IMAGES tab. Some mods may also have a meta.ini file in their folder structure which may cause a conflict, you can simply delete that file. To check this, right click a mod and select "Open In Explorer".
"I did all this and it still didnt work!"
DO NOT PUT SPACES IN THE NAMES OF FILES YOU CREATE.
Double check each file is in the right place: Dont mix up your Starfield folders:
-bat.txt goes in the Steam Install Directory, right beside the Starfield.exe and the txt file name must match the one in the sStartingC... string of the General section of your StarfieldCustom.ini (see example in Images)
-the StarfieldCustom.ini goes in the Mod Organizer 2 install directory under Profiles, then Starfield (or the name of your custom MO2 profile)
-There are actually two StarfieldCustom.ini files: one is the "vanilla" .ini (C:\Users\USERNAME\Documents\My Games\Starfield), the other is a "virtual" .ini located in the Mod Organizer 2 install location (C:\Modding\MO2\profiles\Starfield). Mod Organizer allows you to have multiple mod configurations in different Profiles, which requires each Profile to have their own .ini. ONLY CHANGE THE INI IN THE MOD ORGANIZER DIRECTORY FOR THE PROFILE YOU ARE WORKING WITH. You can use Mod Organizer 2's native .ini editor (the puzzle with the red piece in the toolbar) to make sure you are editing the right one.
-Ensure you are running the game through Mod Organizer 2 using the "Run" button directed at the sfse_loader.exe, not using Steam or directed at the Starfield.exe
-Double check the file paths for the mod files in Windows Explorer and check each path's "data" folder (which will now bear the mods name) in your Mod Organizer 2 install directory, IE: (C:\Modding\MO2\mods\8k Planets (Part 2)\textures\planets\houdiniplanets\biomemasks). If you see a folder named data, simply reinstall the mod and ensure you set the lowest appearing data folder when all folders expanded, and select Replace when prompted.
-Use Notepad++ to show hidden characters ("Show All Characters" on the toolbar) that may be picked up with copy/paste, or type out the ini/bat commands manually to ensure they are correct.
-Triple check your file extensions to make sure you didnt name your bat file to be an ACTUAL .bat file (it should be a .txt file!), or that your ini is ACTUALLY a .ini file and not a ini.txt (StarfieldCustom.ini NOT StarfieldCustom.ini.txt)
-If you are using Baka Disable My Games Folder I want you to ask yourself why. Dont use it if you dont know how to use it properly. If you are using Baka Disable My Games Folder that means your ini files are going to live somewhere else. I dont know where that might be, and if you dont either than obviously that is going to cause problems for you. It is a very useful plugin that definitely helps lots of people, but do you need it? If your answer is yes, then you already know what to do.
"My mods are working, but now all my saves are gone!"
In Mod Organizer 2, there is an option to have your saves quarantined in different Profiles.
In the dropdown at the very top, open it and select <Manage...>
This will open a new window, select your profile (Starfield) and see if the box labelled "Use Profile Specific Game Saves" is checked.
If it is, go grab your saves from the regular Documents\My Games\Starfield\saves folder, and slap them into C:\Modding\MO2\profiles\Starfield\saves
When installing a mod always test to make sure it is working before installing more mods so you can isolate any problems you might run into (crashes, missing textures, etc).
If you need further support, check the mod page of the mod you are having issue with in the Posts/Bugs/Discussions tabs.
You can also join the Starfield Modding Discord server for community assistance and tips: https://discord.gg/xBXsRyZcdF
Hopefully this covers everything for now! Fly Safe Dustys!
6. Extras
If you want to learn more about available console (~) commands see here
Information on ini configuration
To enable achievements use Baka Achievement Enabler
To enable DLSS, use Starfield Frame Generation - Replacing FSR2 with DLSS-G
Use Starfield.exe Auto-Backup (SFSE) so you never have to worry about SFSE/Starfield updates. You can also set Steam to Update On Launch so that the game never updates in the first place (since you are launching with SFSE)
Information on keybindings in the ini
All you need is Windows Explorer and Notepad (both come with Windows), with Steam open in the tray and a legitimate copy of Starfield.
DO NOT SKIP ANYTHING. READ IN FULL.
RUN THE GAME AT LEAST ONCE THROUGH STEAM THEN EXIT THE GAME.
THIS TUTORIAL ONLY SUPPORTS THE STEAM VERSION AND DOES NOT SUPPORT VORTEX, NMM, OR OTHER MOD MANAGERS OTHER THAN MO2. However Sections 2, 3 and 4 may have useful information for everyone.
Game Pass/Vortex users can try this tutorial on the r/starfieldmods subreddit. Or this one. Also see SFSE ASI Loader for Gamepass users.
BACK UP YOUR SAVES.
BACK UP YOUR GAME FILES.
"I've never done anything like this before and I'M SCARED!"
All we are going to do today is:
1. Install a Mod Manager
2. Install a script extender which many mods are dependant on
3. Create two files ourselves.
After that, it is just 6 clicks to install a mod into the manager, dropping a file in a folder, or editing text in a file.
Aaaaaaaaaaaaaaaaand BEGIN
0. Definitions
Modding video games, in the simplest terms, is software development. It is important to understand that the techniques and terms used when modding are not specific to game engines or Bethesda games. Software is in its most basic form just text characters assembled in languages, held in files, placed in folders. In the '80s and '90s when most computing was done in a command line (IE: DOS prompt or cmd/powershell) instead of a graphical user interface ("GUI", IE: Windows), users would need to type console commands to tell each file or folder what to do, for example, in order to allocate memory (RAM) to a program. This evolved into using a batch ("bat") to automate the execution of many console commands. Those commands would then trigger "functions" or "subroutines", which can be understood as the actual task the computer is carrying out.
So with that incredibly brief intro to computer science out of the way, lets get modding!
1. Setting Up Mod Organizer 2
YOU WILL FIRST REQUIRE
Mod Organizer 2
https://www.nexusmods.com/skyrimspecialedition/mods/6194
https://www.nexusmods.com/starfield/mods/106
MO2 Starfield Plugin [NOTE: This Plugin may become redundant with future updates to MO2]
The above plugin is no longer required as of version 2.5.0 of MO2
INSTALL THE ABOVE AS DIRECTED ON THE MODPAGES
READ PLEASE READ
THEN
Open MO2 and close the error you receive, if any.
Click the drop down menu on the top right and select <EDIT...> [ See IMAGE 1 ]
ADD the sfse_loader.exe (located in \Steam\steamapps\common\Starfield\sfse_loader.exe) to the launcher [ see IMAGE 2 ]
SELECT sfse_loader in the dropdown menu
This is where you will launch the game using the Run button once we are all done.
RUNNING THE GAME THROUGH STEAM OR WITH MO2 DIRECTED AT THE STARFIELD.EXE WILL BYPASS ALL YOUR MODS AND CONFIGS.
ALWAYS LAUNCH THROUGH MOD ORGANIZER 2 DIRECTED AT SFSE_LOADER USING THE RUN BUTTON.
You can add additional programs to MO2 in this manner and launch them from here like a game launcher. For example, I like to add programs I use to create mods here for quick access.
Before adding mods, we need to configure our game to allow for loose file validation, as well as setup a few other things with config files and bat scripts.
2. Creating a Custom .ini Config File
[ See IMAGE 3 and 4 ]
Go to C:\Modding\MO2\profiles\Starfield
Using Notepad (or any text editor) CREATE or EDIT StarfieldCustom.ini
Note: ENSURE EXTENSION LABELS ARE SHOWN in Windows Explorer so you dont end up with StarfieldCustom.ini.txt
Windows 10 and previous: Click View on the toolbar, then check "File Name Extensions" box
Windows 11: Click View on the toolbar, open the Show menu, then click "File Name Extensions"
You can also use MO2's built-in ini editor, which can be found by clicking the puzzle piece icon in the toolbar and selecting "INI Editor", Notepad++, or your preferred text editor.
Paste the following in the .ini, this is the bare MINIMUM FOR MODS TO WORK:
[Archive]
bInvalidateOlderFiles=1
sResourceDataDirsFinal=
This is going to allow the game to use loose files contained in the Starfield\Data\ directory to overwrite the vanilla archives inside Starfield - Textures.ba2, Starfield - Meshes01.ba2, etc. So when a mod author says "place my mod in data\blah\blah" this is what allows that to work at all. Mod Organizer 2 is going to handle our mod installation though, rather than placing those files manually.
If you wish to use a bat script (see Section 3), your StarfieldCustom.ini must have this line:
[General]
sStartingConsoleC ommand=bat NameOfYourBatGoesHereWithNoExtension
IMPORTANT: This line must be under the General section with THE SPACE BETWEEN THE 'C' AND THE 'O' IN THE WORD "COMMAND" REMOVED (this page is not allowing me to paste it, sorry about this confusion). There must be no space after the equals sign, there must be one space after the word bat, and the name of the bat must be exactly the same as your custom bat file without its file extension (IE: if you named your bat file poop.txt, the file would read =bat poop and not =bat poop.txt )
"But the modpage of the mod I'm installing says I should put it in \Documents\My Game\Starfield or the steam\steamapps\common\Starfield\Data folder. Where do I put it?"
MO2 uses a virtual file system to keep your game install clean. Thats why the StarfieldCustom.ini goes in C:\Modding\MO2\profiles\Starfield when using Mod Organizer 2
There are many commands you can populate your ini with, for example, under the [General] heading you can place:
SIntroSequence=0
uMainMenuDelayBeforeAllowSkip=0
bEnableMessageOfTheDay=0
bAlwaysActive=1
This will speed up booting the game, make the window always active even when minimized, and removing the message of the day in the top right of the main menu.
You can also change your FOV using the [Camera] section:
[Camera]
fFPWorldFOV=90
fTPWorldFOV=90
fFPPlayerFOV=90
If you would like to know more about ini configuration please see these resources:
https://www.nexusmods.com/starfield/mods/2871
https://stepmodifications.org/forum/topic/19019-starfield-default-values-for-all-known-valid-ini-settings/
MY PERSONAL POPULATED INI CAN BE FOUND IN THE FILES AND IMAGES SECTION OF THIS MODPAGE TO BE USED AS A TEMPLATE OR EXAMPLE.
3. Creating and Populating and merging sStartingCommand "bat script" Text Files
[ See IMAGE 5 and 6 ]
Go to the \steam\steamapps\common\Starfield folder
CREATE a txt file called BigBat.txt (or whatever you want, just dont forget it, and it must match the sStartingCommand=bat field of your StarfieldCustom.ini). You must place the .txt file in the same location as the Starfield.exe in the Steam install directory above.
YOU DO NOT HAVE TO CREATE A .BAT FILE.
"Then why do they call it a bat?"
"Bat" is an abbreviation that means batch. They are for executing a batch of commands one after the other.
"Ini" is an abbreviation for initialization and it lists the settings that should be applied when a piece of software is initialized or started.
Your StarfieldCustom.ini has an automated command (sStartingConsoleCommand) to run a .txt as a bat file when the game launches.
You can populate this txt file with a "bat script" of commands which will change the game at runtime.
Many mod pages on Nexus will tell you to place a file (IE: MadeUpSuperVendorFixerMod.txt) containing only one command (IE: setgs iDaysToRespawnVendor 2) into your steamapp\common\Starfield directory. YOU DO NOT NEED INDIVIDUAL TXT FILES FOR EACH BAT OR COMMAND. You can MERGE them into one! You can alternatively separate bat files with a semi-colon ; in your sStartingConsoleCommand,but I find this makes a mess of your steamapps\common\Starfield folder.
"Ok so I made an empty .txt file that I can name whatever I want... so what?"
Now we learn how to fill it. But first we should know when not to.
3a) Multiple TXT bat files and Understanding When To Merge bat Files
Some bat scripts DO REQUIRE THEIR OWN TXT FILE which you would place together with your merged/automated .txt in the \steam\steamapps\common\Starfield folder.
You can manually run bat files in game by going to the console (~) and typing
bat nameofbatfile
and then pressing enter, where "nameofbatfile" is the name of the bat file, with no extension
One example of a mod that requires multiple manually run bat files is Cruise Between Planets by busylancer/Xi Ling Youyou
In this mod, you select the ship by clicking it in console, then execute the "bat c" command to activate the mod, fly around, and then execute "bat qc" to deactivate it, allowing for a "super cruise" speed boost. This requires 2 bat files called c.txt and qc.txt respectively, which look like this:
c.txt:
; Cruising between planets
forceav spaceshipboostspeed 99999999999999999
tgm enable
sgtm 20
cgf "Debug.Notification" "cruise activated"
qc.txt:
; Cancel Cruising between planets
forceav spaceshipboostspeed 4
tgm disable
sgtm 1
cgf "Debug.Notification" "cruise inactivated"
Another example of this is a "gib.txt" file I use as a instant cheat mode for testing. I open console, run "bat gib" and i get one of everything, 1000 of all consumables, 99999999 carry-weight, 100 million credits, etc.
In these two scenarios, you would not want to merge their .txt files with BigBat.txt, as the two "Cruise" scripts cancel each other out if run automatically at startup, and the gib script is only for testing things before I load a previous save, not regular gameplay.
Anyway, back to our automated sStaringCommand bat!
3b) Adding Commands
In general, bat commands look like this:
setgs fEquippedArmorChanceToDrop 1.0
player.forceav WeapReloadSpeedMult 0.00
player.modav WeapReloadSpeedMult 0.75
...and so on
Above you can see that:
-the Game Setting is Set so that NPCs will drop their equipped armor 100% of the time
-the player's weapon reload speed multiplier is forced to 0
-the player's weapon reload speed multiplier is modified to +75%
NOTE: I have found that if the same type of command has different capitalization over multiple commands in the bat file (IE: one command as setgs and another as SetGS) that it will break the script. Be careful of formatting and keep command prefixes uniform across all commands of the same type.
I do not have all commands at my disposal. Understanding specific bat commands will take some discovery and learning on your part.
Here is most of them:
https://gist.github.com/eacpereira/25f00410b1940d04a24f8a49b0b1bf44
https://starfieldwiki.net/wiki/Starfield:Console#Commands
If you wish to use my settings my custom BigBat.txt can be found in the FILES and IMAGES section.
Deleting any entry will restore the vanilla state, and leaving the BigBat.txt file empty or deleting it entirely is perfectly fine.
NOTE: THE CUSTOM INI AND BAT FILES ARE BASED ON MY PERSONAL PREFERENCES AND SHOULD BE EDITED TO SUIT YOUR TASTES.
3c) Console Command Runner (CCR) "Mods" (theyre still scripts technically)
Console Command Runner or CCR is an SFSE plugin that allows bat scripts to be installed via mod manager. Install Console Command Runner itself by placing the .dll in \Steam\steamapps\common\Starfield\Data\SFSE\plugins\ and then any bat scripts like Baka NPCs Always Drop Their Equipped Armor (AKA: setgs fEquippedArmorChanceToDrop 1.0) can be replaced by easier to install mod manager compatible versions like Armor Drop Chance - CCR. CCR "mods" require no configuring of the ini and no .txt file creation as outlined in 4a, and instead just install via mod manager as outlined in 4b.
4. Choosing Your Mod List
You are now ready to choose your modlist!
At time of writing the most common types of Starfield mods on the Nexus are:
INI EDITS (C:\....\MO2\profiles\Starfield\StarfieldCustom.ini)
BAT SCRIPT EDITS (\steam\steamapps\common\Starfield\BigBat.txt)
REPLACERS: Textures (clothing, food, poster, guns, VASCO), audio, UI, and other assets (.dds, .wem, .ba2, etc inside a "data" folder structure)
ESP MODS (Starfield\data\mod_name.esp)
and SFSE plugins (Starfield\Data\SFSE\plugins\ModName.dll)
4a) ini and txt bat script edits
To install INI edits and bat scripts, copy the text from the mod pages provided ini or txt file and paste it into your ini or txt file.
In the case of ini edits, ensure the added lines are under the right section (General, Display, Controls, Camera, etc).
In the case of bat scripts, read the mod description carefully to decide whether to merge with your main automated bat file, or place an additional txt in the install folder (in which case, you would need to run the bat in console when in game, as outlined in section 3a). You should also check to see if a CCR version of the mod is available on the Nexus by reading the descriptions of both mods to determine if they are redundant.
4b) Mod Manager Installed Mods
[ See IMAGE 7-14 ]
To install other mods (custom skins, textures, load screen replacers, CCRs), simply hit Download With Mod Manager, Slow Download, open MO2, go to the Downloads tab on the right, double click the downloaded mod, RIGHT CLICK THE DATA FOLDER and assign the data folder to be the data folder, then activate the mod by clicking its checkbox on the left panel.
"The data folder to be the data folder? What?"
It is as simple as it sounds: you right click the data folder to make it the data folder. You should always have a file path with only one "data" folder. NO MORE, NO LESS.
IE: \data\textures\clothes\outfit_baseball_cap_01 = CORRECT
\data\data\textures\clothes\outfit_baseball_cap_01 = INCORRECT
\data\textures\data\clothes\outfit_baseball_cap_01 = INCORRECT
\profiles\Starfield\textures\clothes\outfit_baseball_cap_01 = INCORRECT
Note: Sometimes you will find mods that are not packaged correctly. If this happens, simply download the mod manually, create the proper file structure, then using 7zip or winrar create a new archive.
For example:
TextureMod.7z>\decals\impactdecals\impactdecalorganichit01_color.dds < Will not import to MO2 correctly (no data folder)
TextureModFixed.7z>\data\textures\decals\impactdecals\impactdecalorganichit01_color.dds < Works just fine
You can then click Install New Mod From Archive in the top left of MO2 and select the new fixed archive you created.
4c) ESPs
...
UPDATE: This tutorial was written very early after Starfields release, and is written to reflect that reality. With xEdit updating for Starfield support on November 4th 2023, the reality has now changed. Most ESP mods released after the week of the 4th should be safe to use, and many released before have probably be updated/cleaned with the software, or will be at some point by the author. If you are not confident with the information on the mod's page, back up your load order before use, or learn more about xEdit to see how you can check for dirty edits and also create mods yourself! It is a very powerful modding tool used across many BGS games. Just be sure to use Plugins.txt Enabler for best practice.
Below is the original tutorial unedited for contextual purposes and further reading.
...
ESP MODS CAN BREAK YOUR GAME. AVOID THEM UNTIL CREATION KIT IS RELEASED (or dont). Early adoption of ESP mods before Creation Kit's release can leave you with dirty edits in your save file which can corrupt and ruin tens or hundreds of hours of gameplay progression and roleplay. Its typically not worth it considering their limited functionality (due to being developed from the ground up without proper tools) and can often be supplemented with scripts or console commands.
ESPs are file archives in the same family as .esm and .ba2 files (IE: your vanilla game files) and are normally created through Creation Kit. ESP/ESM/ESL/BA2 files can also safely be created by xEdit once we have the base game's ESMs decoded fully, as they generate the esp/esm with the proper record headers. Odds are xEdit will be ready several months before the Creation Kit is live. XEdit is how you create most rebalance mods and how you resolve conflicts (its also how you identify dirty edits in the first place).
You can install ESP mods in the same manner as replacer mods, by simply adding them to MO2 and activating them (Section 4b), or manually adding them to the \Steam\steamapps\common\Starfield\Data directory.
You then must add the following line to your StarfieldCustom.ini:
[General]
sTestFile1=ModName.esp
where ModName is the name of the specific mod file with its extension (IE: ShipStorage.esp)
Each additional ESP requires its own line:
[General]
sTestFile1=ModName.esp
sTestFile2=ModNameExactly.esp
sTestFile3=ModNameExactlyAndExtension.esp
and so on
Again, this is not recommended, and Im simply explaining for the sake of being thorough.
YOUR SAVE FILE MAY BECOME CORRUPTED. YOU WERE WARNED.
4d) SFSE .dll Plugins
SFSE Plugins can be dropped in \Steam\steamapps\common\Starfield\Data\SFSE\plugins and do not require any other configuration, though some may be paired with an ini file for configuration (place it where the author advises). DLL mods can be very sensitive and will give errors or cause crashes if not installed properly, or if versions are mismatched. They can also break due to official game updates. You can use Starfield.exe Auto-Backup (SFSE) to ensure this never happens. With a backup of the Starfield.exe, you can always roll back and continue playing. You can also set Steam to Update On Launch so that the game never updates in the first place (since you are launching with SFSE_loader.exe, which we set up all the way back in section 1).
4e) Performance Settings
Some mod pages will provide a set of ini files to tweak the performance of the game. These replace the default display settings ini files (Low.ini, Medium.ini, High.ini and Ultra.ini) found in your install directory (C:\Program Files (x86)\Steam\steamapps\common\Starfield). Simply overwrite them using Windows Explorer. These types of mods cannot be installed with mod manager.
4f) Knowing the Difference
"How do I tell what kind of mod it is?"
You can Preview files in the Files tab of any Nexus mod page. [ See IMAGE 7 ]
Look at the file structure and file extensions and use your best judgment:
Examples:
NameOfMod.txt is probably a bat script.
NameOfMod\nameofmod.esp is an esp mod.
NameOfMod\Data\textures\clothes\some_ingame_aset_01\some_ingame_aset_01.xyz can probably be installed via MO2 as long as you make the data folder the data folder as explained in section 4b ("textures" could also be "interface", "SFSE", "video", etc and "clothes" may also be "decals", "effects", "weapons", etc).
NameOfMod\Data\SFSE\Plugins\ConsoleCommandRunner\NameOfMod.toml is a CCR "mod" (its really a script, but you install it into a mod slot in your mod manager)
NameOfMod\SFSE\Plugins\nameofmod.dll is a SFSE plugin and needs to be installed manually.
AND ALWAYS READ THE SPECIFIC MOD PAGE YOU ARE LOOKING TO INSTALL.
4g) FOMOD Installers
FOMOD installers are mods the are packaged specifically for use with mod managers, to allow the user to customize the mod during the install process.
For example, lets take a look at Immersive Lightsabers:
The mod is packaged as a FOMOD installer which you can see by its file Preview on Nexus as it contains many versions of the mod (wakizashi vs axe, blue/green/red, etc) in many "Data" folders.
You install it with Vortex or MO2 (section 4b) but before you select the data folder, it should pop up asking what preferences you want (what item to replace, the blade color, etc). You then simply hit Install after choosing your preferences and the installer does the rest. You can then activate the mod with the checkbox in the modlist.
If you want to install FOMOD mods manually for any reason, you have to open the archive and repackage it so you dont have a bunch of extra redundant files configured incorrectly in your Data folder (or mod manager virtual directory).
As always, the files structure is steam\steamapps\common\Starfield\Data\[the content of the mod goes here]
As you open the files in the download, youll find lots of folders named "Data". Copy them and paste them into one folder for the options you want (IE: pick ONE color and ONE weapon to replace, and move its Data folder, not ALL of them)
Lets say I want to replace the Wakizashi with a red light saber
My folders would look like this:
Data\meshes\weapons\wakizashi\wakizashi.nif
Data\sound\soundbanks\13841840.wem
Note: there are 7 sound files youll need in the soundbanks directory all with random number names like that ^ for all of the different sounds the weapon can
make (different materials, miss, sheath, unsheathe etc)
Once you have these 8 files (the .nif for the mesh and texture, then the 7 audio files for the one option you chose) in 2 folders ("weapons" and "soundbanks") under the data folder structure like so, just paste them into your data folder so that they merge and replace the .nif and sound files.
Note: FOMOD packages may have more or less files, these numbers and files are specific to this example with the light saber mod.
5. Support:
"I got an error when installing Mod Oragnizer!"
Literally do not worry about it.
"SFSE plugins wont work!"
Try moving them to C:\Program Files (x86)\Steam\steamapps\common\Starfield\Data\SFSE\plugins. Some .dll mods dont work in mod managers for reasons beyond my understanding, and may need to be installed manually. Make sure you have both the sfse_1_7_XX.dll and .exe files for SFSE itself in the install directory.
If you want to install SFSE and other Plugins via mod manager see Root Builder, KilLoader and Loose Root Data
"When I click on a mod another mod turns red! Theres a lightning bolt telling me things are being overwritten!"
This is a mod conflict. Conflict resolution is a topic for its own tutorial as it really depends on the case at hand. Dont use 2 mods that do the same thing (multiple Sarah jackets, or Mantis Armor replacers, the same poster, etc). You can move mods around in your load order until things are working (lower on the list overwrites the higher listings), and use Separators (which you can create by right clicking just below your load order in the left pane, and selecting Create A Separator) to stay organized. I have included screenshots of a load order for most common UI mods at the end of the IMAGES tab. Some mods may also have a meta.ini file in their folder structure which may cause a conflict, you can simply delete that file. To check this, right click a mod and select "Open In Explorer".
"I did all this and it still didnt work!"
DO NOT PUT SPACES IN THE NAMES OF FILES YOU CREATE.
Double check each file is in the right place: Dont mix up your Starfield folders:
-bat.txt goes in the Steam Install Directory, right beside the Starfield.exe and the txt file name must match the one in the sStartingC... string of the General section of your StarfieldCustom.ini (see example in Images)
-the StarfieldCustom.ini goes in the Mod Organizer 2 install directory under Profiles, then Starfield (or the name of your custom MO2 profile)
-There are actually two StarfieldCustom.ini files: one is the "vanilla" .ini (C:\Users\USERNAME\Documents\My Games\Starfield), the other is a "virtual" .ini located in the Mod Organizer 2 install location (C:\Modding\MO2\profiles\Starfield). Mod Organizer allows you to have multiple mod configurations in different Profiles, which requires each Profile to have their own .ini. ONLY CHANGE THE INI IN THE MOD ORGANIZER DIRECTORY FOR THE PROFILE YOU ARE WORKING WITH. You can use Mod Organizer 2's native .ini editor (the puzzle with the red piece in the toolbar) to make sure you are editing the right one.
-Ensure you are running the game through Mod Organizer 2 using the "Run" button directed at the sfse_loader.exe, not using Steam or directed at the Starfield.exe
-Double check the file paths for the mod files in Windows Explorer and check each path's "data" folder (which will now bear the mods name) in your Mod Organizer 2 install directory, IE: (C:\Modding\MO2\mods\8k Planets (Part 2)\textures\planets\houdiniplanets\biomemasks). If you see a folder named data, simply reinstall the mod and ensure you set the lowest appearing data folder when all folders expanded, and select Replace when prompted.
-Use Notepad++ to show hidden characters ("Show All Characters" on the toolbar) that may be picked up with copy/paste, or type out the ini/bat commands manually to ensure they are correct.
-Triple check your file extensions to make sure you didnt name your bat file to be an ACTUAL .bat file (it should be a .txt file!), or that your ini is ACTUALLY a .ini file and not a ini.txt (StarfieldCustom.ini NOT StarfieldCustom.ini.txt)
-If you are using Baka Disable My Games Folder I want you to ask yourself why. Dont use it if you dont know how to use it properly. If you are using Baka Disable My Games Folder that means your ini files are going to live somewhere else. I dont know where that might be, and if you dont either than obviously that is going to cause problems for you. It is a very useful plugin that definitely helps lots of people, but do you need it? If your answer is yes, then you already know what to do.
"My mods are working, but now all my saves are gone!"
In Mod Organizer 2, there is an option to have your saves quarantined in different Profiles.
In the dropdown at the very top, open it and select <Manage...>
This will open a new window, select your profile (Starfield) and see if the box labelled "Use Profile Specific Game Saves" is checked.
If it is, go grab your saves from the regular Documents\My Games\Starfield\saves folder, and slap them into C:\Modding\MO2\profiles\Starfield\saves
When installing a mod always test to make sure it is working before installing more mods so you can isolate any problems you might run into (crashes, missing textures, etc).
If you need further support, check the mod page of the mod you are having issue with in the Posts/Bugs/Discussions tabs.
You can also join the Starfield Modding Discord server for community assistance and tips: https://discord.gg/xBXsRyZcdF
Hopefully this covers everything for now! Fly Safe Dustys!
6. Extras
If you want to learn more about available console (~) commands see here
Information on ini configuration
To enable achievements use Baka Achievement Enabler
To enable DLSS, use Starfield Frame Generation - Replacing FSR2 with DLSS-G
Use Starfield.exe Auto-Backup (SFSE) so you never have to worry about SFSE/Starfield updates. You can also set Steam to Update On Launch so that the game never updates in the first place (since you are launching with SFSE)
Information on keybindings in the ini
Mods I Made:
Real Grav Drive Supercruise and EVA Spacewalk with Hotkeys
Supercruise Standalone - CCR
Poster Replacer Movies and More
N7 Jacket Replacer for Sarah
Immersive Food Series
LCARS For Hopetech
Klingon HUD Panels for Hopetech Ships
Mods should be free for everyone, but if you would like to leave me a tip for any of my works, here is my Ko-Fi.
Thank you for reading to the bottom of the mod page, its the coolest thing you can do on Nexus.
Here's an airplane
__ \ \ _ _
\**\ ___\/ \
X*#####*+^^\_\
o/\ \
\__\