


0 of 0


About this mod
Details how to quickly convert SE mods to LE. Includes a script that removes record edits left over when backporting mods to LE.
- Requirements
- Permissions and credits
This covers how to quickly backport any SE mod to LE and correctly resolve errors that were once only possible to clean manually, but can now be done autonomously.
*While this works on most use cases, mods that access features that are unique to SE (lighting and weather effects) probably won't work.
*This guide is not intended for mods with a hard SKSE requirement. It is possible to convert SKSE mods but I hear it requires some knowledge of C++.
*For animations, refer to this guide. I haven't tested porting animation mods myself yet, but when I do, I'll update this guide.
*This guide also includes a cell element removal script in the files tab.
Step 0. Download Tools
For this guide, you'll need TESV Edit and Cathedral Asset Optimizer
Depending on the mod, you may also need Easy ESP Backport Script
*Alternatively, you could use Convert SSE to Skyrim Script, Automation Tools for TESV Edit , and my cell element removal script found in the files tab. However, you can probably just use the Easy ESP Backport Script.
Step 1. Install the SE mod normally.
If using Mod Organizer, download and install the SE mod like normal. If not using Mod Organizer, install the mod to a separate folder.
Step 2. Open the install folder of the mod.
In general, there are three file types: textures, meshes, and .esp files. There are also .BSA files but they are essentially just fancy folders and won't change the workflow. Your mod could contain any of these.
*Additional File Types*
.bto - If you have .bto files (LOD terrain meshes), just delete them and regenerate LOD later with DynDOLOD. A great guide for that can be found here..seq - You will need to generate a new seq file using TES5Edit, as the SE seq file will likely crash your game or cause quests to misbehave. See 'Step 5' below.
Step 3. Convert Meshes and Textures
Meshes and textures (or BSAs containing meshes/textures) are easy to port. Download Cathedral Asset Optimizer and extract the tool anywhere you like. Open it up and change the profile to TESV. Then, click 'Open Directory', and browse to the folder containing both your meshes and textures (or BSA).
If you have a BSA, check the 'Extract BSA' box. If you don't have a BSA, leave it unchecked.
Make sure 'Process meshes' and 'Necessary optimization' are both checked under the Meshes tab, and 'Process textures' and 'Necessary optimization' are both checked under the Textures tab. The other options can be left at default.
Click the big 'Run' button.
If you had loose files (no BSA), you're done, the files were converted in place. If you had a BSA, the files should be extracted and you can delete the BSA now.
If the mod has no esp, you're done!
Step 4. Convert ESP
Depending on the esp, you may have to only do a few steps of the following instructions, or you may have to do all of them.
Easiest case: the esp has no master requirements besides vanilla masters.
Harder easy case: the esp has a master dependency but there's an equivalent LE master that exists (USSEP -> USLEEP)
Hardest case: the esp has a master and there's no equivalent LE master.
**Edit: all 3 of these cases are equally very easy to fix given the mod listed below.
Here's the full process for a harder case mod (esp has a master). The easiest case needs only take steps 8-10*, while the hardest case has to repeat this process for each master (discussed later). I will only discuss how to do this with MO for brevity.
1. Temporarily install the desired LE mod master into your SE mod list (e.g. USLEEP if your esp currently depends on USSEP).
2. Install and
open Wrye Bash from MO. Select Skyrim Special Edition.
3. Select your desired ESP and go to the masters field. If the masters field is too small, you can expand the window to see the names of the masters.
4. Right-click the SSE master and select “Change to…”If that option is greyed out (which it likely is), right-click the column header in the masters field and allow editing. Select your desired LE master (ie. USSEP –> USLEEP)
5. Click the save button underneath the masters field.
6. MO users move the mod from the SE mods folder to the LE mods folder. We can swap to our LE instance of MO now.
7. Sort/place the esp roughly where you'd like it in your load order.
*UPDATE*
The following steps (11-22) are unnecessary given this mod (thx turtlegodking for mentioning it). I suggest you give that a try instead. I'll leave the rest of the guide here in case it's helpful for anyone but this mod should automate the rest.*You can just run steps 7-9 with this mod instead. Look for 'Convert ESP from SSE to SLE' instead of 'Convert SSE to Skyrim' in TES5Edit.
8. Download this Convert SSE to Skyrim Script. Extract into the 'Edit Scripts' folder. It's a xEdit script that just sets the esp to form 43 (which LE likes). To use it, open up TESV Edit (MO users should run the TESV Edit executable from MO) make sure everything is enabled, then click 'OK' and wait a bit until the scrolling list of messages says 'finished'.
9. Right-click the esp you want to change, select 'Apply Script' and select 'Convert SSE to Skyrim'.
10. Open up TESV Edit and right-click your esp and select 'check for errors'. Hopefully, you have 0 errors and you're good to go. However, more likely, you'll have to resolve conflicts.
The first mod I tried to backport had 400+ errors, which I sure as hell didn't want to manually resolve. Here's where this guide actually gets helpful.
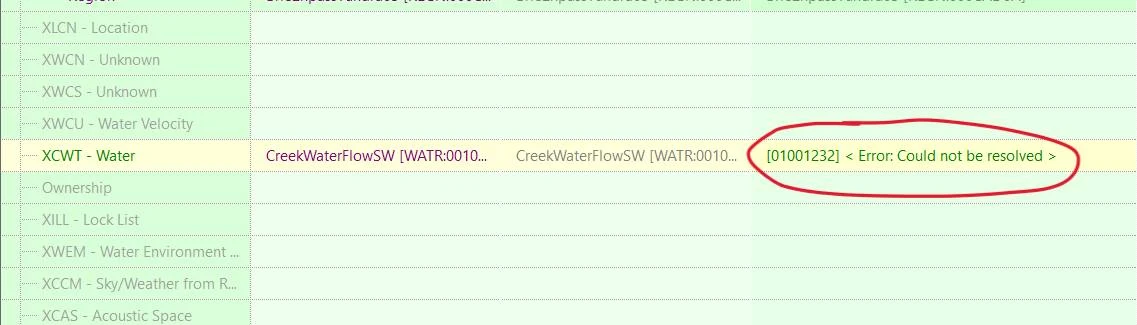
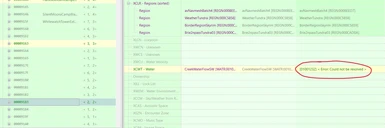
11. Take a look at what the errors are. In my case, most of the errors were unresolved conflicts in XCWT - Water elements. They didn't need to be there and I just wanted them to use what the vanilla plugins had set.
The main idea for the remaining steps is to clear/delete all elements that are causing the problems, and then 'restore' the elements from mods/vanilla plugins which essentially just copies the old values into the now empty elements.
NOTE that the fields should NOT be left blank, they need to be restored for the game to be stable. Leaving the fields blank overrides any plugins that previously modify the records (including vanilla Skyrim) with blank values instead of default values.
Also, if you try to restore without clearing first, any unresolved edits that modify fields that are untouched by every other plugin will not be changed since 'restore' is restoring from an empty field and thus doesn't make any changes.
Just follow the remaining steps and this will all make more sense.
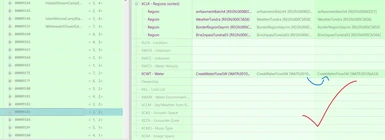
12. Delete all the problem elements - Download my cell removal script attached in the files and extract it into the Edit Scripts folder of TES5Edit. It is written for XCWT values but you can replace XCWT with whatever record you're targeting. Right-click your esp and select 'Apply Script'. Select Remove XCWT Records from the dropdown. Replace XCWT with the problematic record. After completion, the records in your esp should all be blank. If you check for errors again, you should have significantly fewer or no errors, depending on if there are other records to fix.
You are NOT finished!
13. Download Automation Tools for TESV Edit. This tool is amazingly underrated, and the author provides really good documentation. It's essentially a collection of xEdit scripts with a GUI that makes life easier.
14. Extract the files somewhere and drag the Edit Scripts folder into the folder where your TES5Edit.exe and other Edit Scripts folder is.
14.5 (Optional)—if you open the included AutomationTools v1.5.chm file, you'll get access to really nice documentation about the included scripts.
15. Reopen TESV Edit if you closed it. Wait for it to load again.
16. Right-click your mod, 'Apply Script', select 'AT - Quick Change' and click 'OK'. You'll now have another window with 3 boxes pop up.
17. Change the left box to 'Restore'
18. Type the record you're changing (e.x. XCWT) into the middle box.
19. Select the esp/esm you're going to copy the elements from.
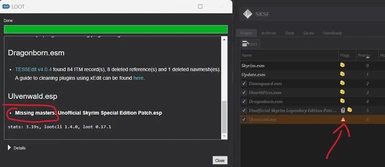
NOTE: if multiple plugins modify different records your mod uses, start with the top mod (e.g. Skyrim.esm) and repeat the remaining steps for each of those plugins, going down your load order. In my case (with XCWT edits), I had to repeat for Skyrim.esm, Update.esm, Dawnguard.esm, Hearthfires.esm, Dragonborn.esm and Unofficial Skyrim Legendary Edition Patch.esp since all of them made changes to different XCWT elements.
20. If you haven't yet, click 'OK' after setting the 3 boxes and let the magic happen.
21. Go back to those records that were changed (they should be highlighted in bold) and see if it's successfully copied the elements you were looking for.
22. Assuming you've already repeated any steps that need repeating, you can now do a (hopefully) final check for errors. In my case, I had a few other records to clean up that I decided to do manually since there were only a few. If there are any remaining big lists of unresolved edits sharing the same record, feel free to repeat steps 16-22 for the next record.
Eventually, you'll do your last check for errors, and it will tell you that you've got 0 errors. Hopefully, you'll have restored everything properly and you're now done!
Step 5. Convert .seq files
If you're backporting a quest mod that has .seq files, here's how to port them.
1. Open mod in xEdit.
2. Right-click the .esp name in the left pane.
3. Mouse over the ‘Other’ option and select ‘Create SEQ File.’ It shouldn't take too long to generate.
4. If you left the SE seq file in the mod folder, it should be automatically replaced. If not, and if you’re running xEdit through MO2, you can find the new file under Overwrite —> SEQ. Replace the SE seq file with your new one.
Step 6. Additional Fixes
A few common glitches you might encounter are:
Transparent NPC head
Grey Face bug
Crashing with Clothing Meshes
For solving these issues, see the bottom of this guide.