


0 of 0
About this mod
Allows you to replace character and object textures with custom files.
- Requirements
- Permissions and credits
- Changelogs
Hey, if you like, please upload your custom textures and screenshots! If you give permission I can add your textures to the optional files section.
This mod allows you to change the texture (image) files used to paint various things in the game. This does not allow you to change the shape of things, just the pixels used to colour them.
To use this mod, you will need to either create a texture png file from scratch (this isn't really practical), or unpack the Portia_Data\StreamingAssets\AssetBundles\referenced_texture3d (among other files) and find the graphics file for reference and edit that.
To unpack the textures, I use Unity Asset Studio to load the file and extract all assets to a folder.
All files go in the mod's assets folder (you will have to create it inside this mod's folder, or download the sample pack for reference).
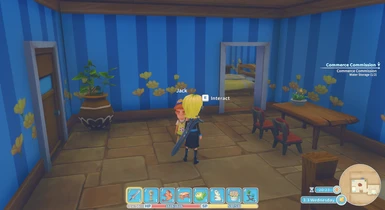
Name your files as explained below depending on what type of object you are replacing. Mesh names can be found by clicking the Dump Scene Names button in the mod settings menu (it will open the log file automatically which will show at the end a long list of meshes and textures - if the log file is already open, you may need to reload the file in Notepad).
Non-DLC NPCs:
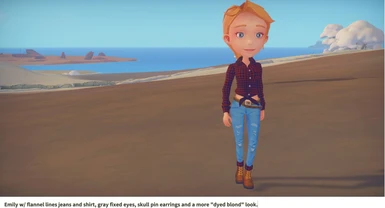
Once you have found the texture for your NPC, you have to edit it and rename it to the NPC's ID. I created an article with a list of the IDs for each NPC here. So, since Alice's ID is 4000050, you need to find her texture in the asset bundle, Alice.png, and copy it to this mod's assets folder as 4000050.png and edit this file with an image editor like Gimp.
DLC NPCs:
For characters that have DLC clothes, you have to create three texture files, as they seem to use DLC skin with non-DLC clothes. There are two options:
The old way:
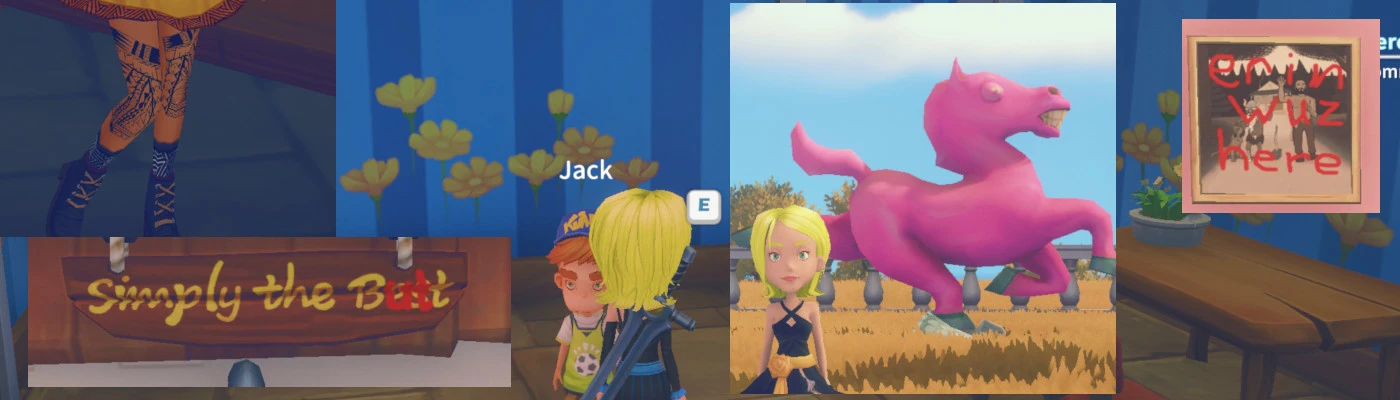
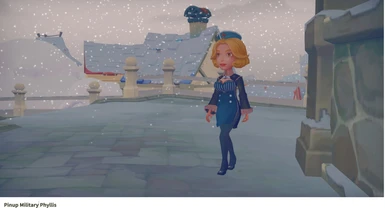
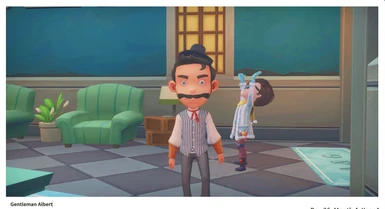
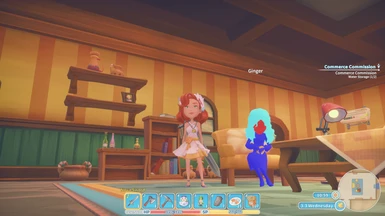
Instead of <ID>.png, you need files like <ID>_1.png, <ID>_2.png, etc. There shouldn't be more than three layers for an NPC, I don't think. I've included examples in the sample pack for Phyllis and Ginger. I've also included monocolour pngs in the sample pack that you can rename as a way of testing where the layers are used on an NPC. I've included a screenshot above of Ginger coloured this way.
This method doesn't take into account multiple clothes sets for NPCs, as it will always use the same set of textures for that NPC.
The new way:
For this method you will need to figure out the DLC actor mesh names you want to apply textures to. To get these, use the Dump Scene Names button. So, for example, with Emily when she's wearing non-DLC clothes, her meshes are:
mesh name: Emily_LOD0_cap texture name: Emily
mesh name: Emily_LOD1_cap texture name: Emily
mesh name: Emily_LOD0_Clothes texture name: Emily
mesh name: Emily_LOD1_Clothes texture name: Emily
she always uses the DLC face, so if you want to edit her face, add:
mesh name: Emily_Face001_DLC7_LOD0 texture name: Emily_001_DLC7
mesh name: Emily_Face001_DLC7_LOD1 texture name: Emily_001_DLC7
The texture names are the assets you should use as a base for your new texture files (in this case you're only editing 2 png files, copied to each part). Filenames for this method should be in the format <ID>_<MeshName>.png. I created an article with a list of the IDs for each NPC here. So in this case you would create:
4000003_Emily_LOD0_cap.png
4000003_Emily_LOD0_Clothes.png
etc.
This method allows you to create textures for each set of clothes the DLC NPC might wear. This should also work with the Change Clothes mod. So if Phyllis is wearing Emily's clothes, create files like:
4000035_Emily_LOD0_cap.png
4000035_Emily_LOD0_Clothes.png
etc.
Player Textures:
Player body parts should be named according to the bundled texture names, but you must add AppearUnit_ to the front of the filename. There are two example files in the Sample Textures assets directory. If you want to find which texture is used by your clothes, check the log file after putting them on, and the names should be there.
For the sample files of the Church dress top and bottom, as an example, the files are:
AppearUnit_Linda_Clothes018.png
AppearUnit_Linda_Pants018.png
Each of this can have a brightness and a mask texture. You can replace these by appending _Brightness and _Mask to the file names. E.g.:
AppearUnit_Linda_Clothes018_Brightness.png
AppearUnit_Linda_Clothes018_Mask.png
Also, eye textures can be specified in a similar manner, but they seem to override head AppearUnit textures, so maybe use these for the face as well:
Blink_Linda_Model.png
Blink_Linda_Model_Brightness.png
Blink_Linda_Model_Mask.png
Eye textures are the face textures for the current selected face (found by dumping textures).
A few player meshes are outside of this list - the one that is used for eye shadow and ones used for worn accessories; they have been added to the dump names info and can be replaced like scene items below.
Mount Textures:
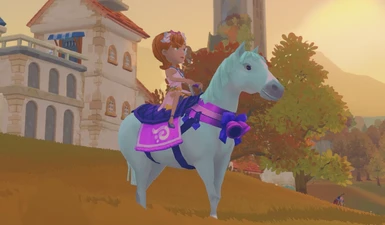
Horse and llama textures should be named as follows: Horse_<HorseName>.png. So if your horse or llama is named "Bunny", you would use Horse_Bunny.png.
Horse saddle textures should be named as follows: Saddle_<HorseName>.png. So if your horse is named "Bunny", you would use Saddle_Bunny.png.
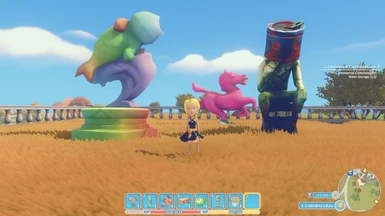
Scene Items:
This mod can now change a lot of textures for scene items. Some outdoor stuff doesn't seem to change, but everything you build seems to work fine. Again you need the mesh names, as a single object might use multiple textures, or the same texture several times. To find the corresponding mesh and texture names, use the Dump Scene Names button when you're in the scene with the items you want to change.
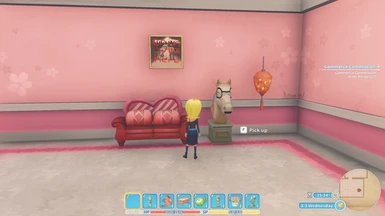
So, for example, if you want to change the teddy bear model, put a teddy bear out, then dump the names, and find:
mesh name: Item_furnishing_BearDoll texture name: Item_furnishing_BearDoll
Most simple stuff has the same mesh name as the texture, so this one's easy. Copy the Item_furnishing_BearDoll.png file from your extracted assets to the mod's assets folder and edit it as you like. The mod should pick up that asset and use it for the bear.
For more complex items (buildings or artifacts, e.g.), you will probably need multiple copies of the same texture, named according to the meshes that use that texture. Experiment away. There are some examples in the sample pack.
Just remember, the file names should be the mesh names, not their texture's names.
Technical
There is a Reload Textures button in the UMM settings, if you want to add or edit textures and see them update while in game. Thanks EonDriftor for the idea!
Requires Unity Mod Manager. Install by extracting to your Mods directory, or via the UMM interface.
Source code at https://github.com/aedenthorn/mytimeatportia.
If you want to complain or ask for help or help me test my mods, you can visit my Discord server.
This mod allows you to change the texture (image) files used to paint various things in the game. This does not allow you to change the shape of things, just the pixels used to colour them.
To use this mod, you will need to either create a texture png file from scratch (this isn't really practical), or unpack the Portia_Data\StreamingAssets\AssetBundles\referenced_texture3d (among other files) and find the graphics file for reference and edit that.
To unpack the textures, I use Unity Asset Studio to load the file and extract all assets to a folder.
All files go in the mod's assets folder (you will have to create it inside this mod's folder, or download the sample pack for reference).
Name your files as explained below depending on what type of object you are replacing. Mesh names can be found by clicking the Dump Scene Names button in the mod settings menu (it will open the log file automatically which will show at the end a long list of meshes and textures - if the log file is already open, you may need to reload the file in Notepad).
Non-DLC NPCs:
Once you have found the texture for your NPC, you have to edit it and rename it to the NPC's ID. I created an article with a list of the IDs for each NPC here. So, since Alice's ID is 4000050, you need to find her texture in the asset bundle, Alice.png, and copy it to this mod's assets folder as 4000050.png and edit this file with an image editor like Gimp.
DLC NPCs:
For characters that have DLC clothes, you have to create three texture files, as they seem to use DLC skin with non-DLC clothes. There are two options:
The old way:
Instead of <ID>.png, you need files like <ID>_1.png, <ID>_2.png, etc. There shouldn't be more than three layers for an NPC, I don't think. I've included examples in the sample pack for Phyllis and Ginger. I've also included monocolour pngs in the sample pack that you can rename as a way of testing where the layers are used on an NPC. I've included a screenshot above of Ginger coloured this way.
This method doesn't take into account multiple clothes sets for NPCs, as it will always use the same set of textures for that NPC.
The new way:
For this method you will need to figure out the DLC actor mesh names you want to apply textures to. To get these, use the Dump Scene Names button. So, for example, with Emily when she's wearing non-DLC clothes, her meshes are:
mesh name: Emily_LOD0_cap texture name: Emily
mesh name: Emily_LOD1_cap texture name: Emily
mesh name: Emily_LOD0_Clothes texture name: Emily
mesh name: Emily_LOD1_Clothes texture name: Emily
she always uses the DLC face, so if you want to edit her face, add:
mesh name: Emily_Face001_DLC7_LOD0 texture name: Emily_001_DLC7
mesh name: Emily_Face001_DLC7_LOD1 texture name: Emily_001_DLC7
The texture names are the assets you should use as a base for your new texture files (in this case you're only editing 2 png files, copied to each part). Filenames for this method should be in the format <ID>_<MeshName>.png. I created an article with a list of the IDs for each NPC here. So in this case you would create:
4000003_Emily_LOD0_cap.png
4000003_Emily_LOD0_Clothes.png
etc.
This method allows you to create textures for each set of clothes the DLC NPC might wear. This should also work with the Change Clothes mod. So if Phyllis is wearing Emily's clothes, create files like:
4000035_Emily_LOD0_cap.png
4000035_Emily_LOD0_Clothes.png
etc.
Player Textures:
Player body parts should be named according to the bundled texture names, but you must add AppearUnit_ to the front of the filename. There are two example files in the Sample Textures assets directory. If you want to find which texture is used by your clothes, check the log file after putting them on, and the names should be there.
For the sample files of the Church dress top and bottom, as an example, the files are:
AppearUnit_Linda_Clothes018.png
AppearUnit_Linda_Pants018.png
Each of this can have a brightness and a mask texture. You can replace these by appending _Brightness and _Mask to the file names. E.g.:
AppearUnit_Linda_Clothes018_Brightness.png
AppearUnit_Linda_Clothes018_Mask.png
Also, eye textures can be specified in a similar manner, but they seem to override head AppearUnit textures, so maybe use these for the face as well:
Blink_Linda_Model.png
Blink_Linda_Model_Brightness.png
Blink_Linda_Model_Mask.png
Eye textures are the face textures for the current selected face (found by dumping textures).
A few player meshes are outside of this list - the one that is used for eye shadow and ones used for worn accessories; they have been added to the dump names info and can be replaced like scene items below.
Mount Textures:
Horse and llama textures should be named as follows: Horse_<HorseName>.png. So if your horse or llama is named "Bunny", you would use Horse_Bunny.png.
Horse saddle textures should be named as follows: Saddle_<HorseName>.png. So if your horse is named "Bunny", you would use Saddle_Bunny.png.
Scene Items:
This mod can now change a lot of textures for scene items. Some outdoor stuff doesn't seem to change, but everything you build seems to work fine. Again you need the mesh names, as a single object might use multiple textures, or the same texture several times. To find the corresponding mesh and texture names, use the Dump Scene Names button when you're in the scene with the items you want to change.
So, for example, if you want to change the teddy bear model, put a teddy bear out, then dump the names, and find:
mesh name: Item_furnishing_BearDoll texture name: Item_furnishing_BearDoll
Most simple stuff has the same mesh name as the texture, so this one's easy. Copy the Item_furnishing_BearDoll.png file from your extracted assets to the mod's assets folder and edit it as you like. The mod should pick up that asset and use it for the bear.
For more complex items (buildings or artifacts, e.g.), you will probably need multiple copies of the same texture, named according to the meshes that use that texture. Experiment away. There are some examples in the sample pack.
Just remember, the file names should be the mesh names, not their texture's names.
Technical
There is a Reload Textures button in the UMM settings, if you want to add or edit textures and see them update while in game. Thanks EonDriftor for the idea!
Requires Unity Mod Manager. Install by extracting to your Mods directory, or via the UMM interface.
Source code at https://github.com/aedenthorn/mytimeatportia.
If you want to complain or ask for help or help me test my mods, you can visit my Discord server.