


0 of 0
About this mod
Overhaul of the survival mechanics during the suicide mission.
- Permissions and credits
- Changelogs
- Donations
The suicide mission is widely considered as one of the best and most iconic missions in the series, in good part because of the real consequences that may result from the player choices. However, beyond a first look, the underlying survival mechanics are sometimes quite debatable. And of course, once the mechanics are known or spoiled, there is no suspense left whatsoever.
In short, my objectives with this mod were to:
* Include a random element to keep the mission tense. Even knowing the mechanics, there is no absolute safety net, anyone can die.
* Preserve player agency, with decisions that do matter. Unlike in vanilla, the decisions do no rest on knowing/guessing which choices are correct or incorrect. Rather, the decisions are about managing the individual strengths of your current team (which will depend on some of your choices during the rest of the playthrough -- not just loyalty), taking chances for a possible later payoff, and putting some squadmates more at risk to preserve others.
* Use a more individual approach to describe the way each squadmate is prepared & motivated for the mission.
This mod also includes an optional cheat that will allow you to revive all lost squadmates and crew members after the suicide mission. Although this deviates a bit from the main intent of the mod (keeping things tense), it is meant for people who find the idea interesting but still want to start ME3 with everyone alive.
COMPATIBILITY
Note that the modifications made by Risky Suicide Mission in different files are highly inter-dependent. Any (future) mod with a higher mount order, and which modifies some of the same files as my mod, has a high chance of creating serious incompatibilities.
INSTALLATION
Install as a DLC mod with ME3 Tweaks Mod Manager:
Timing. This mod can be installed anytime during a playthrough, as long as it's BEFORE the start of the Suicide Mission (when going through the Omega-4 relay). That said, it is preferable to install it before the Horizon mission (otherwise some bonuses will be given to default squadmates, rather than depend on your choices).
Language. The mod was developed with the english version of the game, but it should work fine in all languages supported by the game. French, Spanish, and German are fully translated (might not be perfect). In other languages, the text added or modified by this mod will be in English.
NOTES
* The mechanics are fully detailed below. Reading those will not spoil the experience. Check out at least the first highlighted section (Main Points).
* You can roughly expect to lose 2-5 squadmates during the mission, though it can definitely be more than that, and it is possible that everyone survives.
* The random elements are determined partly when going through the Omega-4 relay, and partly on the spot. So reloading saves during the mission will give mixed results.
* I don't know if it looks like much, but this is actually a pretty "big" mod. Implementing all the underlying logic took a significant effort. Feedback is welcome.
* Everything was tested carefully, and I haven't had any bug reports. Still won't hurt to keep a save file before starting the mission.
CREDITS
This was all written by me.
Special thanks to Mgamerz, SirCxyrtyx, and anyone who contributed to ME3Tweaks Mod Manager and ME3Explorer, Mgamerz for support with deployment and basically anything, and to Mentlegen3218 and burenkov for permission to include compatibility patches.
MECHANICS
This section does include some spoilers for vanilla.
Main points (I recommend to read at least this)
* There is generally no absolute win/lose condition. Any selected squadmate has a chance to succeed at any task, or to fail at it. But the odds heavily depend on some of your choices.
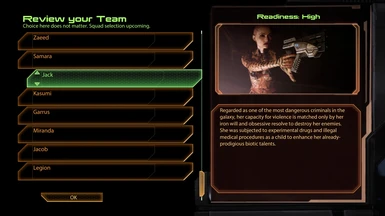
* Each squadmate is assigned a Readiness Score (between Very Low and Very High), which depends on several things before the Suicide Mission, like Loyalty or participation in the 3 main Collector missions. The Readiness Score has a strong influence on how likely a squadmate is to succeed at a given task. It is displayed in-game before any choice where it matters.
* During the Suicide Mission, squadmates selected for specific tasks will receive a strong Readiness boost, which can benefit them and the squad later. There is thus a significant incentive to take the risk of selecting less-than-ideal squadmates (Low-Medium Readiness).
* All three events during the approach in the Normandy have a chance to play out positively or negatively (squadmate death), whether the corresponding ship upgrade is installed or not, although the chance of failure is larger if it is not installed. The catch is that the Normandy can only support 2 out of 3 ship upgrades (this gives the player more control over which event is more likely to fail, rather than have it completely random. The probabilities are of course adapted to the context where 2 upgrades is the best anyone can do). More info about this design choice here.
The full details on the mechanics are given below. It is not absolutely necessary to read the following, as the new mechanics should be mostly self-explanatory while playing. However, since my goal was to create a system that remains interesting even when the mechanics are known, it should not "ruin" the experience either. You can also check the specific details and probabilities sections (marked as spoiler), which is even less necessary, but not problematic either.
Part 0 - Squadmate Readiness
A Readiness score is used to describe how well each squadmate is prepared and motivated for the mission. It can take 5 possible values: Very Low - Low - Medium - High - Very High. Squadmates with higher Readiness are more likely to succeed at any assigned task. But squadmates with lower Readiness have more to gain (in terms of their own motivation) if you trust them to accomplish certain tasks. The Readiness score of squadmates will be shown before any decision where it matters.
An initial value of the Readiness score is evaluated at the moment you go through the Omega-4 relay. All squadmates are on the lowest rank by default (Very Low), but may gain ranks depending on Loyalty, Romance, Morality, and Field Experience (presence on the Horizon, Collector Ship, and Derelict Reaper missions). During the suicide mission, selecting a squadmate for some specific tasks will give that squadmate a strong motivational boost, which will translate in a significant increase of their Readiness score (unless it was already very high).
Computation of the Readiness score.
Part 1 - Approach
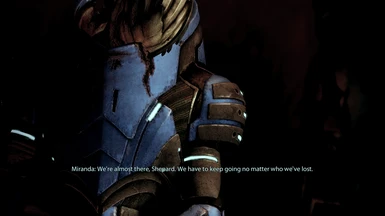
As in vanilla, up to 3 squadmates can perish in the Normandy during the approach, depending on whether or not the ship upgrades (Armor, Shield, Weapon) have been purchased. However, with this mod, the outcome is not systematic. Even with the corresponding upgrade, there is still a small chance of death. And even without the upgrade, there is still a significant chance of survival. The cutscenes have been adapted for the "no upgrade but no death", and "upgrade but death anyway" situations (except that Miranda always says "As long as the new plating holds" when nobody dies, but she is talking about the "new" plating installed by Cerberus when rebuilding the Normandy, obviously).
Good to know:
Specific details and probabilities:
Part 2 - Infiltration
Before leaving the Normandy, you must choose a Tech Specialist and a Team Leader. Both have to succeed at their task, or the Tech Specialist will die. The chances of success depend on the Readiness score of each. In addition, Tali, Kasumi and Legion receive a specialisation bonus for the task of Tech Specialist. Miranda, Jacob, Garrus AND Zaeed receive a specialisation bonus for the task of Team Leader.
After this segment, the Team Leader (even in case of failure) and the Tech Specialist (if they survive) receive a motivation boost corresponding to 2 Readiness ranks.
Good to know:
* The specialisation bonus corresponds to one Readiness rank. So Tali with Medium Readiness and Jacob with High Readiness have the same exact chances of succeeding as Tech Specialist.
* Since Very High is the maximum Readiness score, squadmates with Very High readiness have nothing to gain from the motivation boost, and squadmates with High readiness will only gain +1 rank.
* Therefore, choosing squadmates with higher Readiness gives larger chances of success, but squadmates with lower Readiness will benefit more from the motivation boost, which may end up being the only thing saving their asses later in the mission.
Specific details and probabilities:
Part 3 - Normandy Crew and Escort
Like in vanilla, whether the crew members can be extracted alive from their pods depends on the number of missions completed after their abduction. However, with this mod, the outcome is not systematic. Even if the Suicide Mission was started directly, there is still a small chance of losing some team members. And it is possible to complete a few missions before the Suicide Mission and still have a good chance that everyone makes it out alive.
When what is left of the crew returns to the Normandy, you can choose to send a squad member as escort to accompany them. The Readiness score of the escort will determine the chances of everyone reaching the Normandy alive. If Shepard did not romance anyone from the ME2 team, the crew receives a bonus corresponding to one Readiness rank.
Note that the survival chances for squadmates with Low or Very Low readiness are not great, but higher than for the final battles, so if you have too many squadmates with low readiness, this may be a chance to save one of them, by putting the crew at higher risk.
Specific details and probabilities:
Part 4 - The Long Walk
For this part, you must choose a Biotic Specialist and a Team Leader. Both will be tested individually against their Readiness. If the Biotic Specialist fails, one of the two members of your combat squad will perish. If the Team Leader fails, they will die themselves. Note that Miranda cannot die at this point, so if she is chosen as Team Leader and fails at her task, somebody else will take over and die instead. Jack, Samara, and Morinth receive a specialisation bonus for the task of Biotic Specialist. Miranda, Jacob, Garrus AND Zaeed receive a specialisation bonus for the task of Team Leader.
After this segment, the Team Leader (if they survive) and the Biotic Specialist (even in case of failure) receive a motivation boost corresponding to 2 Readiness ranks.
Good to know:
* The specialisation bonus corresponds to one Readiness rank. So Jack with Medium Readiness and Jacob with High Readiness have the same exact chances of succeeding as Biotic Specialist.
* Since Very High is the maximum Readiness score, squadmates with Very High readiness have nothing to gain from the motivation boost, and squadmates with High readiness will only gain +1 rank.
* Therefore, choosing squadmates with higher Readiness gives larger chances of success, but squadmates with lower Readiness will benefit more from the motivation boost, which may end up being the only thing saving their asses later in the mission.
Specific details and probabilities:
Part 5 - Hold the Line and FInal Battle
The last decision Shepard has to make, is to choose the two squadmates that will join her/him for the last battle. The rest of the team will be holding the line as a group. During this phase, each squadmate still present and alive will have to pass an individual test against their current Readiness score. Squadmates with higher Readiness have a higher chance of survival.
The catch is that, in the group holding the line, squadmates that successfully pass the test have a chance to perform a heroic action and save a squadmate that failed the test. The two squadmates present at the last battle are "on their own" and cannot be saved, nor save anyone else.
Good to know:
* There are no specialisation bonuses for this phase. Mordin or Jack are just as capable to hold the line as Grunt or Garrus (at equivalent Readiness).
* In the group Holding the Line, squadmates with Low or Very Low Readiness still have a very good chance of survival, if they are accompanied by enough squadmates with High or Very High Readiness. So a balanced team is ideal (two squadmates with Medium Readiness are more likely to die than one squadmate with Very Low and one with Very High readiness).
* In your squad for the last battle, taking squadmates with relatively low Readiness is dangerous as they cannot be saved by other squadmates and are thus more likely to die. However, taking squadmates with relatively high Readiness means that they will not be able to save anyone else, which may lead to more deaths in the Hold the Line team.
Specific details and probabilities:
Part 6 - Epilogue
As in vanilla, Shepard will survive if at least two squadmates survived. I did not change that. If you start with 12 squadmates, it is technically possible to lose 11 or even all of them, but extremely unlikely.
If you can't deal with the losses
Once you regain control of the Normandy after the mission, a cheat gives you the possibility to revive all dead squad and crew members. For this, you need to have the Firewalker Pack downloaded and installed. Go to the Captain's cabin in the Normandy and interact with the Prothean Relic. You will have a few opportunities to cancel, but if you go on, everyone will be revived, and all (in principle) plot bools will be set as for a "perfect run". Even your fish will be revived (after leaving the cabin and coming back, don't clean the tank).
This will only work if my mod was installed when starting the Suicide Mission, and will only revive squadmates that were present and activated at that moment.
In short, my objectives with this mod were to:
* Include a random element to keep the mission tense. Even knowing the mechanics, there is no absolute safety net, anyone can die.
* Preserve player agency, with decisions that do matter. Unlike in vanilla, the decisions do no rest on knowing/guessing which choices are correct or incorrect. Rather, the decisions are about managing the individual strengths of your current team (which will depend on some of your choices during the rest of the playthrough -- not just loyalty), taking chances for a possible later payoff, and putting some squadmates more at risk to preserve others.
* Use a more individual approach to describe the way each squadmate is prepared & motivated for the mission.
This mod also includes an optional cheat that will allow you to revive all lost squadmates and crew members after the suicide mission. Although this deviates a bit from the main intent of the mod (keeping things tense), it is meant for people who find the idea interesting but still want to start ME3 with everyone alive.
COMPATIBILITY
- Compatibility patches are provided for Femshep & Jack Romance Mod and Advanced Enemy Factions.
- My mod (safely) overwrites a few minor features from ME2 Recalibrated during the Suicide Mission (Thane images, and the Love Interest saving Shepard at the end).
- My mod (safely) overwrites a minor feature from Tali Remastered ME2 during the Suicide Mission (Tali image on the Tech specialist selection screen).
- Afaik, there shouldn't be any compatibility issues with other mods.
Note that the modifications made by Risky Suicide Mission in different files are highly inter-dependent. Any (future) mod with a higher mount order, and which modifies some of the same files as my mod, has a high chance of creating serious incompatibilities.
INSTALLATION
Install as a DLC mod with ME3 Tweaks Mod Manager:
- Drag and drop the compressed (.7z) mod file into the Mod manager window, and import the mod.
- Select the mod in the Mod Manager library, and click Apply Mod.
- If relevant, select the appropriate options for compatibility patches.
- Just make sure to install before ALOT, MEUTIM and other texture mods.
Timing. This mod can be installed anytime during a playthrough, as long as it's BEFORE the start of the Suicide Mission (when going through the Omega-4 relay). That said, it is preferable to install it before the Horizon mission (otherwise some bonuses will be given to default squadmates, rather than depend on your choices).
Language. The mod was developed with the english version of the game, but it should work fine in all languages supported by the game. French, Spanish, and German are fully translated (might not be perfect). In other languages, the text added or modified by this mod will be in English.
NOTES
* The mechanics are fully detailed below. Reading those will not spoil the experience. Check out at least the first highlighted section (Main Points).
* You can roughly expect to lose 2-5 squadmates during the mission, though it can definitely be more than that, and it is possible that everyone survives.
* The random elements are determined partly when going through the Omega-4 relay, and partly on the spot. So reloading saves during the mission will give mixed results.
* I don't know if it looks like much, but this is actually a pretty "big" mod. Implementing all the underlying logic took a significant effort. Feedback is welcome.
* Everything was tested carefully, and I haven't had any bug reports. Still won't hurt to keep a save file before starting the mission.
CREDITS
This was all written by me.
Special thanks to Mgamerz, SirCxyrtyx, and anyone who contributed to ME3Tweaks Mod Manager and ME3Explorer, Mgamerz for support with deployment and basically anything, and to Mentlegen3218 and burenkov for permission to include compatibility patches.
MECHANICS
This section does include some spoilers for vanilla.
Main points (I recommend to read at least this)
* There is generally no absolute win/lose condition. Any selected squadmate has a chance to succeed at any task, or to fail at it. But the odds heavily depend on some of your choices.
* Each squadmate is assigned a Readiness Score (between Very Low and Very High), which depends on several things before the Suicide Mission, like Loyalty or participation in the 3 main Collector missions. The Readiness Score has a strong influence on how likely a squadmate is to succeed at a given task. It is displayed in-game before any choice where it matters.
* During the Suicide Mission, squadmates selected for specific tasks will receive a strong Readiness boost, which can benefit them and the squad later. There is thus a significant incentive to take the risk of selecting less-than-ideal squadmates (Low-Medium Readiness).
* All three events during the approach in the Normandy have a chance to play out positively or negatively (squadmate death), whether the corresponding ship upgrade is installed or not, although the chance of failure is larger if it is not installed. The catch is that the Normandy can only support 2 out of 3 ship upgrades (this gives the player more control over which event is more likely to fail, rather than have it completely random. The probabilities are of course adapted to the context where 2 upgrades is the best anyone can do). More info about this design choice here.
The full details on the mechanics are given below. It is not absolutely necessary to read the following, as the new mechanics should be mostly self-explanatory while playing. However, since my goal was to create a system that remains interesting even when the mechanics are known, it should not "ruin" the experience either. You can also check the specific details and probabilities sections (marked as spoiler), which is even less necessary, but not problematic either.
Part 0 - Squadmate Readiness
A Readiness score is used to describe how well each squadmate is prepared and motivated for the mission. It can take 5 possible values: Very Low - Low - Medium - High - Very High. Squadmates with higher Readiness are more likely to succeed at any assigned task. But squadmates with lower Readiness have more to gain (in terms of their own motivation) if you trust them to accomplish certain tasks. The Readiness score of squadmates will be shown before any decision where it matters.
An initial value of the Readiness score is evaluated at the moment you go through the Omega-4 relay. All squadmates are on the lowest rank by default (Very Low), but may gain ranks depending on Loyalty, Romance, Morality, and Field Experience (presence on the Horizon, Collector Ship, and Derelict Reaper missions). During the suicide mission, selecting a squadmate for some specific tasks will give that squadmate a strong motivational boost, which will translate in a significant increase of their Readiness score (unless it was already very high).
Computation of the Readiness score.
Spoiler:
The starting rank for all squadmates is Very Low. Maximum rank is Very High, further bonuses will have no effect.
Loyalty:
* All loyal squadmates: +1 rank.
Romance:
* Romanced squadmate: +1 rank
* If nobody from the ME2 team is romanced, Shepard will have spent more time training and motivating the Normandy crew, so they will have larger chances of survival (see below).
Morality:
* Squadmates who generally agree with Shepard moral compass will be more involved and motivated.
* Pure Paragon (Paragon score larger than 5 times the Renegade score): Tali, Garrus, Mordin, and Samara receive +1 rank.
* Pure Renegade (Renegade score larger than 5 times the Paragon score): Jack, Grunt, Zaeed, Morinth receive +1 rank.
* Neutral (any other case): Miranda, Jacob, Thane, Kasumi, Legion receive +1 rank.
* I know the repartition of squadmates may be debatable, but choices had to be made.
Field Experience:
* Squadmates who encountered and fought Collector forces will be more prepared for the mission.
* Squadmates present on Horizon: +1 rank
* Squadmates present on the Collector Ship: +1 rank
* Squadmates present on the Derelict Reaper (and Legion): +1 rank
* In case the mod was not yet installed when playing these missions, the bonuses will be given by default to Mordin and Miranda for Horizon, to Thane and Garrus for the Collector Ship, and to Jack and Grunt (+Legion) for the Derelict Reaper.
During the suicide mission:
* Squadmate selected as Tech Specialist (in the vents): +2 ranks
* Squadmate selected as Fire Team Leader (infiltration): +2 ranks
* Squadmate selected as Biotic Specialist (long walk bubble): +2 ranks
* Squadmate selected as Fire Team Leader (long walk): +2 ranks
Show
The starting rank for all squadmates is Very Low. Maximum rank is Very High, further bonuses will have no effect.
Loyalty:
* All loyal squadmates: +1 rank.
Romance:
* Romanced squadmate: +1 rank
* If nobody from the ME2 team is romanced, Shepard will have spent more time training and motivating the Normandy crew, so they will have larger chances of survival (see below).
Morality:
* Squadmates who generally agree with Shepard moral compass will be more involved and motivated.
* Pure Paragon (Paragon score larger than 5 times the Renegade score): Tali, Garrus, Mordin, and Samara receive +1 rank.
* Pure Renegade (Renegade score larger than 5 times the Paragon score): Jack, Grunt, Zaeed, Morinth receive +1 rank.
* Neutral (any other case): Miranda, Jacob, Thane, Kasumi, Legion receive +1 rank.
* I know the repartition of squadmates may be debatable, but choices had to be made.
Field Experience:
* Squadmates who encountered and fought Collector forces will be more prepared for the mission.
* Squadmates present on Horizon: +1 rank
* Squadmates present on the Collector Ship: +1 rank
* Squadmates present on the Derelict Reaper (and Legion): +1 rank
* In case the mod was not yet installed when playing these missions, the bonuses will be given by default to Mordin and Miranda for Horizon, to Thane and Garrus for the Collector Ship, and to Jack and Grunt (+Legion) for the Derelict Reaper.
During the suicide mission:
* Squadmate selected as Tech Specialist (in the vents): +2 ranks
* Squadmate selected as Fire Team Leader (infiltration): +2 ranks
* Squadmate selected as Biotic Specialist (long walk bubble): +2 ranks
* Squadmate selected as Fire Team Leader (long walk): +2 ranks
Part 1 - Approach
As in vanilla, up to 3 squadmates can perish in the Normandy during the approach, depending on whether or not the ship upgrades (Armor, Shield, Weapon) have been purchased. However, with this mod, the outcome is not systematic. Even with the corresponding upgrade, there is still a small chance of death. And even without the upgrade, there is still a significant chance of survival. The cutscenes have been adapted for the "no upgrade but no death", and "upgrade but death anyway" situations (except that Miranda always says "As long as the new plating holds" when nobody dies, but she is talking about the "new" plating installed by Cerberus when rebuilding the Normandy, obviously).
Good to know:
- As in vanilla, Miranda, Jacob, and Mordin are safe during this phase, and squadmates you take to fight the Oculus are safe for the Shield check. But other than that, all other squadmates can die from any of these 3 events.
- Squadmate Readiness does not play a role during the approach, so deaths during this section are mostly random.
- But not completely random, since the Normandy can only support a maximum of 2 ship upgrades, out of the 3 important ones (because of their weight & power requirements). This is explicitly stated on the item descriptions and implemented in the in-game upgrade interface. If all 3 are installed (which should only be possible if done before installing the mod) when you go through the Omega-4 relay, one of them will be chosen randomly and removed.
- Different squadmates are put at higher risk by not installing certain upgrades.
- It should be clear that if I had left the possibility to install all three upgrades, the probabilities of success/failure would have been set up differently. The goal here is to make it so that one of the 3 events is more likely to fail than the others, and that the player can choose and know in advance which one.
- More info about this design choice here.
Specific details and probabilities:
Spoiler:
* If the upgrade (Armor/Shield/Weapon) is installed, there is 10% chance that a squadmate will die anyway during the corresponding event.
* If the upgrade is not installed, there is 50% chance that a squadmate will die during the corresponding event.
* Not upgrading the Armor puts Samara/Morinth, Garrus, and Kasumi more at risk
* Not upgrading the Shield puts Tali, Legion, and Grunt more at risk.
* Not upgrading the Weapon puts Thane, Jack, and Zaeed more at risk
* In case someone does die during one of those events, it's 25% for each of the squadmates at risk, and 25% any other squadmate.
With 2 upgrades installed (which is the maximum), the probablity to reach the base without loosing anyone is thus 40.5%. The probability to loose 3 squadmates during this phase is 0.5%.
Show
* If the upgrade (Armor/Shield/Weapon) is installed, there is 10% chance that a squadmate will die anyway during the corresponding event.
* If the upgrade is not installed, there is 50% chance that a squadmate will die during the corresponding event.
* Not upgrading the Armor puts Samara/Morinth, Garrus, and Kasumi more at risk
* Not upgrading the Shield puts Tali, Legion, and Grunt more at risk.
* Not upgrading the Weapon puts Thane, Jack, and Zaeed more at risk
* In case someone does die during one of those events, it's 25% for each of the squadmates at risk, and 25% any other squadmate.
With 2 upgrades installed (which is the maximum), the probablity to reach the base without loosing anyone is thus 40.5%. The probability to loose 3 squadmates during this phase is 0.5%.
Part 2 - Infiltration
Before leaving the Normandy, you must choose a Tech Specialist and a Team Leader. Both have to succeed at their task, or the Tech Specialist will die. The chances of success depend on the Readiness score of each. In addition, Tali, Kasumi and Legion receive a specialisation bonus for the task of Tech Specialist. Miranda, Jacob, Garrus AND Zaeed receive a specialisation bonus for the task of Team Leader.
After this segment, the Team Leader (even in case of failure) and the Tech Specialist (if they survive) receive a motivation boost corresponding to 2 Readiness ranks.
Good to know:
* The specialisation bonus corresponds to one Readiness rank. So Tali with Medium Readiness and Jacob with High Readiness have the same exact chances of succeeding as Tech Specialist.
* Since Very High is the maximum Readiness score, squadmates with Very High readiness have nothing to gain from the motivation boost, and squadmates with High readiness will only gain +1 rank.
* Therefore, choosing squadmates with higher Readiness gives larger chances of success, but squadmates with lower Readiness will benefit more from the motivation boost, which may end up being the only thing saving their asses later in the mission.
Specific details and probabilities:
Spoiler:
Chances of success (for each task: Tech Specialist and Team Leader)
* Readiness Very Low: 50%
* Readiness Low: 60%
* Readiness Medium: 70%
* Readiness High: 80%
* Readiness Very High: 90%
* Readiness Very High + specialisation bonus: 100%
Importantly, both the Tech Specialist and Team Leader have to succeed at their task.
Examples:
* With Tali (Readiness Medium) as Tech specialist and Miranda (Readiness High) as Team Leader. Tali will have 80% chance of success, Miranda will have 90% chance of success (since they both get the specialisation bonus). So Tali will have 72% chance of survival.
* With Thane (Readiness Low) as Tech specialist and Jack (Readiness Medium) as Team Leader. Thane will have 60% chance of success, Jack will have 70% chance of success. So Thane will only have 42% chance of survival.
Show
Chances of success (for each task: Tech Specialist and Team Leader)
* Readiness Very Low: 50%
* Readiness Low: 60%
* Readiness Medium: 70%
* Readiness High: 80%
* Readiness Very High: 90%
* Readiness Very High + specialisation bonus: 100%
Importantly, both the Tech Specialist and Team Leader have to succeed at their task.
Examples:
* With Tali (Readiness Medium) as Tech specialist and Miranda (Readiness High) as Team Leader. Tali will have 80% chance of success, Miranda will have 90% chance of success (since they both get the specialisation bonus). So Tali will have 72% chance of survival.
* With Thane (Readiness Low) as Tech specialist and Jack (Readiness Medium) as Team Leader. Thane will have 60% chance of success, Jack will have 70% chance of success. So Thane will only have 42% chance of survival.
Part 3 - Normandy Crew and Escort
Like in vanilla, whether the crew members can be extracted alive from their pods depends on the number of missions completed after their abduction. However, with this mod, the outcome is not systematic. Even if the Suicide Mission was started directly, there is still a small chance of losing some team members. And it is possible to complete a few missions before the Suicide Mission and still have a good chance that everyone makes it out alive.
When what is left of the crew returns to the Normandy, you can choose to send a squad member as escort to accompany them. The Readiness score of the escort will determine the chances of everyone reaching the Normandy alive. If Shepard did not romance anyone from the ME2 team, the crew receives a bonus corresponding to one Readiness rank.
Note that the survival chances for squadmates with Low or Very Low readiness are not great, but higher than for the final battles, so if you have too many squadmates with low readiness, this may be a chance to save one of them, by putting the crew at higher risk.
Specific details and probabilities:
Spoiler:
Pod survival depends on the number of missions between abduction and omega-4 relay. One mission is removed from the count if Shepard did not romance anyone from the ME2 team.
* (there are 3 possible outcomes: everyone survives / a part of the crew survives / only Chakwas survives)
* 0 mission, no romance: 100% / 0% / 0%
* 0 mission: 90% / 10% / 0%
* 1 mission: 70% / 20% / 10%
* 2 missions: 50% / 20% / 30%
* 3 missions: 30% / 20% / 50%
* 4 missions: 10% / 20% / 70%
* 5 missions: 0% / 10% / 90%
* 6+ missions: 0% / 0% / 100%
Escort outcome depends on the Readiness of the squad member chosen as escort. If Shepard did not romance anyone from the ME2 team, the squadmate+crew gain a bonus corresponding to 1 rank of Readiness.
* No escort: crew dies, as in vanilla
* Readiness Very Low: 40% chance of success
* Readiness Low: 50%
* Readiness Medium: 60%
* Readiness High: 70%
* Readiness Very High: 90%
* Readiness Very High + no romance: 100%
In case of success, everyone survives. In case of failure, there is 50% chance that the squadmate sacrifice themselves and saves the crew, and 50% chance that everyone (squadmate + crew) dies.
Show
Pod survival depends on the number of missions between abduction and omega-4 relay. One mission is removed from the count if Shepard did not romance anyone from the ME2 team.
* (there are 3 possible outcomes: everyone survives / a part of the crew survives / only Chakwas survives)
* 0 mission, no romance: 100% / 0% / 0%
* 0 mission: 90% / 10% / 0%
* 1 mission: 70% / 20% / 10%
* 2 missions: 50% / 20% / 30%
* 3 missions: 30% / 20% / 50%
* 4 missions: 10% / 20% / 70%
* 5 missions: 0% / 10% / 90%
* 6+ missions: 0% / 0% / 100%
Escort outcome depends on the Readiness of the squad member chosen as escort. If Shepard did not romance anyone from the ME2 team, the squadmate+crew gain a bonus corresponding to 1 rank of Readiness.
* No escort: crew dies, as in vanilla
* Readiness Very Low: 40% chance of success
* Readiness Low: 50%
* Readiness Medium: 60%
* Readiness High: 70%
* Readiness Very High: 90%
* Readiness Very High + no romance: 100%
In case of success, everyone survives. In case of failure, there is 50% chance that the squadmate sacrifice themselves and saves the crew, and 50% chance that everyone (squadmate + crew) dies.
Part 4 - The Long Walk
For this part, you must choose a Biotic Specialist and a Team Leader. Both will be tested individually against their Readiness. If the Biotic Specialist fails, one of the two members of your combat squad will perish. If the Team Leader fails, they will die themselves. Note that Miranda cannot die at this point, so if she is chosen as Team Leader and fails at her task, somebody else will take over and die instead. Jack, Samara, and Morinth receive a specialisation bonus for the task of Biotic Specialist. Miranda, Jacob, Garrus AND Zaeed receive a specialisation bonus for the task of Team Leader.
After this segment, the Team Leader (if they survive) and the Biotic Specialist (even in case of failure) receive a motivation boost corresponding to 2 Readiness ranks.
Good to know:
* The specialisation bonus corresponds to one Readiness rank. So Jack with Medium Readiness and Jacob with High Readiness have the same exact chances of succeeding as Biotic Specialist.
* Since Very High is the maximum Readiness score, squadmates with Very High readiness have nothing to gain from the motivation boost, and squadmates with High readiness will only gain +1 rank.
* Therefore, choosing squadmates with higher Readiness gives larger chances of success, but squadmates with lower Readiness will benefit more from the motivation boost, which may end up being the only thing saving their asses later in the mission.
Specific details and probabilities:
Spoiler:
Chances of success, for each task: Biotic Specialist and Team Leader.
* (specialisation bonus gives one additional rank for the corresponding task)
* Readiness Very Low: 10%
* Readiness Low: 30%
* Readiness Medium: 40%
* Readiness High: 60%
* Readiness Very High: 80%
* Readiness Very High + specialisation bonus: 100%
Show
Chances of success, for each task: Biotic Specialist and Team Leader.
* (specialisation bonus gives one additional rank for the corresponding task)
* Readiness Very Low: 10%
* Readiness Low: 30%
* Readiness Medium: 40%
* Readiness High: 60%
* Readiness Very High: 80%
* Readiness Very High + specialisation bonus: 100%
Part 5 - Hold the Line and FInal Battle
The last decision Shepard has to make, is to choose the two squadmates that will join her/him for the last battle. The rest of the team will be holding the line as a group. During this phase, each squadmate still present and alive will have to pass an individual test against their current Readiness score. Squadmates with higher Readiness have a higher chance of survival.
The catch is that, in the group holding the line, squadmates that successfully pass the test have a chance to perform a heroic action and save a squadmate that failed the test. The two squadmates present at the last battle are "on their own" and cannot be saved, nor save anyone else.
Good to know:
* There are no specialisation bonuses for this phase. Mordin or Jack are just as capable to hold the line as Grunt or Garrus (at equivalent Readiness).
* In the group Holding the Line, squadmates with Low or Very Low Readiness still have a very good chance of survival, if they are accompanied by enough squadmates with High or Very High Readiness. So a balanced team is ideal (two squadmates with Medium Readiness are more likely to die than one squadmate with Very Low and one with Very High readiness).
* In your squad for the last battle, taking squadmates with relatively low Readiness is dangerous as they cannot be saved by other squadmates and are thus more likely to die. However, taking squadmates with relatively high Readiness means that they will not be able to save anyone else, which may lead to more deaths in the Hold the Line team.
Specific details and probabilities:
Spoiler:
There are 3 possible outcomes for each squadmate (Failure / Success / Heroic Success):
* Readiness Very Low: 90% / 10% / 0%
* Readiness Low: 70% / 20% / 10%
* Readiness Medium: 50% / 20% / 30%
* Readiness High: 30% / 20% / 50%
* Readiness Very High: 10% / 20% / 70%
Failure means that the squadmate dies, unless saved by another squadmate (only possible in the Hold the Line team).
Success means that the squadmate survives.
Heroic Success means that the squadmate survives, and saves another squadmate (if in the Hold the Line team).
Examples:
* There are only two squadmates holding the line, one with Very High and one with Very Low readiness. The squadmate with Very Low readiness has 90% chance of failure, but the squadmate with Very High readiness has 70% chance of Heroic Success. Altogether, there is 9% chance that both die, 19% chance that one of them dies, and 72% chance that both survive.
* If the same two squadmates are taken in the squad for the final battle, they cannot save each other. So in that case, there is 9% chance that both die, 82% chance that one of them dies, and 9% chance that both survive.
Show
There are 3 possible outcomes for each squadmate (Failure / Success / Heroic Success):
* Readiness Very Low: 90% / 10% / 0%
* Readiness Low: 70% / 20% / 10%
* Readiness Medium: 50% / 20% / 30%
* Readiness High: 30% / 20% / 50%
* Readiness Very High: 10% / 20% / 70%
Failure means that the squadmate dies, unless saved by another squadmate (only possible in the Hold the Line team).
Success means that the squadmate survives.
Heroic Success means that the squadmate survives, and saves another squadmate (if in the Hold the Line team).
Examples:
* There are only two squadmates holding the line, one with Very High and one with Very Low readiness. The squadmate with Very Low readiness has 90% chance of failure, but the squadmate with Very High readiness has 70% chance of Heroic Success. Altogether, there is 9% chance that both die, 19% chance that one of them dies, and 72% chance that both survive.
* If the same two squadmates are taken in the squad for the final battle, they cannot save each other. So in that case, there is 9% chance that both die, 82% chance that one of them dies, and 9% chance that both survive.
Part 6 - Epilogue
As in vanilla, Shepard will survive if at least two squadmates survived. I did not change that. If you start with 12 squadmates, it is technically possible to lose 11 or even all of them, but extremely unlikely.
If you can't deal with the losses
Once you regain control of the Normandy after the mission, a cheat gives you the possibility to revive all dead squad and crew members. For this, you need to have the Firewalker Pack downloaded and installed. Go to the Captain's cabin in the Normandy and interact with the Prothean Relic. You will have a few opportunities to cancel, but if you go on, everyone will be revived, and all (in principle) plot bools will be set as for a "perfect run". Even your fish will be revived (after leaving the cabin and coming back, don't clean the tank).
This will only work if my mod was installed when starting the Suicide Mission, and will only revive squadmates that were present and activated at that moment.