


0 of 0

About this mod
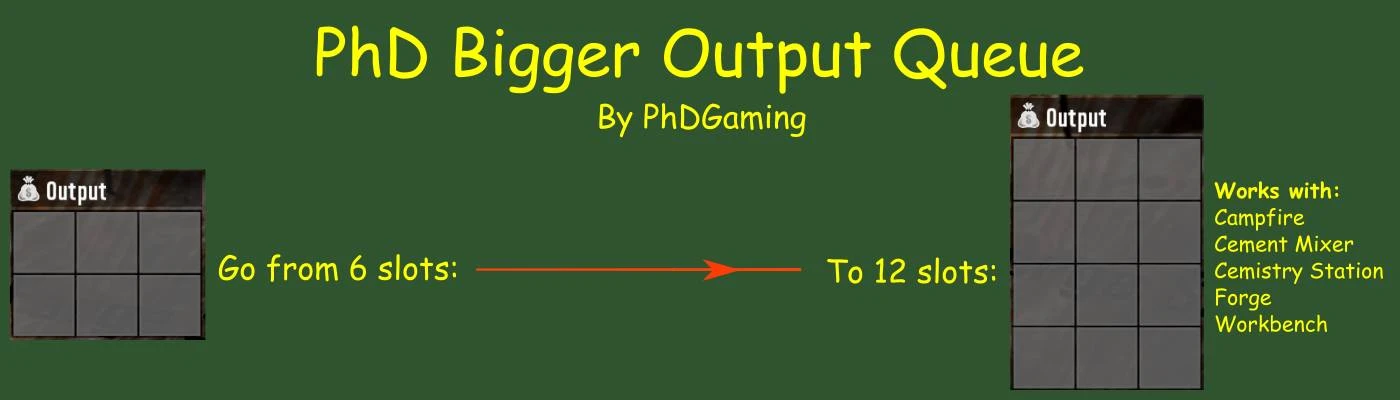
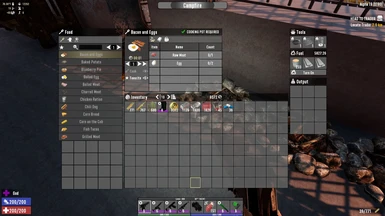
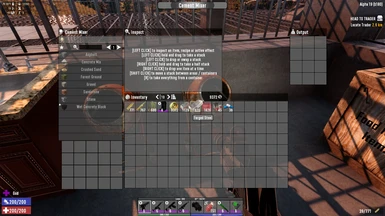
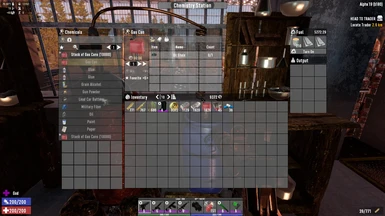
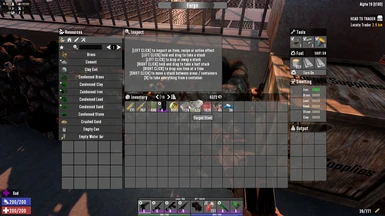
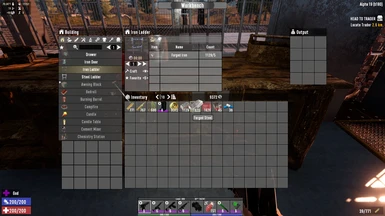
Increases the output queue size from SIX to TWELVE spaces for several work stations.
- Permissions and credits
- Changelogs
- Donations
Increases the output queue size from SIX to TWELVE spaces for the following work stations:
NOTE: This mod is NOT compatible with SMX - By Sirillion.
Let me know what you think. I'm always open to suggestions and comments. Please don't forget to hit the endorse button if you like the mod. It's a big help! Thanks!
I'd also welcome any donations (Patreon)! Thanks!
My Other Mods:
PhD Bigger Crafting Queue (A21)
PhD Bigger Backpack and Secure Storage (A21)
PhD Bigger Forge Input (A21)
PhD Bigger Vehicle Storage (A21)
PhD Disassemble IT (A21)
PhD Just Better (A21)
PhD Nailgun (A21)
PhD Better 30K Stacks (A21)
INSTALLATION:
ALWAYS backup your game! THIS SHOULD ALWAYS BE DONE BEFORE INSTALLING ANY NEW MOD - EVEN WITH A MOD MANAGER!
The best way to install mods is to use a mod manager. I use Vortex. But there are others available such as Mod Organizer 2 and Nexus Mod Manager. There should be a button to learn more about Vortex on the Nexus webpage. The other two can be downloaded from Nexus; just search for them. There are videos available on YouTube on how to install and set up these programs. They might also help you decide which of the three you'd like to use. Installing a mod is then just as simple as pressing the button on the download page. Your installed mod manager will do the rest.
To install a mod manually:
1. Back up your game files!
2. Create a folder called "Mods" in your 7 Days to Day installation folder - "\steamapps\common\7 Days To Die"
3. Extract the folder in the Mod's zip file into the Mods directory. Each mod you install should have its own directory.
4. Start the Game
5. Done
- Campfire,
- Cement Mixer,
- Chemistry Station,
- Forge, and
- Workbench
NOTE: This mod is NOT compatible with SMX - By Sirillion.
Let me know what you think. I'm always open to suggestions and comments. Please don't forget to hit the endorse button if you like the mod. It's a big help! Thanks!
I'd also welcome any donations (Patreon)! Thanks!
My Other Mods:
PhD Bigger Crafting Queue (A21)
PhD Bigger Backpack and Secure Storage (A21)
PhD Bigger Forge Input (A21)
PhD Bigger Vehicle Storage (A21)
PhD Disassemble IT (A21)
PhD Just Better (A21)
PhD Nailgun (A21)
PhD Better 30K Stacks (A21)
INSTALLATION:
ALWAYS backup your game! THIS SHOULD ALWAYS BE DONE BEFORE INSTALLING ANY NEW MOD - EVEN WITH A MOD MANAGER!
The best way to install mods is to use a mod manager. I use Vortex. But there are others available such as Mod Organizer 2 and Nexus Mod Manager. There should be a button to learn more about Vortex on the Nexus webpage. The other two can be downloaded from Nexus; just search for them. There are videos available on YouTube on how to install and set up these programs. They might also help you decide which of the three you'd like to use. Installing a mod is then just as simple as pressing the button on the download page. Your installed mod manager will do the rest.
To install a mod manually:
1. Back up your game files!
2. Create a folder called "Mods" in your 7 Days to Day installation folder - "\steamapps\common\7 Days To Die"
3. Extract the folder in the Mod's zip file into the Mods directory. Each mod you install should have its own directory.
4. Start the Game
5. Done