


0 of 0

About this mod
This modpage is Guide to Optimize your Skyrim to the max using tools that are available in Nexusmods, and how to to ensure you understand the steps and also understand the tools used. Differences is this is the guide by me as a Mod User not a Mod Author, so i hope i could explain in not too difficult way and still get things right and done.
- Requirements
- Permissions and credits
First of all, Hi this is Neverthless. I'm feeling good today i will release a step by step guide how to optimize Skyrim in the very least on the latest Skyrim AE 1170 (Steam Version). There is actually already a lot of optimization guide by other modders in this forum, but this one i hope is different because this guide is created by me as a mod user not author. I hope i could explain every tools i used and how it works rightfully.
There is no actual Mod files to be uploaded or downloaded, but this is a step-to-step guide, how to optimize your heavily modded Skyrim to be able to run properly and actually play the game instead of being bothered by small things like FPS drop, stuttering, low GPU usage, and not utilizing the maximum potential of your devices. But still, remember even there are a a ceiling of the game engine itself and also other aspect that will affect your gameplay because not every mod is different and it will still impact your PC quite a bit.
For starters, i will tell how my FPS really jumped from 30-40 average in outdoor to even be able achieve 50-80 FPS even though it will still be able to drop to 30 and 40 in some really certain crowded area. In indoors, my FPS would be able to jump even further even to 200 FPS average and thus quite happy all my energy spending quite rewarded in finding the ultimate optimization of Skyrim. This FPS average are through a 800 modlist inculding texture like Skyrim 202X by Pfuscher, lotta of animation mod including elden rim by with nemesis, another tons of flora overhaul such as ulvenwald, skyrim 3Ds Trees and plants an also the notoriously heavy impacting grass mod by nolvus grass mashup, notoriously heavy northern road mod and also lot of town overhaul including dawn of skyrim and city mod like Epic Redbag's Solitude, Whiterun Has Walls (Renewed), Make your Ryften, lot of outskirts and docks overhaul, Seasons of Skyrim, Dyndolod with ENB enabled (NAT and PRT).
Next i would think i have a entry-mid range PC with this specs for you for comparison purposes only.
Intel i5-12400F 6 Core 12 Threads (base OC to 135watt (4,4 GHz))
iGame Ultra W/OC RTX 3060 TI 8GB
NVMe SSD PNY 512GB (Skyrim and mod organizer along with Mod was put in to this Drive)
PNY XLR8 16GB 3200MHz DDR4 Single Slot.
Corsair 650 Watt Psu.
Now to the optimization Mod and how to step guide.
1. Use Mod Organizer 2 (MO2)
Using NMM is great for other games you want to easily place and install mod, but not for Skyrim. MO2 really offers a lot more easy and utility in terms for modding Skyrim. It also won't be make your modlist a mess of redudancy and conflicts. Instead you will see each files by files and able determines it clearly without having issues in conflicting files. For more in depth explanation of MO2 usage, i'll provide the links here : Mod Organizer 2 : The Ultimate Setup Guide by GamerPoets (you should see a lot of his videos really, really helpful in explaining a lot of mod usage for beginners and pros alike)
2. Use BethIni : BethIni Pie by DoubleYou's
With a more easy Ini Files Tuning, rather than having to read Notepad and change the Numbers in Skyrim.Ini file one by one, use BethIni to really makes it easy for you. Make sure that the BethIni was added in MO2 and start tune your graphics and settings through BethIni and use BethIni Preset. Don't forget to also click the apply recommended tweaks in BethIni main page after you start your BethIni. Recommended Presets are High, some people said that using Ultra Preset in the BethIni doesnt do much changes, or gives better graphics in game. Instead it will lag your game and reduce your performance so use it with your own accord. (Remember part of Modding is also to test it by yourself to suit your liking and your maximum ceiling of performance. So do try it if you feeling good.)
NOTE : in BethIni, go to the advanced settings, in the search bar, Search "iNumHWThreads" and set it to your liking. For myself though i set it to 8 even though i have to 12 Threads CPU is because i also use this settings Boost Skyrim CPU Performance by GamerPoets (really you should subscribe and like him). So i find setting my Threads to my maximum thread limit appears to be more stuttered and lagging than using 8. Also reminder this games is also "old" so even though you really had beefy CPU, there is a limit to an extent.
3. Use SSE Engine Fixes and SSE Display Fixes
This will gives you a lot of benefit and almost no harm. It is also probably already required by lots of mods from Nexus, so chance is you already installed it even though you know or may not knowing it. But to get maximum benefit is to tweak the Ini file in SSE Display Fixes and Toml file inside SSE Engine Fixes.
3a.)SSE Engine Fixes by aers
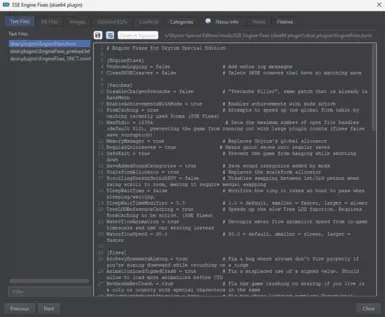
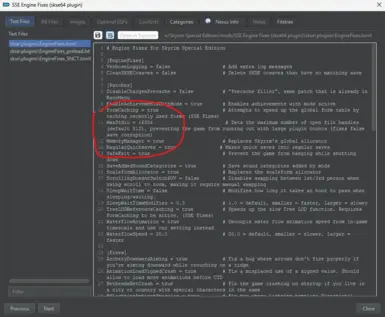
Install as usual with MO2. After installation, through MO2 double left-click on the SSE Engine Fixes and a window will pop-up, go to Text Files section and select the EngineFixes.toml. A list will appear on the right section.
Find the in the list word "MaxStdio" and set it to 16384. also ensure that "MemoryManager" is also turned on in the section. i will provide pictures in the Description.
3b.) SSE Display Tweaks by slavicpotato1
Install as usual with MO2. After Installation, Through MO2 double left-click on the SSE Display Tweaks and a window will pop-up, go to INI Files and select the INI files in the left bar. A lists will appear in the right bar and this is what you need to Find :
Fullscreen = True (set it to True, i find playing in fullscreen will gives you much more stable gameplay rather than borderless windowed, but i will leave this to your preferences. If you prefer Borderless Windowed, set the Fullscreen = False, Then find and set this to true : Borderless = True)
Set Vsync = false and then set EnableTearing = True. (Truth is, i don't feel that much tearing ingame because my FPS is not so far from the maximum refresh rate of my monitor can output. So i will put it to false to ensure the game will be pulling performance from the GPU. If you experience Tearing so much, i would suggest then to turn Vsync = True and EnableTearing = False. Really, do test this on your own and experiment on this, this is the part of modding and don't be scared. There is a lot of Modders out there will help you if you experience crashes in your Skyrim)
4. SSE FPS Stabilizer by Shizof
Ever experience stuttering and lag whenever you move your mouse and screen ? This is the one, I personally install this to ensure and reduce the lag and stuttering whenever i start to move my screen.
5. Skyrim Priority SE AE - CPU Performance FPS Optimizer by boring3
Ever being bothered by looking at your Skyrim in Task Manager, opening it in details and knowing it wasn't high priority ? Then this is the one, basically making your Skyrim ensured to be high priority and using as much as CPU Usage it needs. Again and again, this is also instructed by Boost Skyrim CPU Performance by GamerPoets. (again and again, really support him dude)
6. eFPS - Anniversary Edition by Firegtx
Exterior is such a scary place in Modded Skyrim, like dragons burning down villages and people alike, exterior can burn down you GPU and FPS quickly. So this is a must mod for me. Really guys, read the description and requirement, it is quite long but it is really easy to install. Just remember to find patches for your mod. Chance is, your mod already have it's patch in eFPS - Official Patch Hub. So install it also and check it, if by chance it was none, then you could find by yourself in NexusMods itself.
7. Grass FPS Booster by grvulture
Ever Tired of Grass Munching your FPS like Cow munching grass, Take this Mod as your personal helper to make your grass mods run better and make your Skyrim actually playable with that much grass, you grass pervert ╭( ๐_๐)╮. NOTE : Don't activate this mod when running TEXGEN, DYNDOLOD or GRASS CACHE HELPER NG
8. Grass Cache Helper NG by Shizof
This is seriously also help to relieve your CPU, instead of generating grass in blocks, it changes it to a precache so your grass will relieve your CPU Performance and giving it a space for your CPU to process other things such as particle or other mods that are CPU heavy. Hopefully, by chance your grass mod are already have its cache in Nexus, so search it. If there was none, follow through this guide How To Generate Grass Cache to generate your own grass cache with seasons or not, and also including if you were using Dyndolod.
9. SSEEdit by ElminsterAU and SSEEditQuickAutoClean written byFe4therstone
One of the essential tools in Skyrim Modding. There is a lot of usage within the SSEEdit if you're advanced enough. But if you're unfamilliar with it, you can use the SSEEditquickAutoClean Plugin that are included above to clean some of your plugin that are dirty. Why ? because it will ofcourse reduce your load time and also makes your Skyrim much cleaner and lighter. If you are fortunately using dyndolod, you should be already know how to use this plugin. Use this to clear your Update.esm, Dawnguard.Esm, HearthFires.Esm, Dragonborn.Esm, because with a lot of mod this four plugin will contain many ITM Records (Identical to Master : a type of dirty edit where a mod has overwritten something in the game without actually changing anything). If you really want to start cleaning your Skyrim, you can use LOOT to identify plugins that contain ITM Records and performs the SSEEditQuickAutoClean to those plugin.
10. VRAMr by gavwhittaker
So the purpose of this mod already stated in the Main Page, Downscale your textures to make it consumes less VRAM (looking at you GreenTeam 🫵🏼) and also optimizes your textures to a BC7 Format, which decoded much faster by your GPU which mean less stuttering and less lag ingame.
Simple instruction to use VRAMr is to download the mod, put it in your all-in-one modding folder, then add it to your MO2 using the same method as everything else. Then follow this :
1. Start the VRAMr in your MO2
2. The Program will appear, also a tab which includes warning, suggestion, what to do and what not, and also a simple guide for VRAMr
3. If you already read all the warning and instruction that pops up with the VRAMr App, then proceed to use the VRAMr
4. VRAMr will read all your mod and textures and let it do all that
5. Choose the Quality of your output textures, I personally use High since it already enough for me
6. let VRAMr do the rest, it takes time, so use the time to relieve yourself, take a break, rest, eat or talk to your fams.
7. After VRAMr Completed its task, then create an empty mod in MO2 using the tools in the Screwdriver and Wrench icon.
8. Name it VRAMr Output or anything you like, and copy the VRAMr Output from VRAMr to the folder in the Mod you just created using MO2. ( just right-click the mod you just created an choose open in explorer, then copy the VRAMr Output into it.)
9. Voila, VRAMr is done and experience the differences.
All in all, this is just the guide for dummies, i'm sorry if there is a bad grammar or languange or something, english is not my native or first languange, Special Thanks to all the Modders Above who created all this tools. I'm not a mod author myself so, i'm sorry if there is a misunderstand for the mod usage i listed above. But i want to Help everyone who experiences stutters and lag like me and finally i were able to make Skyrim playable again and runs like butter after hours of tinkering with my modlist.
MAKE SKYRIM GREAT AGAIN (๑•̀ᗝ•́)૭
There is no actual Mod files to be uploaded or downloaded, but this is a step-to-step guide, how to optimize your heavily modded Skyrim to be able to run properly and actually play the game instead of being bothered by small things like FPS drop, stuttering, low GPU usage, and not utilizing the maximum potential of your devices. But still, remember even there are a a ceiling of the game engine itself and also other aspect that will affect your gameplay because not every mod is different and it will still impact your PC quite a bit.
For starters, i will tell how my FPS really jumped from 30-40 average in outdoor to even be able achieve 50-80 FPS even though it will still be able to drop to 30 and 40 in some really certain crowded area. In indoors, my FPS would be able to jump even further even to 200 FPS average and thus quite happy all my energy spending quite rewarded in finding the ultimate optimization of Skyrim. This FPS average are through a 800 modlist inculding texture like Skyrim 202X by Pfuscher, lotta of animation mod including elden rim by with nemesis, another tons of flora overhaul such as ulvenwald, skyrim 3Ds Trees and plants an also the notoriously heavy impacting grass mod by nolvus grass mashup, notoriously heavy northern road mod and also lot of town overhaul including dawn of skyrim and city mod like Epic Redbag's Solitude, Whiterun Has Walls (Renewed), Make your Ryften, lot of outskirts and docks overhaul, Seasons of Skyrim, Dyndolod with ENB enabled (NAT and PRT).
Next i would think i have a entry-mid range PC with this specs for you for comparison purposes only.
Intel i5-12400F 6 Core 12 Threads (base OC to 135watt (4,4 GHz))
iGame Ultra W/OC RTX 3060 TI 8GB
NVMe SSD PNY 512GB (Skyrim and mod organizer along with Mod was put in to this Drive)
PNY XLR8 16GB 3200MHz DDR4 Single Slot.
Corsair 650 Watt Psu.
Now to the optimization Mod and how to step guide.
1. Use Mod Organizer 2 (MO2)
Using NMM is great for other games you want to easily place and install mod, but not for Skyrim. MO2 really offers a lot more easy and utility in terms for modding Skyrim. It also won't be make your modlist a mess of redudancy and conflicts. Instead you will see each files by files and able determines it clearly without having issues in conflicting files. For more in depth explanation of MO2 usage, i'll provide the links here : Mod Organizer 2 : The Ultimate Setup Guide by GamerPoets (you should see a lot of his videos really, really helpful in explaining a lot of mod usage for beginners and pros alike)
2. Use BethIni : BethIni Pie by DoubleYou's
With a more easy Ini Files Tuning, rather than having to read Notepad and change the Numbers in Skyrim.Ini file one by one, use BethIni to really makes it easy for you. Make sure that the BethIni was added in MO2 and start tune your graphics and settings through BethIni and use BethIni Preset. Don't forget to also click the apply recommended tweaks in BethIni main page after you start your BethIni. Recommended Presets are High, some people said that using Ultra Preset in the BethIni doesnt do much changes, or gives better graphics in game. Instead it will lag your game and reduce your performance so use it with your own accord. (Remember part of Modding is also to test it by yourself to suit your liking and your maximum ceiling of performance. So do try it if you feeling good.)
NOTE : in BethIni, go to the advanced settings, in the search bar, Search "iNumHWThreads" and set it to your liking. For myself though i set it to 8 even though i have to 12 Threads CPU is because i also use this settings Boost Skyrim CPU Performance by GamerPoets (really you should subscribe and like him). So i find setting my Threads to my maximum thread limit appears to be more stuttered and lagging than using 8. Also reminder this games is also "old" so even though you really had beefy CPU, there is a limit to an extent.
3. Use SSE Engine Fixes and SSE Display Fixes
This will gives you a lot of benefit and almost no harm. It is also probably already required by lots of mods from Nexus, so chance is you already installed it even though you know or may not knowing it. But to get maximum benefit is to tweak the Ini file in SSE Display Fixes and Toml file inside SSE Engine Fixes.
3a.)SSE Engine Fixes by aers
Install as usual with MO2. After installation, through MO2 double left-click on the SSE Engine Fixes and a window will pop-up, go to Text Files section and select the EngineFixes.toml. A list will appear on the right section.
Find the in the list word "MaxStdio" and set it to 16384. also ensure that "MemoryManager" is also turned on in the section. i will provide pictures in the Description.
3b.) SSE Display Tweaks by slavicpotato1
Install as usual with MO2. After Installation, Through MO2 double left-click on the SSE Display Tweaks and a window will pop-up, go to INI Files and select the INI files in the left bar. A lists will appear in the right bar and this is what you need to Find :
Fullscreen = True (set it to True, i find playing in fullscreen will gives you much more stable gameplay rather than borderless windowed, but i will leave this to your preferences. If you prefer Borderless Windowed, set the Fullscreen = False, Then find and set this to true : Borderless = True)
Set Vsync = false and then set EnableTearing = True. (Truth is, i don't feel that much tearing ingame because my FPS is not so far from the maximum refresh rate of my monitor can output. So i will put it to false to ensure the game will be pulling performance from the GPU. If you experience Tearing so much, i would suggest then to turn Vsync = True and EnableTearing = False. Really, do test this on your own and experiment on this, this is the part of modding and don't be scared. There is a lot of Modders out there will help you if you experience crashes in your Skyrim)
4. SSE FPS Stabilizer by Shizof
Ever experience stuttering and lag whenever you move your mouse and screen ? This is the one, I personally install this to ensure and reduce the lag and stuttering whenever i start to move my screen.
5. Skyrim Priority SE AE - CPU Performance FPS Optimizer by boring3
Ever being bothered by looking at your Skyrim in Task Manager, opening it in details and knowing it wasn't high priority ? Then this is the one, basically making your Skyrim ensured to be high priority and using as much as CPU Usage it needs. Again and again, this is also instructed by Boost Skyrim CPU Performance by GamerPoets. (again and again, really support him dude)
6. eFPS - Anniversary Edition by Firegtx
Exterior is such a scary place in Modded Skyrim, like dragons burning down villages and people alike, exterior can burn down you GPU and FPS quickly. So this is a must mod for me. Really guys, read the description and requirement, it is quite long but it is really easy to install. Just remember to find patches for your mod. Chance is, your mod already have it's patch in eFPS - Official Patch Hub. So install it also and check it, if by chance it was none, then you could find by yourself in NexusMods itself.
7. Grass FPS Booster by grvulture
Ever Tired of Grass Munching your FPS like Cow munching grass, Take this Mod as your personal helper to make your grass mods run better and make your Skyrim actually playable with that much grass, you grass pervert ╭( ๐_๐)╮. NOTE : Don't activate this mod when running TEXGEN, DYNDOLOD or GRASS CACHE HELPER NG
8. Grass Cache Helper NG by Shizof
This is seriously also help to relieve your CPU, instead of generating grass in blocks, it changes it to a precache so your grass will relieve your CPU Performance and giving it a space for your CPU to process other things such as particle or other mods that are CPU heavy. Hopefully, by chance your grass mod are already have its cache in Nexus, so search it. If there was none, follow through this guide How To Generate Grass Cache to generate your own grass cache with seasons or not, and also including if you were using Dyndolod.
9. SSEEdit by ElminsterAU and SSEEditQuickAutoClean written byFe4therstone
One of the essential tools in Skyrim Modding. There is a lot of usage within the SSEEdit if you're advanced enough. But if you're unfamilliar with it, you can use the SSEEditquickAutoClean Plugin that are included above to clean some of your plugin that are dirty. Why ? because it will ofcourse reduce your load time and also makes your Skyrim much cleaner and lighter. If you are fortunately using dyndolod, you should be already know how to use this plugin. Use this to clear your Update.esm, Dawnguard.Esm, HearthFires.Esm, Dragonborn.Esm, because with a lot of mod this four plugin will contain many ITM Records (Identical to Master : a type of dirty edit where a mod has overwritten something in the game without actually changing anything). If you really want to start cleaning your Skyrim, you can use LOOT to identify plugins that contain ITM Records and performs the SSEEditQuickAutoClean to those plugin.
10. VRAMr by gavwhittaker
So the purpose of this mod already stated in the Main Page, Downscale your textures to make it consumes less VRAM (looking at you GreenTeam 🫵🏼) and also optimizes your textures to a BC7 Format, which decoded much faster by your GPU which mean less stuttering and less lag ingame.
Simple instruction to use VRAMr is to download the mod, put it in your all-in-one modding folder, then add it to your MO2 using the same method as everything else. Then follow this :
1. Start the VRAMr in your MO2
2. The Program will appear, also a tab which includes warning, suggestion, what to do and what not, and also a simple guide for VRAMr
3. If you already read all the warning and instruction that pops up with the VRAMr App, then proceed to use the VRAMr
4. VRAMr will read all your mod and textures and let it do all that
5. Choose the Quality of your output textures, I personally use High since it already enough for me
6. let VRAMr do the rest, it takes time, so use the time to relieve yourself, take a break, rest, eat or talk to your fams.
7. After VRAMr Completed its task, then create an empty mod in MO2 using the tools in the Screwdriver and Wrench icon.
8. Name it VRAMr Output or anything you like, and copy the VRAMr Output from VRAMr to the folder in the Mod you just created using MO2. ( just right-click the mod you just created an choose open in explorer, then copy the VRAMr Output into it.)
9. Voila, VRAMr is done and experience the differences.
All in all, this is just the guide for dummies, i'm sorry if there is a bad grammar or languange or something, english is not my native or first languange, Special Thanks to all the Modders Above who created all this tools. I'm not a mod author myself so, i'm sorry if there is a misunderstand for the mod usage i listed above. But i want to Help everyone who experiences stutters and lag like me and finally i were able to make Skyrim playable again and runs like butter after hours of tinkering with my modlist.
MAKE SKYRIM GREAT AGAIN (๑•̀ᗝ•́)૭