Skyrim Special Edition

Root Builder - Managing Multiple Skyrim Game Versions
An infernalryan Skyrim Modding Guide


Overview
This guide will provide instructions on how to use Root Builder to manage multiple Skyrim game versions at the same time (e.g., 1.5.97 and 1.6.1170). This guide applies to Skyrim SSE/AE (Steam and GOG only).

Guide Contents:

    • Preface of what this means and how it is useful
    • Prepare game version "mods" which will include all stock game files for each version
    • Create version-specific profiles in MO2 which may require additional versions of some mods
    • Final considerations to better optimize this setup and disk usage
    • Further reading for links to other helpful information


Please consider ENDORSING if you found this guide helpful!


1   Preface
Utilizing Root Builder, we have the ability to manage files contained in the root Skyrim game folder. Among other things, this means that we can now manage multiple Skyrim game versions at the same time if we choose to within a SINGLE game installation, and quickly switch between these versions using MO2 profiles.

1.1   But… why?
There are several reasons you may wish to do this. Some examples are below.

  • If you are a mod author and want to ensure your plugin works with multiple Skyrim versions without having to continuously (and manually) overwrite your game folder with appropriate files for the version(s) you are testing every time, or run a separate installation for each version (e.g., GOG and Steam concurrently).
  • If you want to run a 1.6 game version but still want to generate grass cache using No Grass in Objects (which is 1.5 only) and import the cache file(s) into your 1.6 game.
  • If you want to maintain a current version of the game for the sole purpose of (re-)downloading Anniversary Upgrade Creation Club content and/or downloading Bethesda 'Creations' from the in-game store and then bringing them into your downgraded version.
    • NOTE – This applies to Steam version only as GOG does NOT have the ‘Creations’ menu (this is intentional), nor do you download the Anniversary Upgrade in this way.
  • If you share a computer with someone and want to play a different version than they do.
  • I'm sure there are other use-cases as well…


1.2   Prerequisites
Before beginning, you must ensure that no plugins are installed directly into your Skyrim game folder. If you have any (such as SKSE, ENB, ReShade, and/or other binaries/plugins), please see my Root Builder - Installation and Usage guide to set those up as MO2 mods (there are setup examples for most common .dll plugins and binaries). After converting these to utilize Root Builder, you will need to ensure their original files are deleted from your Skyrim directory. In other words, EVERY MOD in your Skyrim game folder must be managed by MO2 for ALL versions you want to use. Refer to my Skyrim Game Files List to see a list of all vanilla/stock files if you're not sure if a file is from a 3rd party mod or not.

1.2.1   GOG
If you are using the GOG version, the steps provided require GOG Galaxy. While it is possible to install files for different versions manually via the offline backup game installers from GOG, this is far more tedious and less scalable, so is therefore outside of the scope of this article. This guide does not provide support for installations performed in that way, but the steps below should provide enough information for proper interpretation if you are inclined to do so.


1.3   Disk space
Since this process requires that you maintain more than one version of Skyrim, you will need quite a bit of disk space (at least initially) for preparing these files (about 15GB for Steam and 26GB for GOG, per version). We can reduce this drastically in section 4 (Final considerations), but this space will be needed up front.


2   Prepare game version "mods"
Each game version will act as its own "mod" which can be enabled/disabled between profiles in MO2 to determine which version is active.

2.1   Current game version
For the currently active game version, we need to add these files to MO2 so they can be managed.

2.1.1   Create empty "mod" for the current version
    • From the MO2 'list options' menu (the "wrench" icon at the top right of the mod list window within MO2), select 'Create empty mod'.

    • Enter a name for the current game version (e.g., 'Skyrim 1.5.97 Stock Game Files') and press 'OK' (you should name this with your actual version).
    • Right-click your mod (it is at the very bottom of the mod list), and select 'Open in Explorer' (alternatively, you can hold CTRL and double-click the mod in the list to open the explorer window).
    • Move this folder aside for a moment.


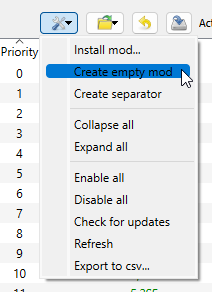
2.1.2   Move game files
Files will next be moved or copied into the new mod folder we created.

    • From the 'Open folders' menu (the "folder" icon at the top right of the mod list window within MO2 next to the "wrench" icon), select 'Open Game folder'. This will open your root Skyrim game folder.

    • Open the 'Data' folder inside.
    • MOVE all files except for the 'Video' folder from the 'Data' folder to the new "empty" mod folder we just created and set aside for your current version. Do not move the folder itself, just the files inside of it – Remember that MO2 treats the mod folder like the /Data folder already. Ensure the files you are moving match only the stock game files found on my Skyrim Game Files List for your current version of Skyrim.
    • When finished, create a new folder called 'root' inside the mod folder that you just copied your files to, then open it.
    • In your Skyrim game /Data folder window, go up a level so that you are back to your main Skyrim game folder.
    • COPY all remaining stock game files and folders (except for the 'Data' folder which we already took care of) from the root Skyrim game folder into the 'root' folder we just created, again ensuring the files you move match only the stock game files found on my Skyrim Game Files List for your current version of Skyrim (NOTE – you can safely ignore any files that are highlighted in purple from that list, if any).
    • Close all open explorer windows from this section.
    • When finished, select MO2 to ensure it is the active window and hit the 'F5' button on your keyboard. This will refresh the application and now reflect the files we changed outside of MO2.
    • Enable the mod by clicking the checkbox to the left of the mod name in the mod list on the left side of the main MO2 window – This is your "current" game version's root files, and should be enabled.
    • If the steps above have been performed correctly, your mod's 'Filetree' tab should look like this (Skyrim 1.5.97 stock game files listed, your files may differ based on your version):

        • Folders collapsed:

        • Folders expanded:

      • Move this mod higher in the list to better organize it with your other mods (there is a specific order shown later).
        • If you have previously performed a "best of both worlds" downgrade, and/or have performed master file cleaning, make sure the stock file mod is higher in the list, and thus overwritten by any updated master mods in your list.


    2.1.3   Launch the game
    Next, you will want to launch your game to ensure it loads without any issues. What we've done in previous steps is a 1 for 1 migration of files from the main game folder to a "mod" managed in MO2, so everything should work exactly how it did before moving anything. Ensure that loading an existing game save also works without issue. If anything is not working as expected, review both the prerequisites in section 1.2 and all steps in section 2.1 to ensure nothing was missed, and take corrective action on any steps that may have been performed improperly. Additionally, you may want to re-review my Root Builder - Installation and Usage guide as folder structure is crucial when using Root Builder. This is why I have provided example images of how the 'root' folder should be placed, and what files need to be inside of it. If you need to rollback/reset back to how things were previously, simply move the files back to your main Skyrim game folder. Refer to my Skyrim Game Files List to ensure these go back to the proper locations.


    2.2   Additional game version(s)
    For additional game versions, we need to download these files and then add them to MO2 in a similar way we did the current version. You can do this for as many versions as you'd like.

    2.2.1   Create empty "mod" for the new version
    Following similar steps as the previous section, we will be creating a new "mod" within MO2 for this new version.

      • From the MO2 'list options' menu (the "wrench" icon at the top right of the mod list window within MO2), select 'Create empty mod'.
      • Enter a name for the new version you are adding (e.g., 'Skyrim 1.6.640 Stock Game Files') and press 'OK' (you should name this with your actual version).
      • Right-click your mod (it is at the very bottom of the mod list), and select 'Open in Explorer' (alternatively, you can hold CTRL and double-click the mod in the list to open the explorer window).
      • Move this folder aside for a moment.


    2.2.2   Download and add additional version to MO2
    These steps differ depending on whether you are using Steam or GOG. Follow only one of the steps below (open their respective 'Spoiler' tag).

    2.2.2.1   Steam
    These downloads will be performed via the Steam console.
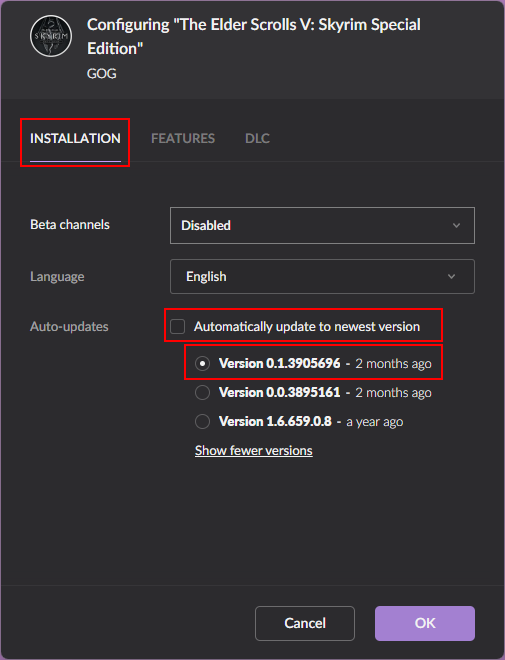
    Spoiler:  
    Show
      • Follow instructions on my Skyrim Manifest List for Skyrim to download your preferred version.
      • Once the depot downloads are done, refer to the Skyrim console to locate where your depots from above have been downloaded to. By default this is:
        •  C:\Program Files (x86)\Steam\steamapps\content\app_489830\
      • Open this folder. The following 3 folders should be inside:
        • depot_489831
        • depot_489832
        • depot_489833
      • Create a new (temporary) folder inside this 'app_489830' folder called 'merged depots'.
      • Open each of the 'depot_xxxxxx' folders listed above and MOVE the files and folders inside here into the 'merged depots' folder you just created.
      • Once all files have been moved, delete the 'depot_xxxxxx' folders.
      • Open the 'merged depots' folder. This folder should now have all of the stock game files and folders organized in the same way as your Skyrim game folder would.
      • Open the 'Data' folder inside.
      • MOVE all files except for the 'Video' folder from the 'Data' folder to the new "empty" mod folder we just created and set aside for this additional version in the previous section. Do not move the folder itself, just the files inside of it.
      • When finished, create a new folder called 'root' inside the mod folder that you just copied your files to, then open it.
      • In your 'Data' folder window, go up a level so that you are back to your 'merged depots' folder.
      • MOVE all remaining files and folders (except for the 'Data' folder which we already took care of) from the 'merged depots' folder into the 'root' folder we just created.
      • You can now delete the 'merged depots' folder.
      • Close all open explorer windows from this section.
      • When finished, select MO2 to ensure it is the active window and hit the 'F5' button on your keyboard. This will refresh the application and now reflect the files we changed outside of MO2.
      • Refer to the 'Filetree' example from section 2.1.2 to ensure your folder structure has been set up correctly.
      • Keep this mod disabled (for now).
      • Feel free to move this mod higher in the list to better organize it with your other mods.
        • If you have previously performed a "best of both worlds" downgrade, and/or have performed master file cleaning, make sure the stock file mod is higher in the list, and thus overwritten by any updated master mods in your list.
      • Repeat all steps in section 2.2 for any additional version(s) you wish to add, otherwise skip to section 3.


    2.2.2.2   GOG
    These files are acquired with a main game version selection within the game configuration menu.

    Spoiler:  
    Show
      • In GOG Galaxy, select your Skyrim game.
      • From the 'More' menu (next to 'Play'), select 'Manage installation > Configure…'.

      • On the dialog that opens, under the 'Installation' tab, be sure 'Auto-updates' is unchecked, and the additional version you want to download is selected. You will have to click the 'Show more versions' link to expand the list and show all versions. For reference, 0.1.3905696 is actually version 1.6.1179. Version 0.0.3895161 is actually a malformed version of 1.6.1170 (which was replaced with 0.1.3905696) and can be ignored.

      • Click 'OK'. This will start to download the new version into your game folder.
      • Wait for the game to complete verification, it will show an 'Updating X%' indicator in the top of the window. Hovering over this will show the status.
      • Repeat all steps from section 2.1.2 (using the mod folder you created and set aside for this "additional version" in the previous section instead) to complete.
      • Keep this mod disabled (for now).
      • Repeat all steps in section 2.2 for any additional version(s) you wish to add, otherwise proceed.


    2.3   Skyrim game folder
    To this point, if you have followed the steps above, your Skyrim /Video folder should be empty except for the /Video folder inside. This is expected. The data files can be quite large so when managing the stock game files from MO2, we don't want to consume more disk space than needed (we want more space for the mods themselves!). The root game folder should still contain all files as per normal, such as the .exe files, etc. (if these are removed, MO2 will complain that there is no valid game installed).


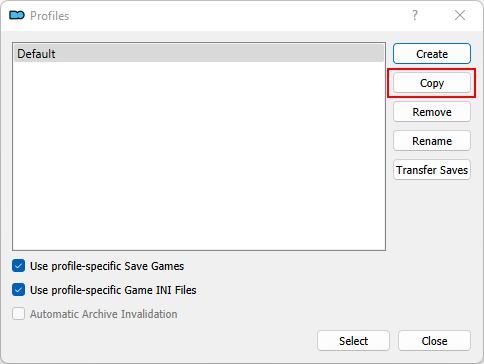
    3   Create version-specific profiles
    To easily switch between versions, MO2 profiles are recommended. This is especially important when different versions of some plugins (such as SKSE plugins) are required for different game versions.

    3.1   Current game version
    Within MO2, ensure the stock files mod created previously for your current game version is enabled, and any other stock file mods you created are not enabled.


    3.2   Additional version(s)
      • From the 'profile' dropdown at the top of the MO2 mod list, select '<Manage…>' (your profile list may look different depending on the names and number of profiles you have already).

      • With your currently active profile selected, click the 'Copy' button (your profile list may look different depending on the names and number of profiles you have already).

      • Give the profile a new name. It is recommended to put the additional version number in the name (e.g., 'Default - Skyrim 1.5.97'). Click 'OK'.
        • Make sure the profile has the 'Use profile-specific Save Games' option selected (save games will not be compatible across versions).
        • Additionally (but optionally), you may also want to enable the 'Use profile-specific Game INI Files' option. Depending on your game versions, there may be additional settings which are valid only for each. While this may make changing a setting globally across all versions a bit of a pain (since you'll have to update at minimum 2 config files), it is the recommended setting.
      • With the newly-copied profile selected, click the 'Select' button.

      • Go back to the profile management dialog

      • Select the previous profile and ensure the same profile settings selected for your additional version are also selected here (regarding Save Games and Game INI Files).
      • While selected, click the 'Rename' button.
      • Give this a name reflective of the existing game version, similar to how you added a profile for the additional version.

      • Click the 'Close' button. Your active profile should still be the newly-added version since all we did here was rename the previous profile and select options.
      • Disable the stock game files mod for the current game version (from the other profile), and enable the stock game files mod which will be used for this new version profile.
      • Repeat the creation of additional MO2 profiles as needed for any additional game versions you are adding.


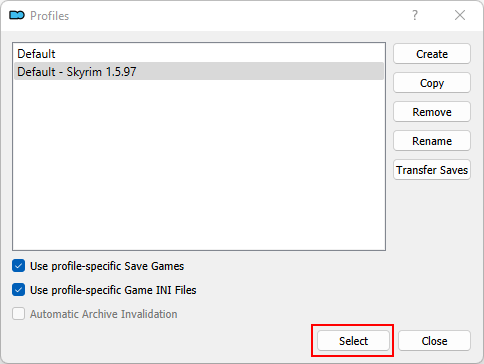
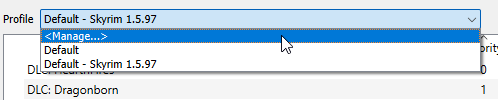
    3.3   Additional steps for specific use cases
    See below for additional step(s) required for some of the use cases presented earlier. Some of the use cases below require you to download alternate versions of .dll plugins to be fully compatible, so see specific notes for each.

    What are .dll plugins?
    Spoiler:  
    Show
    .dll plugins are different from those created with the Creation Kit in that they interact with the game engine itself, allowing you to do much more than what is possible with a traditional .esm, .esl, .esp file, etc.. These require much more frequent (and guaranteed) updates. When a new version of Skyrim is released, a new version of most .dll plugins (such as SKSE) is also required. When the game engine changes (with a new version), the functionality of plugins like SKSE break. Any mods which depend on these plugins can also break. Additionally, when these main plugins are updated, the mods which depend on them also need to be updated, otherwise they may not be fully compatible. This is why when creating a profile that is compatible with an additional version of Skyrim, we have to ensure we also update any applicable .dll plugins.

    3.3.1   Using latest version for mod downloads only
    If you are maintaining a version simply for downloading AE content and/or Bethesda in-game store 'Creations', you will only need to download the correct version of SKSE. From here you can disable EVERY mod except for SKSE and your latest version 'Stock Game Files' mod in the applicable MO2 profile. Since you aren't actually playing on this version, this is all you will need to do to allow you to launch the game to access the in-game store. Once the creations are downloaded, they can be moved over as mods in MO2 for usage in your downgraded game version(s).

    3.3.1.1   Restoring the Creations menu
    If you have used an .ini tool (such as Bethini Pie) or otherwise copied some .ini tweaks to your settings files, your 'Creations' menu may not be accessible, instead giving the "Couldn't connect to the Bethesda.net servers, would you like to modify your load order?" error. Skip to section 3.3.2 if this is NOT happening to you, otherwise, follow the instructions below.

      • Ensure you have the profile option enabled for this MO2 profile to 'Use profile-specific Game INI Files'.
      • Once confirmed, from the 'Open folders' menu (the "folder" icon at the top right of the mod list window within MO2 next to the "wrench" icon), select 'Open INIs folder'. This will open your game .INI files folder managed by MO2.
      • Open the 'skyrim.ini' file.
      • Under the [Bethesda.net] header, change the following option:
        • bEnablePlatform=1
      • This will restore Bethesda.net (and 'Creations') functionality for this profile.
      • Save and close the file.


    3.3.2   Grass cache generation
    If you are adding a 1.5.97 build and profile specifically for grass cache generation with No Grass in Objects (NGIO) so that you can later generate grass LOD with DynDOLOD, you will need the proper SKSE version, but can otherwise skip downloading all other 1.5.97-compatible versions of .dll plugins from your main load order since you won't actually be "playing" this version (only launching it for grass precache). Leave all Creation Kit mods enabled (.esm, .esp, .esl), but disable all other .dll plugins except for SKSE, .NET Script Framework, and NGIO itself. All you'll need to do under this MO2 profile is launch the MO2 'Precache Grass' plugin, per normal, and once finished, move the '*.CGID' files found in the 'Data\Grass' folder in 'Overwrite' to their own mod (e.g., 'Grass Precache'). These files can now be used to generate LOD with DynDOLOD in your 1.6 build. Remember to do this every time your load order changes (specifically your grass placement as result of load order updates). This is by no means a full tutorial on grass cache / LOD generation, but is the sole function of this MO2 profile if used for grass cache only.


    3.3.3   Playable versions
    If you intend to actually play one or more of your additional version(s), you will need to ensure you have the proper version of EVERY .dll-based plugin (SKSE, Address Library, etc.) for EVERY one of these applicable game version(s). Essentially you are creating a version of your mod list which is 100% compatible with these additional game version(s),  and some .dll plugins are simply not compatible with all versions. See general notes below for tips on this.

    • In some cases, not every plugin needs to be updated (for example, many Address Library dependent plugins themselves don't require updates, just the SKSE and Address Library plugins themselves do), but you will need to manually check all of these.
    • Be sure to install all applicable plugins for your additional versions that need to go into the root Skyrim game folder as a "mod" using Root Builder (such as SKSE, etc.). 
    • Check out the amazing SKSE Plugin Status list for plugin compatibility with the versions of Skyrim you want to run.
    • Upon downloading these proper versions, you will need to disable the existing plugin in your load order for this MO2 profile, and enable the proper one(s).
    • Be sure to test launching this version to ensure there are no plugin incompatibilities (which may result in an immediate crash, or a crash shortly after loading).


    4   Final considerations
    Below are some final considerations which can help maximize compatibility and minimize overall disk usage when maintaining multiple versions, along with further optimizing files which can be shared between all versions.

    4.1   Backported Extended ESL Support
    If any of your game versions is less than version 1.6.1130, you MUST install the Backported Extended ESL Support SKSE plugin and enable it for all respective MO2 profiles. If you do not install this, loading any newer Creation Kit mods with the new 1.71 header will cause a CTD when loading (this includes updated masters)! You do not have to enable this plugin in MO2 profiles for any game versions 1.6.1130 and above.

    4.2   Shared files
    The steps in this section are recommended to improve compatibility with any downgraded version(s) and further shave off total required disk space as they can be used in ALL MO2 profiles, regardless of their version. We will clean up all duplicate files created as result of the steps below in the next section.

    4.2.1   Updated game masters
    No matter which versions you have decided to run, you should always be using the latest game master files (.esm, .esp, .esl, .bsa, etc.) with all versions. This is referred to as the "best of both worlds". This provides the highest level of compatibility with new mod releases, even on older game versions, as there are some records that simply do not exist in older versions' master files which may cause a CTD if referenced by newer mods. My guide on Updating Skyrim Game Masters goes over all of these steps. If you are already using the latest version of Skyrim as one of your selected versions from this guide (1.6.1170 at the time of writing), you won't have to (re-)download the files (as instructed in the guide), just copy all applicable files from your latest version of 'Skyrim 1.6.1170 Stock Game Files' to an 'Updated Skyrim Masters' folder/mod, and then enable this mod in ALL MO2 profiles.


    4.2.2   Free Creation Club content
    The latest masters downloaded also include the 4 free Creation Club DLC content files (Survival mode, Fishing, Rare Curios, and Saints & Seducers). If you are already managing these via another "mod" in your load order, you can either safely delete these files from the 'Skyrim Updated Masters' mod, or, alternatively, you can overwrite the files in those mod(s) with the latest ones you just downloaded. If you are not currently managing these files as a separate "mod", it is recommended to create a new empty mod in MO2 (e.g., 'Creation Club Content') and move the files from the 'Skyrim Updated Masters' mod over to this 'Creation Club Content' mod.


    4.2.3   (Re-)Clean master files (optional)
    If you had previously been using "cleaned" master files, or would otherwise like to perform this operation on the newly updated master files, you can do so now. I have created a guide on How to Clean Skyrim Game Files for those interested. This step is completely optional unless you are running the latest DynDOLOD with the 'Large reference bugs workaround' option enabled, in which case it is mandatory.


    4.3   Remove unnecessary duplicate files
    Having multiple copies of stock game files will take up additional (unnecessary) disk space since many of the files can be used in all versions. See below for some suggestions.

    • If you performed the process for updating master game files, or otherwise already have a "mod" containing updated master files, you can safely DELETE any files within your 'Stock Game Files' mods which are being overwritten by the updated masters. Since those duplicate files will never be used, there is no point in keeping them on the disk.
    • Likewise, if you are managing your free Creation Club content files (Survival mode, Fishing, Rare Curios, and Saints & Seducers) separately from your updated master files, you can also DELETE any files within your 'Stock Game Files' mods and 'Updated Masters' mod which are being overwritten to free up additional space.
    • If you performed master file cleaning per the steps outlined in my How to Clean Game Files guide (which was linked in my Updating Skyrim Game Masters guide), I do NOT recommend deleting duplicate files since there are only 4 total files of relatively small size, and deleting duplicates removes your ability to easily revert back to the non-cleaned versions.

    4.3.1   GOG language packs
    Skip to section 4.4 if not using GOG, otherwise, all language packs are included as part of the standard installation. For most users, these can simply be deleted as they take up almost an additional 13 GB of disk space. You can delete these language packs from the stock files mods you created earlier using the following process. Expand the 'Spoiler' tag for instructions.

    Spoiler:  
    Show
      • Right-click your stock files mod and select 'Open in Explorer' (alternatively, you can hold CTRL and double-click the mod in the list to open the explorer window).
      • Open the 'Data' folder.
      • Delete any/all of the following language files and associated default configs:
        • root
          • Skyrim_Default_cn.ini
          • Skyrim_Default_de.ini
          • Skyrim_Default_en.ini
          • Skyrim_Default_es.ini
          • Skyrim_Default_fr.ini
          • Skyrim_Default_it.ini
          • Skyrim_Default_ja.ini
          • Skyrim_Default_pl.ini
          • Skyrim_Default_ru.ini
        • Skyrim - Voices_de0.bsa
        • Skyrim - Voices_es0.bsa
        • Skyrim - Voices_fr0.bsa
        • Skyrim - Voices_it0.bsa
        • Skyrim - Voices_ja0.bsa
        • Skyrim - Voices_pl0.bsa
        • Skyrim - Voices_ru0.bsa
      • Close the folder.
      • Repeat for any other stock files mods created earlier.


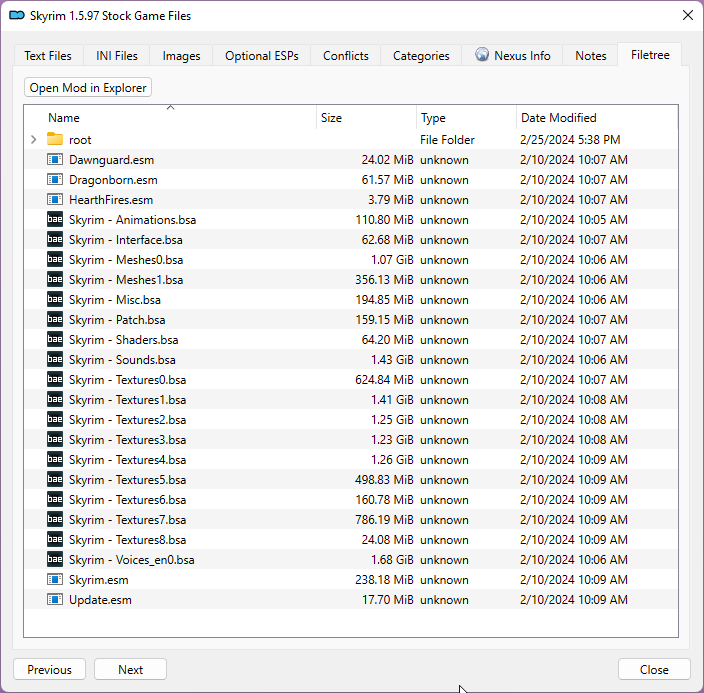
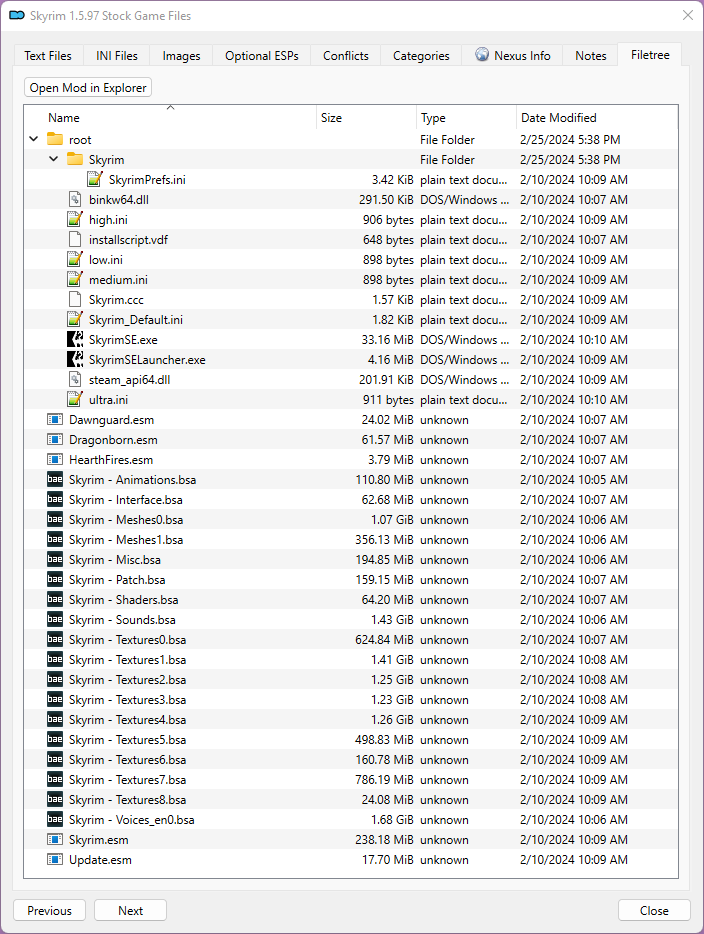
    4.4   MO2 mod order and 'Filetree' structure
    If you've performed all recommended steps above, your MO2 mod order (by priority) and the 'Filetree' structure within should look like the following (from lowest priority to highest). These mods should be enabled at the very top of your mod list. Note that any additional language packs you may have enabled will not be listed. Expand the 'Spoiler' tag for 'Filetree' structures.

    Spoiler:  
    Show
      • Stock Game Files (the order of these doesn't matter at all as only one is enabled per MO2 profile)

        • Skyrim 1.5.97 Stock Game Files (these apply only to version 1.5.97)
          • root
            • Skyrim
              • SkyrimPrefs.ini
            • binkw64.dll
            • high.ini
            • installscript.vdf
            • low.ini
            • medium.ini
            • Skyrim.ccc
            • Skyrim_Default.ini
            • SkyrimSE.exe
            • SkyrimSELauncher.exe
            • steam_api64.dll
            • Ultra.ini
          • Skyrim - Patch.bsa

        • Skyrim 1.6.x Stock Game Files (these files are the same for all versions of 1.6)
          • root
            • Skyrim (Steam only)
              • SkyrimPrefs.ini (Steam only)
            • bink2w64.dll
            • High.ini
            • installscript.vdf (Steam only)
            • Low.ini
            • Medium.ini
            • Skyrim.ccc
            • Skyrim_Default.ini
            • SkyrimConsoleDefault.ini (GOG only)
            • SkyrimSE.exe
            • SkyrimSELauncher.exe
            • steam_api64.dll (Steam only)
            • Ultra.ini

      • Updated Game Masters
        • _ResourcePack.bsa
        • _ResourcePack.esl
        • ccBGSSSE001-Fish.bsa
        • ccBGSSSE001-Fish.esm
        • ccBGSSSE025-AdvDSGS.bsa
        • ccBGSSSE025-AdvDSGS.esm
        • ccBGSSSE037-Curios.bsa
        • ccBGSSSE037-Curios.esl
        • ccQDRSSE001-SurvivalMode.bsa
        • ccQDRSSE001-SurvivalMode.esl
        • Dawnguard.esm
        • Dragonborn.esm
        • HearthFires.esm
        • MarketplaceTextures.bsa
        • Skyrim - Animations.bsa
        • Skyrim - Interface.bsa
        • Skyrim - Meshes0.bsa
        • Skyrim - Meshes1.bsa
        • Skyrim - Misc.bsa
        • Skyrim - Shaders.bsa
        • Skyrim - Sounds.bsa
        • Skyrim - Textures0.bsa
        • Skyrim - Textures1.bsa
        • Skyrim - Textures2.bsa
        • Skyrim - Textures3.bsa
        • Skyrim - Textures4.bsa
        • Skyrim - Textures5.bsa
        • Skyrim - Textures6.bsa
        • Skyrim - Textures7.bsa
        • Skyrim - Textures8.bsa
        • Skyrim - Voices_en0.bsa
        • Skyrim.esm
        • Update.esm

      • Cleaned Vanilla Masters
        • Dawnguard.esm
        • Dragonborn.esm
        • HearthFires.esm
        • Update.esm

      • Creation Club Content
        • ccBGSSSE001-Fish.bsa
        • ccBGSSSE001-Fish.esm
        • ccBGSSSE025-AdvDSGS.bsa
        • ccBGSSSE025-AdvDSGS.esm
        • ccBGSSSE037-Curios.bsa
        • ccBGSSSE037-Curios.esl
        • ccQDRSSE001-SurvivalMode.bsa
        • ccQDRSSE001-SurvivalMode.esl

      • … (all other mods)


    4.5   Delete stock files from 'Overwrite' folder
    It is possible that through the course of testing the steps above by launching the game that existing stock game files from your root Skyrim game folder have been added to your 'Overwrite' folder in MO2. You want to delete these files as they will override any of your other stock game file mods when enabled.

      • Right-click the 'Overwrite' entry (it is at the very bottom of the mod list), and select 'Open in Explorer' (alternatively, you can hold CTRL and double-click the mod in the list to open the explorer window).
      • Open the 'root' folder.
      • Delete any files and folders which are present in my Skyrim Game Files List for any versions you have prepared in the steps above.


    5   Further reading
    See below for links to other helpful information.

    5.1   Other Guides
    See my guides page on Nexus for other helpful Skyrim modding guides.

    5.2   Changelog
    See below for changes made to this document.

    • Version 1.10.2 (04/15/2024)
      • Added clarity on 'Creations' menu for GOG users
      • Added section for restoring 'Creations' menu if it is inaccessible (for Steam users)
      • Removed instructions on ensuring no more files were in the root Skyrim game folder (MO2 complains about the Skyrim instance upon doing this)

    • Version 1.10.1 (04/15/2024)
      • Reorganized Final Considerations section
      • Added sections 4.4 and 4.5 to further clarify end state of folder structure
      • Modified all applicable steps to ignore the /Data/Video folder instead of moving it
      • Other minor corrections and formatting changes

    • Version 1.10 (04/15/2024)
      • Initial release

    Article information

    Added on

    Edited on

    Written by

    infernalryan

    0 comments