Skyrim Special Edition

Downloading Anniversary Upgrade and In-Game Store Content Files on a Downgraded Version of Skyrim (Steam)
An infernalryan Skyrim Modding Guide


Overview
This guide will provide instructions on how to download Anniversary Upgrade and 'Creations' in-game store content on a downgraded version of Skyrim (which includes any version before 1.6.1130) without updating your game version or breaking your current modlist. Version 1.6.1130 and above can ignore this guide as these versions have no issues accessing the in-game store. This guide applies to Skyrim SSE/AE (Steam only). GOG does not have an in-game store (by design), thus there is no ability to download any 'Creations' content of any kind. I have a separate guide on Downloading Anniversary Upgrade Content Files for GOG users if you have the GOG version of Skyrim and are looking for how to (re-)obtain Anniversary Upgrade content files.

Guide Contents:

    • Preface of who this guide applies to, and Skyrim VR exceptions
    • Prepare in-game store files from the latest version of Skyrim
    • Prepare a new profile in your Mod Manager and make required configuration changes
    • Final steps before and after launching including some post-launch considerations
    • Further reading for links to other helpful information


Please consider ENDORSING if you found this guide helpful!


1   Preface
With the release of Skyrim version 1.6.1130, the in-game store became inaccessible to users which were running a downgraded version of Skyrim due to a hardcoded change in the updated Skyrim binary to point to the new store location (which consequently sunset the old store location). This means if you have already purchased the Anniversary Upgrade and/or other in-game store content, or intend to in the future, it is believed that there is no way to (re-)obtain these files without fully upgrading your Skyrim version (and therefore messing up your current modlist). This is fortunately NOT the case. It IS actually possible to (re-)download Anniversary Upgrade content files as well as 'Creations' from the in-game store without fully upgrading your game version. This is done by creating a separate profile for your current modlist with some very specific files and .ini configuration changes from the latest version. These steps will NOT break your current modlist or saves as they will be managed in a separate profile in your Mod Manager.

Note that while downloaded store files should be safe to add to your existing save game (since we are adding files, not removing them), be sure to create a regular game save before doing so in order to revert back if you run into issues.

1.1   Skyrim VR compatibility
If you have Skyrim VR, and also own Skyrim SSE/AE on Steam, you can perform this same process to import these files into Skyrim VR version 1.4.15 as well.


2   Prepare in-game store files
The first thing we will do is prepare the necessary files required to use the in-game store. All files will be downloaded via the Steam console.

2.1   Open Steam console
    • Enter the following in your browser (or Windows Run box with Win+R) to open the Steam Console: steam://nav/console
    • If opened in a browser and prompted to open the Steam Client Bootstrapper, click the 'Open Steam Client Bootstrapper' button.
    • Run each command and wait for it to fully complete before running the next!

Spoiler:  
Show
You will know it has completed when you see the text that says (example):
'Depot download complete : "C:\Program Files\Steam\steamapps\content\app_489830\depot_489831" (1 files, manifest 2289561010626853674)'


2.2   Download latest manifest files
See below for manifest commands (we will need all 3 depots since we need files from each). We're pulling the files from the latest Steam version at the time of writing (1.6.1170). If the main game version (and thus the required store files below) have changed and is not reflected in this guide because it has not been updated since the last game update, see my Steam Manifest List for instructions on how to obtain the proper manifest IDs yourself (under Game versions > Other Skyrim versions).

  • download_depot 489830 489831 8442952117333549665
  • download_depot 489830 489832 8042843504692938467
  • download_depot 489830 489833 1914580699073641964


2.3   Prepare store files
    • Once the depot downloads are done, refer to the Skyrim console to locate where your depots from above have been downloaded to. By default this is:
      • C:\Program Files (x86)\Steam\steamapps\content\app_489830\
    • Open this folder. The following folders should be inside:
      • depot_489831
      • depot_489832
      • depot_489833
    • Create a folder inside of 'app_489830' called 'Skyrim Store Files'.
    • Open 'Skyrim Store Files' and create a folder inside called 'Data'.
    • Go back to the 'app_489830' folder.
    • Open the 'depot_489831' folder and MOVE ONLY the following 2 files inside the 'Data' folder into your 'Skyrim Store Files\Data' folder you just created (cut and paste may be easier).
      • MarketplaceTextures.bsa
      • Skyrim - Interface.bsa
    • Go back to the 'app_489830' folder.
    • Open the 'depot_489832' folder and MOVE ONLY the following 3 files into your 'Skyrim Store Files' folder (cut and paste may be easier).
      • bink2w64.dll
      • Skyrim.ccc
      • steam_api64.dll
    • Go back to the 'app_489830' folder.
    • Open the 'depot_489833' folder and MOVE the 'SkyrimSE.exe' file into your 'Skyrim Store Files' folder (cut and paste may be easier).
    • Go back to the 'app_489830' folder.
    • Delete all 'depot_xxxxxx' folders (we don't need any more of the files).
    • When finished, your 'Skyrim Store Files' folder structure should look like the following:
      • Data
        • MarketplaceTextures.bsa
        • Skyrim - Interface.bsa
      • bink2w64.dll
      • Skyrim.ccc
      • SkyrimSE.exe
      • steam_api64.dll
    • Move this folder aside for a moment (we will come back to it).


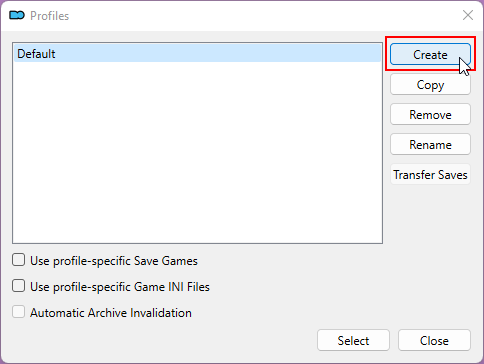
3   Prepare a new profile
To easily switch between your normal modlist and your store-only list, profiles are recommended. Follow only one of the two options based on your Mod Manager of choice.

3.1   Option 1: Vortex

Spoiler:  
Show

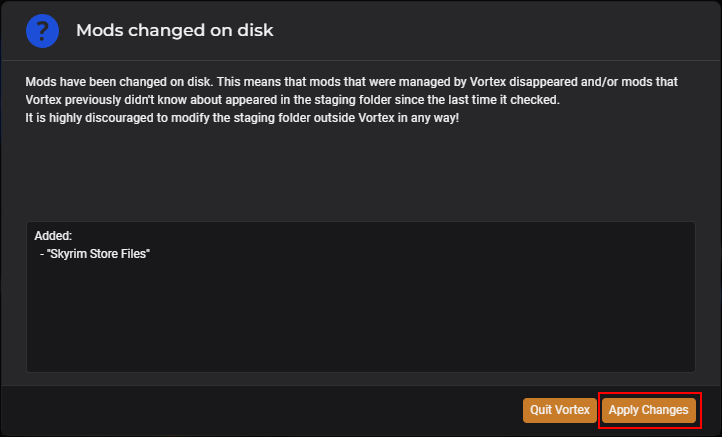
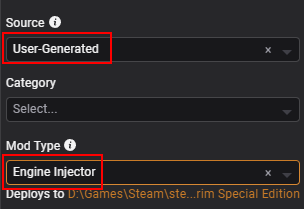
3.1.1   Add Store Files "mod" to mod list
    • Open your mod staging folder by clicking the 'Open…' button in the main application taskbar, and select 'Open Mod Staging Folder'.


    • Set this folder aside for a moment.
    • Go back to the ' app_489830' folder we had open earlier.
    • MOVE the ' Skyrim Store Files' folder into the mod staging folder we just set aside.
      • Note – Do NOT drag these files/folders into the "Drop File(s)" section of Vortex as this could modify our intentional file structure of the mods in a way that makes them unusable – this is because we intend to load these as an 'Engine Injector' type.
    • Close Vortex.
    • Re-open Vortex.
    • When opening, you will be prompted with the following message (example image below, your prompt may differ depending on the name of your folder):


    • Click the 'Apply Changes' button.
    • You should now see the 'Skyrim Store Files' mod in the list as disabled (this is expected).


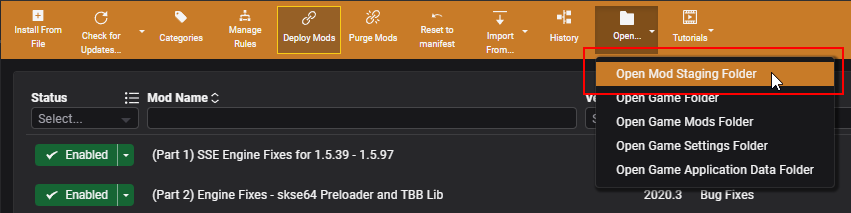
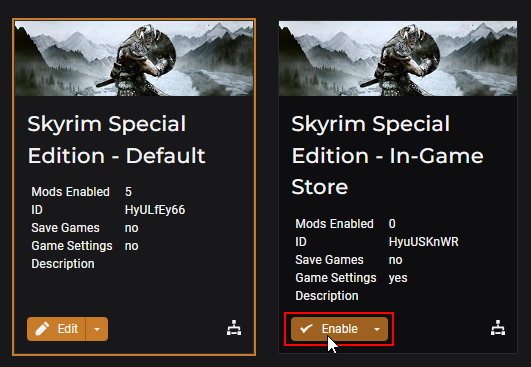
3.1.2   Enable profiles
Skip to section 3.1.4 if you already have profiles enabled, otherwise, proceed.

    • From the 'Dashboard' tab on the main Vortex screen and review the 'Profile Management' button.


    • If it says 'No', click it, and it should now say 'Yes' and a new 'Profiles' tab should appear on the left tab bar.


    • You are done!


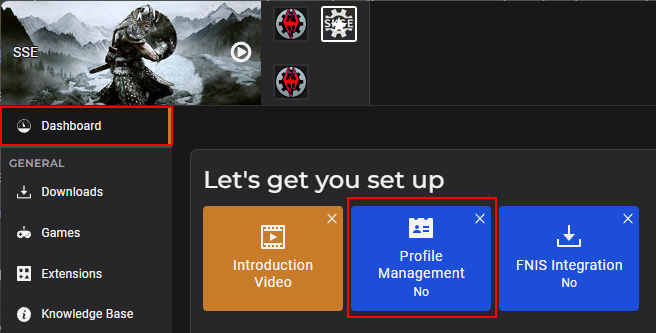
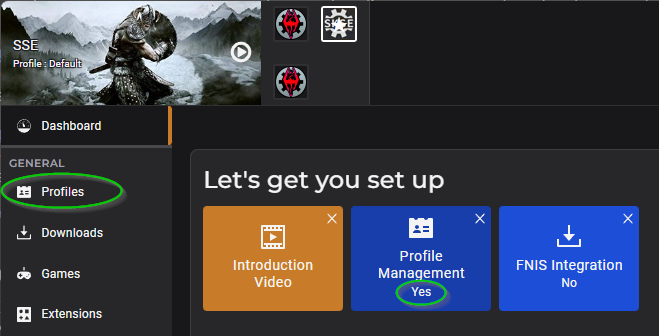
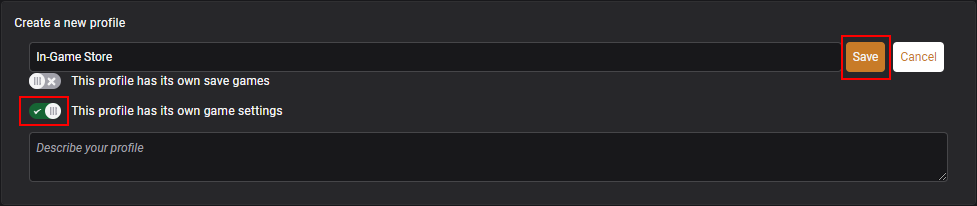
3.1.3   Configure new profile
Next we'll configure your new store-only profile.

    • On the 'Profiles' tab, click the ' Add "Skyrim Special Edition" Profile' button (your profile list may look different depending on the names and number of profiles you have already).


    • Give the profile a name (e.g., "In-Game Store"), and ensure the 'This profile has its own game settings' checkbox is checked.


    • Once created, click the 'Enable' button on the profile selection screen for this new profile.


    • This new profile will have all mods disabled by default (this is expected).
    • Double-click the ' Skyrim Store Files' entry in the mod list to open its properties panel.
    • Change the Mod Type to 'Engine Injector' and the 'Source' to 'User-Generated' (to get rid of the warning icon).


    • Next, enable the mod in the mod list.
    • Deploy mods.


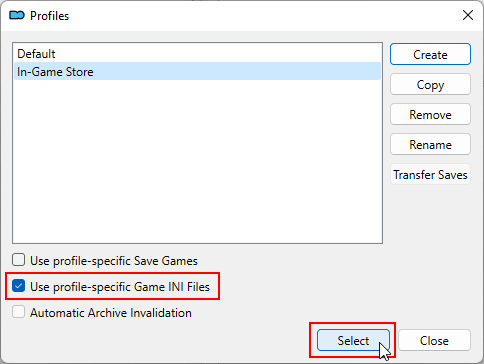
3.1.4   Modify skyrim.ini file
Follow directions below to verify and/or change required .ini file settings so that the in-game Creations menu will work properly for this profile.

    • Open your game settings folder by clicking the 'Open…' button in the main application taskbar, and select 'Open Game Settings Folder'.


    • Open the ' Skyrim.ini' file.
    • Under the  [Bethesda.net] header, if you see a line that says  bEnablePlatform=0 change it to  bEnablePlatform=1
    • Under the  [Archive] header, in the line that starts with  sResourceArchiveList2= line, REMOVE the ", Skyrim - Patch.bsa" from the very end of the line (yes, the starting comma as well).
    • Save and close the file.
    • Skip to section 4.


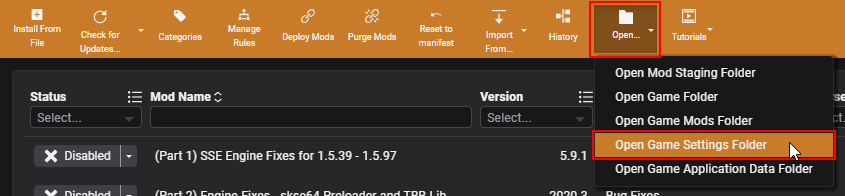
3.2   Option 2: Mod Organizer 2

Spoiler:  
Show

3.2.1   Install Root Builder for MO2
Skip to section 3.2.2 if Root Builder is already installed, otherwise, the process for MO2 requires this plugin, so follow the instructions below.

    • Download the latest version from the main mod page 'FILES' tab – ensure you click the 'MANUAL DOWNLOAD' link (this will not install with your Mod Manager).
    • When completed, open this file from your web browser downloads folder (it is a .zip file).
    • Extract the contents of the file into the  /plugins folder of your MO2 folder. For example, if you installed MO2 into ' C:\Modding\MO2', extract this to ' C:\Modding\MO2\plugins'.
    • If done correctly, you should now have a ' rootbuilder' folder inside of  /plugins (example: ' C:\Modding\MO2\plugins\rootbuilder').
    • Close MO2 if it is open.
    • Re-open MO2.
    • Verify this is installed correctly by navigating to the 'Tools > Tool Plugins' menu of the main menu bar (you can also click the "puzzle" icon in the main icon bar). You should now see a 'Root Builder' entry. 


    • You are done!


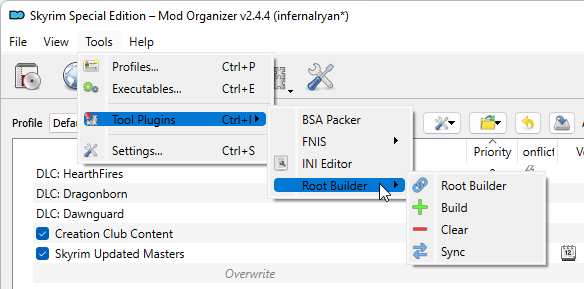
3.2.2   Add Store Files "mod" to mod list
    • From the folder dropdown icon at the top right of the mod list window within MO2 (next to the 'wrench' dropdown), select 'Open Mods folder'.


    • Set this folder aside for a moment.
    • Go back to the ' app_489830' folder we had open earlier.
    • Open the ' Skyrim Store Files' folder.
    • Create a folder inside called ' root'
    • MOVE the following files into the ' root' folder
      • bink2w64.dll
      • Skyrim.ccc
      • steam_api64.dll
      • SkyrimSE.exe
    • Open the ' Data' folder.
    • MOVE the following files into the main ' Skyrim Store Files' folder (cut and paste may be easier):
      • MarketplaceTextures.bsa
      • Skyrim - Interface.bsa
    • Go back to the ' app_489830' folder.
    • You can now DELETE the ' Data' folder (the files inside are now in the base directory).
    • When finished, your ' Skyrim Store Files' folder structure should look like the following:
      • root
        • bink2w64.dll
        • Skyrim.ccc
        • SkyrimSE.exe
        • steam_api64.dll
      • MarketplaceTextures.bsa
      • Skyrim - Interface.bsa
    • MOVE the ' Skyrim Store Files' folder into the "mods" folder we just set aside.
    • When finished, select MO2 to ensure it is the active window and hit the 'F5' button on your keyboard. This will refresh the application and display our new folder added at the bottom of the mod list on the left.
    • Feel free to move this mod higher in the list to better organize with your other mods. There shouldn't be any other mods conflicting if you did not have these files previously.


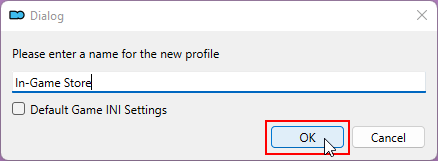
3.2.3   Configure new profile
Next we'll configure your new store-only profile.

    • From the 'profile' dropdown at the top of the MO2 mod list, select '<Manage…>' (your profile list may look different depending on the names and number of profiles you have already).


    • Click the 'Create' button (your profile list may look different depending on the names and number of profiles you have already).


    • Give the profile a new name (e.g., "In-Game Store") and click 'OK'.


    • Make sure the 'Use profile-specific Game INI Files' checkbox is checked for your new profile, and then click 'Select' (your profile list may look different depending on the names and number of profiles you have already).


    • This will now enable the new profile. By default, all mods are disabled (this is expected).
    • Enable the ' Skyrim Store Files' mod by clicking the checkbox to the left of the mod name in the mod list on the left side of the main MO2 window.


3.2.4   Modify skyrim.ini file
Follow directions below to verify and/or change required .ini file settings so that the in-game Creations menu will work properly for this profile.

    • From the 'Open folders' menu (the "folder" icon at the top right of the mod list window within MO2 next to the "wrench" icon), select 'Open INIs folder'. This will open your game .INI files folder managed by MO2 for this profile.
    • Open the ' Skyrim.ini' file.
    • Under the  [Bethesda.net] header, if you see a line that says  bEnablePlatform=0 change it to  bEnablePlatform=1
    • Under the  [Archive] header, in the line that starts with  sResourceArchiveList2= line, REMOVE the ", Skyrim - Patch.bsa" from the very end of the line (yes, the starting comma as well).
    • Save and close the file.


4   Final steps
After all of this prep work, you're finally ready to test launching the game from your Mod Manager.

4.1   Verify manifest file is locked
This should be standard practice for any Skyrim modding being performed on ANY version, but because for many users you will be launching the game without using SKSE, we want to ensure the manifest file is locked. This is done by setting the file to read-only. Follow my guide on how to Prevent Skyrim from Updating to ensure this is done if you are not sure.


4.2   Launch Skyrim
This is how you will launch the game each and every time you wish to launch the in-game store. Follow only one of the two options based on your Mod Manager of choice.

4.2.1   Option 1: Vortex

Spoiler:  
Show

    • Open Vortex if it is not already open.
    • Ensure the 'In-Game Store' profile is the active profile.
    • Deploy mods (if any changes have been made since the last time you performed this).
    • Before launching, you will have to unset SKSE as the primary launching tool by going to the 'Dashboard' tab (this is because we didn't install SKSE for this version). In the 'Tools' widget, click the "kebab" icon (vertical ellipses) and select 'Unset as primary'.


    • Launch the game via the 'play' button icon in the main SSE graphic at the top of the Vortex Application.


    • Your CREATIONS menu should now be functional in the game!
    • Skip to section 4.3 when done.


4.2.2   Option 2: Mod Organizer 2

Spoiler:  
Show

    • Open MO2 if it is not already open.
    • Select the 'Skyrim Special Edition' entry in the executables dropdown list (Do NOT select the SKSE entry). Example:


    • Click the 'Run' button.
    • Your CREATIONS menu should now be functional in the game!


4.3   Post-download steps
See below for post-download information when purchasing and/or downloading Anniversary Upgrade content or 'Creations' from the in-game store.

  • All files will download directly into the Skyrim /Data folder. For MO2 users, this means the files will appear in the 'Overwrite' folder (since the /Data folder is managed).
  • It is recommended to remove these mods from these folders and add them as individual mods in your respective Mod Manager so that they can be enabled/disabled as needed.
  • If you have purchased the Anniversary Upgrade content and are just downloading it now, consider following my Managing Creation Club Content with your Mod Manager guide.


4.4   Final Considerations
See below for final considerations before starting the game to play your regular modlist.

  • Remember to switch back to your regular profile when planning to actually play the game.
  • Don't forget to launch your normal modlist using the SKSE executable (MO2) or SKSE tool (Vortex), and/or re-set the default tool in Vortex back to SKSE when done.


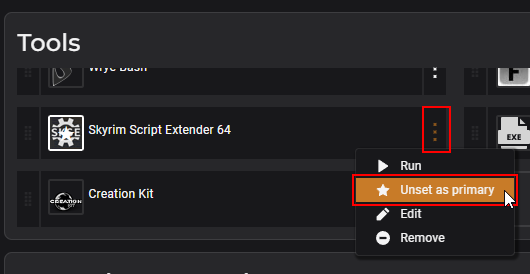
4.4.1   Install updated SKSE (optional)
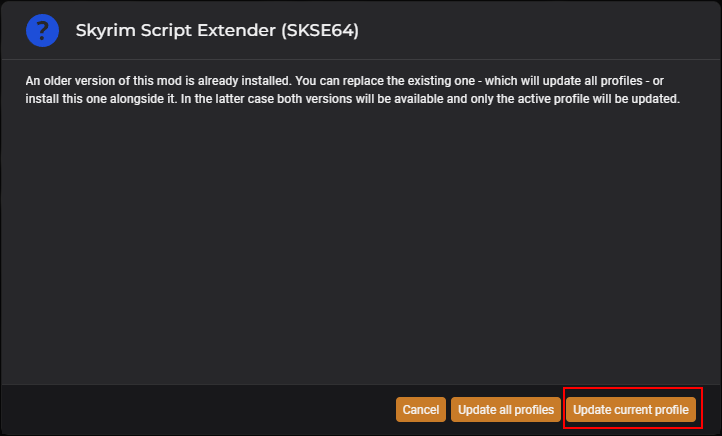
If you would prefer not having to remember which executable (MO2) or default Tool (Vortex) to use or unset, etc., you can always just download and install the latest compatible version of SKSE (version 2.2.6) so that there is no difference in how you launch the in-game store vs your regular modlist. Follow only one of the two options based on your Mod Manager of choice.

4.4.1.1   Option 1: Vortex

Spoiler:  
Show

    • Be sure that your 'In-Game Store' profile is the active profile in Vortex.
    • Download SKSE for this version – 1.6.1170 | main mod page
    • Click the 'Start Download' button on the following page after clicking the link above to download into your Mod Manager.
    • You will likely receive the following prompt after the download has completed. In such cases, click the 'Update current profile' button to affect only the current In-Game Store profile.


    • The only mods that should be enabled now in your current profile's mod list are shown below. Note that the version of SKSE should show as 2.2.6 in the version dropdown. 2.2.6 is the correct version for Skyrim game version 1.6.1170 (which is the version we are launching for the in-game store).


    • Deploy mods.
    • Remember to re-set the SKSE tool as primary.
    • You can now launch all profiles with the SKSE tool / play button (with SKSE set as primary).
    • Skip to section 5 when done.


4.4.1.2   Option 2: Mod Organizer 2

Spoiler:  
Show

    • Setting up an alternate version of SKSE for MO2 will first require that you convert your existing SKSE version (for your normal modlist) into Root Builder mod format so that it can be managed by MO2 and enabled for your normal modlist profile. This will let you create a new (compatible) SKSE mod which is enabled only in your 'In-Game Store' profile. By default, the root Skyrim game folder is not manageable by MO2, so you can only have 1 version of SKSE installed at a time. Follow my guide on Root Builder - Installation and Usage to perform this step.
    • Ensure you enable the current version SKSE plugin in all of your other managed profiles after converting to Root Builder format (this must be done since the files no longer simply exist in the root Skyrim folder).
    • Using the same guide, install and configure the following updated version of SKSE – 1.6.1170 | main mod page
    • When done, enable the updated version of SKSE in your ‘In-Game Store’ profile only.
    • You can now launch all profiles with the SKSE executable within MO2.


5   Further reading
See below for links to other helpful information.

5.1   Other guides
See my guides page on Nexus for other helpful Skyrim modding guides.

5.2   Changelog
See below for changes made to this document.

  • Version 1.15 (04/29/2024)
    • Initial release


Please leave a comment with any issues or suggestions!

Article information

Added on

Edited on

Written by

infernalryan

0 comments