


0 of 0


Documentation
Readme
View as plain text
Polemos's Wrye Mash Fork v100
Latest Version: Nexus
Discussion: Comments section
Tested mainly in Win7 x64. It is also lightly tested and running in Win XP* and Win 10 x64 (tested with various encodings).
*Only the x86 version is tested in Win XP.
"I am not a magician so you will obviously find bugs. Please bear in mind that Wrye Mash has a huge tool set and even though I checked thoroughly, I surely missed some.", Polemos
What's new? Click here to find out: Versions.
1. Quick Start
Do you find long docs scary? Here's a quick guide to Mash's most popular features.
Overview
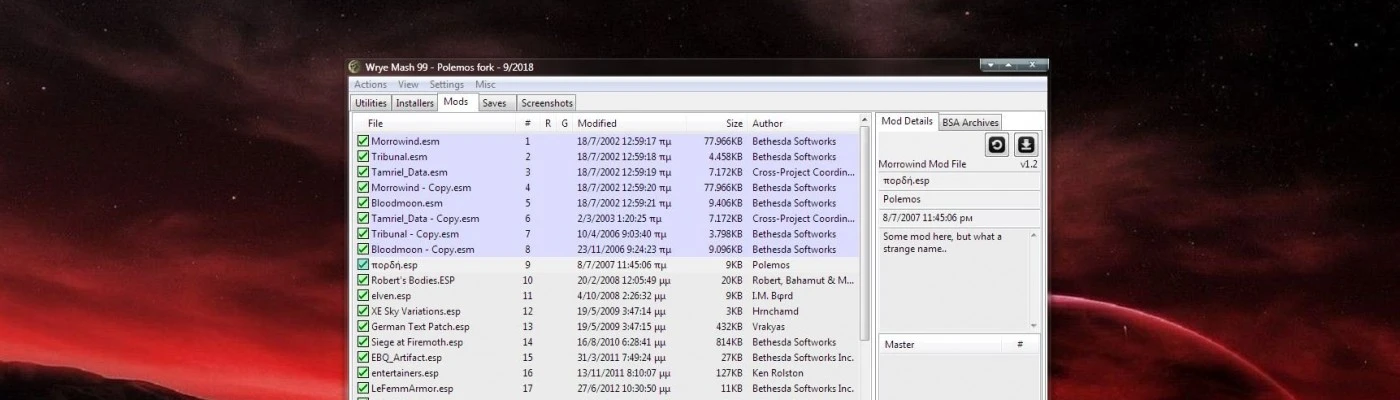
The interface is divided into five tabs: Utilities, Installers, Mods, Saves and Screenshots. Each of these is in turn divided into a list and a details view.
Commands are accessed through the menus which can also be invoked by right-clicking on item or a column heading and also by left clicking on the menubar (on the top) or certain buttons.
There is also a Morrowind Launch button, a settings button and a help button at the left side of the status bar (among other buttons covered later).
Finally also note that Polemos' fork of Wrye Mash can be installed in any directory.
Maintain Your Load Order:
You only have to do this once...
Go to Mods tab, and make sure that "Lock Times" is checked in the "Settings" Menu.
For more information, see Load Order Maintenance.
Change Mod Load Order
Go to mods tab, and select the mod you want to reorder.
Click on the right pane the "Modified" date/time field to the date/time you want.
Merging Leveled Lists
The easy way:
Select "Create Mashed Patch" from the menu and you are done.
And the hard way:
Copy "Mashed Lists.esp" from the mopy\Extras folder to your Data Files folder.
Select the mods you want to load from the Mods tab.
Right click on "Mashed Lists.esp" in the Mods tab and select "Import: Merged Lists".
For more information, see Import Merged Lists.
Repairing a Save Game
Go to the Saves tab and right click on the save game, then select "Repair All".
For more information, see Repair Refs Command.
Adding/Removing Mods From a Save Game
Go to Mods tab and check the mods that you want to use.
Go to Saves tab and select the save game you want to play.
On the right pane, right click on the top of the Masters List, and select "Sync to Load List".
Click "Save". The checkbox for the save game should turn purple.
For more information, see Master List Updating.
Using an Updated Version of a Mod
You only need to do this if the new version of the mod adds or removes references from the game!
Put both new and old versions of the Mod in the Data Files directory.
Go to Mods tab, right click on the new mod and select "Updaters...".
Click on the "Add" button, select the old mod and click Open.
Close the Updaters dialog.
Go to the Saves tab, and select the save game that you want to update.
Right click on the top of the Masters List, and select "Update".
Right click on the old mod and select "Change To...".
Select the new mod in the file dialog and then click "Open".
The renamed master should turn bright green (instead of the usual pale green).
Click Save.
For more information, see Mod Updating.
Tweak Morrowind.ini
Settings in Morrowind.ini control aspects of the game like light attenuation, weather lighting, moon size and appearance, etc. You can tweak Morrowind.ini by hand, or by applying mit files.
To apply an mit file...
Go to mods tab and select "INI Tweaks..." in "Settings" menu. This will bring up a file selection dialog.
Select one of the mit files from Morrowind\Data Files\Mits and click Open. This will apply the changes in the mit file to Morrowind.ini.
Manage Texture Replacers Setup
Create a directory called "Replacers" in your Data Files directory.
Unpack/unzip the replacer package that you want to use into the Replacers directory. The name of the directory will be the name of the replacer. E.g., "E-Icons Blue Star", or "Redoran, Carnajo" or "Redoran, Lady Rae".
The replacer's directory structure can be one of two forms:
Just like the Data Files directory structure:
Replacers
Bob's Replacement Set
Icons (if you have icons)
Meshes (if you have meshes)
Textures (if you have textures)
Just the textures (for texture replacers only):
Replacers
E-Icons, Blue Star
dds files
Redoran, Lady Rae
dds files
Note that most texture replacement packs have the second form.
Usage
Go to Mods tab, click "Replacers..." in "Settings" menu -- this will bring up a checkbox list of the available replacers.
Checking a replacer will apply it. (Large replacer collections may take a while to apply.)
Unchecking a replacer will remove it.
Switch Between Save Profiles
Go to Saves tab and Profiles menu.
Choose Edit... to add, rename, remove profiles.
Choose a profile to switch to it. Current savegames and Morrowind.ini will be archived, and the new profile's savegames and Morrowind.ini will be loaded.
General Advice
Run Repair All
Run Repair All on old save files -- this will often find problems to fix.
Run Repair All once in a while after editing Master lists.
Use Duplicate
Before making major changes to a save file, create a duplicate and make the changes on it.
Features
Manage Mod Files and Load List
Select load mods from a list that can be sorted by: File Name, Modification date, Size, Mod Author, Load Order, Selection State and file type (Esm/Esp).
Select mods by loads lists which you define. E.g., define a Bethesda Mods list, or an LGNPC or Astarsis Heads list.
Hide rarely used mods. (Yes, there's an Unhide command too!)
Delete and Duplicate Mods.
Edit file name, modification date, author, description and master list.
Automatically reset modification dates after file has been modified. (This substantially reduces doubling problems.)
Manage Save Games
View a list of your save games sorted by: File Name, Save Name, Player Name,
Current Cell, Load Status (see below).
Delete, Duplicate and Hide Save Games.
Edit file name, Save Name and master list.
Reduce/Eliminate Doubling
See potential doubling before it happens. (Status boxes in save game and master lists.)
Automatically reset modification dates.
Update save game files to handle changes to the masters that it depends on and to the current load list.
Repair References in existing files.
Browse Mod Documents
Browse documents for all mods with the Doc Browser.
Run Additional Commands
View File Statistics. See the number and size of record types in any file.
Create Your Own Utilities
Wrye Mash provides libraries and an interface that make it (relatively) easy to define new save and file munching utilities and make them through the Wrye Mash interface.
You can also define your own command line utilities for munching on data files.
Modify Anything
Because the entire source code is available (or soon will be), and because no special tools are required, you can modify whatever you like. Of course, making modifications that don't break the program requires care, but some things are relatively easy and safe to modify
Context Menu structure.
Status icons and highlight colors.
Toolbar/launcher buttons.
2. Python info
Polemos: Wrye Mash is written in python and uses the wxPython GUI library to provide the interface. So if you want to run Wrye Mash from the source or make it standalone, you'll need to download both of these.
Download and Install the latest Python 2.x.x
Download and Install the latest Unicode wxPython the python 2.x you will be using.
3. Settings Window
settings
To open the settings window, click on the gear disk icon at the bottom left of Mash window (the icon in the leftmost part of the status bar).
You may select having a toolbar menu, a column menu (when right clicking on any column on top of any list) or both.
Set Wrye Mash to notify you for any new program updates and the notification frequency. Enter 0 for checking daily.
On the interface settings you may also select a theme, a highlight effect list effect and some more (self explained) options.
You need to have enabled at least one type of menu (Menubar or Columns) before you are allowed to save your settings.
On the paths tab the two main options are the Morrowind install directory and the installers directory.
The optional paths can be skipped as they are not necessary.
Enter a new path in the text field or click the button on the right of the field to change the defined directory.
If TES3cmd is in the correct location a blue detected message is shown. Click "Re-Check" to recheck it.
On the defaults tab you may enable/disable various Mash warnings (by default they are all enabled).
Reset the columns widths of all the displayed lists in Wrye Mash to their default settings.
"Use 7zip to calculate crc32 for large files...": If this is selected, Mash will also use the 7z executable to calculate large files crc32 values. This may speed up times in some configurations. Check it out.
Note: The changes are not saved, unless you click on the 'OK' button.
4. Utilities Tab
The utilities in Wrye Mash aren't limited to executable files. It is possible to launch anything from the utilities tab. Even batch files or commands, and mish commands.
In the list on the left of the tab, you can see the utilities available. There are no default utilities configured. You have to do this yourself.
Utilities Tab Menu
New will add a new utility.
Fill up a least the Program field to create a utility. Arguments and Description are optional.
Modify pops up the same window as New, but related to the selected item in the list.
Delete just delete a utility. This is quite brutal, no "undo" possible.
The fields of the panel have the same order as described in the File Format above.
Note: The name of the utility is given automatically by Mash.
Utilities File Sample (utils.dcg)
; utils.dcg
; File containing the mash utils data
;
; Format of a file entry
;
; ID of the utility; command line to launch the utility; parameters; description of the utility
342; C:\Program Files\Bethesda\Morrowind\MyTES Construction Set.exe; my.esp; "My Unofficial editor."
As you can see, a small explanation is given in the file itself. But you need to have some precision.
File Format
It is a semi-colon separated values format.
If a line starts with a semi-colon or is empty, it will be ignored by the parser.
Other lines will be considered as "valid" lines. So be sure to respect the syntax.
There are four fields: 342; "C:\Program Files\Bethesda\Morrowind\MyTES Construction Set.exe"; my.esp; "My Unofficial editor."
The utility ID. It can be a number between 100 and 999 and is set automatically by Wrye Mash.
The utility full path. Relative paths aren't (yet) supported.
Enclose the command line with quotes (") in order to avoid your OS to consider only a part of it and get an error.
The parameters are optional, and depends on the needs of the utility.
The description is optional too, but it can be usefull if you have several utilities pointing to the same file, but with different command line parameters.
Exception (Mish)
If you want to use mish.py and you don't have unpacked Wrye Mash sources, you can still use it through the utilities.
In 'utils.dcg', add a line like this: My mish util; mish; refInfo my.esp; Prints the info references for my.esp
Note: That, only in this case, you don't have to write the full path to mish.py, because this file is embedded in mash.exe, and is inaccessible for your file system. This also true for New/Modify window Program field.
Double click your utilities to run them...
5. Installers Tab
The Installers tab provides a mod package installer facility (called Bain). It makes mod installation simpler, and perhaps more importantly, it mades mod UN-installation simple and safe. It's also useful for resolving resource file conflicts between different mods. Bain has been backported from an old version of Wrye Bash -- hence the name "Bain", aka Bash Installers. (Yes, I probably should call it "Main", but that would be too boring.) If you're familiar with Timeslip's OBMM or MWMM, then Bain is fairly similar, but has some substantial advantages (and some disadvantages) compared to them. For a comparison, search the web for Bash vs. OBMM.
Note that if you have been using the Replacers Feature, then you should upgrade/switch to using Bain instead, since Bain completely supercedes Replacers.
Getting Started
About Mash.ini and mash_default.ini:
=>Mash.ini functionality is disabled for now.<=
If you need support for a remote Installers directory you should create a mash.ini file in your Wrye Mash directory. Use as a template the included mash_default.ini and change the relative folder according to your needs.
Notes:
Mash.ini overrides Wrye Mash Installers setting but doesn't alter it thus if you remove mash.ini your older setting will take effect.
For older users of Wrye Mash: You do not need mash.ini to use Wrye Mash anymore.
If you are using mash.ini and you open the settings dialog to change the Installers dir, any changes will be reflected to mash.ini.
If you encounter any bugs while using mash.ini open the settings, browse and select your Installers directory and restart Wrye Mash.
Here's a brief getting started guide. You may have to read sections further down before this section makes full sense.
Terminology: Package
A "package" is a collection of esps, esms and/or resource files. Everything listed under the Installers tab is a package. Packages can be either archive files in (zip, 7z or rar format) or directories (aka Projects).
Initialization.
When you first visit the Installers tab after starting Mash, Bain will need to go through an initialization process. If you've done this before, and no new packages are installed, and the machine is "warm", then it will take on the order of ten seconds.
However, if you have just added a bunch of packages, then Bain will take longer to intitialize, since it will need to scan all new/modified packages.
In particular, the first time you start Bain, it will take a long time (on the order of three to ten minutes) to initialize. Enjoy your coffee break. :D
Reducing Init Times
You can disable Bain entirely by unchecking "Enabled" in the "Settings" menu on the Installers tab. (Note that this does not erase previously stored info. I.e. it's safe to disable Bain and then later re-enable it if you prefer.)
You can choose to "Avoid on Startup" (again from "Settings" menu). This will cause Mash to try to avoid the Installers tab when it starts up. And since Bain won't initialize until you visit the Installers tab, you'll save a bit of time if you weren't planning on visiting it anyway.
Install Directory
As noted below, Bain looks for packages in the Morrowind\Installers directory. Easiest way to get started with Bain is to just grab all your old mod archives and move them to the Installers directory. Then return to the Installers directory to see Bain's evaluation.
If you're a modder with existing project directories, you can move those to the Installers directory too.
Reviewing Package Status
Some packages may be green, but most (even ones that you have previously installed) will likely be red. (Even if you have installed a package, Bain's Doc File Sweeping means that some files will be in unexpected places.
For each package, you can select it, and then review its details in the Debug text box. In particular, look for Missing and Overridden files.
You can install a package as desired (though you may want to change their order first.)
For complex packages, you will likely want to configure their sub-packages before activating them.
For packages with unrecognized structure (grey checkbox and name), you'll need to restructure the package's directories and files to something more like what Bain expects before you can install them.
Overview
Bain will search for and display packages from the (new) Morrowind\Installers directory. Mods (either archives or projects) can then be installed or uninstalled, and their status can be reviewed in the details pane on the right.
Checkmarks
Installed packages will be marked with a "+".
Icon Colors
Icon colors indicate the degree to which the package is synchronized with the Morrowind\Data Files directory:
Green: Package is fully synced. Note that a package can be green even if it is not "Active". E.g. if you have two identical packages and one is (fully) installed, then it will be green and checked. But the identical package will also be green -- since it too is fully synced with the data directory.
Red: Some files in the package are missing from the data directory.
Orange: All package files are present in the data directory, but some esps/esms are not identical. (E.g. another package installed an alternative version of that file, or the user modified the file after installation.)
Yellow: All package files are present in the data directory, but some resource files are not identical. (E.g. another package installed an alternative version of that file, or the user modified the file after installation.)
White: This is relatively rare. It just means that the package is configured in a way that it has no files to install. This can happen for complex packages where none of the sub-packages are checked.
Grey: This indicates that the package has a structure that Bain does not recognize, and so cannot install.
Red X: The package is corrupt and/or incomplete. You'll likely see this for packages that you are currently downloading into the Installers directory.
Icon Shape
Diamond: A project, i.e. a subdirectory in the Installers directory.
Square: A mod package archive. Note that only rar, 7z and zip formats are supported.
Text Colors
Blue: Indicates a package with sub-packages. The files to be installed, and thus the install state of the package will depend on which sub-packages you have activated.
Grey: This indicates that the package has a structure that Bain does not recognize, and so, cannot install.
Text Background
Orange: Indicates that the install is dirty. This will occur for packages for which the configuration has been altered (either by altering active sub-packages and esmps, or by altering the package itself). This can be repaired by running Anneal or Anneal All.
Yellow: Indicates that the package has "underrides" i.e. some of its installed files should be overridden by higher order packages. This may happen after reordering mods that have already been installed. It can be repaired by running Anneal or Anneal All.
Grey: Indicates that some files present in the package will not be installed. This is usually due to a complex structure that is only partially handled by Bain, but can also be due to having files that Bain refuses to install (exe's, dlls, sub-archives, etc.)
Package Details
Details for the currently selected package will be show on the right. There are (currently) three fields here:
Info Tabs
The tabs at the top display several types of information relevant to the current mod. Note that much of this information is dependent on the install status of the mod and sometimes it's order.
General: Shows summary info and the files to be installed -- as determined by sub-package, esp/m, voice filtering, etc.
Matched: Shows files which are identical to current data directory files.
Missing: Files which are missing from the data directory.
Mismatched: Files which are present in the data directory, but which aren't identical to the package's version of those files.
Conflicts: Shows which other packages will conflict the current package and for what files. Note that if a given file is mismatched, but the mismatch isn't due to other packages, then it won't appear. This report can be modified to show inactive conflicts and/or lower order conflicts through Package Header Commands.
Underridden: Shows packages which should be overridden, but are not, due to install order errors. This can be corrected by running Anneal or Anneal All.
Dirty: Shows files which the package previously installed, but which now should be removed or altered due to a reconfiguration of the package. Dirty files can be cleared by running Anneal or Anneal All.
Skipped: Shows which files in the package were skipped by Bain.
Sub-Packages
This will be blank unless the package has sub-packages. You can determine which of these to install simply by checking the ones you want. Note that sub-packages are installed in the order they appear. So if different subinstallers have different versions of the same file, then the subinstaller that is later in the list (and active) will win.
Esp/m Filtering
This tab can be used to filter out specific esps and esms from a packages. This is intended for use with packages that provide alternate and optional mods. Note that Esp/m filtering is applied after sub-package filtering. E.g. it may be easier to turn off a sub-package entirely rather than disable individual espms from it.
Comments
This is a field where you can enter comments about the package. Useful for keeping track of what the package is supposed to do, etc. Do note that if you uninstall the installer you also delete permanently the comment.
Package Structure
Bain recognizes three package structures:
Simple
If the package has esps, esms or bsa's at the top level, or if it has any of the regular Morrowind\Data Files subdirectories (e.g. Meshes, Textures) at that level, then it will be categorized as a simple package.
Complex
If a package is not simple, but has subdirectories which appear simple (have esps/esms/bsas and/or have standard sub-directories), then it will be categorized as complex.
In this case, each top level subdirectory (that appears simple), will be treated as a sub-package, and you'll be able to activate or deactivate it as desired before installing.
Complex/Simple
If a package is complex, but has only one sub-package, then it will appear as a simple package in the interface. (I.e. there will be no sub-package options.)
Skipped Files
Bain will skip over (never install) certain types of files in the package.
Silent Skip
A few files are skipped silently. Files in this group are: Thumbs.db files, and the omod conversion directory and its subfiles.
Directory Skipping
Bain will skip files from directories that it does not recognize. I.e. it will only install files that go directly into the Morrowind\Data Files directory or one of its regular subdirectories (Meshes, Textures, Sound, etc.). Files from irregular directories will be skipped. If this happens, you'll find them listed in the Skipped pane on the right.
Extension Skipping
Bain will skip files with certain extensions - mostly executables (exe, dll, dlx) and subarchives (7z,zip, etc.). Again, these will be listed in the debug pane on the right. (But only if they're not already skipped because of the directory that they're in.)
Doc File Sweeping
In order to prevent clutter and centralize doc file storage, Bain will sweep files that appear to be doc files into Morrowind\Data Files\Docs. Also, files named simply readme.txt (or readme.doc, etc.) will be renamed according to the package name before being swept into the Docs directory.
Ordering
Bain assigns an install order to all packages. When packages are installed and/or uninstalled, the order is considered in determining which files will actually be installed/uninstalled.
General
Install order is shown the table in the "Order" column.
All packages are moved to just before the ==Last== marker when Bain first encounteres them.
Order can be changed by right clicking on a package (or group of selected packages) and selecting "Move To" or by drag and drop. Just enter the position to which the packages should be moved. If you're moving many packages at once, they'll keep their relative order, with the "oldest" moving to the specified position, and the others following after it.
Last
Last is a special marker entry that Bain automatically adds to the archive list. It corresponds to the position at which any newly encountered packages are inserted. if you want specific packages (e.g. your personal projects) to always have high order, then move them to after the ==Last== marker.
Install Order
When you install a package, then the order of higher packages will be respected. I.e. if the package being installed conflicts with a higher order package that's already active, then it won't overwrite the files from the higher package. Rather, only the files that don't conflict with higher packages will be installed. (However, if you want to overwrite later packages, then you can use the "Install Last" command, which will move the selected packages to the end of the list and then install them.)
Uninstall Order
Uninstalling a package will also respect order. Specifically, files that are owned by higher order packages will be left in place. More than that, files that aren't owned by the package being uninstalled will also be left in place. (Hence manually edited mods and files will be left in place.)
Also, if a lower order package installed an identical version of a given file, then that file will not be removed. (I.e. ownership will cede to the lower order file.) By the way, you can "uninstall" packages that aren't active. This is useful for cleaning out the files from packages that you have previously installed.
Auto-Annealing
When you uninstall packages, Bain will also attempt to "anneal" the file system by restoring any files from active packages that were previously blocked by the packages being uninstalled. If you prefer that Bain not auto-anneal files, then you can deactivate "Auto-Anneal" from the "Settings" menu.
Mod Name Aliasing
If you make a practice of renaming your installed espm files (as I do), then Bain will not be able to match the mod in the package to the installed file. So to adjust for that, you can define a mod aliasing database.
Setup
After installing Mash, look for Data Files\Mash\Official_Local_default.csv, and copy it to "Official_Local.csv" in the same directory.
Updating
Open "Official_Local.csv" in your favorite spreadsheet program. Note that the file format is csv (comma separated values). When making changes be sure to save it in the same CSV format (with comma separators)! You'll see that the file has two columns.
On the left is "Official" which is the "official" name of the mod, i.e. the name of the mod that you'll find in the archive package that you downloaded.
On the right is "Local", which is the "local" name of the mod, i.e. the name you prefer for the mod.
The way this works is simple -- when mash encounters a mod with a specified official name, it will map it to the local name. All install, uninstall, etc. commands will then act as if the file in the mod actually had the local name.
So to define entries, the easiest thing to do is:
Open Mash and go to the Installers tab. Find a mod for which you have changed the name.
Go to the Missing tab, select and copy the name of the missing mod, then paste that into the Official column.
Go to the Mods Tab, select the mod and copy it's name from the detail view on the right and paste that into the Local column next to the official name.
Save changes to the csv file. (Be sure to save in CSV format!)
Return to Mash Installers tab. Mash should immediately recognize the updated file and adjust for its changes.
Note: Of course, you don't have to change mods one at a time. You can do a bunch at once and then save the file, then return to Mash/Bain.
Package Commands
The following commands are available from the packages context menu.
Open: Open package(s) in the file system.
Duplicate: Duplicate package.
Delete: Delete the package(s).
Repack: This is a new function since Wrye Mash v99 (Polemos). When you right click an installer package you may select "Repack" to repack an installer package. After selecting the repack option the package explorer will open up, and in there you may select the mod's root (the base directory of the mod) by right clicking on the folder you believe it must be the root of the mod and selecting it. Afterwards by clicking the "OK" button the explorer will close and the repack process will begin. When it finishes a new package prefixed by "repack" and followed by the source package name will appear at the bottom of the Installers list.
Refresh: Refreshes all info for selected packages. Useful for updating info when package has been modified outside of Mash.
Move To...: Moves selected packages(s) to specified position. If multiple packages are active, they'll retain their relative order, but move as a block to the selected position.
Has Extra Directories: Ordinarily, Bain will only recognize a limited set of subdirectories of the Data directory -- and files that come from other directories will be skipped over. However if a package has special directories (usually restricted to OBSE scripts), checking this option will cause Bain to recognize these special directories as valid subdirectories (and thus allow them to be installed).
Anneal: Will "anneal" the selected file(s). This will install any missing files and correct any install order errors (aka "underrides").
Install: Will do an "in-order" install. I.e. it will fully install the package except for files that are masked by higher order packages.
Install Missing: The same as Install, except that it only installs missing files -- i.e. it will not override any currently existing files.
Install Last: Moves the package to to the end of the order list and installs it.
Uninstall: Uninstalls the package. If Auto-Anneal is active, then files from lower order packages will automatically be restored as necessary.
Unpack to Project: (Archives only.) Unpack the archive to a project.
Sync from Data: (Projects only.) Synchronize the project with files from the Morrowind\Data Files directory. This is essentially the reverse of "Install" for projects since it copies from the Morrowind\Data Files directory to the project rather than the other way around.
Notes:
Repack is allowed only on installers and not on unpacked projects.
For now Wrye Mash can repack a single installer at a time and not multiple at the same time.
Package Menu Commands
The following commands are available by clicking the various menu options in the Installers tab:
Sort by Active: Active installers will be sorted to the top.
Projects First: If this is checked, then project packages will be sorted to the top of the table.
Also sorting by order, name, size and more.
Open: Opens the Installers directory in Windows Explorer.
Refresh Data: Rescans the Data directory and all project directories. Since this operation takes a little while, this scan is ordinarily done only once per Mash session. So, if you have manually edited the directories after that one-time scan, you should run this command to update Bain to the changes.
Full Refresh: This does a full refresh of all data files. Notably this will recalculate CRCs for all files (ordinarily CRCs are only calculated for files that seem to have changed). Running this command will likely take 5-15 minutes.
Anneal All: This will install any missing files (for active installers) and correct all install order and reconfiguration errors.
Avoid at Startup: Toggles Mash to avoid the Installers tab on startup, thus avoiding unnecessary data scanning. Unless you're spending a lot of time in the Installers tab, you'll should Enable this.
Enabled: This enables/disables Bain itself. Preferred setting: Enabled (checked).
Clean Data Directory: If this is checked, then any empty subfolders of the Morrowind\Data Files directory will be deleted.
Show Inactive Conflicts: If checked, then the conflicts report will show conflicts with inactive as well as active mods. Usually only active conflicts are of interest, however sometimes its useful to review all conflicting packages.
Show Lower Conflicts: If checked, then the conflicts report with show conflicts with lower order packages. If you're only interested in higher order conflicts, the uncheck this to remove some clutter from the report.
Progress Extra Info: see extra information during Installers actions
Notes:
Changing the order of Installers is not allowed when the installers tab is not set "by order" or if it is set either by "Sort by active" or "Projects first".
You may enable "Progress Extra Info" setting in the menu if wish to see more information during Installers actions but do note that it is very expensive on speed execution. Use it when debugging or in very fast PCs.
6. Mods Tab
Mods List
Sorting
Sort Mod list items by (left) clicking on a column header, or by using the sort submenu of the column popup menu.
Reverse a sort by redoing it. E.g., left click on the File column header twice in a row.
Force ESMS to the top of the list by selecting "Sort by Type" from the context menu.
Force selected mods to the top of the list by selecting "Sort by Selection" from the context menu.
Selecting Load Mods
Select load mods by clicking on the checkbox next to their file name.
Note: When a mod is selected, its master mods will also be selected. Conversely, when an esm is unselected, any mods that depend on it will also be unselected.
Line Colors
Blue: An esm file.
Pink: A file that shares a modification date/time with another file. Not a problem unless they're both selected, in which case, the lines turn...
Red: A file that shares a modification date/time with another file -- with both files being selected. This should definitely be corrected! Use details view to change the modification date of one of the files by a second or more.
Orange: Overloaded Exclusion Group (See below.)
Checkbox Colors
Checkbox colors indicate the "health" of the mod file's master files. See Master List Updating below. Basically, with mod files, you're okay unless the checkbox is red -- which indicates that a master file is missing.
Exclusion Groups
Oftentimes users will have different versions of the same mod, or different mods which do the same sort of thing in an incompatible way. Exclusion groups can be used to help flag these mods so that you don't accidentally load more than one at once. When an exclusion group is violated, all violating mods will be highlighted in orange.
Defining an exclusion group is easy -- just change the name of the mod to include a comma. The part of the name before the comma is the exclusion group.
Mod Details mini Tab
Two new buttons appear now (since v99) on top of the Mod Details mini Tab which allow the saving and restoring of your mod's order:
on the left the Restore mod order which when clicked opens a dialog showing the latest saved backups.
on the right the Save mod order which takes an snapshot of your mod order (active, inactive order).
Make changes to the file in the details view.
File Name: Change the file name.
Note that changes to the file name are not automatically reflected in any mods that have the current mod as their master. See Doubling below.
Modification Time: Change the file modification time.
Note that this affects file order. See Doubling below.
Author: Change the author name.
Description: Edit the mod description.
Masters List
The masters list show the esm files that the current mod depends on, and the load order (modIndex) of that master. While there's rarely a need to edit the masters of a mod, if the need does arise, you can use the masters list to do so. It is recommended that you be familiar with editing masters of save games before you attempt to edit masters of mods. Click the double hevron button to open the masters lists menu or by left clicking on one of the master lists columns. You can access this menu from the masters mini tab. You have to either click the double hevrons icon (in between save and cancel buttons) or left click one of the columns of the master list.
Copy List: Right click on the column header of the master list and select this command to copy the list of masters to the clipboard. This is useful for forum postings where you want help debugging your load list, or just want to show off how many mods you have loaded! Note that this list is more useful than the list in the morrowind.ini file, since it lists the mods in load order. It will also include the version number of the master if the description field of the master includes a line like "Version ####". Note that this is the same version labeling scheme that the Snapshot command (mot the mod order snapshot) uses.
Sync to Load ESMs: This option will sync the master list to masters files in your current load list.
Update: Updates masters list and prepares it for further manual editing. Automatically fixes: names, sizes and load order.
For more information, see Mod Updating below.
BSA Archives mini Tab
In this mini tab you are able to register/unregister and order any BSA archives in your Morrowind Installation. You may use the mouse or the keyboard.
Menu items
Using Load Lists
Aside from using checkboxes to select and un-select mods, you can also use load lists. These are accessed through the "Actions" menu.
None: Un-selects all files.
Save List... Saves your currently selected files to a new load list.
Edit Lists... Allows you to delete and rename previously defined load lists.
[Load List] Selecting a load list causes all of its files to be selected. This action is not exclusive, but additive -- i.e., the files will be selected in addition to the currently selected files.
Snapshots: By selecting the "Snapshots" sub-menu in "Actions" you may save/restore your active mod order. You may also open a saved mod order, import a saved mod order or export it to a custom location. The "Take fast snapshot" and "Restore fast snapshot" are best used when you want to make tests in your load order and you don't want many pop ups. Do note that "Snapshots" in contrast with "Load Lists" take a complete snapshot of the mod order and of the active/inactive mods. Use "Export Snapshot" to save a named snapshot anywhere you wish.
Create Mashed Patch (Action Menu): You can create and update a Mashed Lists patch automatically now by selecting "Create Mashed Patch" option from the menu (Actions). It will automatically delete any previous Mashed Patch and replace it with a new one. Afterwards it will automatically import and merge your mod lists and enable the patch in your mod order.
Reset Bethesda Dates (Settings Menu): This option will reset Morrowind.esm, Tribunal.esm, Bloodmoon.esm, Morrowind.bsa, Tribunal.bsa and Bloodmoon.bsa to their original (Bethesda) dates. This may help with the Steam version of the game.
TESlint Settings (Misc Menu): This option open the settings used by Wrye Mash for TES3lint, a powerful mod analysis tool. The settings in this window are the settings used by TESlint when you right click a mod in the Mods Tab and select "Check with TES3lint". You need to define your perl installation location (needed to run TES3lint) and the location you have installed TES3lint and either accept the default and recommended settings or change them according to your needs.
Note: The "Extra Options" debug and verbose can produce so much output (in some plugins) which eventually may freeze Wrye Mash. It is best to avoid using these options without reason. After you setup TES3lint, you may use "Check with TES3lint" when right clicking your mods. You may select as many a you like.
Custom Commands (Misc Menu): This option opens a new window into which you may add (or edit and remove) custom commands to use on mods selected in the Mods Tab. Click Add and in the new dialog enter a name in the top field (which will appear as an option when you right click a mod or mods) and on the bottom field any command you wish, like you would if you were in the command prompt. Use %target% variable to define were in your command the name(s) of your selected mod(s) will appear. Click OK and your new entry will appear in the Main Custom Commans window.
Note: Click OK again to exit and Save your commands. Cancel will discard any changes without asking. Your Custom Commands are saved to custom.dcg file in Mash installation dir.
Custom Commands Sample (custom.dcg)
; custom.dcg
; File containing Custom Commands entries
;
; Format of a Custom Command entry:
;
; Name;Command parameters
; Hint: use %target% variable to represent the position of file target(s) in your commands.
TESlint;C:\perl\Strawberry\perl\bin\perl.exe tes3lint -a -n %target%
reset;tes3cmd resetdates
As you can see above, two example entries are supplied.
Update Notification: Since v94 Wrye Mash can notify you if any new versions are released. To enable update notifications open the settings dialog from the status bar (Gear icon) and tick "Enable Notifications" under "Update Settings". Afterwards you may select how often Wrye Mash will check for updates in the "Interval (Days) field. If you select 0 days you will be notified whenever Wrye Mash is run. The max is every 365 days. You may also check manually for updates either by opening the the "Misc" menu on the menu bar or by opening the context menu, and then selecting "Check for Updates" on either.
For mlox and TES3cmd check the respective entries.
File Commands
Backup: Create a backup of the file. Note that backups are also automatically created (see "Revert to Backup" below). If you want to be sure that you can later restore from a specific point, use Duplicate or Snapshot instead.
Duplicate: Creates a duplicate of the file in the mods directory.
Snapshot...: Creates a snapshot copy of the current mod in a sub-directory (Mash\Snapshots). Snapshots are indicated by appending to "-l.n.m" to the root of the file name. E.g., "My.esp" becomes "My-01.esp" or "My Mod v1.01.esp" becomes "My Mod v1.01-01.esp".
Note that Mash will automatically generate the next available snapshot number. However, you are free to choose a different number if you like. Also, if there's an existing version line (e.g., "Version NN.MM-LL") in the description field of the mod, then it will updated with the new version plus snapshot number when the snapshot is saved.
Delete: Deletes the file... Permanently. Also deletes all backups and temp files, but not snapshots.
Hide: Moves the file to a sub-directory (Mash\Hidden). Use this on seldom used mods to keep them from cluttering the mods listing. This is especially useful when modding, since the TESCS Data Files list cannot be sorted.
Note that there's a corresponding "Unhide..." command in the "Actions" menu. If the file's group is defined (e.g. Heads), and if the Mash\Hidden directory has a sub-directory with the same name (e.g. Mash\Hidden\Heads), then the file will be hidden in it.
Sort: Reorders selected mods to make them sort in alphabetical order. Modified time of first mod is set to earliest modified time of set. Other mods follow it at one minute increments.
WARNING: Some mods must be loaded in a certain order (e.g., a patch mod must be loaded after the original). Sort may break that required ordering! Use sort with extreme caution! Note too that there is no "undo" command for sort!
Revert to Backup: Reverts the file to the last Backup made of it. Mash will make a backup of a file the first time it is significantly changed in an application session. E.g., if you make two or three changes to a file in a given application session, then only the first change will generate a backup.
Revert to First Backup: Same as Revert to Backup, only it reverts to the very first backup that Mash made of the file. The first backup is generated the first time that Mash alters a file, and is never overwritten. Hence it is guaranteed to be free of any problem that Mash might introduce. Of course, this also may mean that it's badly out of date!
Revert to Snapshot: Reverts the file to a selected snapshot.
Using mlox
If you have Mlox installed, you can go to the settings (the Gear icon in the toolbar) and select the directory where you have it installed. You may run mlox from the "Misc" menu in the mods tab and from the toolbar.
Launch Mlox: launches mlox.
Revert Changes: reverts the load order to how it was before you sorted it.
Notes:
If you have Mlox installed somewhere within the Morrowind directory, Wrye Mash will try to find it automatically and add it to Wrye Mash's toolset.
Mlox "Revert Changes" reverts to the last time before you executed mlox. Subsequent executions will overwrite the file holding that information and you will have to manually revert your changes (use the "Snapshots" functionality instead).
This version of Wrye Mash uses the standalone (EXE) version of mlox and not the Python version.
Using tes3cmd
If tes3cmd is installed in the Data Files directory, you will be able to use tes3cmd with Wrye Mash. To use the *clean* command, select any number of mods, right click select "Clean with Tes3cmd"
To use *Fixit (all active)* select it from the main menu in "Misc"
You may also restore the files that TES3cmd modified by selecting *Restore modified files* in the main menu
You may also create a Multi Patch which is more powerful than Mashed Patch by selecting "Create MultiPatch" in the Misc menu.
Notes:
Only version 0.37 of TES3cmd has been tested. Feel free to try any newer ones and post your results.
Only the standalone versions of TES3cmd are supported.
Use "Restore modified files" before any subsequent TES3cmd operations to avoid having backuped files overwritten by TES3cmd.
"Fixit (all active)" executes the following: tes3cmd.exe fixit --hide-backups --backup-dir
If you use the Multi Patch (recomended) you don't need to have a Mashed Patch ("Mashed Lists.esp") in your load order.
Export/Import Dialog
From the mods context menu, select Export: Dialog to export all dialog text to a file, or select Import: Dialog to re-import dialog text from a file.
The purpose of these functions is to facilitate spellchecking and general text editing. Accordingly, only the text of the dialog is exported. (I.e., this is a more focussed dialog export/import than the similar TESCS function.)
Format
Exported text is sorted by speaker/topic. However, imported text may be in any order, and can be trimmed to a subset of the originally exported set of entries.
Lines beginning with '#' signs are comments and are ignored. Feel free to add additional comment lines to the exported file -- they'll be ignored in import.
Lines beginning with '@' encode the dialog type, topic and info entry number. Do not alter these lines!
Trimming
Text is automatically trimmed to some degree on import...
Leading and trailing spaces and new lines are trimmed.
Some characters are replaced or deleted: curly quotes are straightened; single character ellipses are replaced with multi-character elllipses; reserved characters (@, #) are deleted.)
Any remaining text over 511 bytes will be trimmed. If such trims are made, a window will popup detailing them.
Export/Import Scripts
These paired commands will export all scripts in a mod to a text file, and then subsequently reimport them.
Note that after importing, you must manually recompile (in TESCS) any scripts that have been changed.
Import LCV Schedules
Generates LCV schedule scripts from an LCV schedule text file, and inserts the scripts into the current mod file.
Note: This feature is only useful for modders working with LCV Schedules.
Schedule Generation Steps
Generate the text file.
The current LCV release includes its source text file. This can be used as example when developing the schedule for a new location, or as starting point, when modifying an existing schdule.
The source text file must contain the complete schedule for at least one location.
Select the esp to import schedules to and use the Import: LCV Schedules command on it.
Open the esp in TESCS and make in extra modifications that are required: Be sure to include the current LCV Schedules esp in your load list.
Add state variables (SC_TownName_State)
Add scriptholders for the master scripts, and place them as needed.
Id: SC_TownName
Name: TownName Schedule
Model: EditorMarker.nif
Script: SC_TownName_Master
Add any extra items needed. E.g., boats for fishermen, etc.
Compile scripts, either manually or by using the Recompile All command.If you only imported a schedule for one town, then recompiling by hand is probably simplest. If you imported schedule for several towns, then Recompile All is probably best.
Errors in your schedule files are most likely to show up during the compile process. To fix them, go back and fix your text file, then re-import and recompile.
Save esp
Note that Recompile All typically recompiles several base Morrowind scripts: DagothUrCreature1, EndGame, Float and LorkhanHeart. After you save, you should use the Details view to delete these modified scripts from your esp. Then reload the esp and save again to completely eliminate these bogus scripts.
Import Merged Lists
Note: The following can be done automatically by selecting "Create Mashed Patch" from the menu (Actions).
Overview
Leveled lists determine what creatures you will encounter and what items you will find in various containers. Mods that add creatures or items to the world generally modify these lists. However, if two or more mods modify the same list, then the last mod to load will delete any additions/changes made be previous mods. This function combines changes made to the same leveled lists from different mods and saves the combined list to the current mod.
Usage
This function is only available for mods whose author is "Wrye Mash". This is a safety feature to prevent overwriting the load lists of a normal mod. If you don't have such a mod available, then start by copying "Mashed Lists.esp" from Mopy\Extras to the Data Files folder.
Note that you may want to have different versions of the Mashed List esp for different load sets. If this is the case, just duplicate one Mashed List esp and rename it as desired.
If you have a copy of Merged_Leveled_Lists.esp (produced by TesTool), then remove it from your load list. You won't need it anymore. Note too that you won't need to use the Leveled List Resequencer tool. The Import Merged List lists are already resequenced.
Make sure you have your full load list loaded, then right click on the "Mashed Lists" esp and select "Import: Merged Lists".
Don't forget to update the masters on your save game when you're done.
Tech Notes
Mash's Merge List function is a bit more efficient that TesTools -- if there's no need to merge lists, then it won't.
In merging lists, Mash ignores lists from any of the three Bethesda Masters, under the assumption that anything in them will also be in any plugin that tries to modify them.
In merging lists, Mash ignores any mod whose author is "Wrye Mash".
When merging two lists:
Chance None is set to Chance None of last mod to change list.
Calculate for Each Item is true if it's true for either list.
Calculate from All Levels is true if it's true for either list.
All entries from the first list, plus any new items in the second list will be included in the merged list.
A deletion of a leveled list will be ignored unless the deletion comes from the last mod to modify that list.
Import Replacer
Overview
Ref replacers allow you to systematically replace one set of references with another. For example you can "NOMify" a mod that adds towns by systematically replacing empty bottles with equivalent NOM bottles; and static ovens, grills, cauldrons and kegs with equivalent NOM activators.
Setup
Select Import: Edit Replacers, and use the resulting dialog to add a replacer file. Be sure that the file that you have selected is a replacer file!
Usage
Select Import: [Replacer Name]. You'll receive a report on all replacements made and records imported.
Tech Notes
The mod replacer file defines which object ids's are to be replaced and with what object ids, and (optionally) which source mod to copy records from.
If multiple replacements are defined, then each of the replacements objects will be used in turn. E.g. for NOM, the first morrowind kegstand will be replaced with a beer barrel, the second will be replaced with a wine barrel, etc.
If you define a source mod (srcmod), then the replacer will grab a copy of each object id used from the srcMod and copy it to the target mod. E.g., if the user only replaces bottles, then only bottle object definitions will be imported into the target mod. If you don't define a srcmod, then nothing will be imported.
In the mod, only the id of the placed object will be changed. Thus, the replacement should work at the coordinate/orientation used by the original, and the original should not have extra info that is incompatible with the replacements type! I.e., if the original is a soulgem and includes info on the type of soul included, then the replacement should not be anything but another soulgem. This means that you have to to know what you're doing when you're defining a replacement. (Probably the main limitation is not replacing soulgems or things that have uses.)
Be aware that ref replacement doesn't do any spell checking... So be sure that both the original and replacement items are spelled correctly.
Renumber Refs
This is an advanced feature intended to reduce the likelihood of local refs conflicts between mods. It works by renumbering the local refs placed by the esp, so that instead of starting objectIndex numbers at 1, it starts them at some random number between 1,000 and 10,000 (or a user selected number between 1 and 100,000.)
Notes
This feature is experimental! Seems okay so far, but it does something a little unexpected and perhaps Morrowind engine won't like that.
The main problem with doing this is that every time TESCS is used to edit the esp, it will renumber the object indexes starting from 1. So, this feature is best used by end users rather than by modders. (Since end users don't re-edit the esps.)
This command remembers the starting object index numbers for each mod. If used a second time on the same mod, it will default to the same starting index number it used last time. So, if you have to edit the esp with TESCS, just run the command again.
Usage
[Optional] Duplicate the original mod and make changes to the duplicate rather than the original. If you're going to modify an esp that is already in use by save games, you'll need to do this (and create and use an updater) in order to prevent doubling.
After selecting the command, you can either accept the suggested first value (randomly chosen between 1,000 and 10,000), or manually enter a value between 1 and 100,000.
Repair Refs
See Doubling below.
Copy to Esm/Esp
Copies the esm to an esp and vice versa.
Sort Records
This sorts the file records so that they can be more easily found in the TESCS Details view.
Ordering Details
TES files are only semi-ordered. Some records must be in a certain order, e.g. DIALs and their associated INFO's form a block. Other records seem to have a record preferred by TESCS/Morrowind, while other types of records are loosely intermixed (e.g., most object type records).
The sort record commands follows both the required and preferred record order rules, but also orders records more strictly by record type and by record id (when available, and when not in conflict with other rules). This stricter ordering makes records easier to find.
Inherited Order
Records that are modifications of pre-existing records (i.e., records inherited from master esms and even from esps selected in the load list) will be reordered when TESCS saves the esp file so that the inherited records are moved to the top of their TESCS save group (e.g., the "most objects" group), in the order that TESCS originally saw them in -- which is fairly disordered.
However, it seems to be safe to use the Sort Records command on the Bethesda esms themselves. (But don't be surprised if Mash hangs for a minute or so while sorting Morrowind.esm!) Once this is done, when saving your esp, the modified records will still be moved up, but at least they'll be ordered by record type and id.
Statistics
Displays statistics for the file's record types.
Updaters
See Doubling.
7. Saves Tab
Saves List
Checkbox Colors
Checkbox colors indicate the "health" of the mod file or save files master files. See Master List Updating below.
Save Details
Make changes to the file in the details view.
File Name: Change the file name.
Save Name: Change the save name. This is the save name that appears in the in-game game load list.
Masters List
The masters list show the esm and esp files that the current save game depends on, and the load order (modIndex) of that master. Editing the masters list of a save game is probably the most common use of Mash, since it is the action that is necessary to prevent doubling. For more information, see Mod Updating below.
You can access this menu from the masters mini tab. You have to either click the double hevrons icon (in between save and cancel buttons) or left click one of the columns of the master list.
Copy List: Right click on the column header of the master list and select this command to copy the list of masters to the clipboard. This is useful for forum postings where you want help debugging your load list, or just want to show off how many mods you have loaded! Note that this list is more useful than the list in the morrowind.ini file, since it lists the mods in load order. It will also include the version number of the master if the description field of the master includes a line like "Version ####". Note that this is the same version labeling scheme that the Snapshot command (mot the mod order snapshot) uses.
Sync to Load List: This option will apply your current mod order to your saved game.
Update: Updates masters list and prepares it for further manual editing. Automatically fixes: names, sizes and load order.
Restore Mod Order from Save: This will restore the mod order saved inside your saved game, essentially it is the opposite of "Sync to Load List".
Profiles
You can now define several different savegame profiles and easily switch between them. Each profile consists of a set of savegames and a Morrowind.ini file. Use the Profile menu to edit and switch between profiles.
If you wish to move savegame files between profiles:
Load the profile currently containing the savegames to be moved.
Select the files, then right click on the selected files and select File: Move To... Use the directory dialog to specify to select a destination profile (i.e., one of the subdirectories of Saves\Mash\Hidden).
File Commands
Same as for Mods Tab: File Commands above. Except... Hide has been replaced with Move To...".
Move To: moves the selected save files to the specified directory. Usually this will be one of the subdirectories of Saves\Mash\Hidden, since these subdirectories correspond to your Profiles (see below).
Remove: There are several commands for removing different types of references and other data from save files.
Debris Cells: This removes all references in cells that have been visited, but are not supported by the current set of masters. Typically this is used to cleanup exterior cells that were added by mods that have since been removed.
Note that if you have intentionally placed objects into such cells (e.g., a travelling ship), then those objects will be lost!
Spawned Creatures: This removes all lvcr (leveled creature) references from the file.In other words, it resets all spawn points.
Warning: Some of the major creature/npc mods create herds of creatures and/or groups of NPCs. Typically only one of the npcs/creatures in these groups are associated with the spawn point. So resetting the spawn point only removes that single npc/creature. To fully clear npc/creature groups use a object list remover (see below). For a savegame, this has the effect of resetting all spawn points.
Removers (Object Lists): Removers allow you to remove all instances of arbitrary lists of objects from the game. The only instances not removed will be those instances that reside in cells that match the list of "Safe Cells".
Warning! If the remover that you use includes standard containers, you should be sure that your safe cells list includes you stash cells -- e.g., your stronghold, mansion, etc.
Setting up Removers:
First, select "Edit Safe Cells..." and make sure that your stash cells, e.g., stronghold, mansion, etc. are included in it. Note that a safe cell named "Balmora" would protect all cells whose name begins in "Balmora".
Next, select "Edit Removers..." and select one or more of the files in Mopy\Data. This will add that(those) file(s) to the list of removers. Close the edit box when done. The new remover will now appear on the remover menu.
Using a remover:
Use the Remove: [Name of Remover] command on the savegame.
Remover Files
You can easily create your own remover file...
Remover files are just plain text files, with each line listing an object to be removed. Blank lines and any text after a '#' character are ignored.
Objects to be removed should be first on the line and surrounded by quotes. Anything after that will be ignored.
Hint: if you use the export feature in TESCS, the resulting file will be in the right format to use as a remover. But be sure to edit it first! There are many unique and scripted objects which should not be reset in the game.
Journal Browser: Shows the journal entries for the selected save.
Note: Journal browsing is a memory hog and will slow down switching between save files! If you're not using it, close the window.
Load Masters: This causes the save game's master files to be loaded.
Note that unlike Load Lists, this function is exclusive, not additive. I.e., only the masters of the save file will be selected.
Map Notes: From the saves context menu, select Map Notes to extract all of the notes that you have added to the map for that save game.
Map Note Tips: Add map notes by double clicking anywhere on the map while viewing it.
Notes attached to a cell are visible from the map square for for any door that leads to that cell. E.g., map notes placed in a cave will be visible not only while in that cave but in the landscape outside. So, for caves, tombs, etc. place the note inside the cave if possible.
Repair All: See Doubling below.
Update Map: Updates the world map to reflect added and removed landmasses. Use this after adding or removing mods with landmasses, and using Repair All.
Draws the borders around the visible map area.
Note that lands located outside of this area will never be drawn. I.e., if you're inside, you should see the land; if you're outside, you should see nothing but blue ocean.
Draws a grid with spacing of 5 cells centered on the center of the 0, 0 cell.
Want to use a COE (Center on exterior) console command? Now you can easily figure out what the coordinates are!
You can disable the gridline drawing by unchecking World Map Gridlines on the menu. However if you've previously drawn the map with the gridlines enabled, you may still see some gridline remnants on the land masses that you've visited. These will not disappear until you re-visit the corresponding cells.
Notes: If you see marked cells for landmasses that have been removed, try using Repair All first.
Statistics: Displays statistics for the file's record types.
8. Screenshots Tab
Polemos beloved bike...
In this tab besides looking at your saved screenshots you also get a nice managing utilitie.
By selecting a screenshot and using the context menu (right click) you have the choices of opening (your default image editor), renaming, deleting and converting your images to JPG format. By selecting many screenshots together you can apply those actions en masse.
If you click on the menu "Configure screenshots" you are also able to define a custom directory for morrowind to save any screenshots you take and also to define a default saving scheme for Morrowind to follow when saving screenshots (e.g Screen0, Screen1..., Screen88).
9. Doc Browser
You can easily and quickly scan through your mod's document files (readme's) from the Doc Browser window. Supported doc types: text files, html and mht (html archives).
To show the Doc Browser window, select "Readme..." from the mod's context menu.
Using the Doc Browser
When you the Doc Browser is showing and you click on the name of a Mod in the Mods Tab, Mash will try to show the document for that mod in the Doc Browser window. If Mash does not know which document to associate with the mod, it will show a blank page.
To associate a document with a mod:
Select the mod in the Mods Tab.
Switch to the Doc Browser and click on "Set Doc..." and use the file dialog to find the document.
To disassociate a document with a mod:
Use "Set Doc..." again to pick a different doc. Or...
Use "Forget Doc...": to dissassociate any docs.
To change the name of a document, click on the "Rename Doc..." button, and use the file dialog to pick a new name/location. The document will be renamed and/or moved to the new directory.
To view a different document:
Select the document on the Mods tab. Or...
Use the mod name combo box to select the desired mod.
To make a text document editable, click the "Edit Doc..." button.
Note that editable docs will stay editable until you unset "Edit Doc...".
Also the Edit doc setting is remembered separately for each mod. As you switch between mods, the "Edit Doc..." button will return to the remembered state for that document.
Any changes to the document will be automatically saved when the mod is changed, the document window is closed or the edit button is unclicked.
To create a new document, just use "Set Doc..." and pick a file name that doesn't exist yet. This will give you a blank document template - and any changes to it will save automatically, creating the new file.
Wiki Text Format: If the mod's doc file is a .txt file in wrye wiki text format, an html version of it will be automatically generated as needed, and this html version will be shown when the doc Browser is not in edit mode. Format Documentation and Template:
The wiki text format is documented in Data Files\Docs\Mash Readme Template.txt.
When you create a new readme document (by using "Set Doc..." to a file that doesn't exist yet), you'll be given a template wiki text file. The template will be based either on the Template above, or on Data Files\Docs\My Readme Template.txt if it exists.
Notes:
If you rename a mod in the mods tab, Mash will move the document association to the new name.
Similarly, if you copy a mod, the new copy will be associated with the same document.
Documents can be stored in different directories.
If you delete a mod, then Mash will forget about its document (but won't delete it). However, if you Hide a mod, Mash will remember the document, and you'll still be able to select it from the Doc Browser's mod name combo box.
Suggestions: You may want to move your docs from the Data Files directory to a new Data Files\Docs directory. This will reduce clutter somewhat and make documents easier to find.
10. Doubling
Doubling Theory
Full Explanation
Background: Reference Ids
So, you start Morrowind, load your last saved game, and find yourself in Balmora. There on the bridge is the same MCA character. There at your feet is the potion that you just dropped. Over there is the door that you opened. And it occurs to you... How does Morrowind keep track of all this stuff? How does it know this potion is supposed to be here? How does it know that door needs to be open?
The answer is reference ids -- every object that you see in the game world has an unique numerical id attached to it, defining it. When you load a set of mods (as you do when Morrowind starts up), Morrowind first recreates the world in a "virgin" (i.e. unchanged state). Then, when you load a savegame, it reapplies all the changes that you made -- killing bandits, filling quests, opening doors, moving NPCs, etc. It makes those changes by matching the reference ids stored in the savegame against the reference ids as calculated for the virgin gameworld (i.e. for the the set of loaded mods).
Unfortunately this matching/updating process can go wrong sometimes. Doubling is the most obvious such problem. But other problems can happen, e.g., changes meant for a bar door might be applied to an NPC. These mismatches might be invisible, might cause weird behavior, or might cause CTDs. As people have found in the past, if enough of them pile up (e.g., after repeatedly changing the mod list), you will get corrupted unplayable games.
Note that all of these problems are caused by mismatches between reference ids! E.g. from your loaded mod list, Morrowind determines that the referenceid number for that door should be 345672-05, but your savegame thinks that the reference id for the door should be 345672-07, or maybe 345674-05. So the secret to avoiding doubling, etc. is simply preventing such mismatches. Well, easier said then done, unfortunately!
So, a little more background... Each reference id is actually two numbers: the ObjectIndex and the ModIndex. For each mod, the objectindex is unique, i.e., there's only one "1292" objectindex in each mod. The modindex, on the other hand is simply the order of the source mod in the load list. Morrowind.esm loads first, so it has modindex == 1. Tribunal and Bloodmoon if loaded, are usually numbers 2 and 3 respectively. Okay, but how about objects that don't really belong to a particular mod? E.g. an arrow that you bought and dropped on the ground? Simple enough, these objects belong to the savegame itself, and are given the special modindex of 0.
That's the basic story. There are a lot of exceptions and complications (e.g., spawnpoints), but that's the basics, so let's go on...
Reasons for Reference Mismatching.
If you change the mod load order -- either by adding new mods that want to load before your current mod, or by resaving a mod (which changes its modification date, and thus load order), then the ModIndex numbers will be mismatched.
Also, if a mod has had new references added, then many of its objectIndexes of existing references will be changed. This is because TESCS completely renumbers all references when the mod is saved.
There are quite a few technicalities and qualifications here, but that's the gist of it.
Morrowind Repair Work
If the load order changes, Morrowind tries to correct ModIndex numbers. If only the load order has changed (i.e., exactly the same files with the same names are present), then it seems to do a pretty good job of adapting.
But if new mods are added or if old mods are given new names, it gets confused and its repair often fails.
Note that the effect of this failure may not be immediately apparent, and the effects may oscillate under certain conditions -- e.g., doors may disappear and reappear with each new load change.
Doubling Prevention/Repair
So to prevent/fix doubling, you need to do several things:
Prevent modification date related mod disordering. (See Load Order Maintenance.)
Adjust ModIndex numbers to account for new load ordering. (I.e. complete the job that Morrowind does partially.) (See Master List Updating.)
Repair existing damaged games files by removing existing corrupted records. (See Master List Updating.)
Adjust for changes to objectIndex numbering from mod modification. (See Mod Updating.)
Load Order Maintenance
In order to prevent doubling and to get correct behavior out of mods, it is important that they load in the correct order. Since mod load order is determined by their modified time, it is important to be able to set and keep fixed the modified time.
To set the load order of a mod, just edit the Modified field of the mod in the details view.
To keep the modified time fixed, Turn on the "Lock Times" feature in the menu of the Mods Tab. When this is done, Mash will memorize the modified times for all files that it sees. Then, whenever Mash launches, or comes to the foreground, it will check to see if any Modified times have changed, and if so, reset them to the earlier memorized values.
Note: If you want to use a non-Mash load ordering utility, you'll first need to turn off "Lock Times". When you're finished with the external ordering utility, turn Lock Times back on. It will reset to use the times set by the other utility.
Mod Updating
As described above, adding references to (or removing references from) an existing mod is likely to cause doubling. Part of the cause of this is reordering of the mod (which is fixed by Lock Times ), but the other cause is ObjectIndex renumbering. Fixing this second problem requires that the objectIndex numbers be remapped in the save file (e.g., remap object number 123 to number 234). This can be done in Mash, but requires several stages.
Procedure
First, there must be separate mod files for the original mod and for the updated mod, and these mod files must have different names (e.g., "AoScrye 1.1.esp" and "AoScrye 1.15.esp").
For modders, it's okay to continue to modify the original mod, so long as you do not add or remove refs, and so long as you do not change the id of any placed refs!
If you need to add or remove refs, then these changes need to be made on a new version of the mod. (Just use the File: Duplicate command and rename the new copy as desired.)
Second, you need to generate an "Updater" for each old/new version pair.
Select the new version of the mod in the Mods tab and then select "Updaters..." from the context menu. This will popup a new dialog which will list the updaters available for that mod.
Click on "Add" and select the old version of the mod. This will create the updater, which will now be shown in the list. If some of your save games depend on even older versions (e.g., "AoScrye 1.0.esp"), then you can add additional updaters for those.
Third, update the masters list of the save game that you want to update.
In the saves tab, select the save game you want to update, and, in its master list, change the name of the old esp version to the new esp version. I.e., click on the old name and then either edit the master name in place, or use the context menu to select the new master. If you've done this correctly, then the updated master will be hilighted in dark green. (Masters that have been changed, but don't have an updater applied are highlighted in pale green.)
Merged Plugins
If you have a save game that is dependent on one or more plugins which are merged into combined plugin, then you can define an Updater from the original plugin(s) to the merged plugin. E.g., if your save game depends on "Alpha.esp" and "Beta.esp" and these are then merged to form "Gamma.esp", then you can define updaters as above and then, in the save game master list, rename both "Alpha.esp" and "Beta.esp" to "Gamma.esp".
Note that should work well, so long as the merged files do not place the same type of object into the same cell. However, even in this case, running Repair All should fix any problems.
Master List Updating
Master/Save/Mod Health
In the master list, checkbox colors indicate the "health" of that master. Blue is best, red is worst. Green, yellow and orange represent intermediate levels of health.
In the saves and mods list, the checkbox color is the same as the least healthy of its masters. I.e. if, for a save, one master is orange and the rest are green, then the save's checkbox will be orange. The exception to this is purple, which is a sort of "superblue".
More specifically, and from worst to best, the meanings of master colors are:
Red: The master is missing. Either the mod file has been removed, or its name has been changed.
Orange: The master file is out of load order compared to the rest of the masters in the master list.
Yellow: The master file's size has changed since the game was last saved. This likely indicates a change to the mod file -- which may result in objectIndex caused mismatching.
Green: The master file is in order compared to the other files in the master list, but is out of order compared to the files in the current load list.
Blue: The master file is synced, has the right size and is in the right order.
Purple: This will only appears for saves. It indicates that not only are all of the masters synced, but also that no extra masters are loaded. If a save is blue (not purple), then the load list contains an extra esp that the save is not yet dependent on. If you play the save, then the save will become dependent on that new master.
For save games, you want every master to be blue - i.e. you want the save itself to be blue.
Mod files have much less problems than save files -- so it's sufficient if all masters are orange or better. I.e., as long as the master is present, it should be okay. For this reason, for mod files, "green" is considered to be perfect health.
When to Update Masters
If the save game checkbox color is blue, then it's fine -- there's no need to edit it.
If the save game checkbox color is green, then its master list is fine, but it not compatible with the current load list. You can use the "Load Masters" to sync load list with the master list. Note that the load list does not have to be exactly the same as the master list. It can have additional load files, so long as those files will load after the files in the save games master list. Otherwise, you should edit the load list.
Updating the Load List
If you like, you can create a duplicate or snapshot of the file before you edit it. But remember that Mash also will automatically create a backup that you can revert to. So, creating a duplicate is simply an extra measure of safety.
Bring up the context menu for the masters list column header, select "Edit", and then click "Yes" in the dialog that appears. Doing this will result in some initial cleaning of the list:
Master files will be placed in the correct order.
Missing files will be renamed if Mash thinks it knows what the new name is. Otherwise the missing master will be unchecked.
The correct file size will be applied.
Note that files that have had their name or size changed will now be hilighted in green.
If all masters are checked and are either green or blue, then you're probably done and can save your changes. Otherwise, continue...
You can rename masters by editing their label directly or by using the "Change to..." command from the master item popup menu. (Right click on the master name.) This will bring up a dialog allowing you to select an esm or esp.
You can change esm references to esp references and vice versa. (E.g., suppose you depending on an esp that has since been converted to an esm.)
You can change different existing masters to point to the same new master.
You might do this if you merged several head mods. (Note that merging may cause objectIndex doubling -- so hopefully the merge has been done in such a way as to prevent that.) When the file is saved, these different master references will be merged into a single reference.
If the rename has an Updater associated with it (i.e., from "AoScrye 1.1.esp" to "AoScrye 1.15.esp"), then the new name will highlighted in dark green. Otherwise, the rename will be highlighted in pale green. (See Mod Updating above for more information.)
You can unselect masters that you want removed.
Note that this will delete any changes that you made to that objects references from your save game.
You can use the "Sync to Load List" command from the column context menu. This will uncheck unmatched masters and add additional masters as necessary.
Suggested Actions
In the mods tab, first select the mods that you want to run with.
Then switch to the save tab. If the save you want to use is not blue, then begin editing the master list for it.
If there are any missing masters, then rename them. Also check the auto-renames (look for green highlighted items) to see if they look right.
Then use "Sync to Load List, do a final inspection and save the file.
Then use Repair All on the file (see below).
Note: If any of the masters is in an unknown encoding your actions will be canceled and you will receive a notification. This is to prevent damage to your saves/mods. Try renaming the offending master outside of Mash and update accordingly in the masters mini-tab (the list you were alterating).
Repair Refs Command
Note: For save games, the Repair Refs comand has been extended into the Repair All command. Repair All performs all of the work of the Repair Refs command, plus additional cleanup, which is described below.
This Repair All function attempts to repair references and other records damaged by past changes to file list.
Note: If the health of the file is not Blue or Green, then you should to update the master list before you can use the Repair All command.
When you run Repair All, you'll either get a report that no repairs were necessary, or you'll get a report of repairs that were made. Repairs will take the form of either rematches or deletions.
Rematches: The Repair All function compares the object id for each reference with the object id expected from the save files master list for the references combined modIndex and objectIndex. If they those id's don't match, then Repair All tries to find a different value of modIndex for with the id's do match. If it finds such a match and if that match is not already used by another reference, then it switches the reference to use the new modIndex. This is a rematch.
If Mash can't find a non ambiguous match, then it will report "NO MASTER" and delete the reference.
If Mash finds a match, but it's already in use, then it will report "DOUBLE" and delete the reference.
Also if Mash finds a reference that is marked as "Deleted" but has a modIndex of 0 (meaning that it's owned by the save file, not any of its masters), then Mash will delete the reference. Note that a save game needs to remember when a master file reference is deleted, but should not remember when a save-game owned reference is deleted -- since there's no need to do so. These bad deletes seem to be responsible for doors, NPCs, etc. that disappear and reappear with every change in the load list.
Repair All Command
In addition to repairing refs, as described above, Repair All performs several other cleanup tasks...
Remove Orphan Contents
Content records (CREC, CNTC and NPCCC) records that have become disassociated with a place reference are removed.
Remove Debris Records: Sometimes gameplay leaves a modified copy of a database object even after the mod that "owns" that database object is no longer in the load list. This is common for globals (GLOBs), but also occurs for a variety of other records (NPC_s, LEVCs, etc.).
The list of object ids in the save game is compared against the object ids provided by the game's master files, and records that are unmatched are deleted.
Exceptions: Some items are intentionally created in game (new spells, enchanted items). Also, the MonthsToRespawn global is created during gameplay. These records are excepted from the Debris removal process.
Remove Overriding Lists: Mods that modify leveled lists through the addToLev and removeFromLev script commands will cause copies of those (modified) leveled lists to be added to the savegame itself. This approach conflicts with the use of leveled list mergers since the savegame copy of the leveled list will override even the merged leveled list esp. Accordingly, the scripted approach is now considered obsolete. Mods should no longer use the leveled list script commands. However, this still leaves the problem of cleaning savegames that are contaminated by older leveled list modifications. Repair All will now (as of version 0.70) do this.
Repair All will remove any leveled list in the savegame if more than one master mod has a copy of the list. (Thus unique lists belonging to a single mod may still use script commands.)
Note however, that if an older script modifying mod is still present in your load list, it will most likely continue to readd the leveled list back into the savegame. The solution to this is to update/patch the offending mod to no longer use the leveled list script commands.
For more info, including a list of problematic mods (and updates/patches for them) see: UESP Leveled Lists.
Masters mini-tab extra action for saves.
"Restore mod order from save" will restore the mod order that your selected save was using at the time to your mod list. This is irreversible so backup your mod order if you think you may change your mind afterwards.
11. Mish
Polemos: Not yet available in stand alone.
Mish is a command line interface to the features of mash. At the moment, there are a couple of features that you can access from it that you can't access from the GUI. Also, with a bit of python coding you can do some pretty nice useful mangling of tes3 files.
Mish Commands
Using Mish
Chdir to the mopy directory and then (if you have python environment fully defined), type mish commandName [arguments].
If you don't have the python environment fully defined, then type: python mish.py commandName [arguments]
I'm assuming that you at least have the python.exe in your command path. If you're confused, but desirous of learning more, go to python.org and look for info on setting up your python environment.
refInfo
This command will give you info on the refs in a file. Typically, I use this for finding which references are changed from (faster).
Usage: refInfo "Yadda yadda.esp"
There's a line in the refInfo function that goes like "if object[0] == 0". Set this way it will tell you about all new references in the file. But if you change it to "!= 0" it will tell you about all changed references in the file. Which is useful if you want to know what you've accidentally bumped into while changing refs in a given cell.
cleanRefs
Usage: cleanRefs "Yadda.ess" "Data\Beth All.etxt"
This removes references from Yadda.ess that match the objects listed in "Data\Beth All.etxt". Or you can use one of the other list files or make your own.
DO NOT USE THIS ON AN ESP FILE Unless, of course, you want to blow away a bunch of the references in that esp. Hmmm... Actually, that might be useful for cleaning gunk out of your file... But you had better know what you're doing -- this file makes no distinction between refs that you've modified from an esm and refs that you've placed yourself.
genSchedule
Usage: genSchedule "My Seyda Neen Schedule.etxt" "My Seyda Neen.esp"
Munches a schedule text file and from it generates a set of LCV style scheduling scripts. These scripts will either be written to the specified esp file or to a text file named after the source file (e.g., "My Seyda Neen Schedule.mws") if you leave off the second argument (name of the esp).
While this writes the scheduling scripts to the file, it does not compile them. You'll need to open the esp file in TESCS and either compile each new/updated script in turn, or use the compile all button. (But if you do that, you'll probably need to save, then go to the details view and delete several scripts that were uncompiled or incorrectly compiled in the original morrowind.esm, then open and resave. (Though I think that some of these four are fixed in the other Bethesda esms.)
Note that the "LCV Schedules.etxt" does not contain any of the idle defs. That's because all of these are defined in (and loaded frm) mush.py. You can still define and use your own idle (or any other defs), but I would advise that you use the ones in mush.py if possible since they're fairly standard.)
etxtToHtml
This command generates html documents from an etxt document. I use this to generate all my html docs -- e.g. this one.
Usage: etxtToHtml yadda.etxt
This will generate yadda.html in the same directory.
For etxt formatting, see "Wrye Mash.etxt" for examples.
12. Internationalization
Mash now supports localization for most(?) western languages (translation of program strings to local language). It supports non-roman character sets (Cyrillic, Arabic, Asian languages, etc.) but this needs testing. Since you're looking here, I'm assuming that you're trying to add translations for your language. Here's how:
Custom Program Strings
Custom program strings are translated from lookup files that you'll find in the Mopy\local. E.g., for English, it would be Mopy\locale\English.pkl. (Of course, the program is already in English, so this isn't needed.)
These pkl files are automatically compiled from the corresponding txt files (e.g., Mopy\locale\English.txt) as needed when Mash (or mish) starts up. So, to update the program strings for your language all you have to do is edit the txt file in a text editor adding translations for strings. Naturally, not everyone needs to do this -- once someone does the txt files for a language, they can redistribute them to other people -- including me, so that I can include them in next Mash release.
If the text file for your language doesn't exist yet, open a DOS shell, chdir to the Mopy directory and type python mish.py dumpTranslator. This will create a new text language file for you in the locale directory (e.g., Mopy\locale\NEWEnglish.txt). If you already have some strings translated, this new file should contain all of them. And if mash has added new strings to be translated, they will appear.
So to create the strings, all you have to do is edit the text file to add the translations, and save the file with the leading "NEW" stripped off.
Translation Tips
Here's part of the a translator file.
masher.py, 4605
Default profile cannot be removed.
>>>>
masher.py, 4611
Delete profile %s and the %d save files it contains?
>>>>
DELETE PROFILE %s AND THE %d SAVE FILES IT CONTAINS?
Each entry begins with the source file and the line number (in case this helps you figure out how to translate the code).
After that is the original text, then a >>>> dividing line, then the translated text. Here, the second entry has been translated, while the first has not. (Here the the "translation" consists of changing it to upper case.
It's important that you leave the formatting characters in place and in order! Formatting characters are text like %s %d %08X \n. The '%' strings are place holders where file names, counts, etc. are entered -- if they're not present, Mash will throw an exception. The \n combinations are newline characters -- I use them in dialogs and other places where I want line breaks.
In translating, I would suggest that you translate the strings that you see the most first. E.g., a good one for a quick test is masher.py, 2126: Mods -- this is the name of the Mods tab. And right under it is the name of the Saves tab.
To test your translations, just save your changes to the text file, and restart Mash. Your changes should appear immediately.
Of course, it's probably a good idea to keep backup copies of your translator file in case you mess one up. If you revert to a backup copy, just throw the pkl version away to it to update. (Remember it won't autocompile unless the text file is newer than the pkl file.)
Spell checking: If you're using an office suite, you might want turn on dictionaries for both English and your language -- Abot mentions that Open Office allows you to do this.
13. Python and wxPython
(By Wrye, kept for historical reasons information is not accurate anymore in a lot of places)
Python
I've programmed in something like 20-30 different languages and of those, Python is by far the easiest and most powerful. I strongly recommend it both for first time programmers and experienced, professional programmers.
As you'll see from the code, it's an untyped, object oriented language. (By "untyped" I mean that you don't have to declare the type of variables before using them.)
You'll also notice that it's compact with very little overhead -- it's probably about as close a programming language can get to pseudocode -- i.e., to the way you think the program.
Note that when you installed python, you got a very complete manual. When programming, I just keep this manual open.
wxPython
wxWidgets is a cross-platform GUI widget set. wxPython is a python wrapper around that library. Unlike Java, the graphics are native to each platform-- hence drawing operations are fast.
However, while there's a fair amount of documentation for wxPython, between wxPython and wxWidgets, there can be something of a documentation gap. In several places I had to search for a while, and do some experiments before I figured out the right way to do things. In a few other places I couldn't get things to work, that from the wxWidgets documentation seemed like they should work. So, it's not a completely mature platform.
However, the end result looks damned good and is responsive, (not bad for my first real GUI application!) so I'm not regretting the choice.
For your interface work: The closer you stick to my code the easier things will go.
As mentioned before, the wxPython manual and docs are a separate install from the base wxPython install. There are several types of help available in it.
Most useful is the wxPython Demo. This is where I usually start.
Of secondary use are the wxPython manuals. These are fairly complete, but they're primarily designed for the c++ version of wxWidgets. The conversion from C++ call to python call is unfortunately not always documented or obvious.
And of course, there's the web. A well chosen google search will oftentimes help substantially.
Mechanics: Editors and Navigation
Polemos: You will find that Wrye Mash code is very elegant and proffesional. There are thinks to learn for a pythonista here. Note: If you want to do some serious coding, you'll probably want to get a decent editor like pycharm.
Getting Started (by Wrye)
Python
If you're not familiar with it, check out python.org. There are lots of links to good tutorials there. Also, the python installation
Mish.py
Command line programming is definitely easier than GUI! So if you just want to understand the data level code, you can restrict yourself to mosh.py and mish.py.
I'd suggest that you make your own copy of mish.py and then play around with extracting data and spitting stuff out. Then when you feel confident, you can start modifying files.
GUI Programming.
Context menu items are the easiest things to add. They're relatively simple, and I've specifically designed the code to make it easy to add new menu commands.
Menu definition and Creation
Both menu items and the Morrowind buttons are subclasses of my Link class.
You'll notice that I define these classes last in the file, and don't actually them into the interface until the InitLinks() function.
Examples
MorrowindLink creates the Morrowind Launch button in the status bar.
It's very simple, and by following it back you can see how it get's added into the bar.
UnHideLink Is more complicated, but is still pretty comprehensible.
FileStatsLink Is not very complicated in itself, but that's only because it pushes most of the interface work onto a new class FileStatsList. But it's an example of a menu command that introduces a little extra
GUI complexity.
Code Layout (by Wrye)
The code is self documenting... Yeah, right! Actually, I keep my code pretty clean and well laid out so it shouldn't be too bad. But there are few hints that I can give you...
Python supports internal code documentation through the the triple quote syntax ("""Function does x.""") This is similar to Java's code documenting feature. I've used this a little bit, but not as much as I should have.
mosh
Settings
The class and singleton are defined in mosh.py and used by other modules.
For convenience, I use dictionary emulation to allow the singleton to be accessed like a dictionary. (E.g., _getitem_ supports the settings[key] syntax.
FileInfo and FileInfos
These are parent classes for ModInfo and ModInfos, and SaveInfo, SaveInfos.
I.e., basically mod and save files and collections of them.
TES3 File Structure
Basically, I only defined as much as I had to.
For performance reasons, I don't analyze the data file any more than I have to. E.g., for the remapMasters function, I only care about the objects in the cells. Thus there's all other records (except for TES3) are left in their raw data form, and even for cell objects, I leave most subrecords in raw data form.
Note also the use of the changed flags -- this allows me to skip repacking data if the cell record hasn't been changed.
masher
images and colours are convenience collections for correspond objects.
Final interface assembly does not take place until the end, through the various init functions. This is done to make the program more easily modifiable. (And easy to write in the first place!)
Data and Extras
The Mash distribution includes additional files that assist in its operation and/or assist the modder in other ways...
Data: Ref Removers
These are text files that define Ref Removers.
Beth All.etxt
Bethesda non-unique containers and creatures.
Beth Containers.etxt
Bethesda non-unique containers.
Beth Creatures.etxt
Bethesda non-unique creatures.
Beth Doors.etxt
Bethesda non-unique doors.
Wrye All.etxt
Wrye creatures plus Beth containers and MCA 4.1 NPCs.
Wrye Creatures.etxt
Creatures from Bethesda plus Mephisto's Creature Pack and Pirate Lords's Creatures.
Data: Ref Replacers
These are text files that define Ref Replacers.
MCA Refs.etxt
MCA spawn points. Note that these require that that placeholder spawn points be pre-added to the mod first.
So why not just add MCA spawn points directly? Because this way, MCA becomes optional -- it's up to the user whether they want to install MCA or not. Also, if some other mod provides MCA-like functionality, a replacer can be defined to place their NPCs instead of MCA NPCs.
NOM Refs.etxt
Bottles, keg stands, ovens, wells, etc. This replaces certain statics and misc items with their NOM equivalents.
Extras
These are miscellaneous files used to assist Mash functions, etc.
ESTemplate.ini
A template file for use with Enchanted Editor.
Mashed Lists.esp
Template file for Mash's leveled list merge and resequence feature.
Copy this to your data files directory.
NOM MiniRes.esp
This file is a mini resource esp for NOM (Necesities of Morrowind) that is used by the NOM Ref Replacer.
Although this file should never be selected as a load mod, it needs to be copied to your Data Files directory in order for the NOM Ref Replacer to work. (The Ref Replacer will, as necessary, copy object definitions out of this file and into the mod being modified.)
XXX ====.esp
When you have hundreds of esps, it can become difficult to find the esp that you're looking for, especially in TESCS. One approach is to chronologically reorder the esps by type. E.g., all of my Race mods are set to have their modification date in the month of July 2001.
If you done something like this, then you can use something like these spacer esps to help find those mods in your mod listing.
Usage: Copy these esps to your Data Files directory, set their dates as desired and then set the dates of your various mods so that they group as desired.
Note that ordering is important for many mods. Reversing the order of some mods may cause problems.
14. Troubleshooting
Installers bugs: If you have bugs while you are using the Installers tab then go to the settings (Gear icon on the status bar) and browse and re-set your installers directory from there. Afterwards do a full-refresh on the installers tab. It fixes things in between version updates.
Encoding bugs: Try renaming the offending mod.
EOFError when starting Wrye Mash: Delete "settings.pkl" and "settings.pkl.bak" from Mash directory, they are corrupted.
EOFError when using the updaters: Go to your Morrowind "data files" and open the "mash" directory inside it. Inside that folder you will find a file named ObjectMaps.pkl. Delete it. This will make Wrye Mash forget which mods it has updated but it will not affect your updated saves or any mods you have updated.
Windows 10, After the first time wizard Wrye Mash crashes with: UnicodeDecodeError: 'ascii' codec can't decode byte 0xa0 in position 1: ordinal not in range(128): Disable the "Use Unicode UTF-8 for worldwide language support" in the "Region Settings" of your Windows 10 installation.
15. Versions
100 Polemos [10/25/2019]
-Mainly a bugfix and optimization version
Updated help file.
Removed trailing spaces and used UNIX line endings.
Refactored error and locale code.
Added a notification when using Mashed Patch and having TES3cmd installed which suggests the use of Multipatch instead (User-friendly).
Implemented a self reset of "Updaters" data in case it gets corrupted (asks the user first).
TES3cmd is shown if it is detected correctly in the Paths section of the Settings dialog (to avoid user confusions).
TES3cmd was, in some cases, erroneously detected as active when it was outside "Data Files" folder, this is now fixed.
Refactored/optimised various wxpython dialogs.
Fixed the "Open..." option menu in the Installers to show information if no package is selected in Menubar or be disabled in the Old Menu.
Added a new menu option "Import Package.." which imports packages to the Installers directory (User-friendly).
Added the option to disable the new "7zip crc32 calculation on big files" in the settings (just in case).
Added a new "Advanced" tab on the settings dialog.
Fixed a bug in Master Tab (thanks praisejebus732 and Jaiysaun!).
Cleaned the settings module code.
Increased the size of the start-up wizard dialog.
OpenMW implementation additions and fixes. => OpenMW/TES3mp
Updated the help file.
Refactored MGE XE and mlox statusbar implementation.
Added the option to set MGE XE path in settings. Will still try to auto detect the path if not already set.
Finalized Wrye Mash alpha (as in before beta) v100 for OpenMW. => OpenMW/TES3mp
Optimized TESLint and Custom Commands, log dialogs.
Optimized TES3CMD Fixit and Multipatch functions. Wrye Mash will no longer freeze while TES3CMD is working.
Fixed a regression bug in the query dialogs.
Time is shown in 24h format now (in lists). Date remains locale specific.
Fixed a bug in the newly updated query dialog (the one with the check mark).
Added a warning when changing masters with unknown encodings in a save . The action is cancelled before any changes are made.
Optimized installers full refresh. A full refresh of 1.34GB installers (and Data Files) takes 5.6 sec in my system
Implemented 7z crc32 calculation for big files. Depending on the size of the scanned files there is a 2%-20% speed increase.
Implemented xxhash algorithm in place of crc32 for installer packages (for the packages not their contents), which decreased by 30% the scan time of packages.
Fixed the toolbar not refreshing when editing mlox in the settings.
Mash will now try to revert to the backup settings configuration if settings.pkl is missing.
Structure refactoring.
Fixed a bug in Tes3lint implementation which was preventing to exit the output dialog.
Added a new Tab in the Settings dialog named "Defaults". In there you can enable/disable Mash warning prompts and also reset the column widths of Mash lists (e.g. Mods list) into their default widths).
Optimized and refactored the query dialogs for high resolutions.
Optimized conf backup (morrowind.ini or openmw.cfg) fail-safe auto-restoration.
Improved conf file saving for better compatibility with Morrowind/OpenMW.
Added a filename detection for possible problems with filename encodings. It warns the user when a filename might cause problems with Morrowind/OpenMW or Wrye Mash.
Refactored Menubar to wxpython Phoenix standards.
Added chardet support for the mod/plugin description field.
The High Contrast theme applies to the Help File contents list color now.
Added a warning when changing Morrowind directory in settings for the need to restart Wrye Mash.
Added encoding options in the settings dialog.
Mash first time use Wizard is now allowed to be resized.
Some code refactoring in the Mash Wizard also added encoding choices (for translated version of Morrowind).
Added a warning when changing masters with unknown encodings in a mod/plugin . The action is cancelled before any changes are made.
Added a warning when a master is automatically deselected in the masters list in saves and mod/plugins (when missing or of wrong encoding).
Fixed problem in masters list when a file contains unknown characters. It will not bug out but it will deselect the problematic master. (Thanks KarmicKid)
Fixed a mistake which was preventing rearranging the mods order in the mods tab. (Thanks KarmicKid)
Fixed a fail-safe in morrowind.ini and openmw.cfg parsing
Added an extra safety check for unrecognized characters in morrowind.ini and openmw.cfg.
Added marker checkups in the installers tab.
Added ability to rename markers in Installers. (thanks MOB2).
Fixed positioning on renaming in Installers.
Small speed improvement in package installations. => OpenMW/TES3mp
Added a check on open if there is already an instance of Wrye Mash running.
First 64bit release.
Code updates preparing transition to wxpython Phoenix.
Fixed another Unicode bug, (thanks movomo!).
Optimized "Full Refresh" speed in Installers by around 75%!! You got to see to believe it! It went from 23" to 5" in my system.
Added option to force close Wrye Mash if it is stuck ad infinitum in the debug log.
Optimized author, description, mod name fields dialog code and datetime dialog (thanks Valascon).
Fixed an attribute overload bug in mod/bsa enumeration, (thanks Stahpk).
Added existence check on "Rename", "Duplicate", "Delete", "Repack", "Refresh"... actions on installers. This fixes throwing an error in case there was a deletion Mash hasn't detected.
"Repack" option in installers tab now repacks rar archives (into .7z).
Fixed a bug in Masters mini tab column ordering when clicking a column to reorder (sorry, late night mistakes...).
Optimized the way Wrye Mash finds itself. Safer and fixes problems when having multiple Mash installations.
Fixed a bug in Installers highlight color.
Added animation package support. Wrye Mash will recognize animation packages now.
99 Polemos [10/16/2018]
Added a notification when changing paths in settings to restart Wrye Mash.
Fixed "syncing or repairing saves" bug which was preventing syncing or repairing saves.
Fixed a bug in updates check in settings which wasn't allowing to set less than 15 days (in effect also blocking saving manual entries below 15).
Made DateTime dialog fields and the dialog itself a little bigger to accommodate user variety of scrollbar sizes.
Made Details (mod info, name ...) dialog a little bit larger to accommodate user variety of scrollbar sizes.
Added sort by name or by order for Masters list both by clicking the columns and in the masters menu.
Right hand details panel in Mods Tab has now adjustable width (easier to read Masters list).
Right hand details panel in Saves Tab has now adjustable width (easier to read Masters list).
Fixed a Unicode bug in Installers "Duplicate" function.
Fixed a bug in Installers "Duplicate" function which happened when inputting an illegal char.
Added 'Rename..." action in Installers tab.
Fixed a highlight effect bug in Installers Tab.
Disabled drag and drop on reversed list. It was never supported (even on Yakoby's version) and I don't intend to add support. On the other hand, moving items with the Keyboard is supported on reversed lists. Bonus: I optimized keyboard movement on reversed lists, by reversing up/down arrows, try and see.
Added the ability to delete Installer packages when pressing the button DEL in the installers tab.
Fixed an unintended behavior in Installers which prevented using any keyboard key if installers were not sorted by "Load order".
Added the ability to restore the mod order from a saved game (ess) file. In the saves tab under the masters mini tab select 'Restore mod order from save'.
Added a menu button in masters mini tab on both Plugins and Saves tabs.
Installers dated out of Unix Epoch will show start of Epoch instead of throwing an error.
Fixed a bug in archive explorer.
Changed default "Docs" behavior in the Installers. Now when installing, all dirs and files under the "Docs" dir will also be installed.
Created first Wrye Mash theme: "Black fonts for windows High Contrast theme". It only changes the lists font color though to black...
Created theme engine. For now, only the font color of lists can be changed and the font hover color.
Fixed "Enable Highlight on Hover in Lists". It will not reset line colors anymore. Also Added color option in the theme engine.
Optimized, refactored "Load" menu" item in Mods Tab.
Fixed an age-old bug in Mods Tab when selecting "Load" menu to load a saved list. It was throwing an error if a mod in the list was missing. (Thanks Valascon)
Fixed a bug in repack engine affecting some installers
Fixed a bug in archive explorer which was throwing an error on some installers
Made "Comments" field in the Installers Tab friendlier to the end user.
Added "Minimize to Systray" option in the Settings.
Fixed a bug plaguing Wrye Mash at least since Melchior's version, with some installer packages not displaying sub-packages when containing a "Docs" folder. (Thanks Valascon)
Further optimized settings dialog, also made strings translatable.
Added an option in settings to disable showing the error log.
Recoded and further optimized the MenuBar
Fixed a problem with the MenuBar "View" sub-menu which wasn't allowing to reverse the active sorting. (thanks Abot)
Fixed a bug in the MenuBar, which when clicking "Reset Bethesda Dates", the BSA Mini Tab was not getting refreshed .
Fixed BSA list enumeration bug. Now enumeration goes according to datetime order (as it supposed to).
Recoded the Help browser. Now supports copy, select all, hotkeys. It is also more colorful among other things.
Complete update of the help file. Fixed spellings, removed obsolete material, updated images, fixed typos and some more.
Updated credits and licenses
Cleaned up unused icons in code and in files, changed the default icons and increased their resolution on the statusbar.
Added a "Use Big Fonts on Lists" option in the settings dialog, for people with tired eyes.
Fixed a bug in esm line color on Mods Tab.
Fixed a newly introduced bug in mod enumeration.
Added a new "Sort by" menu in Installers Tab.
The Installers are allowed to move only when set to "By order" from now own (like Wrye Bash does).
The Installers list does not not allow any movement anymore when "Sort by Active" or "Projects first" are set. If this creates problems please say so
Fixed 2 bugs in TES3cmd restore. One opening the wrong tes3cmd backup dir, and one which allowed restoring from Data files to Data FIles.
Added a small toolbar with a save and a restore button, above mod details in Mods Tab (like MO), for storing/restoring the plugins order.
Added a simple junk filter for the "Repack" option in the installers.
Added a "Repack" option for the installers. It opens the new Archive Explorer and the user may select which folder is the "Data Files" folder, of the installer. Afterwards it automatically creates a new "repacked" archive from it.
Added an Archives Explorer for the Installers Tab which shows the archive contents to the user. For now it runs only when selecting the new "Repack." option.
Basic .omwaddon and .omwgame support added to Wrye Mash (no Mashed patch for those yet). => OpenMW/TES3mp
Added a dialog (which can be set to not appear) after TES3cmd fixit which asks if the user likes to redate ESMs and ESPs in continuous dates (aesthetics).
Added a dialog after TES3cmd fixit which checks if Bethesda masters are earlier in the mod order from other masters and asks if the user wants to move bethesda masters in front of the other masters.
Optimized and refactored mlox implementation.
Check for updates now takes into account if Mash is a beta version.
Fixed statusbar field not being reset to profile text after selecting a menubar item.
Fixed a newly introduced bug which was throwing errors when installers Tab was empty (thanks StaticNation).
Fixed a bug in Screenshots column when resizing the columns (thanks StaticNation).
Fixed a bug when showing a screenshot from a save in the Saves Tab which had corrupted image information (thanks StaticNation).
Optimized selecting (not activating/deactivating) multiple items(or all) in Mods Tab list. Now it is almost instantaneous even on huge lists.
Optimized selecting multiple items(or all) in Saves Tab. Now it is almost instantaneous even on huge lists.
Added CTRL+A to select all saves on Saves Tab.
Restored asking to delete a mod by pressing DEL button in Mods Tab list (which was disabled in Yacoby's version).
Fixed a bug in TES3cmd clean which on some rare occasions was prevented from finishing.
Fixed a bug in TES3cmd implementation (v99beta2) which it was not updating the mod order on the GUI (thanks StaticNation).
ESM files buggy behavior when dragging and dropping them is fixed.
Recoded drag and drop in Mod/Bsa lists. Now long lists are faster with slightly different behavior (Using ctrl+arrows has the old behavior).
Optimized and refactored mod, bsa, plugin lists.
Fixed a bug in mod enumeration. Now it is also faster.
Fixed 2 unicode bugs on the Mods Tab info fields. (thanks StaticNation).
Fixed line endings on saved logs (TES3lint, multipatch, TES3cmd Fixit, etc). They look nice now on Windows OSes. (thanks StaticNation).
Basic context menu items are ready (when selecting items) in OpenMW Tabs. => OpenMW/TES3mp
Basic Menu items (MenuBar and Columns Menu) are ready for OpenMW Tabs. => OpenMW/TES3mp
Refactored and optimized Save/Mods/Plugins details, also cosmetic changes.
Added Alphanumeric search key presses on BSA archives mini Tab.
"Run Custom" remembers last used command now.
Added special color rulesets for TES3lint, multipatch, TES3cmd Fixit when shown in the log dialog.
Optimized speed of TES3lint, multipatch, TES3cmd Fixit, Custom Commands and any Adv. log functionality. Now they run fast...
Fixed a bug in TES3lint implementation where it was always using -n flag regardless of settings (thanks calemcc).
Added a small cosmetic effect (font highlight on hover) on Tab lists, can be switched off.
Fixed a MWSE "missing files" icon bug (thanks Pherim for beta testing).
Added Restore/Backup buttons in Mods Tab (like MO) to restore/backup mod order. => OpenMW/TES3mp
Installers bugfixes (age old).
Refactored MenuBar code, also made MenuBar strings translatable.
Added basic context menu for the packages miniTab in OpenMW/TES3mp. => OpenMW/TES3mp
Added ability to visit a mod's webpage in Nexus on the Downloads Tab for OpenMW/TES3mp (only Nexus for now). => OpenMW/TES3mp
Added basic context menu on Downloads Tab (remove, rename) for OpenMW/TES3mp. => OpenMW/TES3mp
Fixed a bug in Columns Sort sub-menu.
Added column alignment filters for tab lists.
Completed mod installer for OpenMW/TES3mp (Merge, replace, rename, copy, move functions+). => OpenMW/TES3mp
Created a junk filter for OpenMW/TES3mp mod installer. => OpenMW/TES3mp
Extract Nexus mod page and version from mods filename. => OpenMW/TES3mp
Auto-detect Data Files root from Packages added. => OpenMW/TES3mp
Created a Package explorer for Mod Packages, choose what folder to install. => OpenMW/TES3mp
Optimized the first use Wizard for OpenMW/TES3mp. => OpenMW/TES3mp
Created a first use Wizard for regular Wrye Mash.
A sudden epiphany => small speed improvement in Installers (timed as always).
Created a new welcome dialog.
A lot of code refactoring, optimizations and cleaning.
Added MWSE support, Installers Tab recognize 'MWSE' from packages and install contents into 'Data Files/MWSE.'
Total reconstruction for the Settings window. Now it is able to accommodate all the new settings.
Small fixes in Utilities Tab.
Fixed an issue where selecting a mod by pressing the first letter of the mod's name wasn't scrolling the window to the mod's position in the list (Thanks Abot).
98 Polemos [5/23/2018]
Added a safety switch which in case of fatal error, auto restores the last Morrowind.ini/openMW.cfg backup.
Added the ability to select a mod by typing its first letter in the Mods Tab (which was missing in the Yakobys version) (thanks Zikerocks)
Fixed alphabetical sorting on Mods Tab (thanks Zikerocks)
Optimized Morrowind.ini parsing (faster when having a lot of mods)
Optimized OpenMW.cfg parsing
Implemented BSA support for OpenMW
97 Polemos [5/6/2018]
Bugfix Version (thanks Oooiii), fixed a bug in Installers unpacking
Speed improvement in Installers
Some code optimizations
Updated Credits
96 Polemos [5/4/2018]
Optimized mlox auto detection x5 faster
Cosmetic Change in Installers Tab (display KB, MB, GB in sizes)
Small speed improvements all around but mainly in Installers Tab
Optimized default window settings (For new/clean installations)
No need to restart Wrye Mash anymore when there are changes in StatusBar (like when adding mlox location)
Fixed a bug in Settings which didn't allow to fire some Settings notifications
Fixed a bug in Installers Menubar
Optimized Error log, added option to save log
Added Archives mini Tab, Wrye Mash can fully handle BSA files now
Various code optimizations/refactorings and cosmetic fixes all around
Added option to Restore Default Dates for Official Bethesda Masters and Archives (Helps with problems in Steam)
Added "Create Mashed Patch" which automates creation, enabling and list importing for Mashed Patch
Added TES3lint implementation. In a way a GUI for TES3lint within Wrye Mash
Fixed a rare bug in Mods Tab
New better live logging of interface actions
Added Custom Commands menu option. You may save custom commands and execute them on items you select in Mods Tab
Refactored and optimized TES3cmd implementation (+one Unicode fix in TES3cmd log)
Cosmetic changes and the ability to save the log for TES3cmd "fixit" function
Added "Create MultiPatch" option for TES3cmd
Unicode bugfix in Utilities Tab
Code optimizations in Utilities Tab
Refactored Screenshots and added 'Size' attribute in Screenshots Tab
95 Polemos [3/29/2018]
Cosmetic fixes in TES3cmd Cleaning window
Fixed a bug in TES3cmd implementation which prevented cleaning files if they had a space in their filename (thanks Oooiii)
Optimized TES3cmd implementation code
Fixed * Open "Data Files dir"- in Menubar to open Data Files instead of Morrowind dir
Many general bugfixes (Omissions in Yakoby's code and before).
Fixed a bug in Installers which prevented uninstalling active mods
Fixed 2 bugs in Menubar
Small improvements in speed all around Wrye Mash interface
Code optimizations in Installers, small speed improvements all around(timed)
Improved Installers speed (full refresh) by up to 50% (timed) by changing default progress
Fixed a bug in installers (key error).
Optimized About dialog.
Many Unicode bugfixes for the regular Morrowind version.
Mash.ini has been removed for now. It produced more bugs than benefits, it will come back again in the future as an option in settings.
Wrye Mash can merge leveled lists now and create a Mashed list patch for OpenMW
OpenMW mod data folders are shown in the Downloads tab. Unload/load data mod is ready.
Full Profiles solution basis is complete (working but not allowed creating/changing yet)
Cosmetic, addons and code optimizations in the Setttings dialog
Opening wizard for OpenMW is complete
Downloads tab (beta) is complete (replaces installers in OpenMW/TES3mp mode)
94 Polemos [3/2/2018]
Wrye Mash will notify user when a new Wrye Mash version is released (configurable in settings and asked on first run).
Changed Mlox browse dialog, from a dir dialog to a file dialog in settings.
Added a welcome message on first run for newbies.
Added a dialog to run when Installers dir is not defined on start.
OpenMW/TES3mp:Added auto-detect/browse function for OpenMW profile dir (where openmw.cfg, saves dir, etc are contained)
OpenMW/TES3mp:Created the entries for the Settings menu (OpenMW)
Settings dialog remembers position now.
Mash.ini is now an override. You do not need to have it. If you create one, it will override installers setting. You can use it when you need the Installers in a remote or relative directory.
Optimized mlox path setting/detection.
Another bugfix/check in installers.
Fixed all progress indicators in Installers tab.
Optimised the way "Installers" deleted files (fix errors when deleting folders containing many files).
7z console popups are now hidden.
OpenMW/TES3mp:Basis for setting regular/openmw-tes3mp switch in Wrye Mash.
OpenMW/TES3mp:Wrye is able to read openmw mod config (openmw.cfg).
OpenMW/TES3mp:Wrye is able to to read and show in mods tab, the esps and esms from openMW virtual data folders.
OpenMW/TES3mp:Load order synchronization with openmw.cfg is complete.
Possible fix of a -universal Wrye editions- bug (Hey Stahpk)
93 Polemos [2/6/2018]
Fixed an ages old bug in the installers which plagued Wrye Mashes from times immemorial.
(It prevented in some instances to install directly from an archive)
Fixed a bug in balt progress bar
Some optimizations in installers code
Added varius informative dialogs for bugs in installers
Fixed a unicode bug in installers (thanks stahpk for reporting it)
Basis for setting regural/openmw-tes3mp switch in Wrye Mash
Wrye is able to read openmw mod config (code in, not enabled)
92b Polemos [1/22/2018]
Added a Menubar
Added help text for menu items in the statusbar 2nd field (needs better text in places)
Added context menu (which was missing) for selected items in Utilitie tab
Fixed pickle file creation bugs (hackish)
Wrye Mash starts with some better predefined settings
Added support for windows XP
Changed the way Wrye Mash finds the help file
Added option to disable the new menubar or the old column bar in settings
Code optimizations
General Bug fixing
Can now import non unicode morrowind.ini mod order from previous versions of Wrye Mash
Updated Wrye Mash Help file (need help on that)
91 Polemos [1/15/2018] (not released)
Added mod order "#" number in the mod tabs columns
Can change mod order both with "modified" and "#" now
Added "About" button in toolbar
Added/fixed missing "delete" function in screenshots tab
Added remaining character count in dialogs needing one
Better date/time dialog.
Added a real time log when TES3cmd is run (Instead of waiting to finish before showing any info). Good for the nerves
Finally fixed a long hunted unicode folder bug
General bug fixes (few regression bugs also)
some code refactoring
90 Polemos [12/31/2017] (not released)
Cosmetic change in Progress dialog (Installers) displays more information
Small cosmetic changes here and there
Fixed unicode bug in "Copy active mods" (how did I miss that?)
Added new functionality "Snapshots" for active mod order. Users can save and exchange mod order easily now
Replaced in mods tab: clicking the text fields (right) and editing with new dialogs. Click ok in the dialogs also saves any changes directly
Replaced date/time field with a dialog. Better. Clicking OK saves
Fix: Clicking "masters" field or any other field without selecting a mod/save no longer produces any actions
Fixed mlox implementation. It also now works only with the exe of mlox
Added option in settings to define mlox directory
Removed sort order with mlox from mods context menu. This is implemented in running it from the menu
Added automatic insertion of mlox icon in the toolbar after mlox directory is defined (needs restart)
Implemented "revert last changes" for mlox in menu (talking about the exe now)
Fixed TES3cmd implementation
When TES3cmd is installed in data files it is automatically identified by Wrye Mash
Added "Restore modified files" for TES3cmd
Added MGE XE identification. When installed a new icon of MGE XE will be automatically added in the toolbar (needs restart)
General Bug fixes (some regression bugs also)
89 Polemos [12/25/2017] (not released)
Further improved unicode handling, utilities tab
Replaced name input with auto generated one. It now uses an auto generated ID
Fixed utilities bugs
Some cosmetic changes:
-mods tab color (removed white highlight, mods with no problems default to grey),
-screenshots display image fills window (missing in Yacoby's)
-Saves tab journal artifact is fixed and map notes display in a more cosmetically nice dialog
When you run Wrye Mash for the first time sort "by modified" is the default
Fixed Yacoby's "editing the file header" bug
Fixed Progress dialog to work as intended in many places
88 Polemos [12/18/2017] (not released)
Further improved unicode handling, installers tab
Fixed installers bugs
Implemented a python unicode bug fix into the code (yeap python has bugs too)
Updated 7zip, updated code to handle it
Changed the way "information" is transfered inside the structure. Better unicode sandwich.
Decided against unicode identifying in favor of unicode tolerance (heh heh go figure)
Improved Yacoby's drag and drop function
Added PNG image capability in screenshots tab (why was it missing?)
Clarified the text in some dialogs/menus
Added the ability to recreate "mash_default.ini" instead of crashing (and mash.ini)
Fixed a lot of typos
Installers default directory is set inside morrowind dir
Added "Open Installers dir" in installers tab
Personalized "Open {your tab} dir" in every tab
87 Polemos [11/11/2017] (not released)
Using latest (2.x) unicode wxpython and python with Yacoby's latest dev source
Improved unicode handling, unicode names in mods tabs do not produce any problems any more
Wrye Mash can be installed in any unicode named folder without any byproducts anymore
Updated code to handle newer python/wxpython
Many (many) bug fixes (in general but mainly in mods tab)
86 Yacoby [In Development]
Fixed output logging
Added drag and drop for mods and installers tab
Fixed "Avoid at startup" option
Allowed settings to be transfered from previous versions
Improved unicode handling - File names are now stored as unicode
Disabled marker renaming
85 Yacoby [05/11/2011]
Merged changes with Wrye Mash Standalone
Added Ctrl Based mod sorting
You can now toggle mods with the space bar
Improved startup logging
Added a "Load All" method (SCOs changes)
Totally trashed the help browser trying to remove wx.lib.ie dependacy
Fixed bug with utilites panel and programs not starting
Added Mlox integration
Added tes3cmd intergration
Fixed issue with installer and read only files
Installer files now open on double click
Added Ctrl based sorting to the installers tab
Fixed the odd unicode errors
Changed the icon
Added markers to the installer
A lot of code refactoring
Moved code out of masher.py
Settings now is in settings.py
Globals are in a file called globals.py (so it is easier to tell if a var is global)
84 DCG 0.0.2 [8/9/2010]
Key shortcut for deletion in mods and saves tabs.
Installers Tab improved (support for remote drives).
Settings Window improved: added the installers path field.
84 DCG 0.0.1 [7/14/2010]
Utilities Tab improved with functions for creating/editing/deleting utilities.
Settings Window added: allow user to change some settings of Mash.
84 DCG 0.0.0 [6/17/2010] (not released)
Utilities Tab added: allow user to launch programs and commands from Wrye Mash.
Changed the help file interface: it looks like .chm ones now.
Wrye Mash is now a stand alone program: users who don't want to modify it don't have to download and install a bunch of Python libraries.
The sources are available in the sources.zip archive.
84 [2/5/2009]
Installers Tab: Fix a bug with espm filtering of aliased mods.
Baltization: Switch some code to balt.
Add Screens tab.
83 [2/5/2009]
Baltization: Switch some code to balt.
82 [2/4/2009]
Bugfix: Include new/updated icons.
Baltization: Switch some code to balt.
81 [2/4/2009]
Installers Tab Betaish!
Please see discussion topic.
80 [12/24/2008]
Minor code performance tweak.
Script import no longer zeros out variable data. (Still need to recompile.)
Fixed some "bash" stuff in the install instructions.
79 [2/13/2008]
Bash to Mash Retrofit.
Update Doc Browser.
Add autoquit button.
Refactor bish
Settings: 'wrye.mash' >> 'mash'
Misc. Changes
Changed dialog to export by topic.
New: Export/Import Scripts
Updated German translation by DWS.
0.78 [2/18/2007]
Bugfixes/Tweaks
Fix post2038 dates for python 2.5.
WikiText: CSS tag.
0.77 German, Misc. [1/27/2007]
Tweaks
Improved install debugging help.
Allow shorter internal link specification.
Foreign Language Support
German (by DWS)
Italian tweaks (by Abot)
0.76 [1/26/2007]
Fixed a tiny little bug that broke the code.
0.75 [1/25/2007]
Foreign Language Support
Bugfix for translation file reading.
Italian (99% Complete) (by Abot)
0.74 [1/24/2007]
Foreign Language Support
Minor tweak to bish's dumpTranslation function
Italian (98% Complete) (by Abot)
0.73 [1/21/2007]
Python 2.5 compatibility.
Tweaked shortcuts to be more generic.
Wiki Text Html Generation.
Added support for Internationalization.
Allow No Gridlines on World Map Updating.
Updated/Added Ref Removers:
Pirate Lord Creatures (by Dragon32)
Caits Critters Unleashed (by Dragon32)
0.72 [1/5/2007]
New/Improved
Tweaked list merging so that chance none is set to the chance none of the last mod to load rather than to the mimimum chance none. Tweak needed for MCA 5.1 Lighter to work with Mash.
Added remover for Fireflies by Thaedyn Vyr (remover by Shasta Thorne).
0.71 [12/10/2006]
New/Improved
Modified remover creation to accept multiple files.
Removed "Beth All", "Wrye All" and "Wrye Creatures" removers (since these can now be recreated as multi-file remover.
Added many new removers (by Dragon32 and Shasta Thorne) to Data\Removers directory.
0.70 [11/4/2006]
New/Improved
Removed "blue" mod masters. (Blue is not relevant for mod masters).
Tweaked sorting by name to ignore extension.
Tweaked snapshot file wildcard filter.
Added "Overriding List" check for Repair All on savegames.
0.69 [10/17/2006]
New/Improved
LCV Schedule generator upgrades (see LCV 03-13)
Added "INI Tweaks..." function.
0.68 [10/12/2006]
New/Improved
LCV Schedule generator upgrades (see LCV 03-12).
Bug fix
Ignore directories that are named like mods (e.g. "xxx.esp".)
Fix bugs associated with merging lists where a list is being deleted.
0.67 [10/9/2006]
New/Improved
LCV Schedule generator upgrades (see LCV 03-08 through 03-12).
0.66 [9/26/2006]
New/Improved
Finally fixed zombie progress bars! (I think.)
Profile name is now included in app title.
Added purple color for perfectly synced savegames.
Bug fix
Fixed a minor bug related to declining to remove a profile.
Fixed a minor bug with error handling during leveled list merging.
0.65 Bug fix [7/14/2006]
Bug fix
Fix bug with help button setting.
0.64 Misc. [7/14/2006]
New/Improved
Added help button.
Added savegame profiles.
Mash now semi-expects to be installed under Morrowind directory.
Added "Redate" reordering function.
Added exclusion groups ala Bash.
Added save game screenshots.
Moved doc and journal browsing to context menu commands and eliminated the previous document buttons.
Removed static text headers from mod and save details panels.
Use temp files more often to avoid power fail related file corruption.
Fixes/Cleanup
Fixed an error reporting bug for replacers.
Prevent 'DaysPassed' global from being deleted. (Apparently, like MonthsToRespawn, it's automatically added by the game engine.)
Cleaned up some vestigial code. (NotesBrowser.)
0.63 Misc. [1/19/2006]
Fixes/Cleanup
Fixed a new bug that broke ref removers.
0.62 Misc. [1/10/2006]
New/Improved
Doc Editing Minor bug fix and improvement to make it easier to add/edit
new doc files.
0.61 Misc. [1/9/2006]
New/Improved
Ratings: Specify ratings (i.e., score, grade) for mods.
Hiding Files: Hide will now first try to hide to sub-directory named for author, if it exists.
Edit Docs: Can now edit text document files.
Library Generator: Feature for generating library books. (CLI only.)
Fixes/Cleanup
Fixed bug with list merging that caused incorrect number of records to be written. Only a problem if you then attempted to edit file with Enchanted Editor, which would give an odd error and then truncate the merged esp file.
Complete representation of: BOOK, INFO, GLOB records.
Useful for programmatically modifying these records. See mish.py for examples.
Misc. code cleanup.
0.60 Object Index Renumbering [11/9/2005]
ObjectIndex Renumbering
Experimental feature to renumber object indices reduce likelihood of local ref conflicts between mods.
0.59 Bugfix [10/16/2005]
Fixes/Cleanup
Make sure backup directories exist before attempting to clean them.
0.58 Misc. [10/9/2005]
Fixes/Cleanup
Fix bug with hiding files that hadn't been assigned to a group.
Backup directories now cleaned on application exit.
0.57 Resource Replacers [10/2/2005]
Fixes/Cleanup
Resource Replacers:
Add progress dialog on apply.
Add file types: kf, bmp.
Fix makedirs bug.
0.56 Resource Replacers [9/30/2005]
New/Improved
Resource Replacers: Easily apply/remove resource replacers.
Remove: Debris Cells for saves.
Clean renamers dictionary on quit.
0.55 Repair Map [9/17/2005]
New/Improved
Improved Repair Map function.
0.54 Repair Map [9/15/2005]
New/Improved
Workable version of map repair. Still needs some work.
Fixes/Cleanup
Fix UI to upgrade correctly after mod select/unselect.
0.53 Misc. [9/8/2005]
New/Improved
Alpha sort multiple mods!
When duplicating saves, now specify the save name, rather than the file name.
After mod or save duplication, selection will jump to duplicate.
Can now skip warning when clicking on masters list.
Hide now hides to Mash\Hidden\[GroupName] if group is specified for the the file and the directory exists.
Fixes/Cleanup
Refactored UI updating. All file changes should now update UI correctly.
Comment out a print statement during global ref remapping.
Cleaned out some junk code; refactored other code.
0.52 Misc. [8/16/2005]
Fixes
Fix error.file bug.
0.51 Misc. [8/8/2005]
Fixes
Mash will now remap global script references as part of Repair All and master file updating process.
Updated Extras\ESTemplate.ini with SCPT.RNAM data.
Added Review function for saves.
0.50 Misc. [8/3/2005]
New/Improved
Renamed Genre -> Group, and added editing of group names.
Added a (very minimal!) ref replacer for MCA 4.1. Only works with mods designed to use it. (E.g., LCV Wolverine Hall.)
For save games, Repair All now replaces Repair Refs, and includes Remove: Orphan Contents.
Fixes
Fixed a bug with Genres that broke Ref Replacer importing.
0.49 Misc. [7/31/2005]
New/Improved
Can now specify genre for any mod.
Added dummy marker mods (XXX ===.esp) to Extras folder.
Schedules now supports projects and imports.
Fixes
Ref Removers and Replacers menu items are now disabled if more than one file is selected.
Internal
Prep for internationalization.
Refactor unpack of structs, and record and subrecord headers.
Refactor Tes3Error handling.
0.48 Misc. [7/27/2005]
New/Improved
Tes3Error's should now print problem file.
Fixes/Tweaks
Repair All will no longer remove MonthsToRespawn global.
0.47 Ref Replacers [7/26/2005]
New/Improved
Added ref replacer ability and replacer file for NOM.
0.46 Mashed Lists [7/23/2005]
Mashed Lists
Added support for creating merged, resequenced lists.
Misc.
Add LEVI and LEVC to types of debris items removed during Repair All.
0.45 Misc. Fixes and Tweaks [7/22/2005]
LCV Script Generator
More support for off schedule NPCs.
Support for initialization of NPCs through hello dialogs in each town.
Fixes
Tweak default and minimum window sizes to fix infinite looping that some people have seen.
Auto-add python root directory to os.environ['PATH'] so that activex dlls will be found.
Auto-create Data Files\Mash and Saves\Mash directories for tables and object maps.
Misc.
Tweak journal text display.
0.44 Journal Browser, Repair All [7/16/2005]
Journal Browser
Can now browse the journal for any save file.
Repair All vs. Repair Refs
Repair Refs no longer removes Orphan Contents. Instead...
New Repair All does Repair Refs, but also removes Orphan Contents and
Debris (GLOBs, BOOKs, CREAs and NPC_s) in save games left over from previous games that are no longer associated with save game.
Misc.
More intelligent updater creation. If you try to create an updater when one is not necessary, you'll get a message saying as much and no updater will be created.
Fixes
Fix possible bug in script generation.
Fix a bug that prevented user from turning off "Lock Times".
0.43 Misc. Fixes [7/12/2005]
New
Finally added "Revert to Snapshot" command!
LCV Schedule generator now checks for SC_offSchedule item.
Fixes
Fixed a problem where snapshot wasn't resetting the file date after updating the version info in the file's description header.
Fixed a problem where some mtimes were being saved even though "Lock Times" was turned off.
Fixed a problem where mod and save details were not updating correctly after a mod file date change.
0.42 Doc Browser [7/3/2005]
Doc Browser
Docs for mod files can now be accessed easily from within Mash.
Internal
MTime info is now saved in Data Files\Mash\Table.pkl, along with doc names,
and (in the future) other mod specific data
Misc. code cleanup.
0.41 Misc. Upgrades [7/1/2005]
Ref Removers
The remove objects by id function added to the CLI in version 0.38 is now available in the GUI.
Lock Times
Lock Times (formerly "Remember Times", formerly "Auto-set Times") will now forget memorized times if you turn it off. This prevents Lock Times from overriding changes made by other load ordering utilities.
Internal
Added doc strings.
Misc. code cleanup.
0.40 Misc. Upgrades [6/29/2005]
Masters List: Copy List
Copy the masters list to the clipboard for forum posts, etc.
Masters List Numbering
Masters list now shows the load order (modIndex) for each master.
Import: LCV Schedules
Tweak to fix problem with sleep scripts.
Miscellaneous
Upper limit (255) on number of load files is now enforced.
Added Quick Start section to this doc.
Added continue warning for Sort Records.
Fixed master list sorting.
Items added to master list are now sorted.
Mish
etxtToHtml command now included.
Internal
Renamed link classes.
Added doc strings.
0.39 Misc. Upgrades [6/25/2005]
Import LCV Schedules
Imports LCV schedules into a mod file.
Map Notes
Extracts map notes from save file.
Remove Orphan Contents
Removes content records that have become "orphaned" -- i.e., no longer matched to a cell reference.
Sort Records
Sorts mod file records for easier searching in TESCS Details view.
Statistics
You can now view the statistics for more than one file at a time. (I.e., statistics are now shown in a non-modal window.)
Miscellaneous
Menus have been reordered slightly.
This docment has been rearranged and updated.
0.38 Misc. Upgrades [5/30/2005]
Mish: Misc
LCV Schedule Generator
Remove Objects
Sort Records
Save: Unspawn
New save file command resets all spawn points. Great for resetting
game after changing your spawned creature lists.
Misc.
Rearrange Masters link list.
0.37 Window Closing Bugfix [3/13/2005]
Closing While Minimized
Previously, if Mash were closed while minimized, it would save a bogus frame position in settings, which would prevent it from opening correctly on next use. This is fixed now.
0.36 Misc. Improvements [2/25/2005]
Circular Masters Mash was going into infinite loop if masters were circular. This is fixed
now.
Sync to Load ESMs will no longer allow you to create circular masters.
0.35 Misc. Improvements [2/13/2005]
Dialog Export/Import
Deleted dialogs no longer cause a problem.
Entries are now better sorted.
Some characters are now replaced or deleted. (@, #, curly quotes, ellipses, extra spaces).
0.34 ObjectIndex Mapping, Dialog Export/Import, Misc. Fixes [2/5/2005]
ObjectIndex Remapping
Mash now does ObjectIndex remapping, thus completing its program for preventing/fixing doubling.
Dialog Export/Import
Can now export and import dialog.
Snapshot Modifications
Snapshot numbers can now only be preceded by a '-'.
Is Snapshot command has been removed.
Interior Cells with Water
Mash was misidentifying interior cells with water as exterior cells. This may have resulted in excessive reference deletion on repair. This is corrected now.
0.33 Minor Fixes and Improvements [1/29/2005]
Minor Bugfixes
Mash was throwing an error when you right clicked on a master that didn't exist. This is fixed now.
Mash was throwing an error when you tried to "Load Masters" when one or more of the masters didn't exist. Mash now gives you a warning message.
Misc. Improvements
Add support for '+' at end of version numbers in descriptions (e.g.,
"Version 1.2.3+". Use this as a note that file has changed since snapshot was taken.
0.32 Minor Bug Fix [1/27/2005]
Bugfix: New Lines in Mod Descriptions
Mash was writing descriptions with unix style new lines when it should have been using windows style new lines. This is fixed now.
If you have a lot of files contaminated with this error, you can use the mish temp3 function to fix it. Ask on the forums for more info if you need it.
AFAIK, this produced no run time problems -- it just messed up your description display in TESCS.
0.31 New Features, Minor Fixes [1/27/2005]
Copy to Esm/Esp
You can now copy an esp to an esm and vice versa. Look for new command on Mod items context menu.
Editing Masters
Change menu item name from "Edit" to "Update".
No more warning if select from menu. But clicking anywhere in list will trigger Update query.
For esps/esms, change "Sync to Load Files" to "Sync to Load ESMs".
Can now directly "Sync to Load Files/ESMs". I.e., don't have to "Update
Masters" first.
Snapshot Improvements
New Is Snapshot command for versioned mods.
Version number is now written to description field if description has a pre-existing "Version N.M" line.
Minor Bug Fixes
Mash was failing to remove masters when the user attempted to uncheck them in the master list. This works now.
Miscellaneous
You can now sort mods by file version.
Mash now deletes backups and temp files while deleting files. However, it does not delete snapshots or hidden files.
0.30 Itty Bitty Fix [1/24/2005]
Minor Bug Fix
Fix a key not found error that showed up on some Ref Repairs.
0.29 Misc. Improvements and Fixes [1/23/2005]
Major Bug Fix: Refs Repair on Exterior Cells
Mash was misidentifying exterior cells, and as a result erroneously marking a change refs in those cells as BAD::NO MASTER, when they were fine. This is fixed now.
Repair Refs on Mods
You can now use Repair Refs on mods.
Also a (hopefully) rare bug on editing masters of esps has been fixed.
Improved Error Checking
Mash now checks read size for reasonableness before attempting to read. This fixes the slowness problem mentioned in File Corruption Handing for version 0.28.
During Repair Refs, Mash now generates useful error messages if a master needs to be repaired first.
Mash now checks for second NAM0 records in cells.
Minor Bug Fixes
Mash would sometimes crash if a mod file was deleted or renamed from outside Mash. It now handles handles this correctly.
0.28 Minor Fixes and Features [1/22/2005]
Major Bug Fix
Mash was failing on manually unselecting files. (This is a recent "break something while fixing something" bug.) This is fixed now.
More File Corruption Handling
Added a new handler for another type of file corruption, but it seems to move pretty slowly (if such a corrupted file is present). Better than nothing, I guess.
Bugfix: Morrowind.ini
Mash could enter an infinite loop at startup if the Morrowind.ini file had been altered by hand in certain ways.
Now, Mash handle most (all?) legitimate changes to the Morrowind.ini file. However, a missing [Game Files] section will still result in a failure/exit on startup.
0.27 Major Bugfix [1/21/2005]
Bugfix: File Version
Mash was reading the file version in as a float, but writing it out as an int! This in fact, was the cause of the death animation problem as well as the character's attire becoming confused after header editing.
Now, Mash writes file version as a float and no longer uses the current animation deletion "fix" from version 0.26.
Also, Mash now displays file version in both mod and save details views.
Files with version 0.0 are mostly likely corrupted and should be reverted to backup or first backup.
Bugfix: Corrupted Headers
Mash crashed on startup if you had mod or save files with missing or corrupted headers. Now, Mash warns you and ignores the damaged files.
Bugfix: Y2038 Bug
Mash crashed on startup if you had files with modification dates greater than 1/19/2038 (Unix Epoch rollover! Welcome to Y2038!). Now, Mash resets the modification dates of those files to around 1/1/2037 and notifies you of the change.
0.26 Major Bugfix [1/20/2005]
Header Editing
Instead of blowing away all leveled creatures, I now blow away all current animations. This seems to be a full solution.
Drawbacks: NPCs may stand around for a little while before resuming their normal activities. Also, corpses will repeat their death animations.
Ref Repair
Fixed an MVRF bug before I saw it.
ESTemplate.ini
This is the Enchanted Editor template that I'm currently using. It has a number of additions related to save files. It has not been massively tested (but that's true for the original templates too, of course). Still, use at your own risk. Includes some additions from Beryllium as well.
0.25 Partial Bugfixes [1/19/2005]
ESM Ordering
Reworked this in an effort to mimic Bethesda's ordering. Seems to be correct now...
Header Editing (Partial Bug Fix)
After editing headers, creature corpses are not able to find their death animations. Living creatures are fine, as are creatures that you kill after the editing. Also, it doesn't seem to be a problem for NPCS -- just for creatures.
As a temporary partial solution, I'm resetting all LVCR references. This is basically safe -- it will just cause those points to respawn. But this still leaves the problems of non-spawned creatures (many of whom are crucial to various quests.)
Repair Refs
Maintain original ordering of functions.
Note: This may also suffer from creature death animation bug.
EE Wrye 0.0.ini
Enchanted Editor template file with my personal updates.
0.24 Repair Refs, etc. [1/15/2005]
New
Repair Refs Function
MenuItem: Backup
Improvements
Progress dialog for master save.
Reordered File submenu.
Fixes
Changed temp file names to remove potential problem with Morrowind launcher.
Disable Backup menu items on multi-select.
0.23 First release with docs!
16. Credits/Thanks
"Every modder and utility developer in the Morrowind community stands on the collective shoulders of everyone who preceded them, contributing time, talent, and inspiration. So, thanks to all the past developers and folks in the forums!", Wrye.
Wrye: the original creator of Wrye everything,
Melchor: New help interface, Utilities tab and settings window,
Yacoby: drag and drop functionality, mlox TES3cmd support, fixes, refactoring and more,
Polemos: Toolbar menu, mod order snapshots, better Unicode support, fixes, BSA Archives implementation, OpenMW/TES3mp compability, TES3lint support, Custom Commands support, new dialogs, theming options, store/restore mod order buttons, interface modernization and streamlining, speed improvements, update notifications, support for people with weak vision, higher icon res for the status bar, extra functionalities, complete update of the help file and more.
ManaUser: Coding (a lot).
Argent: Java code and technical insights into Morrowind files.
FallenWizard: Key shortcut for deletion in mods and saves tabs from Bash.
Beryllium: EE templates, bug reports and feedback.
Abot: Translations.
Dragon32, Shasta Thorne: Ref Removers.
Oooiii, Stahpk, Abot, StaticNation, calemcc, Zikerocks, Valascon and Pherim: Vital bug reports and ideas.
StaticNation: The Wrye Mash bug finder champion.
KOYK_GR: New icon and Bug testing.
17. Contact
The way to reach me is through the Nexus. Write a comment.
Python and wxPython specific questions should be directed to online communities. Check also https://stackoverflow.com/.
18. License
Wrye Mash Polemos fork GPL License and Copyright Notice
Wrye Mash Polemos fork Copyright (C) 2017-2018 Polemos
based on code by Yacoby copyright (C) 2011-2016 Wrye Mash Fork Python version
based on code by Melchor copyright (C) 2009-2011 Wrye Mash WMSA
based on code by Wrye copyright (C) 2005-2009 Wrye Mash
License: http://www.gnu.org/licenses/gpl.html GPL version 2 or higher
Copyright on the original code 2005-2009 Wrye
Copyright on any non trivial modifications or substantial additions 2009-2011 Melchor
Copyright on any non trivial modifications or substantial additions 2011-2016 Yacoby
Copyright on any non trivial modifications or substantial additions 2017-2018 Polemos
Wrye Mash License and Copyright Notice
Wrye Mash is free software; you can redistribute it and/or
modify it under the terms of the GNU General Public License
as published by the Free Software Foundation; either version 2
of the License, or (at your option) any later version.
Wrye Bolt is distributed in the hope that it will be useful,
but WITHOUT ANY WARRANTY; without even the implied warranty of
MERCHANTABILITY or FITNESS FOR A PARTICULAR PURPOSE. See the
GNU General Public License for more details.
You should have received a copy of the GNU General Public License
along with Wrye Mash; if not, write to the Free Software Foundation,
Inc., 59 Temple Place - Suite 330, Boston, MA 02111-1307, USA.
Wrye Mash copyright (C) 2005, 2006, 2007, 2008, 2009 Wrye
This software contains other softwares which fall under different Licenses:
7zip is licenced under LGPL
Python https://www.python.org/download/releases/2.7/license/
wxPython https://wxpython.org/pages/license/
Cole Bemis for icon Pack Feather, CC BY 3.0, https://creativecommons.org/licenses/by/3.0/
Rafiqul Hassan for Blogger Iconset, Freeware, http://www.iconarchive.com/show/blogger-icons-by-rafiqul-hassan.html
bobsobol for TES3 - Morrowind icon on DeviantArt, Creative Commons Attribution-Share Alike 3.0 License, https://www.deviantart.com/bobsobol/art/TES3-Morrowind-209901409