


0 of 0


About this mod
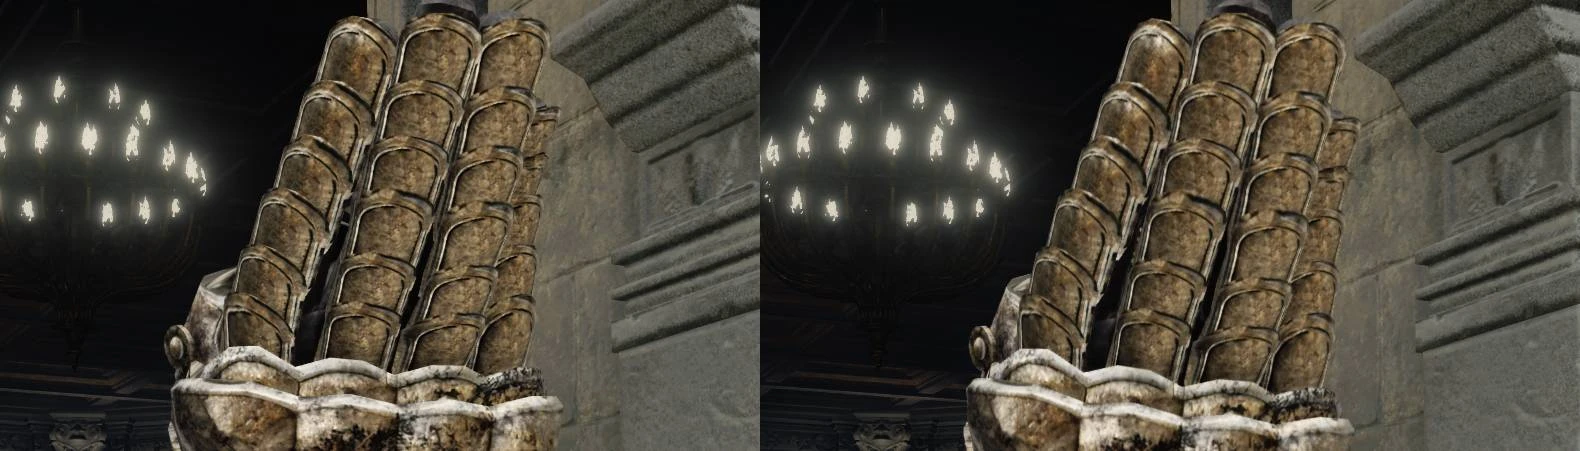
Replaces the mitten gauntlet on the right hand of the Banished Knight and Veteran's armor sets with a duplicate of the left gauntlet. Vanilla and 4K resolution available.
- Requirements
- Permissions and credits
- Changelogs
- Donations
I guess someone had to do it, right? In all seriousness, the mitten gauntlet and duck feet on the Banished Knight and Veteran's sets were enough for me to not want to use them sometimes, or at least, those two pieces. Many people online online seem to agree. The duck feet problem was solved a few months back with ScaledFeather's mods: Banished Knight Greaves Modified and Veteran's Greaves Modified. Now here I am to solve the second problem.
Essentially what I did was duplicate the Banished Knight left gauntlet and put it in place of the right. It was frustrating and headache inducing, but I finally got it to work and I'm happy. Full disclosure, I did cheat a bit with the Veteran's Gauntlet. I fully replaced it with the Banished Knight gauntlet model because they are about 98% the same. You probably wouldn't even notice if I hadn't just told you about it. This saved me SO MUCH work so I'm okay with it.
These model are also available in my other mods: Banished Knight Armor Set Recolors, Veteran's Armor Set Recolors, and COLOSSUS.
Ray Tracing must be turned off! Using any mods that edit models like this one, with Ray Tracing on, will crash the game! There is no fix for this as what would have to change is out of my control: either Ray Tracing itself or the very tools we modders use for FromSoftware titles have to change.
This mod is prone to clipping, especially the Veteran's version. When your character has their fist clenched, you will notice that it looks... stretchy. This is mostly down to weight painting. Don't worry if you don't know what that is, but I'm not a game dev and cannot recreate their work 1:1. Hence, the stretchy metal on our character's fingers. I did it to the best of my ability, but given how fast paced this game is you hopefully won't notice it much.
I use REVENANT ReShade, specifically the Lush version with a couple tweaks of my own. This is reflected in the screenshots I took for this mod, so keep in mind that it may look differently for you if you do not use a ReShade!
I also use Texture Improvement, specifically the 4K textures. This is, again, reflected in the screenshots and so your game/recolors may look different than mine!
DO NOT attempt to play the game online while using any mods or you will be banned! Download Anti-cheat toggler and offline launcher to circumvent EAC, or if you use Mod Engine 2 then that program will automatically disable it.
There is a way to make the model show up on co-op partners, NPCs and the Mimic Tear. Within the parts folder there is a file called a DCX File. All you need to do is make a copy and add "_l" directly before the period in the DCX file name. That's an underscore and lowercase L. So, you'd change am_m_1660.partsbnd into am_m_1660_l.partsbnd. Continuing the example: if you started with 1 DCX file, you'll end with 2. This way the mod shows up on you and your co-op partner/NPC/Mimic Tear.
UXM
Mod Engine 2 [RECOMMENDED]
Simply delete the DCX file in the parts folder, or the entire parts folder if this is the only mod you have installed that uses it. Make sure that the game is not running when you do this, otherwise the armor will be invisible.
Graphics/ReShade/Mods Used for Screenshots
Remove vignette
Remove chromatic aberration
Ultrawide UI Fixes
Remove black bars
Increase animation distance
Disable Sharpening
Texture Improvement
Unlock the framerate
Elden Ring PC Stutter and Low FPS Fix
REVENANT ReShade
I play on a 21:9 (3440x1440) ultrawide monitor with an NVIDIA RTX 3080. In game settings, I turned Depth of Field and Motion Blur off. For everything else I use the recommended settings from NVIDIA GeForce Experience.
Tools Used In Mod Creation
Yabber
UXM
FLVEREditor
Gigapixel AI
Blender
Bloodborne Tools
Noesis
Please refer to my Elden Ring Recolor Guide and Tutorial if you want to know how to create your own recolor mods or are curious about how I make them.
If you like my mods, please leave an endorsement :)
Donations are also welcome and my PayPal is linked on my mod pages, but you are not obligated to do so.
I create mods that I want to make, and do not expect money in return.
Essentially what I did was duplicate the Banished Knight left gauntlet and put it in place of the right. It was frustrating and headache inducing, but I finally got it to work and I'm happy. Full disclosure, I did cheat a bit with the Veteran's Gauntlet. I fully replaced it with the Banished Knight gauntlet model because they are about 98% the same. You probably wouldn't even notice if I hadn't just told you about it. This saved me SO MUCH work so I'm okay with it.
These model are also available in my other mods: Banished Knight Armor Set Recolors, Veteran's Armor Set Recolors, and COLOSSUS.
**Disclaimers! Please Read!**
Ray Tracing must be turned off! Using any mods that edit models like this one, with Ray Tracing on, will crash the game! There is no fix for this as what would have to change is out of my control: either Ray Tracing itself or the very tools we modders use for FromSoftware titles have to change.
This mod is prone to clipping, especially the Veteran's version. When your character has their fist clenched, you will notice that it looks... stretchy. This is mostly down to weight painting. Don't worry if you don't know what that is, but I'm not a game dev and cannot recreate their work 1:1. Hence, the stretchy metal on our character's fingers. I did it to the best of my ability, but given how fast paced this game is you hopefully won't notice it much.
I use REVENANT ReShade, specifically the Lush version with a couple tweaks of my own. This is reflected in the screenshots I took for this mod, so keep in mind that it may look differently for you if you do not use a ReShade!
I also use Texture Improvement, specifically the 4K textures. This is, again, reflected in the screenshots and so your game/recolors may look different than mine!
DO NOT attempt to play the game online while using any mods or you will be banned! Download Anti-cheat toggler and offline launcher to circumvent EAC, or if you use Mod Engine 2 then that program will automatically disable it.
Modding Tips
There is a way to make the model show up on co-op partners, NPCs and the Mimic Tear. Within the parts folder there is a file called a DCX File. All you need to do is make a copy and add "_l" directly before the period in the DCX file name. That's an underscore and lowercase L. So, you'd change am_m_1660.partsbnd into am_m_1660_l.partsbnd. Continuing the example: if you started with 1 DCX file, you'll end with 2. This way the mod shows up on you and your co-op partner/NPC/Mimic Tear.
Installation
UXM
- Follow the instructions of UXM Selective Unpacker to unpack the parts folder
- Extract this mod to your location of choice
- Place the contents of "parts" within the folder of the same name created by UXM
- Don't forget that if you use UXM to install and use mods, to Patch the game using UXM Selective Unpacker
Mod Engine 2 [RECOMMENDED]
- Download Mod Engine 2. It can be placed in any location, does not have to be the game directory
- Ensure that you have a "parts" folder within the "mod" folder of Mod Engine 2. If you do not have one, then you can make a new one yourself.
- Extract this mod to your location of choice
- Place the contents of "parts" within the folder of the same name located in the "mod" folder
- Launch Elden Ring with Batch File launchmod_eldenring
Uninstallation
Simply delete the DCX file in the parts folder, or the entire parts folder if this is the only mod you have installed that uses it. Make sure that the game is not running when you do this, otherwise the armor will be invisible.
Graphics/ReShade/Mods Used for Screenshots
Remove vignette
Remove chromatic aberration
Ultrawide UI Fixes
Remove black bars
Increase animation distance
Disable Sharpening
Texture Improvement
Unlock the framerate
Elden Ring PC Stutter and Low FPS Fix
REVENANT ReShade
I play on a 21:9 (3440x1440) ultrawide monitor with an NVIDIA RTX 3080. In game settings, I turned Depth of Field and Motion Blur off. For everything else I use the recommended settings from NVIDIA GeForce Experience.
Tools Used In Mod Creation
Yabber
UXM
FLVEREditor
Gigapixel AI
Blender
Bloodborne Tools
Noesis
Please refer to my Elden Ring Recolor Guide and Tutorial if you want to know how to create your own recolor mods or are curious about how I make them.
If you like my mods, please leave an endorsement :)
Donations are also welcome and my PayPal is linked on my mod pages, but you are not obligated to do so.
I create mods that I want to make, and do not expect money in return.