


0 of 0


About this mod
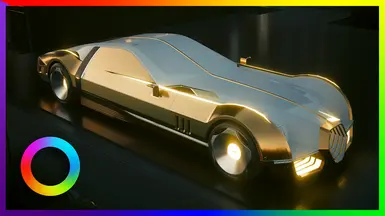
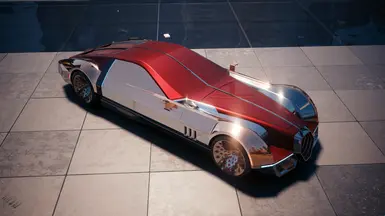
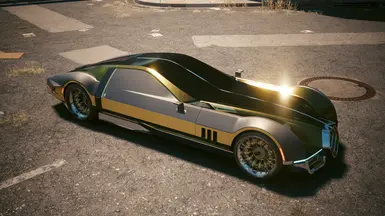
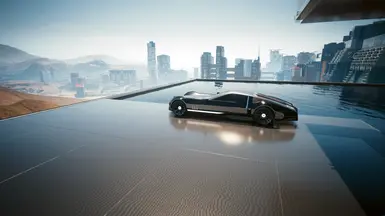
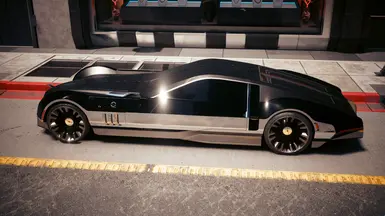
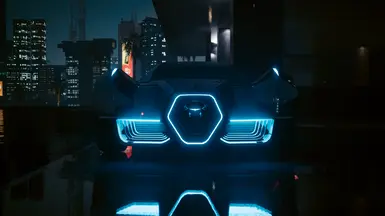
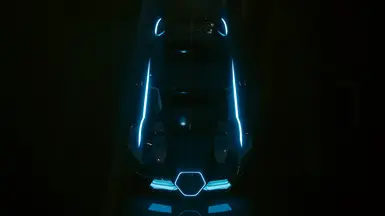
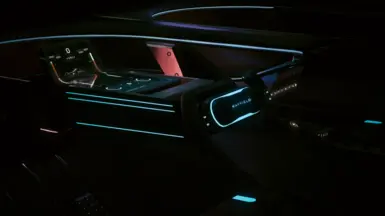
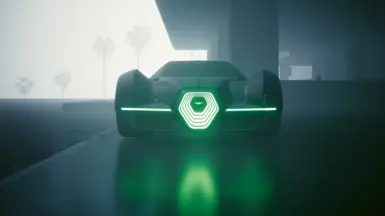
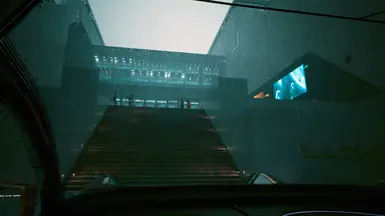
This mod improves the CrystalCoat feature for the player's Rayfield Aerondight. Customize 90 parts material and illumination. Modify the vehicle sounds and use a custom color picker widget.
- Requirements
- Permissions and credits
-
Translations
- Russian
- Changelogs
DESCRIPTION
This mod improves the CrystalCoat feature for the player's Rayfield Aerondight. Customize 90 parts material and illumination. Modify the vehicle sounds and use a custom color picker widget. This is the model you can buy at the autofixer.
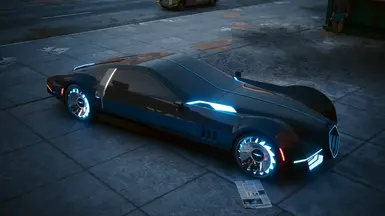
You can use different wheel models and customize the crystal dome as well. This mod also fixes most cases where the front wheels were going through the bodywork.
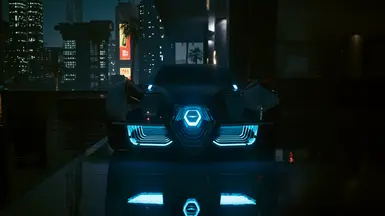
If you want to customize the head / tail / blinker lights using the primary color or to use another color or if you want to keep CrystalCoat enabled after getting out of the car I recommend you to add my other mod Enhanced Vehicle System.
By default I have set light glass covers around the vehicle to get white when CrystalCoat is enabled. This allows Enhanced Vehicle System mod to modify the light color using the CrystalCoat primary color without conflicting with the original glass color (red, orange...).
I want to create a translation for this mod
Great ! If you are willing to participate and make this mod support a new language, you can do it easily by following this tutorial.
I want to create the same kind of mod for another vehicle
Great ! I have created a tutorial on the wiki for this purpose. It won't cover all the features of this mod but this is still a good start !
Known issues
- The vehicle deformation is not supported with current modding tools. However scratches and corrugated aspect of damaged parts are working.
Credits: to the Cyberpunk 2077 Modding Community discord server whose members offered me tons of advice. This mod wouldn't have been possible without their work to improve core mods.
NATIVE SETTINGS UI
This mod provides some settings that will change your experience depending on your preferences. Open the menu and click on "Mods" then look for the mod name and change the settings as you wish. The settings will persist upon restart of the game.
Settings are saved into the game folder:
"Cyberpunk 2077\bin\x64\plugins\cyber_engine_tweaks\mods\Crystal Coat for Rayfield Aerondight\settings.json"
The Native Settings UI Side Menu Add-on is also supported.
I don't want to install Native Settings UI !
While it is recommended to use it, you can still run this mod without NativeUI installed. In this case the settings file will be created on first launch.
You have three ways to refresh the vehicle appearance: summon the car after it has disappeared, toggle CrystalCoat state or use the refresh key binding. The refresh key binding won't work if you have installed NativeUI because the vehicle appearance will be updated automatically.
The key binding also uses a multi-tap parameter defined into the settings file, so you can define how many times you must press the key to trigger the refresh. Default values are:
- refreshKey: IK_E
- refreshKeyMultiTap: 3
- refreshKeyMultiTapTimeWindow: 0.25
Multi-tap must be an integer value > 0. The multi-tap time window is the maximum duration between two taps.
Key codes are defined here.
Settings description
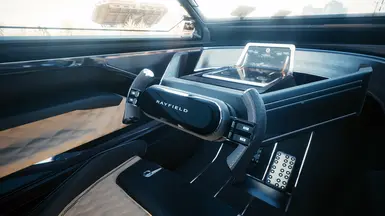
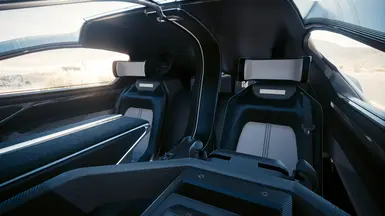
Each vehicle part offers the same customization possibilities.
Concerning "Part sets":
For all settings you can choose special values which are "Part set <1 to 10>". When a setting is using such value it will bind with the corresponding part set setting. All settings for Part set categories will stay visible no matter the values you select. This is intended because some part settings may bind with part set values so it is more convenient to keep them all visible.
By default I have defined these part sets:
- Part set 1: painted parts
- Part set 2: chassis parts
- Part set 3: silver polished parts
- Part set 4: doors upper part and front wings
- Part set 5: some parts inside the vehicle
However you can rearrange them as you want.
Concerning wheels:
You can choose between 6 wheel models and for each wheel model there are up
to 5 customizable parts. They are all regrouped into the same setting
category. Their names will be: Main, Insert 1, Insert 2, Insert 3,
Insert 4. The dynamic picture hints of the menu will help you identify
which part they refer to.
This is a description of the settings you will have for each part:
Use with CrystalCoat:
- No = the part will keep its current appearance.
- Yes = the part will be colored by CrystalCoat. If selected the material color
for CrystalCoat ON state will be hidden because it cannot be mixed with
CrystalCoat color.
Settings for CrystalCoat OFF state:
These settings will be applied only when CrystalCoat is disabled. That is to
say this will be the default appearance of the vehicle when you summon
it.
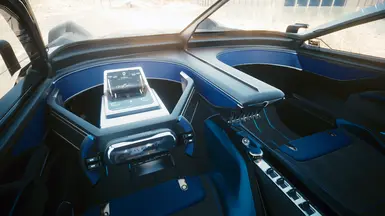
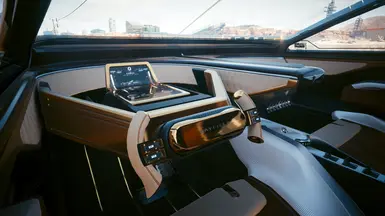
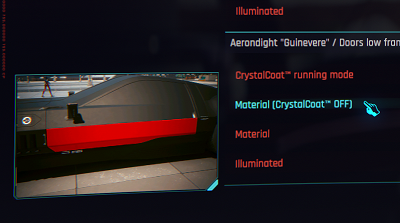
- Material = choose a material to apply on the part. Some materials have no option. Standard material is the one from the base game. Metal materials have a metal finish parameter, and some other materials have a predefined color parameter.
- Metal finish = additional parameter for metal materials only. Ranging from « Gold » to « Brass ».
- Predefined color = additional parameter for some materials only. Ranging from « Matte » to « Nylon ».
- Stitches color = for some parts you can customize the stitches color or hide them if you
think the selected material should not have stitches (metals…).
- Glass color = some parts are made of glass such as lights cover or the hood panel.
Settings for CrystalCoat ON state:
Same settings as OFF state except they will apply when CrystalCoat is enabled.
Illuminate: allow to illuminate a part when using utility lights of the vehicle (for example: neon rims).
Light color binding: define if the light color should be specific to this part or bound with a part set.
Light intensity binding: define if the light intensity should be specific to this part or bound with a part set.
Red: define the RGB red light component.
Green: define the RGB green light component.
Blue: define the RGB blue light component.
For each part of the vehicle you will have a picture hint to illustrate which areas of the vehicle will be modified.
REQUIREMENTS
INSTALLATION
Simply extract the ZIP archive into the game folder.
SUPPORT
Feel free to contact me in case something does not work as expected so I can investigate.
Use the POSTS tab and describe your issue with as many details as you can.
MY MODS
MY TOOL FOR MODDERS
This mod improves the CrystalCoat feature for the player's Rayfield Aerondight. Customize 90 parts material and illumination. Modify the vehicle sounds and use a custom color picker widget. This is the model you can buy at the autofixer.
You can use different wheel models and customize the crystal dome as well. This mod also fixes most cases where the front wheels were going through the bodywork.
If you want to customize the head / tail / blinker lights using the primary color or to use another color or if you want to keep CrystalCoat enabled after getting out of the car I recommend you to add my other mod Enhanced Vehicle System.
By default I have set light glass covers around the vehicle to get white when CrystalCoat is enabled. This allows Enhanced Vehicle System mod to modify the light color using the CrystalCoat primary color without conflicting with the original glass color (red, orange...).
I want to create a translation for this mod
Great ! If you are willing to participate and make this mod support a new language, you can do it easily by following this tutorial.
I want to create the same kind of mod for another vehicle
Great ! I have created a tutorial on the wiki for this purpose. It won't cover all the features of this mod but this is still a good start !
Known issues
- The vehicle deformation is not supported with current modding tools. However scratches and corrugated aspect of damaged parts are working.
Credits: to the Cyberpunk 2077 Modding Community discord server whose members offered me tons of advice. This mod wouldn't have been possible without their work to improve core mods.
NATIVE SETTINGS UI
This mod provides some settings that will change your experience depending on your preferences. Open the menu and click on "Mods" then look for the mod name and change the settings as you wish. The settings will persist upon restart of the game.
Settings are saved into the game folder:
"Cyberpunk 2077\bin\x64\plugins\cyber_engine_tweaks\mods\Crystal Coat for Rayfield Aerondight\settings.json"
The Native Settings UI Side Menu Add-on is also supported.
I don't want to install Native Settings UI !
While it is recommended to use it, you can still run this mod without NativeUI installed. In this case the settings file will be created on first launch.
You have three ways to refresh the vehicle appearance: summon the car after it has disappeared, toggle CrystalCoat state or use the refresh key binding. The refresh key binding won't work if you have installed NativeUI because the vehicle appearance will be updated automatically.
The key binding also uses a multi-tap parameter defined into the settings file, so you can define how many times you must press the key to trigger the refresh. Default values are:
- refreshKey: IK_E
- refreshKeyMultiTap: 3
- refreshKeyMultiTapTimeWindow: 0.25
Multi-tap must be an integer value > 0. The multi-tap time window is the maximum duration between two taps.
Key codes are defined here.
Settings description
Each vehicle part offers the same customization possibilities.
Concerning "Part sets":
For all settings you can choose special values which are "Part set <1 to 10>". When a setting is using such value it will bind with the corresponding part set setting. All settings for Part set categories will stay visible no matter the values you select. This is intended because some part settings may bind with part set values so it is more convenient to keep them all visible.
By default I have defined these part sets:
- Part set 1: painted parts
- Part set 2: chassis parts
- Part set 3: silver polished parts
- Part set 4: doors upper part and front wings
- Part set 5: some parts inside the vehicle
However you can rearrange them as you want.
Concerning wheels:
You can choose between 6 wheel models and for each wheel model there are up
to 5 customizable parts. They are all regrouped into the same setting
category. Their names will be: Main, Insert 1, Insert 2, Insert 3,
Insert 4. The dynamic picture hints of the menu will help you identify
which part they refer to.
This is a description of the settings you will have for each part:
Use with CrystalCoat:
- No = the part will keep its current appearance.
- Yes = the part will be colored by CrystalCoat. If selected the material color
for CrystalCoat ON state will be hidden because it cannot be mixed with
CrystalCoat color.
Settings for CrystalCoat OFF state:
These settings will be applied only when CrystalCoat is disabled. That is to
say this will be the default appearance of the vehicle when you summon
it.
- Material = choose a material to apply on the part. Some materials have no option. Standard material is the one from the base game. Metal materials have a metal finish parameter, and some other materials have a predefined color parameter.
- Metal finish = additional parameter for metal materials only. Ranging from « Gold » to « Brass ».
- Predefined color = additional parameter for some materials only. Ranging from « Matte » to « Nylon ».
- Stitches color = for some parts you can customize the stitches color or hide them if you
think the selected material should not have stitches (metals…).
- Glass color = some parts are made of glass such as lights cover or the hood panel.
Settings for CrystalCoat ON state:
Same settings as OFF state except they will apply when CrystalCoat is enabled.
Illuminate: allow to illuminate a part when using utility lights of the vehicle (for example: neon rims).
Light color binding: define if the light color should be specific to this part or bound with a part set.
Light intensity binding: define if the light intensity should be specific to this part or bound with a part set.
Red: define the RGB red light component.
Green: define the RGB green light component.
Blue: define the RGB blue light component.
For each part of the vehicle you will have a picture hint to illustrate which areas of the vehicle will be modified.
REQUIREMENTS
- Game version: v2.12 / v2.13 / v2.2.
INSTALLATION
Simply extract the ZIP archive into the game folder.
SUPPORT
Feel free to contact me in case something does not work as expected so I can investigate.
Use the POSTS tab and describe your issue with as many details as you can.
MY MODS
- Mute TV Ads
- Mute TV News
- Quieter TV Ads
- Remove TV Ads
- Quieter TV News
- Mute V's Footsteps
- Mute V's Pain Voice
- Louder V's Footsteps
- Mute Loading Screens
- Mute Vehicle Gear Shift
- Mute OpenWorld Devices
- Enhanced Vehicle System
- Mute Police Dispatch Radio
- Dex Briefing - Music Theme
- Crystal Coat for Arch Nazare
- Quieter TV News and TV Ads
- Louder V and NPCs Footsteps
- Enhanced Police Lights System
- Crystal Coat for Herrera Outlaw
- Evelyn Stilettos Sound Replacer
- Mute Combat and Camera Alert
- Crystal Coat for Yaiba Kusanagi
- Crystal Coat for Quadra Type-66
- Mute Combat and Stealth Music
- Crystal Coat for Makigai MaiMai
- Always use Stiletto Heels Sound
- Restore v1.63 NCPD Police Siren
- Restore v2.0 Double Jump Sound
- Crystal Coat for Rayfield Caliburn
- Crystal Coat for Villefort Alvarado
- Crystal Coat for Rayfield Aerondight
- Remove Crystal Dome Scanning Lines
- Escape from NY Menu Theme and Ringtone
- Mute both TV News and TV Ads (Legacy only)
- Chippin' In (Refused) Song or Instru Mix - Music Theme
MY TOOL FOR MODDERS