


0 of 0


File information
Created by
wghost81 aka Wasteland GhostUploaded by
wghost81Virus scan
Safe to use
Documentation
Readme
View as plain text
modFriendlyHUD/UI
=================
by wghost81 aka Wasteland Ghost
===============================
This mod requires Community Patch - Base installed to work properly.
Description:
============
Switching some parts of the HUD off allows for more immersive gameplay. But playing without minimap or healthbar can be as painful under certain circumstances as it's fantastic while just exploring the world. This mod offers a lot of options to configure HUD modules as well as adds 3D markers for quest and NPC tracking and makes several improvements to game menus. You can use all of the options mod has or turn the ones you don't need off.
The mod doesn't change any of the balance aspects of the game and only provides pieces of information to the player he/she already has access to. By installing it you won't be making the game easier or unrealistic, it's an UI mod, which aims to improve quality of life and immersion.
Note: This mod doesn't change your save files, so installing or uninstalling it in the middle of playthrough is safe.
List of changes:
================
1. Non-intrusive customizable HUD
- Smart HUD: turn off all HUD modules for clean uncluttered view during exploration and the mod will automatically show different groups of modules when they're needed - when in combat, losing vitality or using witcher senses, etc.
- Quick access to hidden HUD modules with "hold to see" and "pin it" features: holding a hotkey shows corresponding group of modules and releasing it hides it; holding "pin module" modifier key pins corresponding group of modules until you unpin it. Hotkeys can overlap with corresponding vanilla menu hotkeys (as menus are accessed by pressing a key not holding it), so you don't need to keep in mind dozens of new key bindings.
- An option to hide journal updates HUD module - the one that shows updated quest name, quest items received, books received, level up and other quest related messages and can never be switched off using vanilla menu.
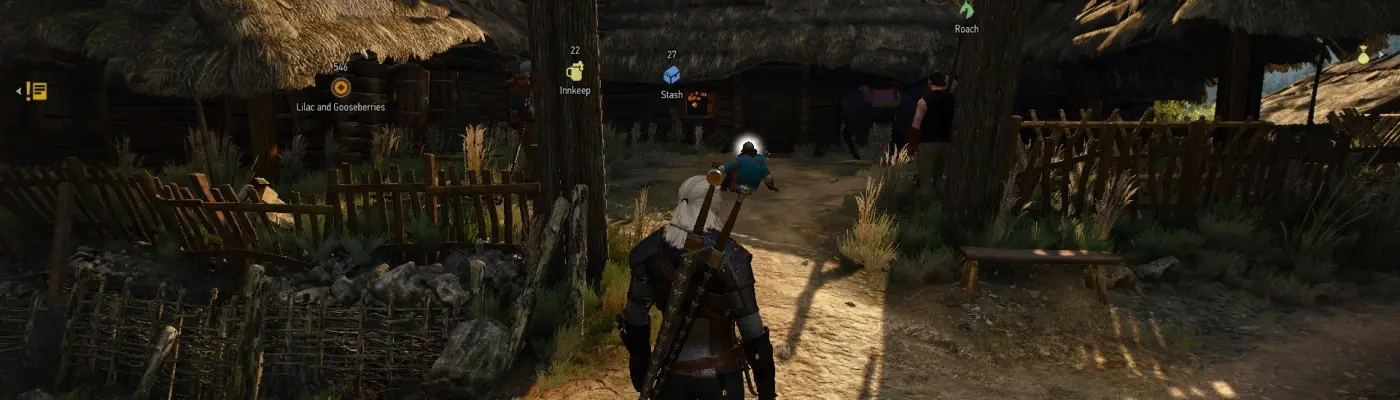
- 3D markers for map locations and NPCs: shows map/minimap markers as icons in game world. Can be used instead of minimap or along with it. There are a lot of options to configure markers' appearance as well as when and which markers to show.
- Non-intrusive Skyrim like compass: can be used instead of minimap (or along with it) and together with 3D markers.
- Configurable interaction markers and text: switch talk bubble/text over NPCs heads on and off or switch all interaction buttons/text off completely.
- Quest markers for quest NPCs: fixes vanilla bug (or weird feature) with not displaying quest markers for NPCs if you're not tracking their specific quest. Can be switched off.
- Configurable zoom levels for minimap. By default minimap is zoomed out twice compared to vanilla.
2. Quality of Life features
- Quick access to potions, bombs and oils via Radial Menu using hotkeys/WASD/controller D-Pad.
- Quick switching between crossbow and latest used bomb.
- Pause game at any time you like, even in dialogs and cutscenes (except prerendered movies).
3. Menu enhancements
- Access main menu whenever you need it, even from dialogs and cutscenes/prerendered movies.
- Configurable zoom values for map menu with an ability to switch unlimited zoom on (already enabled by default).
- Configurable default inventory tab - choose which tab will be selected when opening inventory menu.
- New item marker for junk, crafting and edibles never shows up and all such items are automatically marked as being seen already (can be switched off).
- True item price and price comparison while bartering is shown beside buying/selling price as well as how many of this item you already have (in stash and total).
- Recycling parts you get when dismantling an item are shown in item description.
- New recipes and crafting schematics are now marked with asterisks making them easier to find.
- Patch 1.22 feature where you can buy crafting ingredients from blacksmiths directly while examining crafting schematic in crafting menu is added to alchemists: you can now buy alchemy ingredients from alchemists directly while examining alchemy recipe in alchemy menu.
- Patch 1.22 feature where you can split stack of items when moving it to stash was improved: you can now also split stack of items when moving it from stash back into your inventory.
- Selectable main menu animation (default, random, base game, HoS, B&W).
4. Miscellaneous
- An option to can hide enemy levels and damage numbers.
- An option to disable sound notification on journal update.
- An option to pause cat effect outside of caves and to unpause it at night.
Default key bindings:
=====================
"F2" - force show 3D markers;
"F10" - essential HUD modules on/off;
"F11" - pause/unpause the game;
"~" - switch between crossbow and selected bomb;
"Esc (press controller Select button)" - menu in dialogs/scenes;
"Hold Right Shift" - pin module modifier (hold RShift and press M to pin minimap module, for example).
"1-9, 0, -, =" - drink potions/equip bombs/apply oils in radial menu;
"F1" - show potions in radial menu;
"F2" - show bombs in radial menu;
"F3" - show oils in radial menu;
"F4" - show currently active buffs in radial menu;
"Q (controller Y button)" - cycle through potions/bombs/oils/buffs in radial menu;
"Controller D-Pad arrows" (or WASD if corresponding option is enabled) - navigate quick items list in radial menu;
"Controller Right Thumb" (or "C" if corresponding option is enabled) - drink selected potion/equip selected bomb/apply selected oil in radial menu;
"Hold M" - show minimap temporarily;
"Hold J" - show tracked quest objectives temporarily;
"Hold K" - show character modules temporarily;
"Hold Enter" - show essential modules temporarily;
"Hold controller Back button" - inventory menu.
Configuration:
==============
Most of the options are configurable directly from in-game menu - look for "Mods" and "Friendly HUD" entries.
3D Markers visibility options:
- Force: respects max distance, ignores visibility conditions;
- Pin: ignores max distance, respects visibility conditions;
- Allow user-pinned markers: makes it so placing the green user marker on top of any of the other markers on map will simultaneously force and pin that marker (so it will always be visible) and the user marker itself won't be displayed.
- Hide markers disabled in area map: hides 3D markers based on map marker types disabled in area map filter. I.e. if you disable Player Stash marker for area map, with this option on it will also be disabled for 3D markers.
For conditional modules to show up after you turn them on in menu you sometimes need to reenter the state. For example, if you're in combat state with no combat modules enabled and you go to menu and enable them, they won't show up immediately. But after you finish current combat and start the next one, they will show up properly. Disabling of modules works immediately.
All menus have presets to quickly restore default mod settings or to switch to vanilla.
Combat modules: wolf medallion, buffs, additional items, damaged items, companions.
Witcher senses modules: minimap, tracked quest.
Meditation modules (for Friendly Meditation/Preparations mod): minimap.
Radial menu modules: additional items.
Lists of modules and quick items can be configured inside "[Path To The Witcher 3]\Mods\modFriendlyHUD\content\scripts\fhudconfig\modFriendlyHUDConfig.ws" file. Configuring requires very basic programming knowledge, use it if you want to change some of the mod's inner workings. Configurable section starts with the line "Configurable section begin" and ends with the line "End of configurable section". Don't change anything outside these lines if you don't know exactly what you're doing.
Installation:
=============
It's recommended to use The Witcher 3 Mod Manager (TW3MM) available on Nexus for installing the mod. TW3MM installs all parts of the mod automatically, no additional manual steps are needed.
Note that Nexus Mod Manager (NMM) doesn't support installing new menus and hotkeys, so additional manual steps are required for NMM users (see below)!
Resolving conflicts with other mods
===================================
If you have other mods installed, use Script Merger to find and resolve conflicts. Note that some of the mods on Nexus might not support the latest patch and thus are incompatible nor with this mod not with the current game version in general. Also note that you need to re-merge all your merges after updating any of the mods to a newer version.
Configuring HUD modules (important!)
====================================
The mod doesn't hide HUD modules, it shows them. So if you want to use smart HUD feature, you need to turn modules OFF one by one using in-game vanilla video options menu. You don't have to turn off every module, just the ones you don't want to see all the time. Modules that are ON in game video options are not affected by the mod and retain their vanilla behavior. Another important thing to know is that turning an entire HUD off with a hotkey or menu switch will result in no modules being shown at all (as modules are part of the HUD and when an entire HUD is off nothing is shown).
Manual installation:
====================
1. Creating backups (optional)
If you have vanilla version of the game, backup your "[Path To The Witcher 3]\bin\config" folder as some of the mods (including this one) make changes to configuration files and it won't hurt to have vanilla version in case you will need to quickly clean up all your mods.
2. Installing core mod files
Install core package by unpacking the mod and copying an entire "modFriendlyHUD" folder to "[Path To The Witcher 3]\Mods" folder. If "Mods" folder doesn't exist, create it first. You can use NMM for this step, but make sure you also perform all the steps below.
3. Installing in-game menu and new hotkeys
For in-game menu to work you need modFHUDConfig.xml to be in your "[Path To The Witcher 3]\bin\config\r4game\user_config_matrix\pc" folder.
For new hotkeys to work, they have to be added to your "[Path To The Witcher 3]\bin\config\r4game\user_config_matrix\pc\input.xml" file.
3.1. Quick install
If you don't have any other mods which add new hotkeys installed, simply copy "[Path To The Witcher 3]\Mods\modFriendlyHUD\bin" folder into your "[Path To The Witcher 3]" folder. A window will pop up, asking if you want to replace existing input.xml file, if you're doing everything right. Choose "overwrite" to replace vanilla input.xml with the modded one.
3.2. Step by step install
If you have other mod(s) installed which add new hotkeys, you most probably don't want to replace your existing input.xml. To install new hotkeys in this case open your existing "[Path To The Witcher 3]\bin\config\r4game\user_config_matrix\pc\input.xml" file and modded "[Path To The Witcher 3]\Mods\modFriendlyHUD\bin\config\r4game\user_config_matrix\pc\input.xml" file and manually copy modFriendlyHUD changes (they are marked with "modFriendlyHUD begin" and "modFriendlyHUD end" comments) into the same part of your existing input.xml file.
Also copy "[Path To The Witcher 3]\Mods\modFriendlyHUD\bin\config\r4game\user_config_matrix\pc\modFHUDConfig.xml" file into "[Path To The Witcher 3]\bin\config\r4game\user_config_matrix\pc" folder to install in-game menu.
4. Initializing mod default settings and hotkeys
Mod settings are stored in "C:\Users\[Your Username]\Documents\The Witcher 3\user.settings".
Key bindings are stored in "C:\Users\[Your Username]\Documents\The Witcher 3\input.settings".
To initialize default settings open both "C:\Users\[Your Username]\Documents\The Witcher 3\user.settings" and "[Path To The Witcher 3]\Mods\modFriendlyHUD\user.settings.part.txt" file from the mod, select everything inside "user.settings.part.txt" and copy and paste it at the beginning of "user.settings" file. Note that if you miss this step, most of the mod's options will be off and the mod will appear to be not functioning properly.
To initialize key bindings open both "C:\Users\[Your Username]\Documents\The Witcher 3\input.settings" and "[Path To The Witcher 3]\Mods\modFriendlyHUD\input.settings.part.txt" file from the mod, select everything inside "input.settings.part.txt" and copy and paste it at the beginning of "input.settings" file. Note that if you miss this step, you will see hotkeys in game menu, but you will be unable to assign them properly.
Updating:
=========
It is always safer, both when updating manually and with TW3MM/NMM, to remove previous mod version (and make sure "[Path To The Witcher 3]\Mods\modFriendlyHUD" folder was indeed deleted) and install it anew. No other steps but installing core mod files are needed, if changelog for the new version has no new menu options and no new bindings mentioned.
If there were changes to hotkeys in a new version, safest way to upgrade is to delete your "C:\Users\[Your Username]\Documents\The Witcher 3\input.settings", run the game once to create a default one and then repeat steps 3 and 4 of the install process, described above.
If there were changes to menu options in a new version, safest way to upgrade is to delete your "C:\Users\[Your Username]\Documents\The Witcher 3\user.settings", run the game once to create a default one and then repeat steps 3 and 4 of the install process, described above.
Warning! Deleting input.settings and user.settings files will reset your input and game settings to defaults, so you'll need to restore your preferred setting after doing so!
If you have other mods installed, un-merge your existing merges in ScriptMerger and re-merge everything again.
Uninstallation:
===============
If you've installed the mod using TW3MM, simply choose uninstall option an it will handle uninstalling all the parts of the mod.
Do not forget to run Script Merger to fix your merged files and to restore in-game video options to vanilla after uninstalling the mod.
Manual uninstallation:
======================
1. Uninstalling core mod files
You can either uninstall the mod with NMM or manually delete "[Path To The Witcher 3]\Mods\modFriendlyHUD" folder.
2. Uninstalling menu and hotkeys
To remove in-game menu you need to delete modFHUDConfig.xml from your "[Path To The Witcher 3]\bin\config\r4game\user_config_matrix\pc" folder.
To remove new hotkeys, you have to delete them from your "[Path To The Witcher 3]\bin\config\r4game\user_config_matrix\pc\input.xml" file.
2.1. Quick uninstall using backup
If you have backup of your vanilla "[Path To The Witcher 3]\bin\config" folder and have no other mods installed which change configuration files, simply delete your "[Path To The Witcher 3]\bin\config" folder and copy backup "config" folder in its place.
2.2. Step by step uninstall
To remove key bindings you need to open "[Path To The Witcher 3]\bin\config\r4game\user_config_matrix\pc\input.xml" file and delete everything in between "modFriendlyHUD begin" and "modFriendlyHUD end" comments.
To remove menu options simply delete "[Path To The Witcher 3]\bin\config\r4game\user_config_matrix\pc\modFHUDConfig.xml" file.
3. Conflicts with other mods
If you have this mod merged with the others, you will need to re-merge remaining mods after uninstalling this one.
4. Restoring vanilla HUD settings
Remember that mod doesn't change any of your vanilla HUD settings, so you have to re-enable every module you want to see using in-game video options menu.