


0 of 0

About this mod
This GIMP script allows you to automatically upgrade low-fidelity textures using a high-fidelity template. Useful when you've found multiple retextures for an object, and you like the details of one but the colors of the other.
- Permissions and credits
- Donations
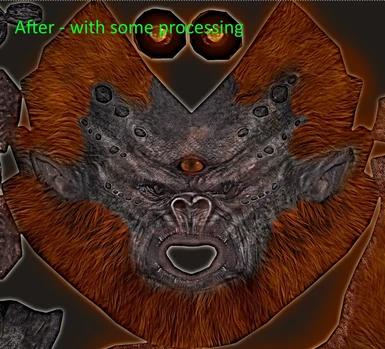
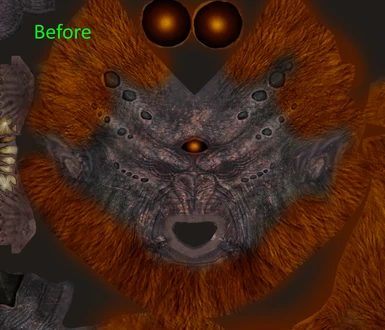
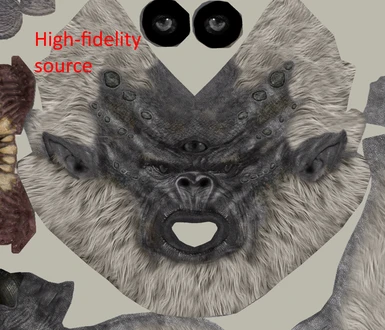
This is a GIMP script I developed to transfer the details from a high-fidelity texture to another, lower quality texture. It's useful when you like the details of one texture but prefer the colors of the other texture.
To be clear, it's not magic, it only works if the textures have the same basic layout. And even in those cases, your mileage will vary.
I've found it useful for creature textures, where the remastered HD textures always have very similar shapes to the original low-def ones. Lots of people have made alternate color retextures using the low-quality vanilla textures, while very few people have made high-fidelity overhauls of the texture. I'm using this script to transfer the high-fidelity work to all of the low-fidelity color variants. You'll see it in action in my upcoming Diverse Trolls Collection, as well as the next major version of Diverse Dragons Collection.
DISCLAIMER: Obviously you can't publish other peoples' work, or derivatives of their work, without their express permission. If you don't have permission from BOTH the high-fidelity author and the low-fidelity author, you absolutely CANNOT publish the textures you make with this tool. That said, nothing will stop you from using them in your personal Skyrim if you don't publish them.
INSTRUCTIONS
I'll try to go into a lot of detail for those who aren't familiar with GIMP.
INSTALLATION
1) Install GIMP2: https://www.gimp.org/downloads
2) Install the DDS import/export plugin: https://code.google.com/archive/p/gimp-dds/downloads
2a) Here's a tutorial for installing and using the DDS plugin: http://steamcommunity.com/sharedfiles/filedetails/?id=816839147
3) OPTIONAL: Install the Fast Fourier Transform plugin from here: http://registry.gimp.org/node/19596
4) Find your scripts folder by going to Edit>Preferences>Folders>Scripts in GIMP. If you have v1.0 installed, delete the old script before installing the new ones. The file names have changed so it won't overwrite.
5) Copy my script into this folder.
6) If GIMP is currently open, you'll need to go to Filters>Script-Fu>Refresh Scripts before you'll see my script appear. Otherwise it'll show up as soon as you open GIMP.
PREPARING TO RUN THE SCRIPT
Load two or more textures into the same window in Gimp as separate layers. Make sure the high-fidelity template is the first (top) layer. You can load multiple low-fidelity color sources at the same time -- the script will process all of them. I usually open the high-fidelity as a new image, then drag the other images in from a file explorer window. Don't worry about any "mipmap" layers, they will be automatically deleted.
RUN THE SCRIPT
1) Go to opusGlass -> Transfer Fidelity (Blur-Unsharpen).
2) I recommend using the default options first. You can try adjusting the thresholds and other options later to see if they improve your results.
3) To try different options, hit Ctrl+Z once and wait for a moment. This will undo the script and you can try again with different options, or a different version of the script (if you have the FFT plugin). If you only hit Ctrl+Z once, it won't undo the image scaling step, which will save you time when you run it again. But if you hit Ctrl+Z twice it will undo everything. I recommend copying your results to another file before you hit undo.
FINISHING UP
Export as DDS. Choose "BC3 / DXT5" for the compression (or "BC1/DXT1" if there is no alpha/transparency) and check the box for "Generate mipmaps". (If you loaded multiple low-fidelity sources, you may need to separate each into its own window before exporting - use Ctrl+C to copy and Ctrl+V to paste.)
NOTES
As mentioned, it's not magic. Where there are deviations in the layout between the two textures, you might see odd effects. In the example images you can see that there were areas where the vanilla troll didn't have fur but Kajuan's troll did. So in the final result, the fur in those sections was colored like skin instead of fur. If you have problematic sections like this, the only way to fix them is by manually adjusting the colors in those sections. If you're going to do this, I recommend editing the low-fidelity image before running the script.
You can see an example of this in the uploaded images. (Note that the "After - with some processing" image is a little over-sharpened. I didn't add the extra contrast in post process, I just used different settings when I transferred details the 2nd time...my bad)
HOW IT WORKS
The gist of it is that it separates the images into low and high spatial frequencies, swaps the high frequency between the two, and recombines them.
If you want more detail:
Textures seen in screenshots:
High-fidelity snow troll:
Kajaun's TROLL: https://www.nexusmods.com/skyrim/mods/68131
Cool-colored red troll:
scot's Akavir Creatures: https://www.nexusmods.com/skyrim/mods/15933
To be clear, it's not magic, it only works if the textures have the same basic layout. And even in those cases, your mileage will vary.
I've found it useful for creature textures, where the remastered HD textures always have very similar shapes to the original low-def ones. Lots of people have made alternate color retextures using the low-quality vanilla textures, while very few people have made high-fidelity overhauls of the texture. I'm using this script to transfer the high-fidelity work to all of the low-fidelity color variants. You'll see it in action in my upcoming Diverse Trolls Collection, as well as the next major version of Diverse Dragons Collection.
DISCLAIMER: Obviously you can't publish other peoples' work, or derivatives of their work, without their express permission. If you don't have permission from BOTH the high-fidelity author and the low-fidelity author, you absolutely CANNOT publish the textures you make with this tool. That said, nothing will stop you from using them in your personal Skyrim if you don't publish them.
INSTRUCTIONS
I'll try to go into a lot of detail for those who aren't familiar with GIMP.
INSTALLATION
1) Install GIMP2: https://www.gimp.org/downloads
2) Install the DDS import/export plugin: https://code.google.com/archive/p/gimp-dds/downloads
2a) Here's a tutorial for installing and using the DDS plugin: http://steamcommunity.com/sharedfiles/filedetails/?id=816839147
3) OPTIONAL: Install the Fast Fourier Transform plugin from here: http://registry.gimp.org/node/19596
4) Find your scripts folder by going to Edit>Preferences>Folders>Scripts in GIMP. If you have v1.0 installed, delete the old script before installing the new ones. The file names have changed so it won't overwrite.
5) Copy my script into this folder.
6) If GIMP is currently open, you'll need to go to Filters>Script-Fu>Refresh Scripts before you'll see my script appear. Otherwise it'll show up as soon as you open GIMP.
PREPARING TO RUN THE SCRIPT
Load two or more textures into the same window in Gimp as separate layers. Make sure the high-fidelity template is the first (top) layer. You can load multiple low-fidelity color sources at the same time -- the script will process all of them. I usually open the high-fidelity as a new image, then drag the other images in from a file explorer window. Don't worry about any "mipmap" layers, they will be automatically deleted.
RUN THE SCRIPT
1) Go to opusGlass -> Transfer Fidelity (Blur-Unsharpen).
2) I recommend using the default options first. You can try adjusting the thresholds and other options later to see if they improve your results.
3) To try different options, hit Ctrl+Z once and wait for a moment. This will undo the script and you can try again with different options, or a different version of the script (if you have the FFT plugin). If you only hit Ctrl+Z once, it won't undo the image scaling step, which will save you time when you run it again. But if you hit Ctrl+Z twice it will undo everything. I recommend copying your results to another file before you hit undo.
FINISHING UP
Export as DDS. Choose "BC3 / DXT5" for the compression (or "BC1/DXT1" if there is no alpha/transparency) and check the box for "Generate mipmaps". (If you loaded multiple low-fidelity sources, you may need to separate each into its own window before exporting - use Ctrl+C to copy and Ctrl+V to paste.)
NOTES
As mentioned, it's not magic. Where there are deviations in the layout between the two textures, you might see odd effects. In the example images you can see that there were areas where the vanilla troll didn't have fur but Kajuan's troll did. So in the final result, the fur in those sections was colored like skin instead of fur. If you have problematic sections like this, the only way to fix them is by manually adjusting the colors in those sections. If you're going to do this, I recommend editing the low-fidelity image before running the script.
You can see an example of this in the uploaded images. (Note that the "After - with some processing" image is a little over-sharpened. I didn't add the extra contrast in post process, I just used different settings when I transferred details the 2nd time...my bad)
HOW IT WORKS
The gist of it is that it separates the images into low and high spatial frequencies, swaps the high frequency between the two, and recombines them.
If you want more detail:
Spoiler:
Blur/Unsharpen version:
1. The first layer (the Template) is duplicated.
2. I then run a Gaussian blur on every layer except the duplicate of the Template to get a low-frequency version.
2. I set the low-frequency version of the Template to Grain Extract mode, and merge it with the copy of the Template. This removes the low-frequency details and leaves us with only the high-frequency ones.
3. Then I set the high-frequency Template to Grain Merge mode and duplicate it for every low-frequency source layer.
4. Then I merge each high-frequency Template onto its low-frequency source layer to get the final result.
Fast Fourier Transform version:
1. Firstly I use the FFT plugin to convert each image to its Frequency Domain equivalent.
2. Then I add a layer of pure gray above each layer, and give these gray layers a layer mask.
3. Draw a Radial Gradient in each layer mask, to assign a distinct value for every pixel based on its distance from the center.
4. Then I use the "gimp-curves-explicit" tool to convert this gradient into the filter we will use (Gaussian or Butterworth depending on the version you use). The Template layer's filter is inverted to be a high-pass filter instead of a low-pass.
5. Then I merge these gray mask layers down into their target layer.
6. Then I duplicate the high-frequency Template for each low-frequency source and merge it down in Grain Merge mode.
7. Then I use the Reverse FFT command to return each layer to the spatial domain (the one you can see).
Show
Blur/Unsharpen version:
1. The first layer (the Template) is duplicated.
2. I then run a Gaussian blur on every layer except the duplicate of the Template to get a low-frequency version.
2. I set the low-frequency version of the Template to Grain Extract mode, and merge it with the copy of the Template. This removes the low-frequency details and leaves us with only the high-frequency ones.
3. Then I set the high-frequency Template to Grain Merge mode and duplicate it for every low-frequency source layer.
4. Then I merge each high-frequency Template onto its low-frequency source layer to get the final result.
Fast Fourier Transform version:
1. Firstly I use the FFT plugin to convert each image to its Frequency Domain equivalent.
2. Then I add a layer of pure gray above each layer, and give these gray layers a layer mask.
3. Draw a Radial Gradient in each layer mask, to assign a distinct value for every pixel based on its distance from the center.
4. Then I use the "gimp-curves-explicit" tool to convert this gradient into the filter we will use (Gaussian or Butterworth depending on the version you use). The Template layer's filter is inverted to be a high-pass filter instead of a low-pass.
5. Then I merge these gray mask layers down into their target layer.
6. Then I duplicate the high-frequency Template for each low-frequency source and merge it down in Grain Merge mode.
7. Then I use the Reverse FFT command to return each layer to the spatial domain (the one you can see).
Textures seen in screenshots:
High-fidelity snow troll:
Kajaun's TROLL: https://www.nexusmods.com/skyrim/mods/68131
Cool-colored red troll:
scot's Akavir Creatures: https://www.nexusmods.com/skyrim/mods/15933