


0 of 0


Tools:
Nifskope
Blender
Photoshop
I have a hell of a time trying to get blender to export or import nifs, so I what I did was export my base mesh (the bee body) in nifskope as a .obj, import it into blender, make my edits, and export that in blender as a .3ds. In Nifskope, I then import the .3ds on top of the copypasted branch of the base mesh. Sometimes blender does this weird thing with imported .objs and turn them sideways, so I just edit the translation in nifskope to a 90* degree until it goes where it's supposed to. If your blender can handle importing and exporting nifs, you might have an easier time.
How to make a shell mesh:
1. Import your base mesh into blender.
2. Go into the edit mode and delete the vertices of all the extra parts you don't want
fuzzy. This can be the teeth, the claws, the eyes, the lower paws (there
is such a thing as too much fuzz) etc.
3. Go into object mode and hit modifiers (wrench)
4. Hit solidify on the menu.
5. Adjust the solidify (you may need to move it forwards or backwards to
make the mesh more thick). I adjusted it increments of 0.05, but you can
do it at your preference.
6. Export the shell mesh. Make sure during the process not to edit the UV map or disrupt it.
7. Do this 3-5 or more times depending on how detailed you want your fuzziness to be.
1. Copy the base branch of the main body and paste it under the 0 BSFadeNode. Import the shell mesh on top of the pasted branch.
2. Make the pasted branch point to the shell texture.
3. Attach an alpha property (right click the pasted branch's nitrishape, go to node >> attach property >> nialphaproperty). Right click the alpha propery and go to flags.
4. Edit the alpha test threshold flag.
5. The alpha test threshold flag with make the fuzziness cover of each shell mesh greater or less depending on the number.
6. Set your least thick shell mesh (your first one) to a number slightly higher than your base, but the lowest of the shell meshes. Check "enable blending" for smoother fuzz (but less volume).
7. Repeat each step for all your shell meshes, importing in order from your least thick to most thick shell. For the alha test threshold, you can increase each mesh by increments of 5-20 or more. The base should have the lowest, and the most thick shell should have the highest.
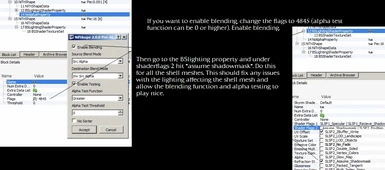
Update: 8. If you want to enable blending for your shell textures, change the alpha flag to 4845 (the threshold can be 0 or higher). Then go into the BSshaderproperties and check SLSF2_Assume_Shadowmask. Do this for each shell mesh that you want to have blending. This should fix any issues the mesh may have with not responding to lighting correctly when blending is enabled.
How to make a shell texture:
1. Open up the texture and slap a black and white filter over it.
2. Adjust the brightness/contrast to your liking.
3. Add a new layer and blacken out the arts you don't want fuzzy. This isn't neccesary if you deleted those parts on the shell mesh.
4. Select all, copy merged, and paste into your alpha channel under paths.
5. Turn off all the adjustments and get back to your base texture, then save as creaturename_shell.dds.
Inspiration from the FusaFusa Project. (the bear in the images is theirs)