


0 of 0


Documentation
Readme
View as plain text
CLEARSKY HIDEOUT - Version 01.5
Fully Animated Playerhouse
by Hoamaii
Animations and Features Guide
TABLE OF CONTENT
~ Welcome
~ A few basic recommendations
~ Player Sleeping and Outfit Management
~ Activators
~ Inside The House
~ At The Crafting Station
~ On The Summit Lookout
~ Around The Grave
~ At The Stables
~ Inside The Cave and Lab
~ Spoilers
~ Uninstallation instructions
WELCOME TO CLEARSKY, DOVAHKIIN
Clearsky is designed to convey a feeling that you actually LIVE in there, better suited for slow-paced, relaxing times. All animations are Vanilla and simply triggered by activating furnitures and objects. No quest or AI package, Vanilla or modded, has been edited.
There are dozens of activators, triggers and unique features in Clearsky, all accessible to the player of course - the main idea is to click and see what happens - just be sensible about it, don't spam your keys.
For your follower to use these activators too, you will need a follower mod, this has been designed with Followers Can Relax and AFT running, it should work with UFO or EFF too or any follower mod which lets them sandbox freely. I deliberately avoided implementing a new follower quest to prevent any conflict with the countless follower mods on the Nexus.
If only with FCR installed, your follower will keep randomly busy depending on his or her mood, AI package or the time of day. Other than playing lots of animations, ClearSky also lets them craft their own items, food and potions when using workbenches. They will also mine ore and chop wood for you and eventually store them in the appropriate containers. Relaxing by the fire or in the tub will bring a smile on their faces and they'll become mischievous enough as to let you test their more or less fortunate attempts at potion crafting - at your own risks...
There is no rule as to what they'll choose to do, they can be very hard workers at times and at other times, I find my follower being a total drunk or a shower maniac - it is part of the fun.
A FEW BASIC RECOMMENDATIONS
Animations being one of the main features of Clearsky, there are a few common sense 'rules' you should keep in mind:
1. DO NOT SPAM your activating key to avoid triggering several animations, events or scripts at the same time. Animations are not designed to be stormed through, be patient, give the animation graph time to play through.
2. it is best experienced in THIRD PERSON - most animations do not play in 1st person anyway and you'll find your character forced to third person quite often.
3. As a general rule, ALL SITTING animations can be very naturally walked out of by pressing the FORWARD key, including the drinking, reading, writing, eating soup and eating bread animations - anything where you're sitting.
Six STANDING animations and the LAYDOWN animation behave differently, these are:
- the drinking standing animation
- the reading standing animation
- the eating standing animation
- the warming hands animation
- the wall lean animation
- the rail lean animation
- the lay down animation (not the sleep one, the relax one with your eyes open)
For these and ONLY for these, you will need to press again the same activator to exit the animation. As an alternative, you can learn and use an "Exit Animation Power" which will take you out of the animation a more natural way. Once you've learned this "Exit Animation Power", all you'll have to do is use this power to exit these animations.
A third kind of very few animations are "small scenes" designed and scripted to play through completely before you can exit, these are:
- the candle lighting and blowing animations
- the wood drop and wood pick up animations
- the castIronPot soup serve animations
- all the digging, planting and harvesting animations around the Grave
- the music playing animations - timed for the music score which'll play with it.
- the entering scene of painting animations in the lab, after that you just exit it like any regular workbench.
For these, simply wait until the animation is over. You'll know it's over when you character is back to default idle. As soon as they are done playing, you will be able to walk away as usual by pressing the forward key.
And that's it. In any case, should you get stuck (animations can be a bit sensitive at times) you can always get out of it by jumping. Everything is designed and scripted so that you won't need to but even after extensive testing, it is completely impossible to foresee every scenario.
PLAYER SLEEPING AND OUTFITS MANAGEMENT:
Clearsky deliberately avoids messing up with the Player's AI, followers' packages, quests or outfit management.
In all my screenshots, I have been using L.P.'s 'Another Sleep Mod' which has always worked flawlessly for me, with no risk of shut-eye or blocked-bed bug. I strongly recommend that you use it too, as you will need a sleep mod to be able to see yourself sleep under blankets. It should work just the same with Immersive Beds or See You Sleep if you are using these mods.
By default, both player and follower will unequip everything when going to sleep or entering the tub and they will dress up again coming out. The player will put on a special Clearsky outfit and your follower will reequip everything that he/she was wearing before unequiping.
This is achieved the harmless, simplest possible way, by quickly adding and removing a small item in their inventory, using a basic Vanilla game feature which makes them reevaluate their inventory to requip their best items, with no need to keep track of the countless armor mods and equipable slots we all use. You may notice a slight stutter when they do which is unfortunately unevitable, it is due to their AI reevaluating their equipement. As a consequence, a heavily burdened follower will take longer to do so than another one with a fairly light inventory.
If you have other mods installed with player or follower outfit management, Clearsky's default settings can of course be changed by disabling the outfit management at the "House Rules and Manners" board, pinned to a wall left of the house's entrance. Other features can also be customized there.
The default Player garments are Vanilla-skinned, pants for male, Nocturnal robe for female. You can replace them with any piece of clothes of your choice by renaming your nif files 'CSInnerWearM_0/1' for male and 'CSInnerWearF_0/1' for female and replacing the identically named nifs in 'mehes\DwemerShack\armed clothes'.
ACTIVATORS:
There are over 100 activators and triggers in Cleasky, most of them will be enabled when you first walk in but not all. Some are unlocked by specific actions, so keep in mind that some new activators may pop up at times in zones you thought you had already explored. Some others will be deleted once their purpose has been fulfilled.
The main idea is try and click on everything and see what happens. Some will activate items, some others trigger animations.
But should you want to know more about what Clearsky has in store for you, the following pages contain a list of the main features you will find. Refer to them if you feel you get stuck somewhere.
Or if you want to go the very easy way, you'll find a list of spoilers at the very end.
INSIDE THE HOUSE:
Circling the room from left to right of the door:
1. Hanging Cloak: as you enter the house, you'll see a small fur cloak hanging to a peg, you can pick it up equip, unequip, hang it back to the peg - or do whatever you want with it , it's a piece of clothing. If you you use Frotsfall it will grant you standard protection.
2. House Rules and Manners board: triggers the "study" animation and lets you customize player and PC behaviors: enable or disable the use of bed blankets, enable or disable the mini outfit management for bed and for shower, disable or enable the "book-menu" triggered by the reading animation, enable or disable the auto-storage system for your crafting supplies (food, spirits, wood, ingots, ores, leather, pelts, ingredients and soul gems). By default when you enter the house, the auto-storage is disabled.
3. Ancient Mara: will trigger the praying animation and cast a custom buff on your character and follower.
4. Dwemer Music Box: animated. It plays 4 different original compositions by Vindsvept. You can customize it by replacing the Xwm files in Music\DwemerShack with your own choice of music if you wish. It is best to turn it off before leaving the house - should you forget to do so, it should automatically reset when you exit the cell.
5. Beddings Sets: when you first enter the house, the beddings will be gold. You can change them to other color sets, red, blue or green, by clicking on the bed sheets stack on the shelf above the bed.
6. Bookshelves: both empty sides of the shelf above the bed are bookshelves. They work like any Vanilla bookshelves... which means they bugged in the 1st release!!.. ~ If you've updated from V01.2 to UpV01.5 update or if you've used UpV01.5 for your 1st install, you will need to fix them yourself in game (after removing their contents first) in a few simple steps:
A - click on the "Time to Fix These Shelves" prompt right below any one of the 2 shelves, a tool box and a small stool ladder will be placed in front of you.
B - climb the ladder and let your character slam his hammer on the bugging shelf a few times. Don't click on the shelf while doing this, once you've had enough hammering, just climb down the ladder, after a second or so both ladder and tool box will be stored away.
C - Repeat the same process for the other shelf, on the other side of the bed.
D - Don't use the bookshelves yet, just EXIT the house for a couple of minutes to give your repair some time to hold.
When you enter the house again, your shelves will be fixed and fully functional.
~ If this is your very first install and you're using '1stInst_V01.5' version, the bookshelves won't need fixing; you may however need to exit and reenter if they're not working properly right away as this is a Vanilla random bug and the only way to initialize them is to leave the cell once and immediately enter again - nothing I can do about this one!
7. Bed Blankets: by default, fur blankets will automatically unfold on player and follower when they go to sleep, and fold back when the actor gets up. Should you want to disable this automatic feature (if you like to watch your followers sleep in a more... exposing apparel), you can do so at the House Rules board and still choose to unfold or fold blankets manually by activating the rolled blankets on each side of the bed. If you use Frostfall, these blankets should warm you up.
8. Bed: the bed actually sleeps 2 people and is 100% Vanilla despite its custom appearance. This guarantees that you'll never wake up sleeping on the other side of the bed or piled up in mid-bed on top of your follower (you wish!..). Other than unfolding a blanket on sleepers, going to bed will also make both PC and NPC unequip armors and weapons - NPCs will reequip all when waking up, the player will only equip minimum clothes because I do not wish to mess up with other outfit management mods. This is the default settings but you can customize it to disable outfit management or decide that player or NPC should stay 'as they were' when getting out of bed.
9. Hourglass: gives you in game time of day or night with incredible Dwemer precision.
10. Candlesticks: can be lit up or blown out, both options playing a short animation.
11. Reading Books: clicking at the bottom of the books row under the wall map will let you play the reading standing animation. While in animation, you can activate any other book you wish to read. By default, it will offer you a choice of custom books to read, telling you more about the previous owners stories. If you get tired of this, this option can be disabled at the "House Rules" board by the door. This is one of the animations which'll require that your either click again on the activator, or use the 'Exit Animation' lesser power, to stop the animation.
12. Exit Animation Power Book: on top of the pile of books lies a blue book which is a spell book. Upon reading, it will teach you the 'Exit Animation Power'. Once learnt, exiting the standing animations (reading, eating, drinking, leaning) will require that you use that power. If you do not want to use that power at all and would rather click a second time on activators to exit animations, don't learn it! Should you change your mind and have lost that spell book, you'll find a second copy in the container above the small reading table left of the fireplace.
13. Changing Maps on the wall: clicking on the map tubes pile will give you 5 different choices of maps to display.
14. Working table: the small table left of the fireplace will trigger 2 animations in turn: the "translate" animation from the Thieves Guild quest, and the Write Ledger animation. At some point, you'll find a book full of enigmatic notes in ancient Dwemeri language. You'll be able to use the translate animation to actually translate these Dwemer notes.
15. Dwemer Sconce light: just toggle it on and off. Note however that there are many lights in the house, they all can be turned on and off for you to compose your own lighting. There are no light source which do not come from either a candle, a flame, a torch or a window in Clearsky. If you light them all together however, you may start to get light glitches, the reason is that they are not supposed to be all lit in the same time. When you get these glitches, turn some lights off and it'll go away.
16. Comfy chairs: you can slouch in there like any regular Skyrim Jarl. Additionally, sitting in there will put a happy smile of your companion's face. Should you not want to slouch, clicking on the large book on the fireplace sill in front of you will let you choose to drink or read in the left chair instead.
17. Fire Iron: use this to light a fire in the fireplace. You will need 4 firewood to start a fire that will last 24 hours and lighting the fire will play a small animation. If you come here while in the "wood carry" animation, your character will drop wood in the fireplace before leaning to light up the fire. You can pick up wood in the wood pile closeby. If you use Frostfall, this fire should warm you up now.
18. Fireplace tankard: play the drinking animation while watching your fire burn. Your tankard will have beer in it. You'll need either to click again or use the 'Exit Animation' power to stop the animation.
19. Candle stick on the fireplace mantle: can be turned on and off.
20. Cooking station: your companion will cook some Clearsky food there - and may share if you ask nicely.
21. Firewood pile: with your fire burning only for 24 hours (that's already a very respectable fire!), you'll need to keep quite a lot of firewood in store. That's where your companion's chopping wood for you in the stable and storing it here will come in handy. This pile is a firewood container which will trigger the 'wood carry' animations when you pick up or drop firewood there. Your follower will/may (depending on his mood) also unload all his firewood burden in there - he'll let you know when he does.
22. Toggle Wood Carry animation: the wood pick and wood drop animations can be a little temperamental sometimes. Should you get tired of them, you can disable - or reenable - them any time you want by clicking on the small saw hanging from the wall above the wood pile.
23. Lever above the woodpile: turns on and off the shower in the tub.
24. Valve above the enchantment font: turns on and off the water heater, should you rather have a steam bath. If you use Frostfall, the Steam bath should warm your up.
25. Enchantment station: a custom one but works like any Vanilla one.
26. Alchemy station: when using it, your companion will create his own health potions. He will also produce a few other unusual mixtures which he/she will safely lay closeby, next to the potion shelf.
27. Testing your companion's alchemy attempts: should you feel bold enough as to test your mate's creations, clicking on the "test your companion's creations" prompt will trigger some unexpected results for you. There'll be 7 different concoctions for you to try but your follower is not very good at labelling them...
28. Storage Cabinet: both drawers are separate containers, and behind the glass window is the food cabinet. The potion shelf is also a container, as well as the satchel and the small urn.
29. Tub/Shower/Steam Bath: when entering the tub, both you and your follower will strip all equipment (who takes a shower with a bathing suit on?). As for the bed, both of you will dress up again when coming out - this can be customized using the "House Rules" board. You both can sit on either towel on the tub sill, picking the one against the wall will let you choose if you'll want to drink or read in the tub. You will also get a small buff for cleaning the blood and mud from your adventures.
30. Shower: you can also stand in the shower, leaning against the wall by clicking on the soap or brush on the stone shelf. This is a "Wall Lean" animation, one of these few ones that will require that you click again on the soap, or use the 'Exit Animation' power to walk out.
31. The small oil lamp by the two tankards against the wall can also be turned on and off.
32. Candle Stick in front of the Oblivion Mural will trigger animation when your light them on or blow them off.
33. Dinner Table: many things can be done here. The first one being of course that you can eat there. You can just plainly sit in any of the seats, or you can pick your menu by clicking on either one of the steaks: drink, eat a sandwich or eat soup, all animated of course. Each choice will give you a small buff and soup bowls will be cleared as soon as you leave the table. It does not matter whether you click before sitting or after (it's easier to locate the activator before sitting however). Your companion will also use these animations when sitting at the table around breakfast, lunch or supper time.
34. Dinner Table Candle: plays an animation when you light it on or blow if off.
35. Serve Soup: clicking on the dessert plate on the outer side of the table will replace it with a Soup Pot and let you play the 'serve soup' animation. Your companion may also play this animation, preferably before lunch or supper, or you can ask him to do it. You can remove the Soup Pot any time you want by clicking on it again.
36. Clear/Set the Table: should you rather clear the table, you can do so by clicking on the front side of it, right above the pine stool. Once cleared, the table can be set again, either for dinner, or for work.
37. Work Table: once set for work, the table will offer you a different set of animations. You can of course lean on the map to examine it. You can of course light on or blow out the candle. You can also play another unusual animation by clicking on the "unpack your findings" prompt. You can translate Dwemer notes here too once you have found them and unlock some new crafting recipes.
Once the table is set for work, all eating prompts are disabled, you'll need to clear the table again and set it for dinner if you get hungry. Your companion will never serve soup on the map, he may have a snack or a drink by your side depending on his AI, but he'll never eat soup on the books either.
38. Windows: they will reflect the time of day. They'll grow dark at night and very bright during the day. Exterior windows will also brighten when you have a fire going on inside and the exterior chimney will blow smoke. You have nothing to do about it. It may happen that the first time you enter the house, the script does not initiate properly but it'll do as soon as night or morning comes. This is not a bug, it happens randomly.
39. Bottomless Bag: there's a shoulder bag hanging by the right side of the entrance door below the Dwemer sconce (which can be lit of course). That bag is a container which can be picked up and carried around. It weighs 25 pounds and no matter how many objects you stuff in there, its weight will not change. When you equip it, an "Open Bottomless Bag" lesser power will appear in your power menu which allows you to transfer items directly from your inventory into the bag without having to unequip it. You can also drop it like any regular piece of garment and access the bag's content by activating it. And you can hang it back to the pegHolder by the door where it'll behave like any regular container. It's a little godlike object I indulged myself because I find it convenient to unload stuff I carry around everywhere when I enter the house then pick them up again when leaving.
40. KeyHouse double: there's a second key hanging by the door which can be retrieved if needed or placed back there if you wish.
41. Eating and drinking animations: all animobjects have been modified, there's meat in the bread, mead in the tankard, soup in the bowl and soup again in the "soup serve" cast iron pot.
42. Custom books: you'll have noticed that there are a few custom books in and around Clearsky. If you're the reading kind, you may want to take a look at them to learn more about the previous occupants and to find clues that'll help you unlock a few secrets. If not, you'll have to be somewhat of a detective or... use the spoilers at the end of this guide.
43. Sconces: all sconces can be turn on and off just like candlesticks - they will only play a very short anim if your weapons are sheathed.
45. Containers: there are many containers in Clearsky but most of them don't have a pre-determined usage other than these around the forge, the wood piles and the food cabinet. It's up to you to decide how you want to use them and what you want to stock in them. The previous occupants have left quite a lot of stuff though but of course, none of the containers respawn.
46. Auto-Storage: by default, it is disabled. Should you want to use this feature, you can enable it at the House Rules board by the door.
AT THE CRAFTING STATION:
The most notable feature is that your follower will actually make some use of these stations and unload some of his burden in the surrounding containers. Other than that, most of the stations work like any other in the game: forge, smelter, tanning rack, and lots of containers. The tempering table and sharpening wheel are in front of the house - the IceWraiths are not part of the mod, they're Vanilla. You'll never need the 'Exit Animation Power' there.
1. Forge: just a regular forge. Except for the fact that at some point, should he decide to do so, you follower may craft his very first item: a very simple male light vest. If your character is male, he'll probably equip it. If not, you'll find this item in his inventory. He may also craft a second one later on.
2. Smelter: works as any other, except that your follower can also use it to smelt some ore from his inventory. He will only smelt malachite, orichalcum, ebony or dwarven metal - anything else that may be needed for Vanilla special recipes will not be smelted by your follower. He will also store the remaining ores from his inventory into the nearby ore container when he leaves the smelter.
3. Ores Container: you can set it up to Auto-Storage at the House Rules board inside the house.
4. Ingot Container: if he decides to use it, your follower will store whatever ingots he carries in there - he will do so when sitting on the nearby through to take a break. You can also set it up to Auto-Storage at the House Rules board inside the house.
5. ArrowCraft Anvil: your follower will craft his own Dwarven arrows when he or she uses the second anvil with the arrow crate next to it. Your character can craft Daedric arrows there as well as torches if she/he has the right ingredients.
6. Tanning Rack: your follower will tan a couple of pelts into leather if he has pelts in his inventory, when done he will automatically store them into the leather container. You can set it up to Auto-Storage at the House Rules board inside the house.
7. Leather Container: if your follower uses it, he or she will store in there the leather and leather strips from his inventory. You can also set it up to Auto-Storage at the House Rules board inside the house. Linen is stored with leather in Clearsky.
8. Junk container: if he uses it, you follower will store Dragon bones and scales, Centurion cores, Chaurus Chtin and Linen wraps from his inventory. Can also be set up to Auto-Storage.
9. Trough: you can sit on the forge's trough and have a drink - the prompt should show up around the tankard, between the trough and the Ingot container.
10. Rich Ore Veins: Clearsky sits on very rich ore veins offering all different types of metal. They will not deplete and can be mined as many times as you need, giving you 4 ores each time. The main difference with Vanilla veins is that your follower will use them and actually mine ores exactly like your player does. Chances are he will store them in one of the appropriate containers when he's done, but again they sometimes have their own agenda so just be careful to check their inventory before you leave, relentless workers as they are, they may very well have mined 50 pounds of metal in no time.
11. Sitting spots, Sit Ledge spots and Cross-legged sitting spots: there are a few around, if you cannot spot them follow your follower for a change. Isolated tiny pebbles usually mark those sit down spots' locations.
12. Idle markers: just for your follower's fun.
13. The armor tempering workbench is a the bottom of the house stairs, next to a Dwemer pillar.
14. The weapon sharpening workbench is right next to it.
15. There's also a fence in front of the house, facing south, where you can lean against to admire the view - lest you prefer to use the sit spots nearby.
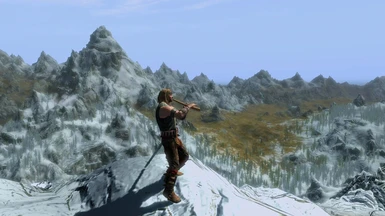
ON THE SUMMIT OVERLOOK:
It is situated on top of the cliff, right above the house. It is fully navmeshed of course but you may need to coach your follower up the steep path the first time you use it, walking up instead of running should do fine. No hard work here, this is for relaxation.
This is a place where all animations which do not include sitting will require that you click again to stop the animation - or use the 'Exit Animation' power.
1. Summit Fire: you need to turn on the valve and have a torch and some Dwemer Oil in your inventory to be able to light a fire that will burn for 12 hours.
2. Bedrolls: activating either one of them will trigger the laydown animation. You cannot sleep here, it is too cold. This is also one of these animations that will require that you click again on the same bedroll to get up - or use the 'Exit Animation' power. Your follower will also use them and enjoy relaxing - he/she should smile while laying down.
3. Flute: once in a while when relaxing here, your follower will feel in the mood to play a little flute by the fire. He/she has a few different custom tunes in store for you...
4. Drinking by the fire: clicking on the tankards by the fire will trigger the Drinking standing animation - one of these that will require that you click again or use 'Exit Animation' power to walk away.
5. Food: clicking on the "eat something" activator on the opposite side of the firepit will trigger the eat animation and let you have a meat-sandwich. Click again to exit or use the 'Exit Animation' power.
6. Warming hands: when there's a fire burning, clicking on the fire will trigger the warming hands animation, you need to click again to leave the animation or use the 'Exit Animation' power.
7. Sit Ledge spots: there are 2 sit ledge spots for you and your follower to use, the activators are placed somewhat over the edge, watch where you follower sits if you have trouble finding them. As for all sitting animation, just press forward to get up.
8. Cross-legged Sit Spot: on the rock above the fire: both you and you follower can use it.
9. Escape ladder: the secret access to ClearSky Hideout, use carefully...
10. Mountain peak: on the peak above the lookout, someone forgot a flute. If you pick it up, you'll be playing the flute too. This is navmeshed so if your follower follows you up there and you ask him to play the flute, he/she will do it for you. There is also a sitting spot up there, just pass your pointer around, you'll find the prompt.
11. Rooftop sit spot: just a sit ledge spot.
AROUND THE GRAVE
This is a special place where lots can be done without moving around much. Just remember the golden rule: don't spam your activate key. Explore sensibly and when an animation triggers, let it play its course before moving on.
1. The grave: the first time you get there, it'll be covered with flowers. Don't try to harvest them the Vanilla way, you can't. But you'll be offered several options by clicking on the "clean the grave" prompt at the foot of the grave mound. If you have trouble finding the prompt, search around the small tool crate at the left of the grave.
2. Harvest: you can harvest the flowers, which'll play an animation and place harvested ingredients in your inventory.
3. Weeding: you can weed the remaining grass, animated too and necessary to go further.
4. Digging: you can dig the grave to access the buried coffin and its content. Of course, you'll need a shovel to do so. Once the grave is open, just walk out of the animation. No worries, you can close the grave afterwards and dig it out again later if needed. You can leave it open if you prefer, but you'll need to close it if you want to do some gardening.
5. Planting: once the grave is closed, you'll be able to plant seeds in order to grow crop. You'll have a choice to plant flowers, mushrooms or vegetables. There are a few seeds sacks in the stables for you to try your hand at gardening before you decide to create your own seed sacks.
6. Growing Crop: Clearsky's crops are kind of magic and only take 3 days to grow - no DLC required. All you have to do is wait.
7. Harvesting again: once your crop is fully grown, a message will let you know and you can collect your harvest the same way you did it the first time.
8. Whatever you decide to do next, planting again or digging again, you'll need to weed the soil first, just any regular farmer.
9. Before you can plant again, you'll also need to turn the soil, and need a hoe to do that - farming is work! There is a hoe in the stables.
10. Seeds sacks: creating new seeds sack will require one sample of each harvested plant. To create your own seed sack, you need to go to the workbench in the stable.
11. Critters: there are also a few bugs flying around. You cannot grow them - they'll respawn the Vanilla way.
12. Rail Lean: after a hard day's farming work, you and your companion can enjoy the view over Solitude and the western coastline. This is the only spot around here where you'll need to either click on the rail a second time or use the 'Exit Animation' Power to exit animation.
13. Lute playing: the previous owners left a lute against the fence for you to play if you feel in the mood for this. Should you ask your follower to play it for you, he will.
14. Praying: should you want to pay your respect, you can click on the tombstone which'll prompt an option to do so.
Note about the gardening animations: these are all small scenes which you cannot exit before they are done playing. In case you get attacked at that unfortunate time, you should not be harmed anyway.
AT THE STABLES
Going from right to left as you come from the house:
1. Sconces: the 1st time you get there, the sconces will have no torches in, there are 4 sconces for you to light while playing a short animation. If you need torches you can craft some at the Anvil by the forge. There is also a barrel containing torches nearby.
2. Dwemer Brasier: you can light a fire to keep you warm there if you have a torch. Once it has been lit, you can warm you hands at the fire by clicking on a new prompt right above it.
3. Empty crate: your follower will/may store the ores that he has mined in there. You'll know because you'll see ores piling up in the crate. You can of course use it too.
4. Small wood pile by the wood chopping block: you can pick up wood here to play the 'carry wood' animation all the way to and inside the house if you wish to. Jumping, running or drawing your weapons will break you out of animation however - if you want to keep carrying wood, just walk.
5. Chopping wood: works like any other station in the game, your followers will produce 6 firewoods every time they use it, useful to gather wood for the fireplace.
6. Saddles and harness: cannot be used yet, but should be in an upgrade to come.
7. Rolled bedrolls: there are two rolled bedrolls under the left saddle. If you click on them, they will unfold at your feet and you can sleep there. By default, you and you follower will sleep 'inside' the bedroll and no longer on top of it, but you both will keep your armors and weapons on - there may be some clipping depending on what you're wearing. If you wish to disable this feature, you can do so at the House Rules board inside the house. Once unfolded over the sleeper, the blankets should keep Frostfall users warm.
8. Spring Water Fountain: activate to trigger the fountain drink animation and fill a bottle of ClearSky water. This water has restoring vertues that will be useful to relieve your exhaustion if you use the Lookout escape ladder. No need to click again to exit animation. Your follower will use it too.
9. Hay bales: at some point, you'll be able to move some around to find your way to the lab.
10. Hay Stack: if you're reading this you probably figured out already this is where the previous owners hid the key to the house - it is a regular non respawning container.
11. Wine barrels: activating the spigot will trigger the animation and give you a bottle of ClearSky wine. Your follower will obviously love to use it too but they don't get any wine bottle, they drink way too much as it is.
12. Big Firewood Pile: will ask you if you want to pick up or drop wood (if you have any in your inventory) and play the appropriate animation as you do. This is one of the containers which you can turn on to auto-storage at the House Rules board inside the house. And should you get tired of the animations, you can also disable them by clicking on the hanging saw above the inhouse woodpile.
13. Workbenches: it is actually 4 work benches in one. You can use the front side to craft special ClearSky artefacts, craft like at any regular forge or temper armors, and the left side is where you'll be able to create seeds sacks to plant and grow on the grave mound if you have the right ingredients.
14. Relaxing spot: sit on the steps of take a break.
15. Lean againt the wall: by clicking on the left wall, you'll play the 'lean wall' animation - this is one that'll require you to click a second time to exit - or use the Exit Animation Power.
16. Rich Ore Veins: the stables sit on a very rich ores vein offering many different types of metal. They will not deplete and can be mined as many times as you need, giving you 4 ores each time. Of course, your follower will be able to mine too. Just be careful to check their inventory before you leave, relentless workers as they are, they may very well have mined 50 pounds of metal in no time. When they are mining and their inventory becomes too crowded, some ores will be automatically transferred to the closest Ores container.
17. Eagle's nest: there is an eagle nesting on the stables' roof, if you can get up there, you'll find feathers, useful to create arrows. Searching the other eagle's nest above the house will grant you the same supllies.
IN THE CAVE AND LAB
Again, lots of things to do in there. Do not use the Exit Animation Power in here, you do not need it to exit any of the animations. As you get in:
1. Sconces: just like the ones in the stable, you need to place a torch in them to get light.
2. Falling rocks: nothing much to stop this from happening, no light foot perk can help you as this is just the entrance sliding roch will causes it. If you own Dragonborn and download the Dragonborn version of Clearsky, you'll find a use to these fallen rocks: you'll be able to sculpt them.
3. Dwemer stand by the door: you need to place the appropriate item there to open the lab's hatch. Though this door should not respawn at any time, it is probably wiser to retrieve the 'key' after you've opened the hatch, should you ever get locked inside.
4. Lab's light: as you enter the lab, you'll probably want to turn the lights on. You can do it by pressing the dwemer button above the bed.
5. Painter's Platform: this is the painter's area. You may need to coach your follower up there, even though it is fully navmeshed the Vanilla chamber collision plane may sometimes interfere. Up there, you and your follower can finish up the mural painting - animated too. You need to paint twice the same spot before your progress shows, it can be done either by you, your follower or both of you in turns.
6. All lamps can be lit or turned off up there too.
7. Brasier at the bottom of the stairs: you'll need to fill it with oil first as there is no wood in there (you can find some oil on the shelf) - then you can light it either with a torch or by using a fire spell.
8. Sit on the bed. A prompt will show up when you pass your mouse around the foot of the bed.
9. Bed: it works just like the bed inhouse - automatically unfolds a blanket on top of the sleeper - and can be set up at the House Rules board inside the house, using the same settings as the bed. This blanket should keep Frotsfall users warm while sleeping.
10. Compressor: useful to fill the diving gear's air tanks with air.
11. Workbench: use it to craft ClearSky's custom gears and objects. Not all craftable objects will be displayed on your crafting menu at first - for some you will need to unlock recipes or discover clues to be able to do so.
12. Akhti's Staff: summons a Dwemer Centurion which levels up with you from level 4 to 81. Very useful to train for combat.
13. Notes and drawings: there are quite a few scattered around the whole place. Some are decoration, some others can be interacted with to play animations and unlock more features and crafting recipes.
14. Writing case: clicking on the wooden stool plays the writing animation, among other uses. Can be walked out of like any regular sitting furniture. This is another spot where you can translate Dwmer notes.
15. Flying Machine: you can build yourself a fully playable Flying Machine like the one on the model hanging from the ceiling. You just need to first learn how to. Be aware that this flying machine should only work properly if you have SKSE installed but I've seen it work without it. It will not work on followers - followers jumping off a cliff is a navmesh thing only.
16. The shelf: the previous occupants of Clearsky have left a few artifacts there for you to play with if you wish. Just do NOT try to click on the Aquarium, a prompt may randomly appear to catch a fish but that is not supposed to happen.
17. Diving Gear: on the shelf, there is a fully playable version of the Diving Gear model displayed in the Aquarium - the only thing you need to do to use these is to fill the tanks with air. You can also craft another one if you want. The default ones are skinned for Sundracon (works on Vanilla) male body and UNP female body. A Vanilla female version is available in the option files if you prefer to use the Vanilla body.
18. Containers: non respawnable of course but no auto-storage in here.
19. MusicTron: works just like the musicbox inhouse - and you can replace the 4 tracks by some of your choice if you wish.
20. Sit on Stairs: just like it says - and will trigger the reading animation.
21. Sculptures: if you have Dragonborn installed and downloaded the Dragonborn version of Clearsky (that version has not been released yet), you'll be able to sculpt them yourself. If not, they're just here for you to enjoy.
SPOILERS AND CLUES:
- key to the house: if you really can't find it, go to the stables by the haybales pile, left of the fountain and search the big hay stack at your feet.
- fireplace pit inhouse: after your first fire has burnt 24 hours, let it die. You may want to clear the ashes and find out what's hidden underneath. You'll still be able to build a new fire afterwards anyway or to clear the ashes again any time you'll need to - except when a fire is burning of course.
- fireplace mantle: there's a Dwemer Cube up there. You may want to pick it up, it is the key to open the Dwemer Lab.
- custom books: they contain clues to help you solve some of Clearsky mysteries and puzzles. You don't need to read them through if you don't want to, but you will need to open them at least once, and for some of them which need translation you'll need to keep them in your inventory until you've deciphered them.
- the gear ring in the small shelf chest by the map inhouse can be disenchanted.
- buried coffin: it is locked, if you can't open it, the key to it is the black rusted key in the "Work In Progress" container by the fireplace inside the house.
- Lab's entrance: you need to read "Aergyl's Journal" to unlock the entrance and search for it in the stables. If you still can't find it, check the hay bales pile, a prompt should show up asking you if you want to move them out of your way. When you do, the cave's door will be revealed against the stable wall, left of the fountain. No key needed there.
- Skeleton key: among the artifacts of Clearsky, you can learn how to craft a skeleton key. It will only become craftable if you do not have the Vanilla Skeleton key nor perk in your inventory - i.e. if you have not yet started the related quest or if you have already completed it.
To learn how to craft it, you'll need to find a book titled "Notes About Notes" in the lab, translate it from Dwemeri language at any work table, inhouse or at the writing table in the lab. You'll also need to find 3 more scattered Dwemeri notes in the Lab and translate them too. To translate all this, you'll need to have the Dwemeri Alphabet in your inventory, as well of course as the notes you wish to translate. Once you've translated all 3 notes + the "Notes About Notes" book, get back to the house, set the dinner table for work and click on the prompt "Unpack your findings" to finally translate the Dwemer key sketch from the "Notes About Notes" book and examine it closely. This will teach you how to craft a Dwemer skeleton key.
You will also need to find the 3 broken parts of that key in order to be able to assemble them. One is in the grave's coffin, another is in the fireplace cache and the last one has been delivered to you with the amulet pouch and the note attached to an arrow by Breezehome's door when you first installed Clearsky.
Once you have all the parts and learn how to craft them, you can assemble these parts at the Lab's workbench or at the Stable's bench. To finally make it fully functional, you'll need to power it with a microre at one of these two workbench.
- Open Dwemer Hand in the Lab: this is a place where you can store the skeleton key if you don't want to use it, or if you need to get rid of it while you go do the related TG quest. You can of course retrieve it later, provided that the Vanilla skeleton key is no longer in your possession (and that you no longer have the SkeletonKey Perk).
UNINSTALLING INSTRUCTIONS:
Although there are quite a few scripts in Clearsky, each of them is attached to a unique custom reference, no Vanilla reference or script have been edited, keywords have always been preferred to ObjectReference Properties, and nothing else but these 4 wilderness cells have been edited in Vanilla Skyrim, which means that when you uninstall the mod, all scripts should stop running, leaving no trace at all in your save file.
A few scripts need to reset before you uninstall though: these are the fireplace script and the crop/harvesting ones. So make sure the inhouse fire is dead and that you have no crop growing (no need to actually harvest as long as what you have planted has fully grown and is harvestable). Of course, make sure you have emptied all containers and have not left any follower sleeping under a blanket or soaking in the tub either ;).
To be completely safe, get away from Clearsky, to an interior cell, Breezehome or Jorrvaskr should do fine, sleep for 72 hours (3 full days), save, quit, uninstall and reload your save. If you know how to read your Papyrus log, you can check that all scripts have gone by searching for "HDS" in your log 0.