Uploaded a test file in the File section of this page. If you think this mod is not working, please install the test file.
If Arthurs eyelashes are rainbow colored everything is setup correctly and the mod is working as intended.
If Arthurs eyelashes are normal there is a problem on your end. Please follow the instructions for DLSS Tweaks/DLSS Replacer/Lenny´s Mod Loader and this mod more closely.
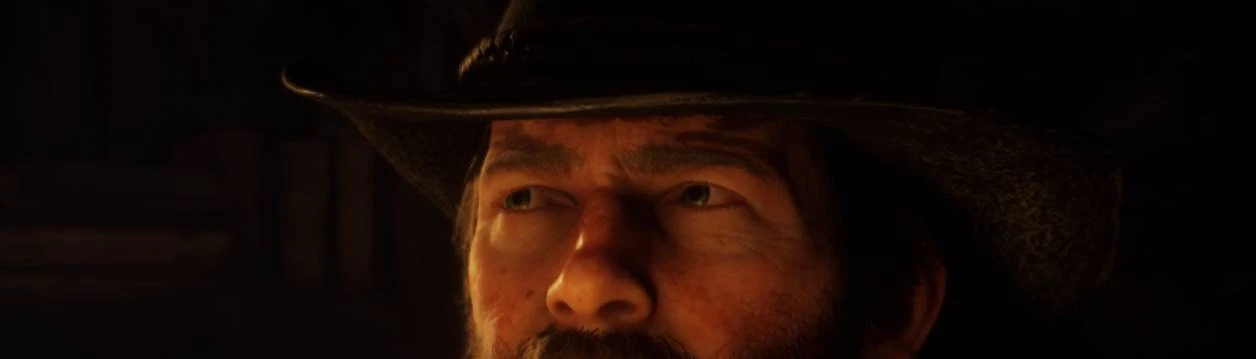
See screenshot in image section for reference how testfile is supposed to look.
Any chance of an update to DLSS 4 and preset K compatibility? the game looks so much better with that preset, but i cannot make the eyelashes look right no matter what i do. the rainbow eyebrows work but they are still thick as hell on the normal file...
All this mod does is remove a single eyelash texture that is used for arthurs eyes. There shouldn´t be any incompatibilities but judging from your screenshots the latest dlss might handle hair differently then previous versions did. In the screenshots beards and hair of characters look way thicker than normal and this mod does not change those. Dlaa might be the cause for it. Try using dlss without dlaa or use an older version of dlss, the performance gain of dlss isn´t that big anyway and its basically a just a better AA method than the game shipped with.
at 1080p just DLSS looks bad, then I put in 1440p via DLDSR but the game crashes, but with TAA it doesn't... I'm kinda confused but since it runs well at 2K with TAA, I'll keep that way, the upscaling offsets the blurriness of TAA, thanks for the reply!
i reinstalled the game and checked it myself with the latest dlss.dll and it looks fine on my end. I forced DLAA via dlss tweaks and enabled the dlss hud with the same to tool to check the preset used. Its DLAA with preset F and no upscaling is applied, 1080p -> 1080p. the screenshots you linked tell me there is something wrong with your setup, arthur and hosea should not have black hair in that scene. Here is how it should look like. Taken with the latest dlss available on techpowerup.com (310.2) with above mentioned settings.
I did this time using the DLSS Tweaks, I repeated your steps and got the same result, maybe is something else I don't know yet, anyway, thank you for the help and the mod! I wish it work for me too.
sorry to hear that its still not properly working for you but i have a question, did you use the override function of dlss tweaks to point it to an updated dlss.dll or did you just force dlaa etc and thats it? if you did the later the game is still using the dlss version it shipped with and that would explain the problems you encounter.
I did a bunch of tests changing one setting at the time, I used both DLSS tweaks with a manual dll replace from TechPowerUp site, I used the original one and the latest an the previous, both in DX12 and Vulkan, I also did via DLSS Override from NVdia App, both in DX12 and Vulkan, steam says I have about 7 hours of gameplay but in reality it was all benchmarks and tests (I'm tired af), I didn't even start to play for real.
man that sucks, i know the frustration of trying to get something to work and hitting a brick wall. Enjoy the game without dlss, it still great looking if a bit blurry with TAA.
I was surprised that even using DLSSTweaks to enable DLAA the eyeliner effect was still there lol. Pretty curious how this even happens specifically with DLSS.
yeah the dlss implementation isn´t very well done in my opinion and is lacking especially compared to a lot of other titles that manage to have a overall good image quality with dlss. Why dlss creates this eyeliner effect i can only speculate but i think it has something to do with the checkerboarding the game has for all hair in combination with dlss upsampling that creates a blurry texture for hair that is especially noticable around the eyes because of the contrast from the tiny dark eyelashes against arthurs lighter skin. Anyway, hope this mod is to your satisfaction. let me know!
i took a quick lok at the mod you mentioned and from what i can tell the should not conflict with each other. But if you want to make sure, use lenny´s mod manager that comes bundled with the mod loader and put this mod lower in the list (lower means higher priority) and set the checkmark for overwrite. That way this mod gets to overwrite the character texture overhaul if both want to change the same texture.
Disregard the load order part. mods in the stream folder do not show up in the mod manager and unfortunately i cant find a definitive answer if stream folder mods overwrite other mods or if other mods overwrite stream folder mods. regardless my mod should not conflict with character texture overhaul.
That mod uses the stream folder too but in a different way, see that mods install.xml: <EasyInstall> <Name>Characters Overhaul</Name> <Author>instanity</Author> <Version>1.4</Version> <Link>https://www.nexusmods.com/reddeadredemption2/mods/4987</Link> <Resources> <Resource> <StreamingFiles>Fellers</StreamingFiles> </Resource> </Resources> </EasyInstall>
no it doesn´t. it requireres you to install the mod in RDR2/LML/Fellers. Mods in their own folder are handled differently by LML than mods that get put into stream but how exactly i do not know because documentation is sparse on that subject. I assume mods in their own folder get installed into memory upon start of the game whereas stream folder lets the game replace an asset when it is needed.
Yeah but that's not actually where it has to go. It would go: RDR2/LML/Character Overhauls/Fellers RDR2/LML/Character Overhauls/install.xml and that is a stream mod since it has this line:<StreamingFiles>Fellers</StreamingFiles>This just tells LML that the stream folder for this mod is this one called Fellers. Stream just replaces every file with the modded one when the game loads, whereas Replace replaces individual files. You don't need to make an install.xml to use the normal stream folder, but this mod is doing essentially the same thing even though it has an install.xml and uses it's own folder. If you wanted to make a replace version folder structure would go like:lml\replace\packs_1\packs\base\models\metaped_textures_player\player_zero_eye_merge.ytdLML thread on RDR2Mods.com there is some explanation:
Spoiler:
Show
Detailed explanation of stream vs replace (older versions) In the lml folder you can find two subfolders, one called "replace" and one called "stream". Both can be used for the same thing but replace is ultimately more powerful, but also more advanced. The stream folder you might recognize from Map Editor or Rampage Trainer and just loads streaming files directly.
Stream As mentioned, similar to other tools available this merely loads streaming files into the game when the game is loading. For instance, model or texture files would go in there and will replace the existing assets in the game. If you do not know the name of an asset, but only its hash, simply name it 0xhash.ext (e.g. 0x9E54B506.ytd for w_melee_machete01+hi.ytd) and it will still be recognized and replace the asset correctly. This is the most convenient way to quickly replace streaming files as you do not have to worry about where in the game files they are located but only their name.
Replace This folder creates a virtual mapping of the entire game file structure and hence allows you to replace any game file, granted you know its full location. This is similar to the paths you can see in OpenIV when navigating RPFs, but not exactly the same. If you want to change the dispatch.meta file for instance, you will need to modify it in update.rpf, as the one in common.rpf is superseded by that. To do that, you would create the following structure: "replace\update\common\data\dispatch.meta". This is exactly the path you would use in OpenIV (without the .rpf ending for update). Now, whenever the game wants to access this file, it will load yours instead. It is that simple!
If you want to replace the font file font_lib_efigs.gfx in scaleform_frontend.rpf for instance, you would create the following structure: "replace\update\x64\patch\data\cdimages\scaleform_frontend\font_lib_efigs.gfx".
Word of caution: File paths do not always match their RPF names unfortunately, hence this is a bit more advanced but also allows greater control. Say you want to replace player_zero_coat_001_open.ydd which is present in both packs_1.rpf (original) and dlc.rpf (from patchpack001, an update to the file). Files DLCs follow a slightly different pathing scheme. The full path to this file would be "replace\dlc_patchPack001\x64\packs\base\models\component_models\player_zero_coat_001_open.ydd". As you can see, it does not match the file path directly, which is also why for many files using the stream folder is just simpler. This is because the game maps some files differently and when you open the dlc.rpf (in patchpack001) and its setup2.xml you will see why: the device name is dlc_patchPack001 which is the "root" of all files inside this archive. Thus the path starts at "dlc_patchPack001" and then follows the RPF structure until you arrive at "replace\dlc_patchPack001\x64\packs\base\models\component_models\player_zero_coat_001_open.ydd". Not that complicated, but certainly not as easy as the streaming folder and something to look out for.
thank you for providing a better description of the stream and replace folders. I actually hadn´t found those when googling for it. But i have to ask, what does this discussion contribute to the initial question if this mod and Character texture overhaul conflict with each other or to the discussion of this mod overall?
If any mod were to conflict that has an install.xml and uses that StreamingFiles implementation, you can just move those files from the mods StreamingFiles folder to the lml/stream folder, delete the mod in questions streaming folder and it'll still work the same. No need to manage conflicts, or wonder which one is taking precedence.
Thanks for this. Also btw, I did the same thing to get the Rifle Holster [w_repeater_strap01.ydr] file using the replace folder in lml. I created the exact path but it did not work. Lastly, I just used the StreamingFiles method in install.xml and made it work.
So I have used the test file and confirmed nothing's wrong on my end (rainbow eyelashes). However, whenever I use the actual file it seems to be doing nothing, unless this is how it's supposed to look.
This looks fine to me. the eyelids are 3d objects that cast shadows on themselves and the eyes so a little bit or darkening is always expected. which dlss version are you using?
EDIT: you could try making a screenshot with the mod and without to see if there is a difference.
You might have installed it the wrong way and/or the DLSS replacer might not work as intended. i recommend DLSS tweaks because you can point that program to a DLSS file that is outside of your RDR2 directory and therefore will not be replaced by the rockstar game launcher and you do not need to start it everytime you want to play RDR2.
You can do this via the DLLPathOverrides option in DLSS Tweaks, just put in the path to your Dlss.dll that you downloaded and hit save in the upper left corner. OR you can just click on "add DLL Override" in the upper middle of DLSS tweaks program and navigate to the DLSS.dll you want to use. Install Lenny´s Mod Loader by opening "lml_rdr_beta_11.zip", going into the "modloader" folder and placing the contents of that folder into your rdr2 root folder (where your rdr2.exe) is. Once that is done, go into the "lml" folder that is now in your rdr2 root folder and create a folder named "stream". place the YTD file from my archive into that folder and it should work IF DLSS is replaced correctly.


37 comments
If Arthurs eyelashes are rainbow colored everything is setup correctly and the mod is working as intended.
If Arthurs eyelashes are normal there is a problem on your end. Please follow the instructions for DLSS Tweaks/DLSS Replacer/Lenny´s Mod Loader and this mod more closely.
See screenshot in image section for reference how testfile is supposed to look.
https://imgur.com/a/lNMxO4F
All images are with DLAA enabled via DLSS override in Nvida app and to be sure I replaced the dll via DLSS Swapper
I'm kinda confused but since it runs well at 2K with TAA, I'll keep that way, the upscaling offsets the blurriness of TAA, thanks for the reply!
Gonna give this a whirl. Thank you!
Anyway, hope this mod is to your satisfaction. let me know!
But if you want to make sure, use lenny´s mod manager that comes bundled with the mod loader and put this mod lower in the list (lower means higher priority) and set the checkmark for overwrite. That way this mod gets to overwrite the character texture overhaul if both want to change the same texture.Disregard the load order part. mods in the stream folder do not show up in the mod manager and unfortunately i cant find a definitive answer if stream folder mods overwrite other mods or if other mods overwrite stream folder mods. regardless my mod should not conflict with character texture overhaul.
<EasyInstall>
<Name>Characters Overhaul</Name>
<Author>instanity</Author>
<Version>1.4</Version>
<Link>https://www.nexusmods.com/reddeadredemption2/mods/4987</Link>
<Resources>
<Resource>
<StreamingFiles>Fellers</StreamingFiles>
</Resource>
</Resources>
</EasyInstall>
RDR2/LML/Character Overhauls/Fellers
RDR2/LML/Character Overhauls/install.xml
and that is a stream mod since it has this line:
<StreamingFiles>Fellers</StreamingFiles>This just tells LML that the stream folder for this mod is this one called Fellers.Stream just replaces every file with the modded one when the game loads, whereas Replace replaces individual files. You don't need to make an install.xml to use the normal stream folder, but this mod is doing essentially the same thing even though it has an install.xml and uses it's own folder. If you wanted to make a replace version folder structure would go like:
lml\replace\packs_1\packs\base\models\metaped_textures_player\player_zero_eye_merge.ytdLML thread on RDR2Mods.com there is some explanation:Detailed explanation of stream vs replace (older versions)
In the lml folder you can find two subfolders, one called "replace" and one called "stream". Both can be used for the same thing but replace is ultimately more powerful, but also more advanced. The stream folder you might recognize from Map Editor or Rampage Trainer and just loads streaming files directly.
Stream
As mentioned, similar to other tools available this merely loads streaming files into the game when the game is loading. For instance, model or texture files would go in there and will replace the existing assets in the game. If you do not know the name of an asset, but only its hash, simply name it 0xhash.ext (e.g. 0x9E54B506.ytd for w_melee_machete01+hi.ytd) and it will still be recognized and replace the asset correctly.
This is the most convenient way to quickly replace streaming files as you do not have to worry about where in the game files they are located but only their name.
Replace
This folder creates a virtual mapping of the entire game file structure and hence allows you to replace any game file, granted you know its full location. This is similar to the paths you can see in OpenIV when navigating RPFs, but not exactly the same. If you want to change the dispatch.meta file for instance, you will need to modify it in update.rpf, as the one in common.rpf is superseded by that. To do that, you would create the following structure: "replace\update\common\data\dispatch.meta". This is exactly the path you would use in OpenIV (without the .rpf ending for update). Now, whenever the game wants to access this file, it will load yours instead. It is that simple!
If you want to replace the font file font_lib_efigs.gfx in scaleform_frontend.rpf for instance, you would create the following structure: "replace\update\x64\patch\data\cdimages\scaleform_frontend\font_lib_efigs.gfx".
Word of caution: File paths do not always match their RPF names unfortunately, hence this is a bit more advanced but also allows greater control. Say you want to replace player_zero_coat_001_open.ydd which is present in both packs_1.rpf (original) and dlc.rpf (from patchpack001, an update to the file). Files DLCs follow a slightly different pathing scheme. The full path to this file would be "replace\dlc_patchPack001\x64\packs\base\models\component_models\player_zero_coat_001_open.ydd". As you can see, it does not match the file path directly, which is also why for many files using the stream folder is just simpler. This is because the game maps some files differently and when you open the dlc.rpf (in patchpack001) and its setup2.xml you will see why: the device name is dlc_patchPack001 which is the "root" of all files inside this archive. Thus the path starts at "dlc_patchPack001" and then follows the RPF structure until you arrive at "replace\dlc_patchPack001\x64\packs\base\models\component_models\player_zero_coat_001_open.ydd". Not that complicated, but certainly not as easy as the streaming folder and something to look out for.
But i have to ask, what does this discussion contribute to the initial question if this mod and Character texture overhaul conflict with each other or to the discussion of this mod overall?
Also btw, I did the same thing to get the Rifle Holster [w_repeater_strap01.ydr] file using the replace folder in lml. I created the exact path but it did not work. Lastly, I just used the StreamingFiles method in install.xml and made it work.
EDIT: you could try making a screenshot with the mod and without to see if there is a difference.
You can do this via the DLLPathOverrides option in DLSS Tweaks, just put in the path to your Dlss.dll that you downloaded and hit save in the upper left corner. OR you can just click on "add DLL Override" in the upper middle of DLSS tweaks program and navigate to the DLSS.dll you want to use.
Install Lenny´s Mod Loader by opening "lml_rdr_beta_11.zip", going into the "modloader" folder and placing the contents of that folder into your rdr2 root folder (where your rdr2.exe) is.
Once that is done, go into the "lml" folder that is now in your rdr2 root folder and create a folder named "stream". place the YTD file from my archive into that folder and it should work IF DLSS is replaced correctly.