


0 of 0

About this mod
Mod Organizer 2 (v2.4.4 and v2.5.0) plugin that enables support for Red Dead Redemption 2, with profile-specific save games enabled.
- Requirements
- Permissions and credits
- Changelogs
20/11/2023 : Updated Mod Description. A Must Read!
- Added important information to manage LML mods load order and overwrites.
- Removed the "version.dll" ASI loader reference from the description, and replaced it with story missions safe solution.
- Changed the ScripthookRDR2 links to the website of Alexander Blade, story missions safe ASI loader "dinput8.dll" included because removal of the "version.dll" ASI loader in the description. Optional Native Trainer "NativeTrainer.asi" also included.
I know there is another MO2 plugin on the nexus that works for mod management only, but I'm so used to being able to have profile-specific save games.. I decided to write one myself.
Supports the mod loaders and ScriptHook below, by dropping into your game directory as before OR keep it tidy by using Root Builder. The Root Builder plugin enables you to run mod loaders and script extenders through Mod Organizer 2 like any other mod. Without Root Builder the Mod Organizer virtual file system has poor support for EXE and DLL files, these files have to be loaded early because many if not all the mods depend on them. Thats why we used to just drop them in the actual game forlder, but Root Builder fixes that. The author Kezyma created the Root Builder plugin for Skyrim but it works for other games too, sometimes with a little tweak. Kezyma also created a very nice tutorial on how to use Root Builder that I highly recommend you check out. In case of RDR2 it needed a small tweak, but works like a charm. I will put the tweak in this description.
ScriptHookRDR2 with ASI Loader and Native Trainer included
The ASI loader "dinput8.dll" doesn't unlock online resources, if you want to unlock online resources I recommend you check out the Online Content Unlocker mod together with the Red Dead Offline mod. Do not use the "version.dll" ASI loader if you don't want some story missions to bug. If you don't like cheats or trainers, do not install the "NativeTrainer.asi"
Lenny's Mod Loader and Manager
The ModLoader is installed in MO2 like any other mod. The ModManager will be added as an executable in MO2 to handle the load order and overwrites of LML mods. Since all LML mods are installed in their own subfolder inside the LML folder, the native load order and overwrite handling of MO2 doesn't work for LML mods. Will look into possibility of finding a solution for handling this natively in MO2, but not making any promisses. (Install and Usage Guide at the bottom of this description)
ASI mods go in the base folder ..\mo2\mods\modname\
LML mods should be inside an lml folder ..\mo2\mods\modname\lml\
LML mods should be inside an lml folder ..\mo2\mods\modname\lml\
REMEMBER TO BACKUP YOUR PROFILE FOLDER!
I recommend turning off Rockstar cloud saves unless you feel like testing how dependable their cloud service is with different profiles. I personally use Onedrive to backup my settings and save files, that way I can actually browse and easily manage the saves of all my different profiles. To turn off cloud saves, just delete "cloudsavedata.dat" from your profile folder :%USERPROFILE%\Documents\Rockstar Games\Red Dead Redemption 2\Profiles\<user-id>
Start up the game without Mod Organizer 2, there will be a dialog in Rockstar Games Launcher asking if you want to enable cloud saves. Press not right now to disable cloud saves and the game will generate a new "cloudsavedata.dat".
Spoiler: 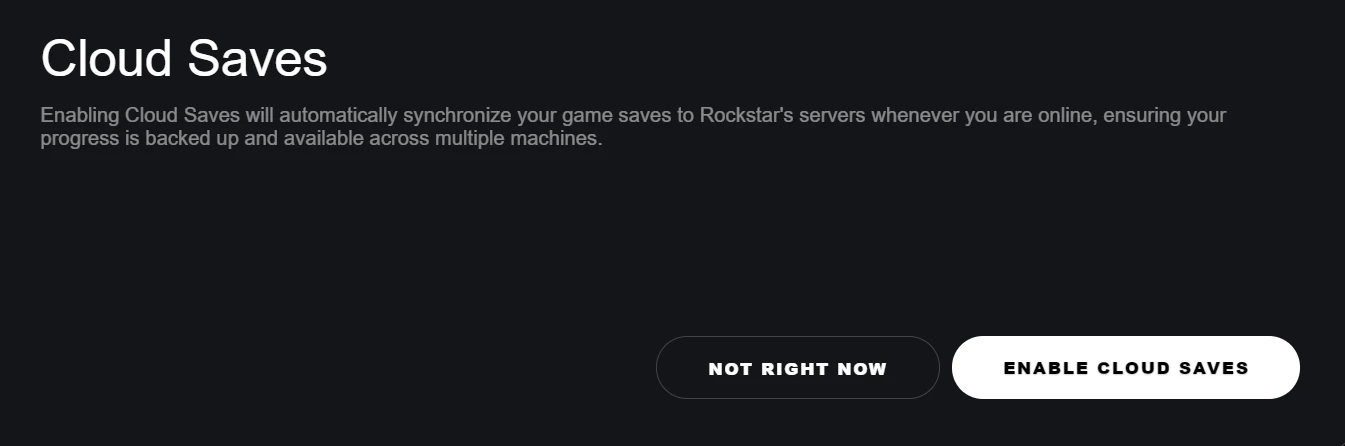
Show
Close the game and Mod Organizer 2 if it was running, download the plugin from the Files section. Extract it with 7zip or Winrar and go down the folder structure and open "game_reddeadredemption2.py" with notepad++ or another good text editor. Please do yourself a favor and don't use windows notepad.
..\plugins\basic_games\games\game_reddeadredemption2.py
Go to line 54 for the Mod Organizer 2 version 2.4.4, line 38 for Mod Organizer 2 version 2.5.0 and look for <user-id>, delete <user-id> and replace it with your user id, you can find your user id by going to
C:\Users\<USERNAME>\Documents\Rockstar Games\Red Dead Redemption 2\Profiles
Inside the profiles folder is a folder, copy the name of that folder in place of the <user-id> you deleted. Close and save "game_reddeadredemption2.py"
Spoiler:

Show
Back out of the folder structure untill you see the plugins folder, copy the plugins folder and paste it in your MO2 directory. If you have downloaded the other RDR2 plugin from the nexus in the past it will ask to overwrite, choose yes.
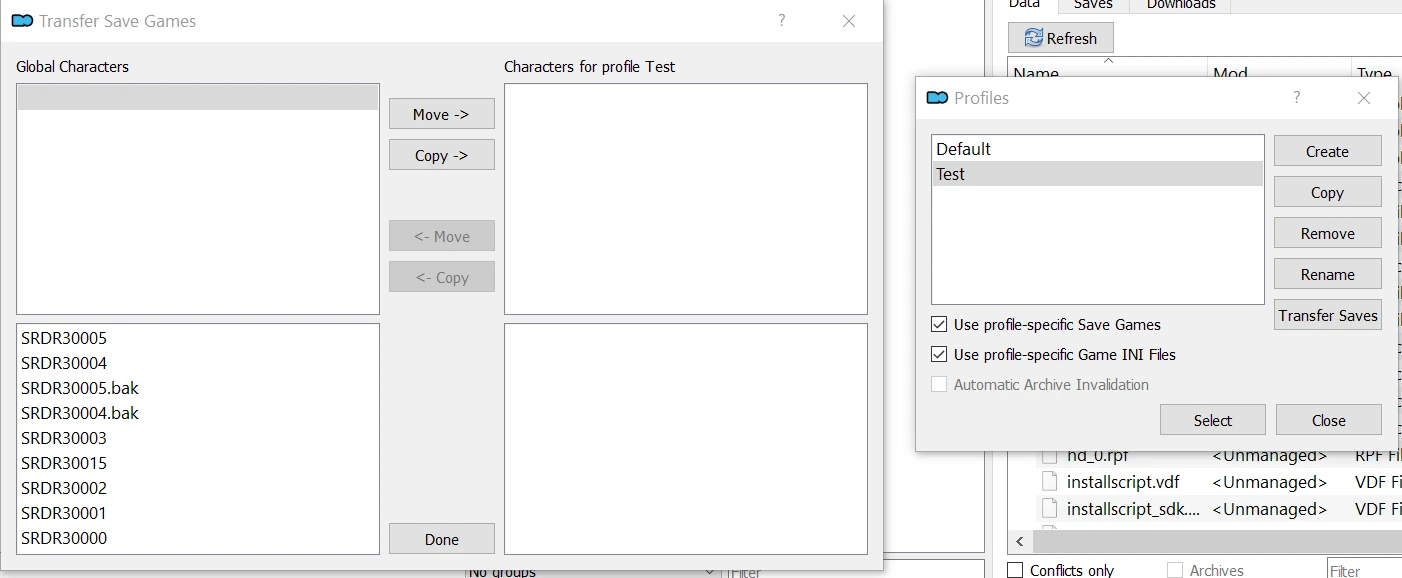
Open Mod Organizer 2 and go to manage instances and create a new instance. Once the instance is created, click on the "Configure Profiles" button. Click the "Create" button, enter a name for your profile and its not needed to tick the Default Game INI box. Once the Profile is created or if you have an existing profile you want to start using with profile-specific save games. Click the name of the profile in the list and make sure both "Use profile-specific Save Games" and "Use profile-specific Game INI Files" are checked and press the "Transfer Saves" button.
Spoiler:
Show
On the bottom left you can see the save games currently in the global save folder:
%USERPROFILE%\Documents\Rockstar Games\Red Dead Redemption 2\Profiles\<user-id>
You have 3 options, either you don't transfer any save files and start a new game. Option number 2 is you copy your global saves to this new profile, and option number 3 is moving the save files to the new profile folder located at:
%BASE_DIR%/profiles/profile_name/saves
The "BASE_DIR" default location for the Red Dead Redemption 2 instance in MO2 is:
C:/Users/<USERNAME>/AppData/Local/ModOrganizer/Red Dead Redemption 2
Unless you changed it to another folder during creation.The third option I think is the best together with turning off cloud saves before installing the plugin, if cloud saves are not disabled it will download the files again when you start up the game, after you moved them to the MO2 profile folder. Not the end of the world because you will always use your profile specific save games when the option is checked, but I prefer to not have save files in there. Only the files mentioned below are in my global save folder.
You can now change to the newly created profile, the other files that are in the folder with the saves, if they are not present in the profile folder Mod Organizer 2 will copy them from the global save directory into the profile folder. These files are:
cfg.dat, cloudsavedata.dat, KeyMappings, Player, ProfileSettingsRoot Builder Tweak and Examples
Please read the Root Builder Tutorial for help and guidance on how to install and use Root Builder, since I won't be rehashing things that are explained there. If you have questions, feel free to ask though.
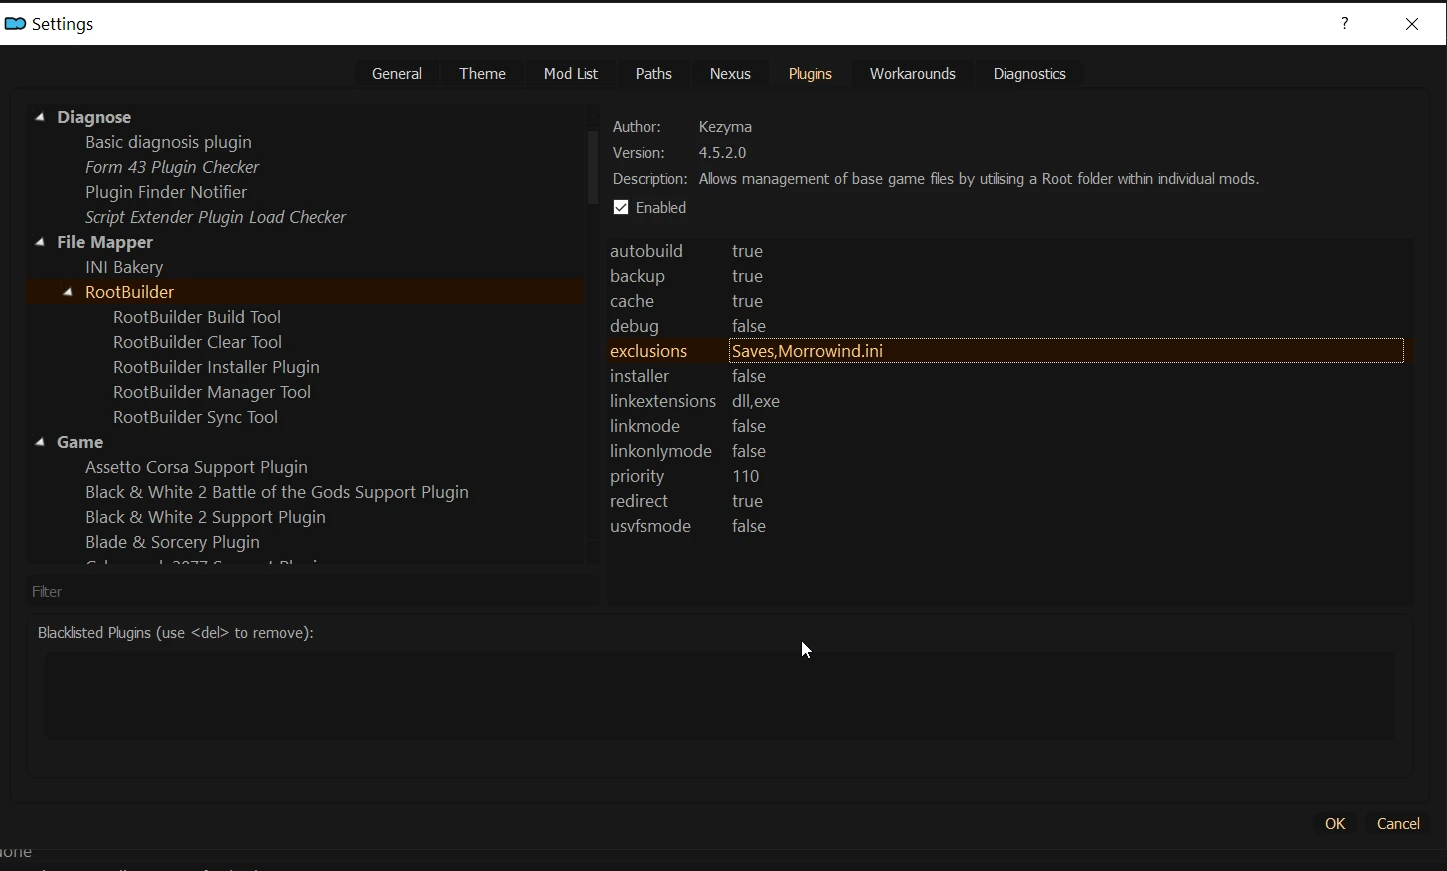
First off the tweak, open Mod Organizer and go to "configuring settings and workarounds". Go to the Plugins tab and look for RootBuilder in the list on the left hand side, then look for the exclusions line highlighted on the right hand side. There should be 2 exclusions there already "Saves" and "Morrowind.ini" seperated by a comma, we're gonna add a few more because when launching RDR2 Root Builder tries to backup the whole game folder before launching the game. Makes it look like MO2 hangs, but when reading the logfile you see it is backing up the whole game folder.
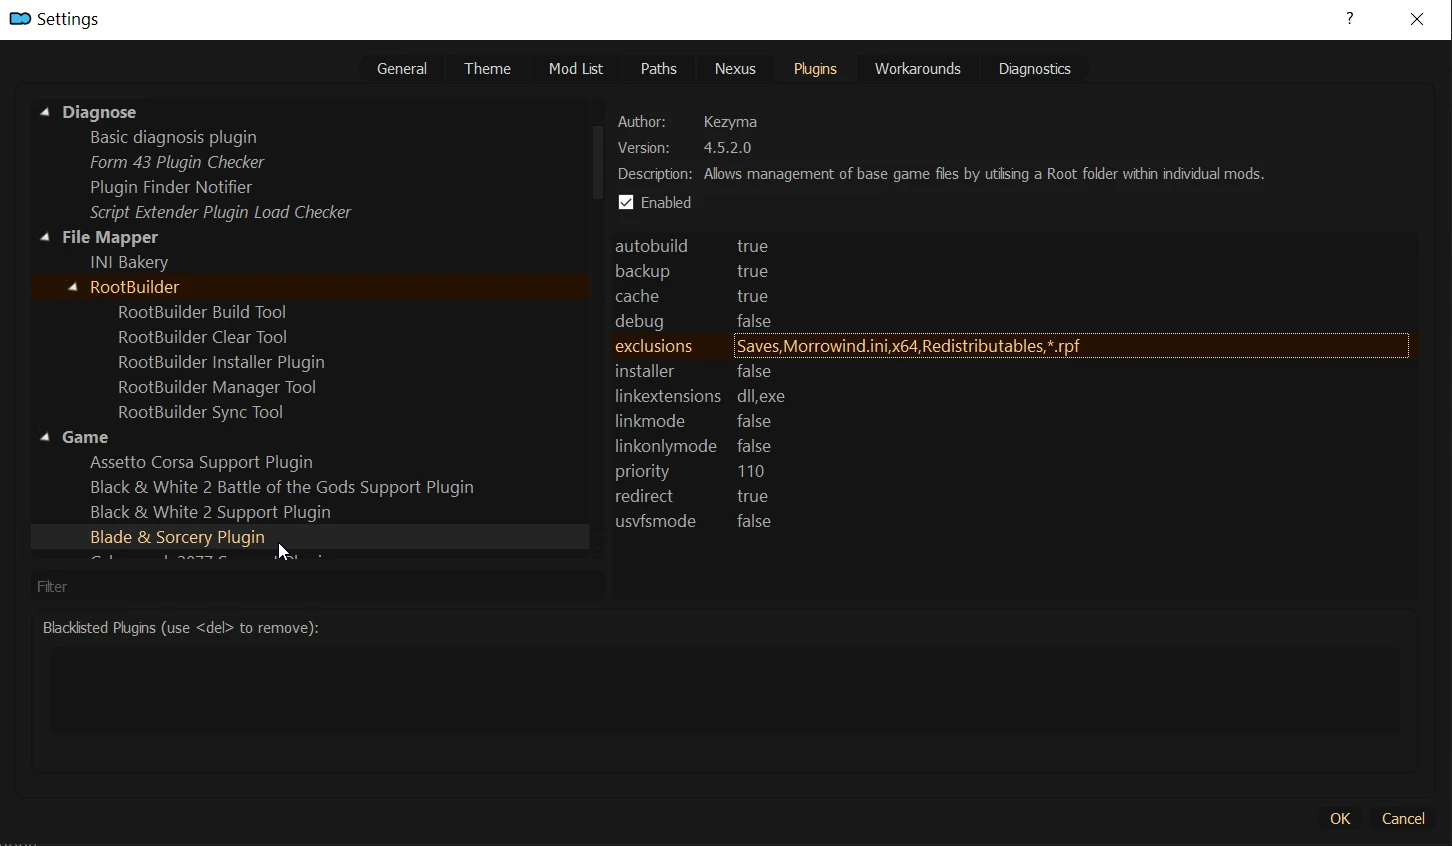
We exclude the x64 folder, the Redistributables folder and any file with the rpf extension. The exclusions line should look like this:
First off the tweak, open Mod Organizer and go to "configuring settings and workarounds". Go to the Plugins tab and look for RootBuilder in the list on the left hand side, then look for the exclusions line highlighted on the right hand side. There should be 2 exclusions there already "Saves" and "Morrowind.ini" seperated by a comma, we're gonna add a few more because when launching RDR2 Root Builder tries to backup the whole game folder before launching the game. Makes it look like MO2 hangs, but when reading the logfile you see it is backing up the whole game folder.
Spoiler:
Show
We exclude the x64 folder, the Redistributables folder and any file with the rpf extension. The exclusions line should look like this:
Saves,Morrowind.ini,x64,Redistributables,*.rpf
Spoiler:
Show
I will install the mod loaders and ScriptHook mentioned on top of this description with Root Builder, hopefully with Kezyma's tutorial and a few examples from me it will make understanding how to use Root Builder a bit easier.
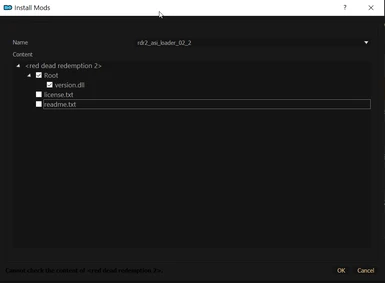
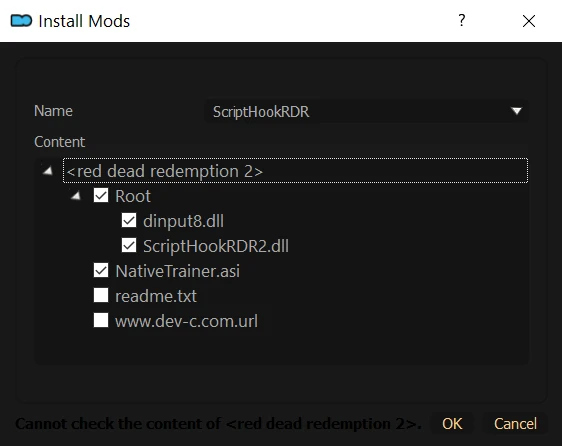
Download ScriptHookRDR2 with ASI Loader and Native Trainer included and drag the archive to the MO2 downloads tab, doubleclick it in the downloads tab.
Spoiler:

Show
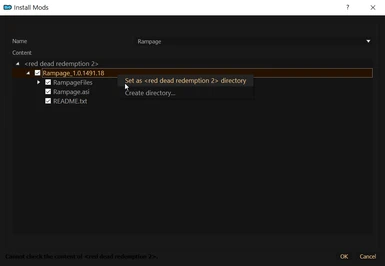
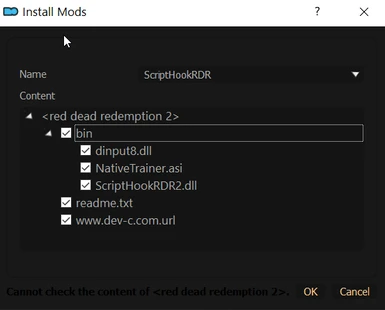
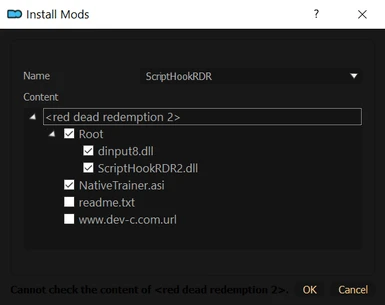
All the files we need are inside a "bin" folder, we're gonna move them to the right folders. Rightclick <red dead redemption 2> and select create directory, name it Root and drag and drop "ScriptHookRDR2.dll" and "dinput8.dll" in the Root folder. If you want to install the Native Trainer, drag and drop "NativeTrainer.asi" to <red dead redemption 2> on top to put it in the base folder. If you don't want the Native Trainer, just uncheck it together with "readme.txt" and "www.dev-c.com.url". press OK to install.
Spoiler:
Show
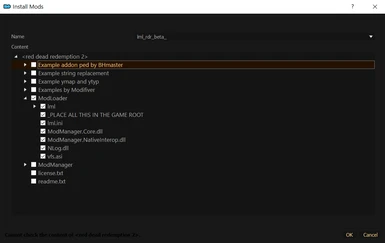
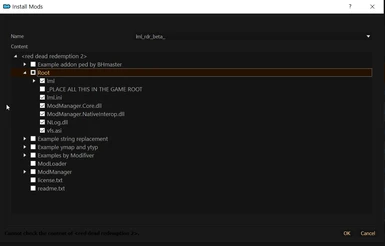
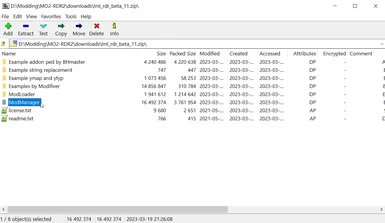
Download Lenny's Mod Loader and Manager and drag the archive to the MO2 downloads tab, doubleclick it in the downloads tab:
Spoiler:
Show
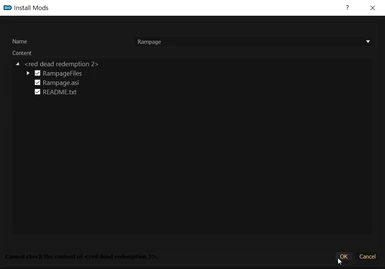
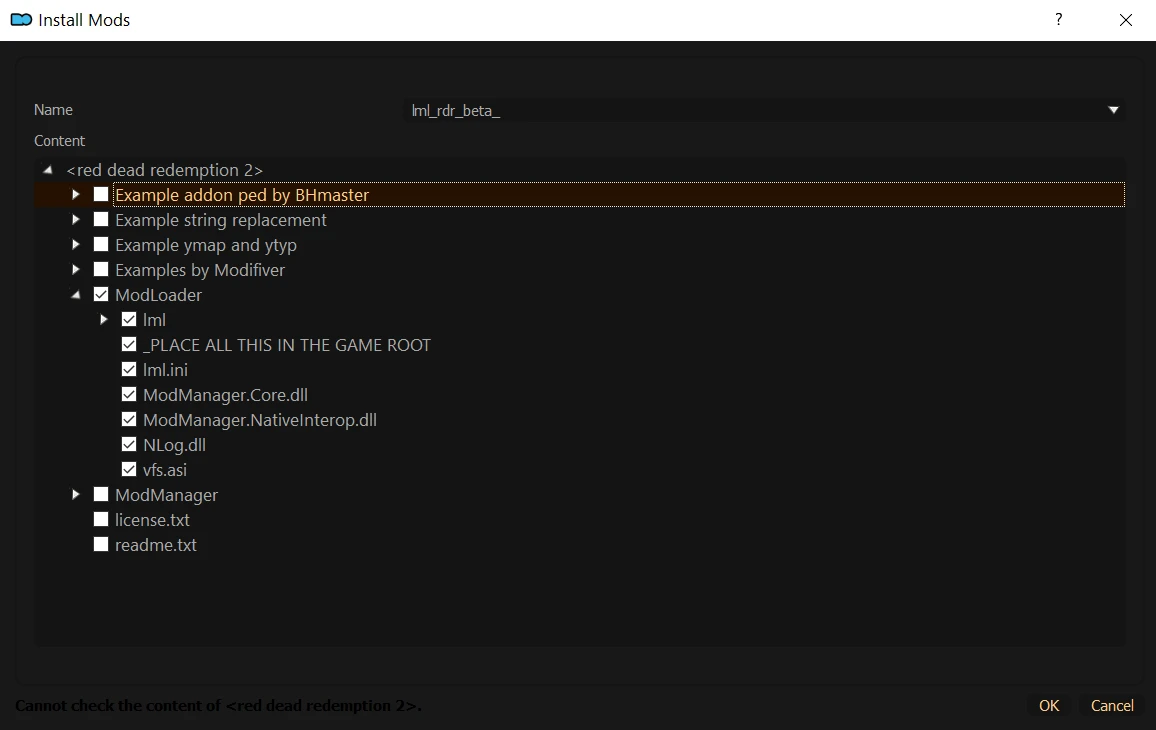
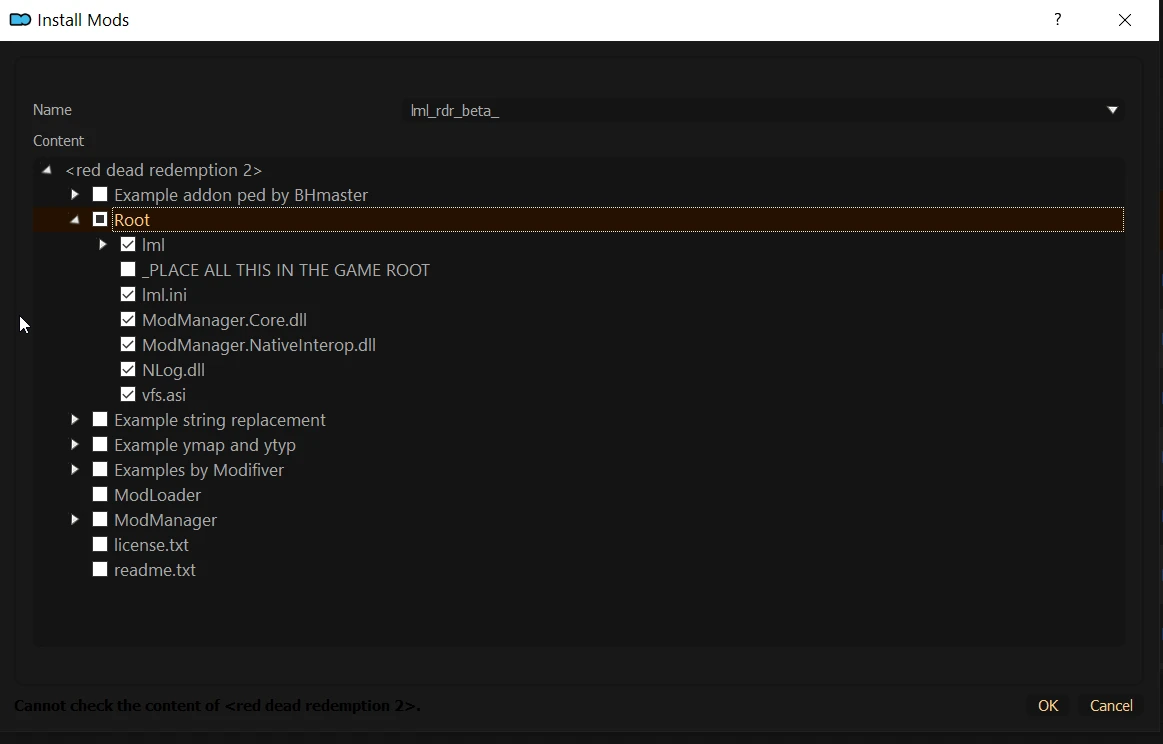
We only need to install the ModLoader in MO2, so its safe to uncheck all other files. When expanding the ModLoader folder it is obvious all the contents of that folder have to go in the main directory of the game, also called "Root". On top of the above pic, rightclick on <red dead redemption 2> and select create directory.. name it Root and drag and drop all the contents from the folder ModLoader into the Root directory. Now uncheck the Modloader folder, expand the Root folder and uncheck _PLACE ALL THIS IN THE GAME ROOT. In the end it should look like this: Hit OK to install.
Spoiler:
Show
Any files that have to be in the main game directory (root) and have to be loaded early, in most cases these will be EXE or DLL files from script extenders or mod loaders. Install them with MO2 and the Root Builder plugin like any other mod, just put those files in a folder called Root when installing with MO2. This way your actual game directory stays pristine in case you want to play online on occasion.
Lenny's Mod Manager Install and Usage Guide
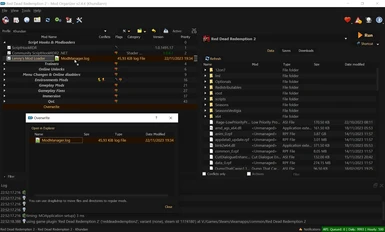
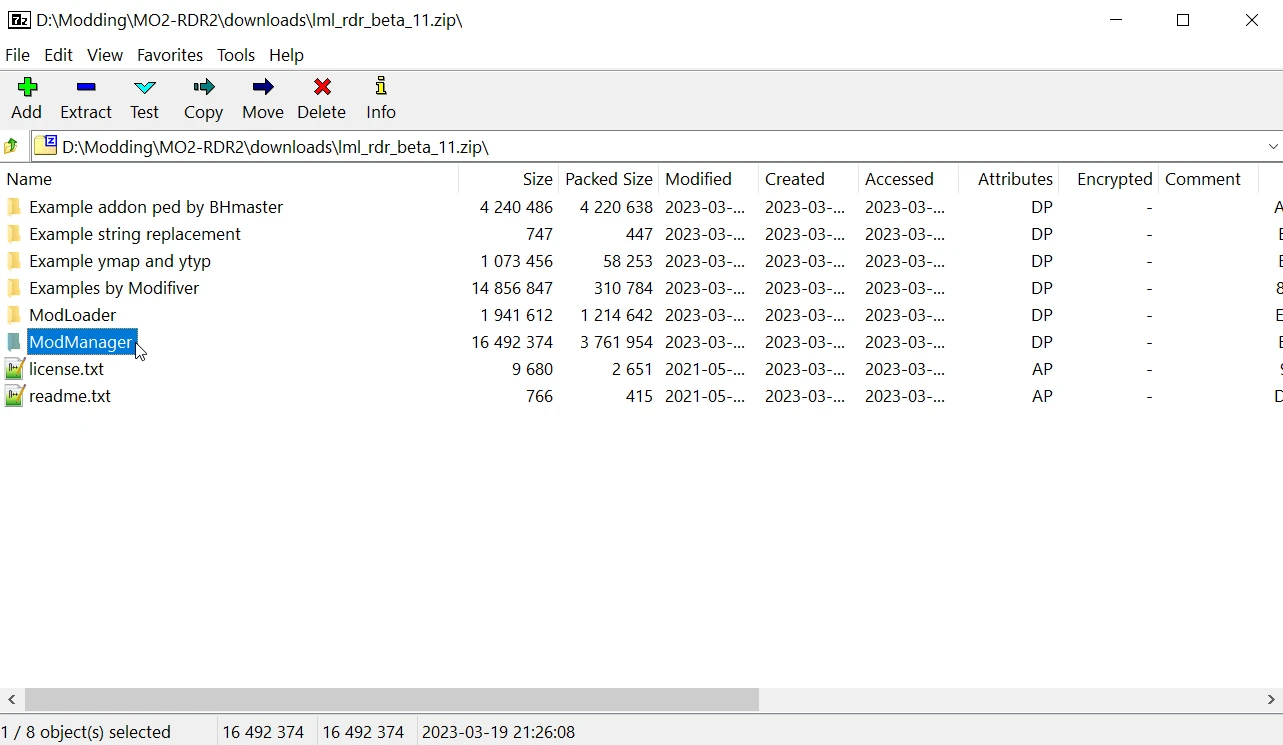
Open MO2 and go to the downloads tab, rightclick the Lenny's Mod Loader and Manager zip file and select "Open file". Select the "ModManager" folder and extract it anywhere but NOT in your actual game folder.
Spoiler:
Show
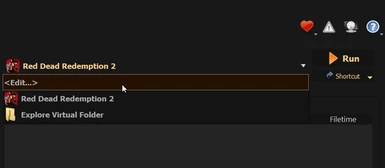
Open MO2 and look at the top right, select edit to manage the executables you want to run through MO2.
Spoiler:

Show
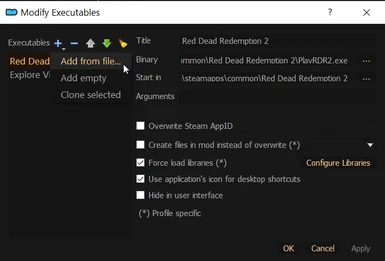
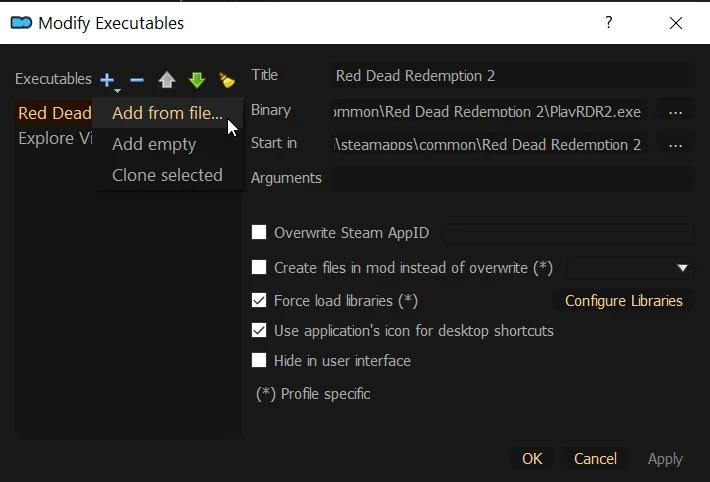
Click the plus icon and select Add from file, browse to the folder where you extracted the ModManager folder and select the "ModManager.UI.exe" file.
Spoiler:
Show
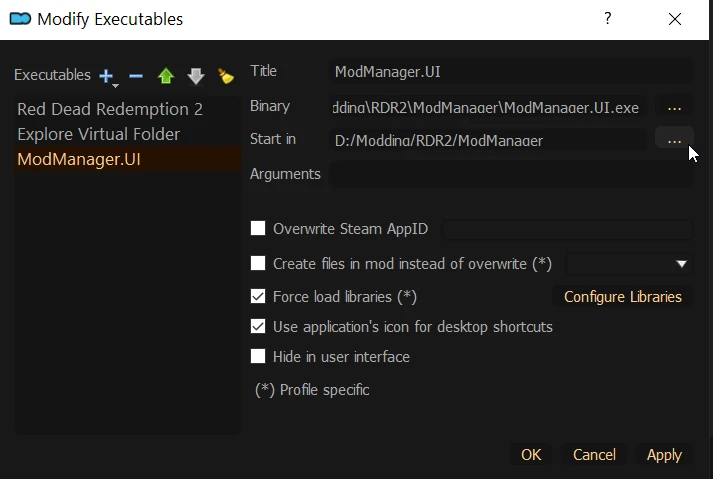
Make sure that on the left side ModManager.UI is selected, then hit the browse button next to the "Start in" line and browse to the folder where ModManager.UI.exe is located. Tick the boxes "Force Load Libraries" and "Use Applications icon for desktop shortcuts" and click apply and OK.
Spoiler:
Show
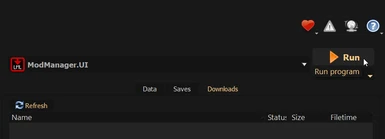
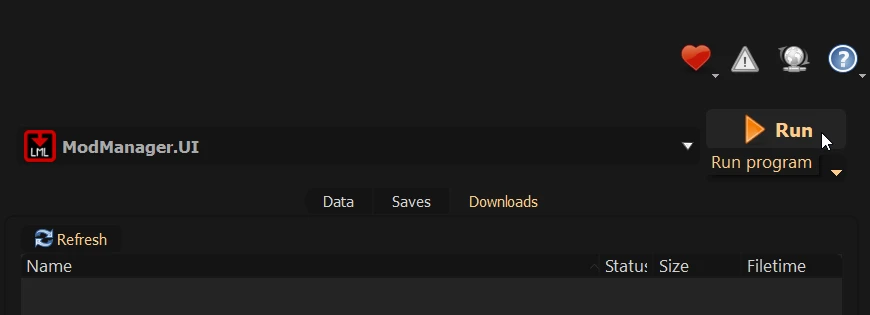
Run Lenny's Mod Manager by selecting it from the executables list in the top right of the MO2 window, and pressing the "Run" Button.
Spoiler:
Show
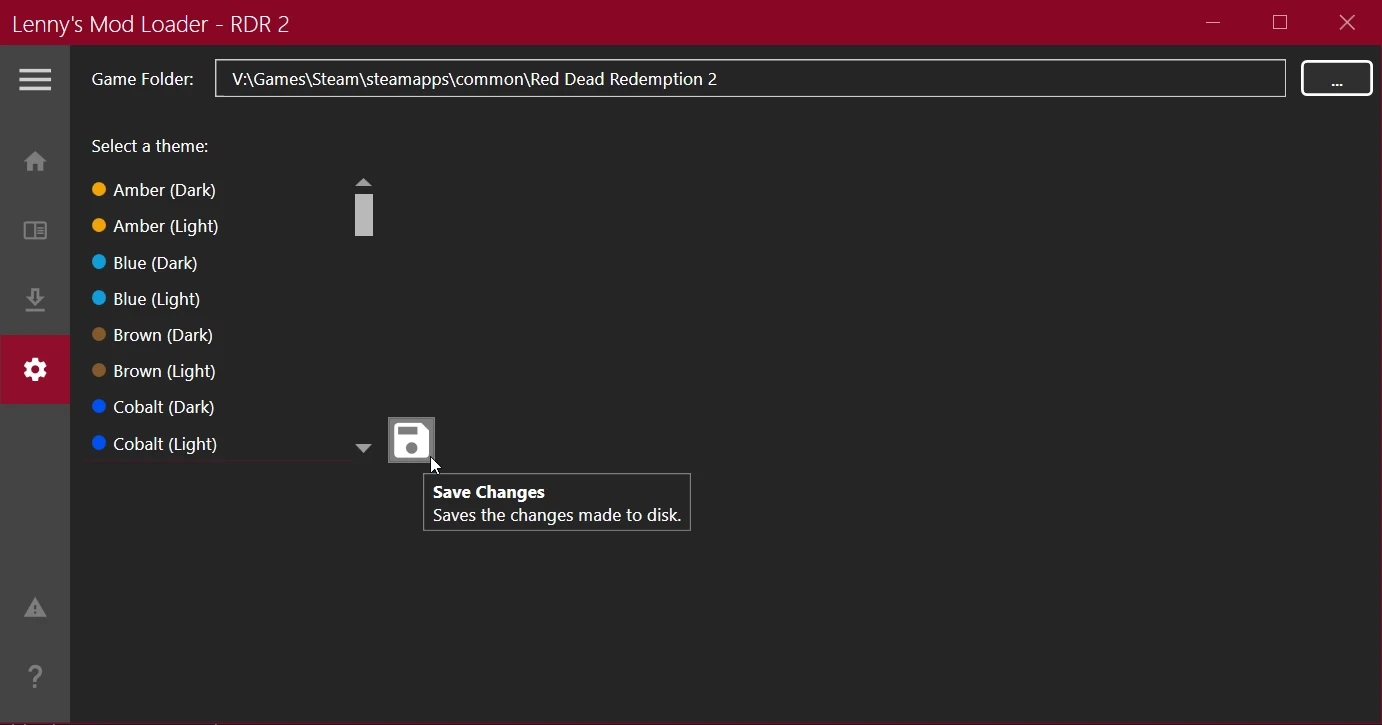
When you run the ModManager for the first time it will open the settings window. Add the actual path to your game folder and press the save button.
Spoiler:
Show
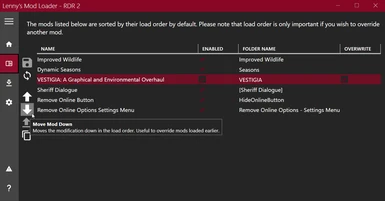
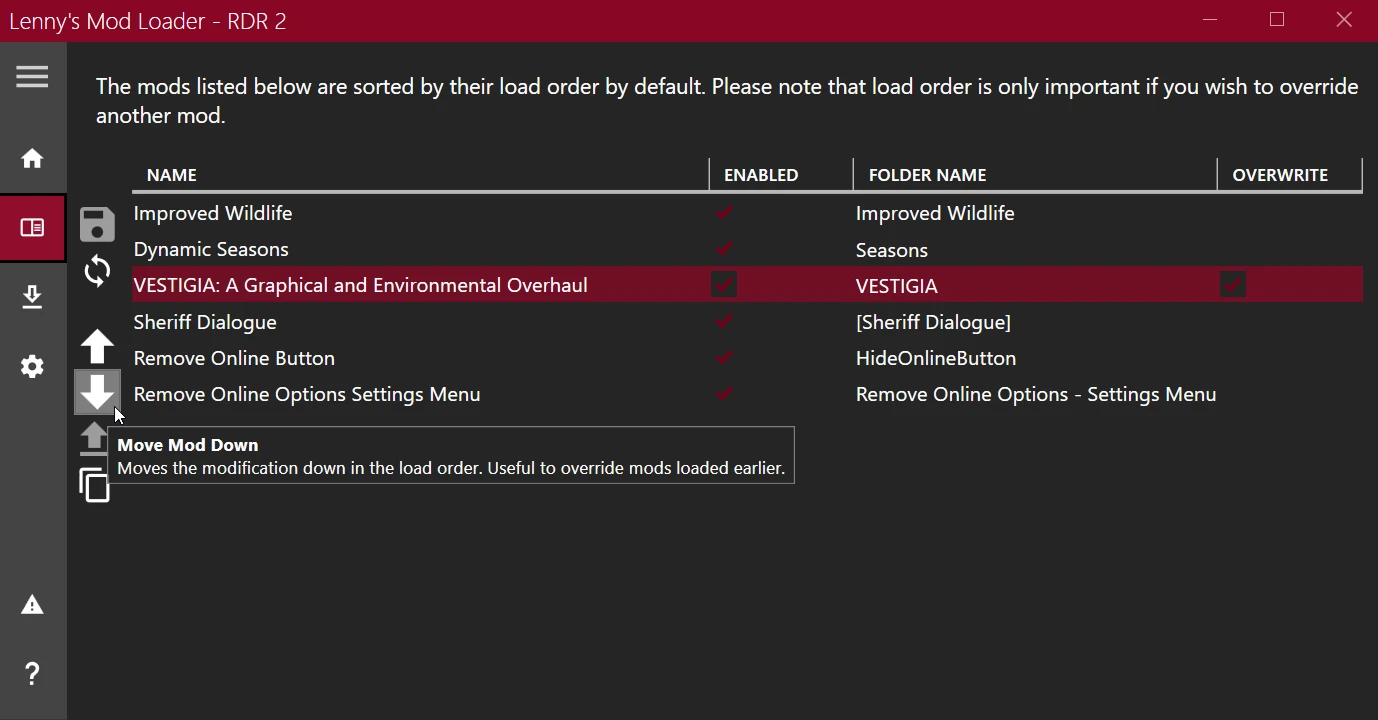
Now click the button under the home button to view your LML mods list. The load order system works the same as in MO2, lower placed mods overwrite higher placed mods. You can change the load order with the arrows on the side, don't forget to save your changes! The load order file is located here ..\MO2\mods\Lenny's Mod Loader\lml\mods.xml. (Will look into possibility of finding a solution for handling this natively in MO2, but not making any promisses)
Spoiler:
Show
The only reason to tick the "overwrite" box on the right is to hide the warnings in "ModManager.log" about overwrites, if you tick the box the lines below will not be shown in the log file. When installing new LML mods, its not a bad idea to check this file to see if there are any files that are being overwritten. The Winning mod is mentioned in the "TRACE" line, in the case below it is "VESTIGA" mod overwriting "Improved Wildlife" mod files. This file is located "..\MO2\mods\Lenny's Mod Loader\ModManager.log" , if it is not there.. its probably in your "overwrite" folder at the bottom of the mod list window in MO2. If it is in your overwrite folder, you can doubleclick the "overwrite" folder and drag the ModManager.log file and drop it into the Lenny's Mod Loader entry in your modlist window in MO2.
Spoiler:

Show
Spoiler:
2023-11-20 07:08:12.0902|WARN|?|common:/data/ai/animalunalertedbehaviours.meta already in list from animalunalertedbehaviours.meta (new path: global/animalunalertedbehaviours.meta)
2023-11-20 07:08:12.0902|TRACE|?|Overwriting common:/data/ai/animalunalertedbehaviours.meta from VESTIGIA: A Graphical and Environmental Overhaul
2023-11-20 07:08:12.0902|WARN|?|common:/data/tune/popzonespawnermanager.meta already in list from popzonespawnermanager.meta (new path: global/popzonespawnermanager.meta)
2023-11-20 07:08:12.0902|TRACE|?|Overwriting common:/data/tune/popzonespawnermanager.meta from VESTIGIA: A Graphical and Environmental Overhaul
2023-11-20 07:08:12.0902|WARN|?|common:/data/tune/ambientbirdspawntunables.meta already in list from ambientbirdspawntunables.meta (new path: global/ambientbirdspawntunables.meta)
2023-11-20 07:08:12.0902|TRACE|?|Overwriting common:/data/tune/ambientbirdspawntunables.meta from VESTIGIA: A Graphical and Environmental Overhaul
2023-11-20 07:08:12.0902|WARN|?|common:/data/tune/flockspawnmanagertunables.meta already in list from flockspawnmanagertunables.meta (new path: global/flockspawnmanagertunables.meta)
2023-11-20 07:08:12.0902|TRACE|?|Overwriting common:/data/tune/flockspawnmanagertunables.meta from VESTIGIA: A Graphical and Environmental Overhaul
2023-11-20 07:08:12.0902|WARN|?|common:/data/tune/scavengerdispatchmanagertunables.meta already in list from scavengerdispatchmanagertunables.meta (new path: global/scavengerdispatchmanagertunables.meta)
2023-11-20 07:08:12.0902|TRACE|?|Overwriting common:/data/tune/scavengerdispatchmanagertunables.meta from VESTIGIA: A Graphical and Environmental Overhaul
2023-11-20 07:08:12.0902|WARN|?|update:/common/data/tune/animaltasks.meta already in list from animaltasks.meta (new path: global/animaltasks.meta)
2023-11-20 07:08:12.0902|TRACE|?|Overwriting update:/common/data/tune/animaltasks.meta from VESTIGIA: A Graphical and Environmental Overhaul
Show
2023-11-20 07:08:12.0902|WARN|?|common:/data/ai/animalunalertedbehaviours.meta already in list from animalunalertedbehaviours.meta (new path: global/animalunalertedbehaviours.meta)
2023-11-20 07:08:12.0902|TRACE|?|Overwriting common:/data/ai/animalunalertedbehaviours.meta from VESTIGIA: A Graphical and Environmental Overhaul
2023-11-20 07:08:12.0902|WARN|?|common:/data/tune/popzonespawnermanager.meta already in list from popzonespawnermanager.meta (new path: global/popzonespawnermanager.meta)
2023-11-20 07:08:12.0902|TRACE|?|Overwriting common:/data/tune/popzonespawnermanager.meta from VESTIGIA: A Graphical and Environmental Overhaul
2023-11-20 07:08:12.0902|WARN|?|common:/data/tune/ambientbirdspawntunables.meta already in list from ambientbirdspawntunables.meta (new path: global/ambientbirdspawntunables.meta)
2023-11-20 07:08:12.0902|TRACE|?|Overwriting common:/data/tune/ambientbirdspawntunables.meta from VESTIGIA: A Graphical and Environmental Overhaul
2023-11-20 07:08:12.0902|WARN|?|common:/data/tune/flockspawnmanagertunables.meta already in list from flockspawnmanagertunables.meta (new path: global/flockspawnmanagertunables.meta)
2023-11-20 07:08:12.0902|TRACE|?|Overwriting common:/data/tune/flockspawnmanagertunables.meta from VESTIGIA: A Graphical and Environmental Overhaul
2023-11-20 07:08:12.0902|WARN|?|common:/data/tune/scavengerdispatchmanagertunables.meta already in list from scavengerdispatchmanagertunables.meta (new path: global/scavengerdispatchmanagertunables.meta)
2023-11-20 07:08:12.0902|TRACE|?|Overwriting common:/data/tune/scavengerdispatchmanagertunables.meta from VESTIGIA: A Graphical and Environmental Overhaul
2023-11-20 07:08:12.0902|WARN|?|update:/common/data/tune/animaltasks.meta already in list from animaltasks.meta (new path: global/animaltasks.meta)
2023-11-20 07:08:12.0902|TRACE|?|Overwriting update:/common/data/tune/animaltasks.meta from VESTIGIA: A Graphical and Environmental Overhaul
If you have any questions, feel free to start a topic in discussions or create a bug report when needed... Have fun!