


0 of 0


About this mod
A comprehensive shader stack to enhance Fallout New Vegas vanilla as much as possible without a major graphics overhaul. Ambient occlusion, screenspace ray tracing, indirect lighting, light scattering, remastered color and value curvature, and much more deployed for an immersive experience true to the original artstyle. No ENB required.
- Permissions and credits
- Changelogs
Important note: Specifically for Reshade 4.9.1 and must have depth buffer access. Details on how and why in the Installation section.
This ReShade preset is aimed to modernize and remaster Fallout New Vegas as much as possible without use of a total overhaul or more extensive mod than ReShade itself (such as ENB or NVReloaded), while retaining the original artstyle.
Meant for immersion rather than screenshots, it enhances all scenes equally without detrimenting any parts of the game from loss of detail to overdarkened shadows, or overexposure/oversaturation, HDR intoxication or bloom fog, et cetera. Despite improving contrast, and adding dark shadows and some bright lighting, the final result has no increased blackclipping than the untouched game, and less white-clipping/oversaturation. It is the antithesis of the "Instagram filter on steroids" ReShade look.
This is a higher-end preset in lieu of a no-compromise approach to image quality without much optimization. At 1920x1080 it hovers around 70 FPS on my humble GTX 960 and i7-7700 @ 3.6GHz, transiently dipping below 60fps on occasion, after all the typical stutter removers and bug fix mods are installed. For better performance options, see the Performance Tweaks section below.
This wall of text is largely supplemental. If you know what you're doing and have depth buffer access, you can just install it and go.
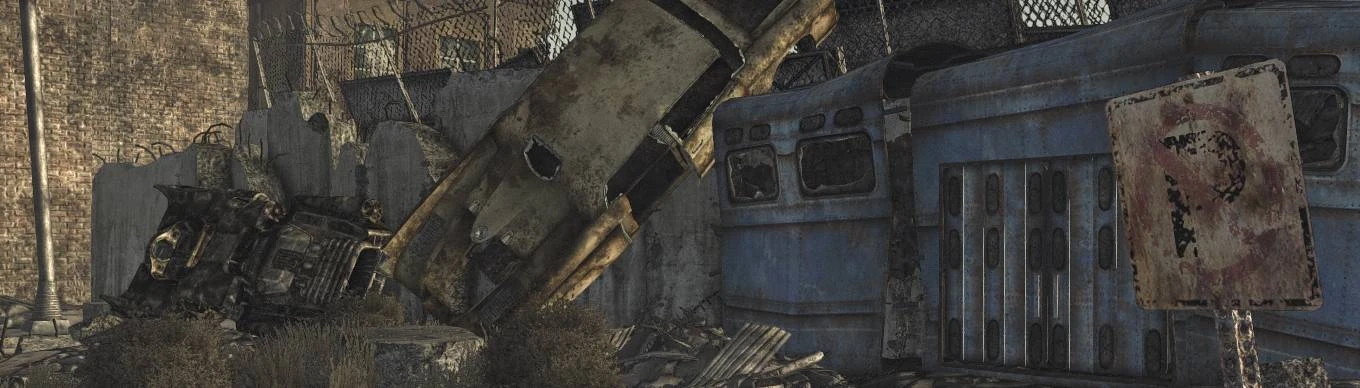
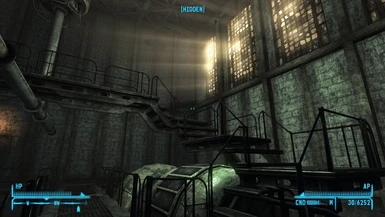
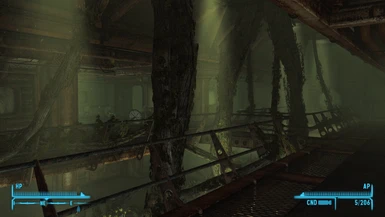
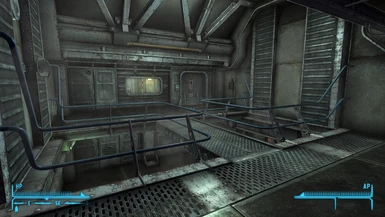
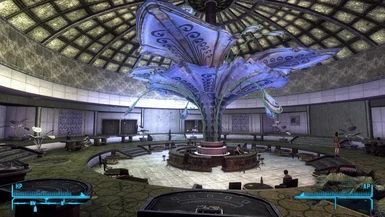
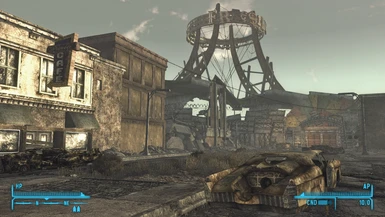
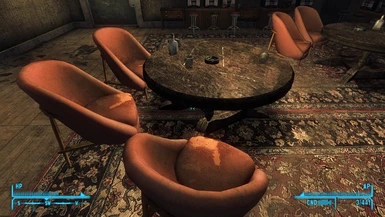
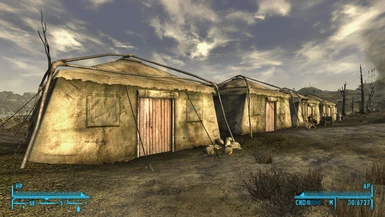
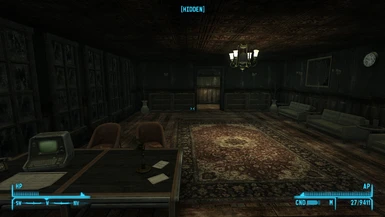
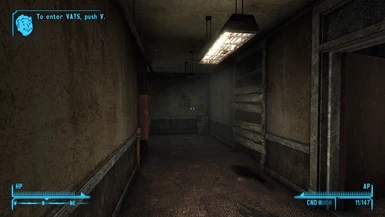
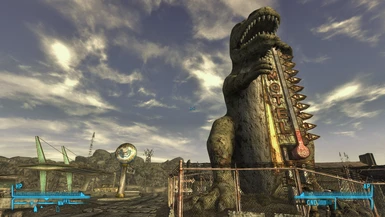
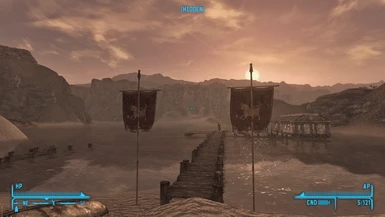
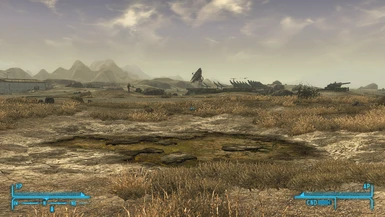
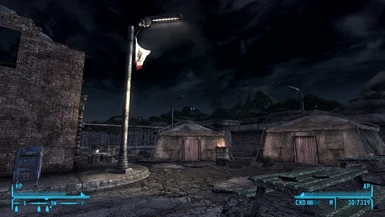
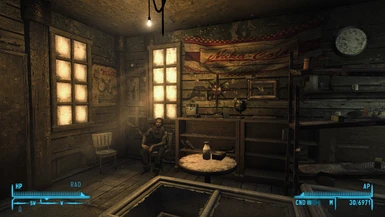
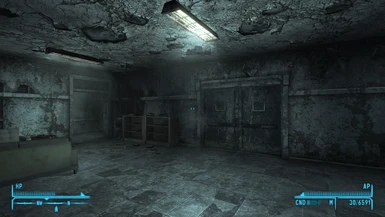
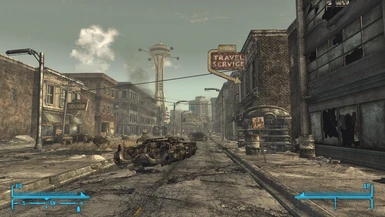
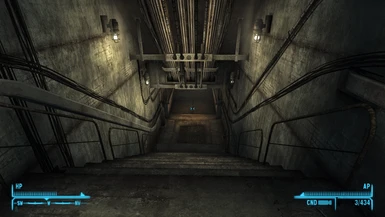
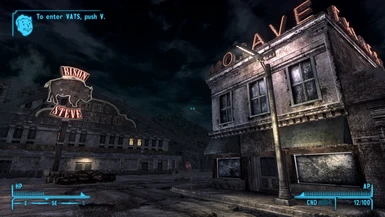
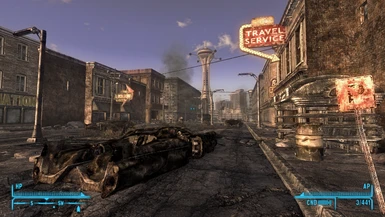
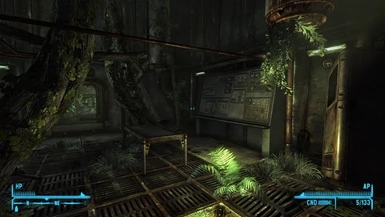
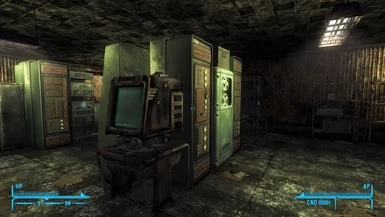
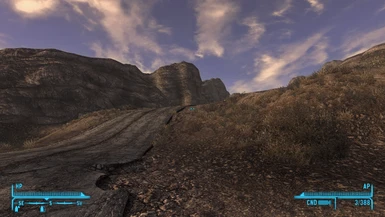
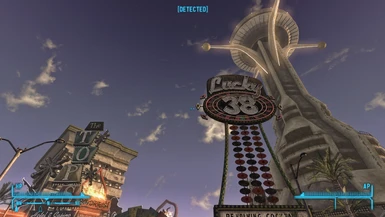
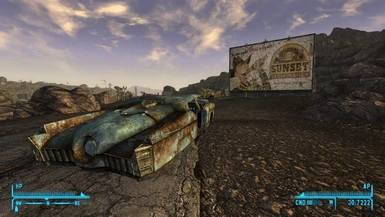
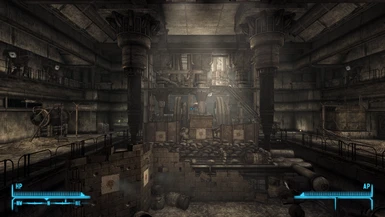
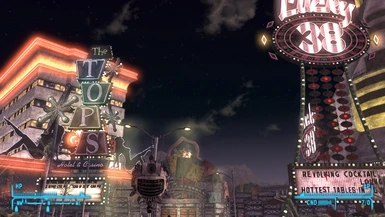
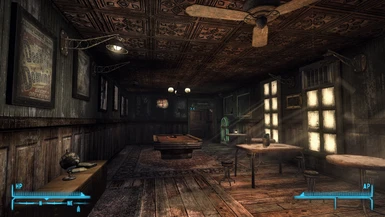
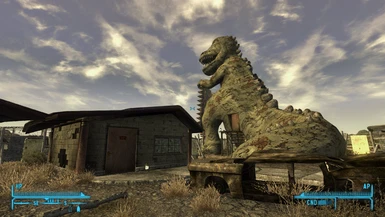
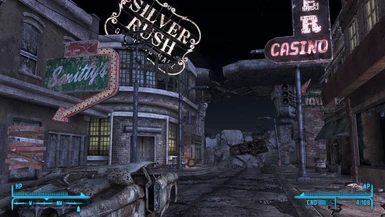
All the screenshots are of the preset with Charge's AI texture pack, no other mods. Forgive my 768p screenshots. The visible noise in the screenshots is barely noticeable in-game since it's in motion.
====
Sections:
====
Installation: Installation of Reshade and this preset is simple. Getting ReShade to see Fallout New Vegas's depth buffer is not. More on that below.
1) Install Reshade: Download Reshade 4.9.1 here. (Reshade 5's depth buffer interpretations leads to weird artifacting with FNV). Run it, selecting for DX9. For simplicity's sake, install ALL shader packages except for legacy, making sure to check rather than just dot each package's checkbox.
2) Configure the game: In the game's splash screen, enter settings and disable antialiasing (this allows ReShade to see the depth buffer). Max-out everything else. Save settings and launch Fallout new Vegas.
3) Load this preset into ReShade: Once in the game, get into the ReShade menu via the HOME key, run through the tutorial, and then load this .ini file at the top of ReShade's Home tab. Bob's your uncle.
I recommend setting a toggle key for ReShade on the Settings tab; I use Insert.
Depth Buffer Access: If you already have depth buffer access, you can skip this section.
New Vegas is notoriously finicky when it comes to tapping the depth buffer, which is required for most of the difference that this shader stack makes. Unfortunately you're more or less on your own here, as no single fix seems to work for everyone, and none of the fixes are simple. The good news is that FNV's depth buffer is not nearly as mystified as the internet's general consensus would have you think.
This section isn't as daunting as its length might look at first; it's just written to be precise/unambiguous/foolproof:
----------------
The least intrusive (no additional mods or scripts) approach is this: On Reshade's D3D9 tab, uncheck "Use aspect ratio heuristics" and check "Copy depth buffer before clear operations." You should see the depth effects work now, but the image is misaligned unless you got lucky. Let's make sure it's aligned correctly:
Under ReShade's Home tab, find the "DisplayDepth" shader. Click 'Advanced Settings" and check both "Show live preview" and "Blend depth map into image". Then adjust the scaling until your depth map is aligned pixel-perfect. The scale values will be different for everybody depending on your display resolution and whatever the game decided the depth map resolution is for your setup.
Once it is aligned pixel-perfect, we'll have to enter those values into 'global preprocessor definitions' by clicking "Edit global preprocessor definitions", which will drop down some prompts. We'll be making two new ones by clicking the + symbol and entering "RESHADE_DEPTH_INPUT_X_SCALE" and "RESHADE_DEPTH_INPUT_Y_SCALE", and then for their respective values, typing in the exact numbers you set the X and Y scale to for perfect alignment. If this is done correctly, checking/unchecking the live preview should have no effect.
You are done. disable DisplayDepth and finally confirm by toggling the depth effects on and off with the PageUp key; the difference should be obvious.
While this solution is the least-intrusive it does come with the compromise that occasionally some depth effects will be rendered over the player character's hands and equipped weapon. With this preset its barely noticeable due to the subtle passes of the individual shaders and use of a special masking shader. There are different solutions around for depth buffer access but this is where I stopped. Additionally, the depth buffer will occasionally blip out here and there at certain infrequent parts of the game.
====
Featured effects and extended details of the preset:
- Two layers of ambient occlusion - a wide sweeping radius to shade the edges of big rooms and large rock features and such, and a small radius AO to shade the details of faces and other smaller/complex geometry. They are tuned to overlap a little for extra shading underneath cars, behind furniture, etc.
- Screenspace ray tracing, teams well with the AO shader's indirect lighting to greatly increase lighting realism.
- Color correction: Colors are pulled back from highlights to reduce the game's heavy oversaturation. Shadows are also slightly desaturated to make room for increased low-light detail. Generally the game is given slightly cooler colors to de-warm this very yellow and orange game, at the cost of indoor areas having slightly cooler colors.
- Monocular Cues and Clarity - MC emulates light scattering over distance to increase perceived depth, also slightly enhances microcontrast. Clarity achieves its namesake by locally enhancing microcontrast, which brings details out of fog and reduces cloudiness from the game's bloom.
- Eye Adaptation, Unsharp, and a soberly-applied Bloom are deployed to recapture the game's increased dynamic range from the added shadows and lighting. Also restores the games color dynamics after the well-needed desaturation.
- A noise filter is applied before the adaptation to give a filmic ISO effect. Noise filters can be cringe but this is subtle and primarily affected by how bright the scene is. In photography bright images have low ISO and therefore low noise, while dark pictures require higher ISO have more noise/grain. Applying noise to shadows before eye adaptation gives it a natural look and fakes detail.
- A depthfog shader subtly adds a sickly yellow-green haze in the far distance to restore fog cleared up by the sharpening and clarity shaders, as well as to inch the game closer to the sinister post-apocalyptic atmosphere expected from a Fallout game. As it is not quite vanilla and the community seems to like clear skies in NV, it can be disabled with the PageDown key.
- Finally, there are two sharpening stages; one after the antialiasing stage and a smaller-radius finishing sharpener at the end of the stack.
====
A word on anti-aliasing:
Since the game's AA has to be disabled to free up the depth buffer, antialiasing shaders are deployed to make up the difference. Post-processing antialiasing will never be as good as aliasing done within the game engine.
Don't laugh, but 4(!) different AA shaders are deployed, each tuned to their different attributes to meet the best trade-off between aliasing and blurriness. FXAA as the base, TAA to reduce flicker, SMAA tuned to address depth edges, and NFAA to pick up the missed jaggies here and there. I try to avoid more than two AA shaders but sometimes you have to get surgical to avoid both aliasing and blurriness.
A better option would be to force superscaling in your GPU's firmware if you have the GPU to spare and if you can get it working with Fallout. Superscaling/Oversampling is still the GOAT antialiasing. Some solutions like New Vegas Reloaded also have superior antialiasing options than post-processing AA, which is always a serious compromise. If you use these instead, you'll want to disable this preset's AA shaders which can be done via the Delete key. In turn the image might be oversharpened after this, and you can disable the post-AA sharpening shader via the End key.
====
Performance Tweaks:
Few compromises of image quality were made for performance - if you need some more juice you can make these toggles and adjustments. In order of the largest gain verses least subjective visual impact:
At some point I'm going to make light versions of the Caticorn Reshades.
====
Hotkeys and Toggles:
Home - ReShade menu (defualt)
Delete - Anti-aliasing shaders
End - Sharpening shaders
PageUp - Depth-based shaders
PageDown - Depthfog
I recommend setting a toggle key for ReShade, found on the Settings page. I use Insert.
====
Recommended Mods: Kind of the main point of a preset like this is to avoid having to install a bunch of graphics mods as much as you can, but a ReShade preset can only get you so far.
Most indispensable is a good AI pack like Charge's which I heavily recommend over a community homebrew texture pack in order to retain good balanced vanilla artstyle.
That's about as far I went with this playthrough. But I do recommend finding good water and LOD mod.
====
Thank you for using my preset. I hope it lets your playthrough hit right again like it did the first time.
This ReShade preset is aimed to modernize and remaster Fallout New Vegas as much as possible without use of a total overhaul or more extensive mod than ReShade itself (such as ENB or NVReloaded), while retaining the original artstyle.
Meant for immersion rather than screenshots, it enhances all scenes equally without detrimenting any parts of the game from loss of detail to overdarkened shadows, or overexposure/oversaturation, HDR intoxication or bloom fog, et cetera. Despite improving contrast, and adding dark shadows and some bright lighting, the final result has no increased blackclipping than the untouched game, and less white-clipping/oversaturation. It is the antithesis of the "Instagram filter on steroids" ReShade look.
This is a higher-end preset in lieu of a no-compromise approach to image quality without much optimization. At 1920x1080 it hovers around 70 FPS on my humble GTX 960 and i7-7700 @ 3.6GHz, transiently dipping below 60fps on occasion, after all the typical stutter removers and bug fix mods are installed. For better performance options, see the Performance Tweaks section below.
This wall of text is largely supplemental. If you know what you're doing and have depth buffer access, you can just install it and go.
All the screenshots are of the preset with Charge's AI texture pack, no other mods. Forgive my 768p screenshots. The visible noise in the screenshots is barely noticeable in-game since it's in motion.
====
Sections:
- Introduction
- Table of Contents (you are here.)
- Installation/Depth Buffer
- Featured Effects/Extended Details
- Anti-Aliasing
- Performance Tweaks
- Hotkeys/Toggles
- Recommended Mods
====
Installation: Installation of Reshade and this preset is simple. Getting ReShade to see Fallout New Vegas's depth buffer is not. More on that below.
1) Install Reshade: Download Reshade 4.9.1 here. (Reshade 5's depth buffer interpretations leads to weird artifacting with FNV). Run it, selecting for DX9. For simplicity's sake, install ALL shader packages except for legacy, making sure to check rather than just dot each package's checkbox.
2) Configure the game: In the game's splash screen, enter settings and disable antialiasing (this allows ReShade to see the depth buffer). Max-out everything else. Save settings and launch Fallout new Vegas.
3) Load this preset into ReShade: Once in the game, get into the ReShade menu via the HOME key, run through the tutorial, and then load this .ini file at the top of ReShade's Home tab. Bob's your uncle.
I recommend setting a toggle key for ReShade on the Settings tab; I use Insert.
Depth Buffer Access: If you already have depth buffer access, you can skip this section.
New Vegas is notoriously finicky when it comes to tapping the depth buffer, which is required for most of the difference that this shader stack makes. Unfortunately you're more or less on your own here, as no single fix seems to work for everyone, and none of the fixes are simple. The good news is that FNV's depth buffer is not nearly as mystified as the internet's general consensus would have you think.
This section isn't as daunting as its length might look at first; it's just written to be precise/unambiguous/foolproof:
----------------
The least intrusive (no additional mods or scripts) approach is this: On Reshade's D3D9 tab, uncheck "Use aspect ratio heuristics" and check "Copy depth buffer before clear operations." You should see the depth effects work now, but the image is misaligned unless you got lucky. Let's make sure it's aligned correctly:
Under ReShade's Home tab, find the "DisplayDepth" shader. Click 'Advanced Settings" and check both "Show live preview" and "Blend depth map into image". Then adjust the scaling until your depth map is aligned pixel-perfect. The scale values will be different for everybody depending on your display resolution and whatever the game decided the depth map resolution is for your setup.
Once it is aligned pixel-perfect, we'll have to enter those values into 'global preprocessor definitions' by clicking "Edit global preprocessor definitions", which will drop down some prompts. We'll be making two new ones by clicking the + symbol and entering "RESHADE_DEPTH_INPUT_X_SCALE" and "RESHADE_DEPTH_INPUT_Y_SCALE", and then for their respective values, typing in the exact numbers you set the X and Y scale to for perfect alignment. If this is done correctly, checking/unchecking the live preview should have no effect.
You are done. disable DisplayDepth and finally confirm by toggling the depth effects on and off with the PageUp key; the difference should be obvious.
While this solution is the least-intrusive it does come with the compromise that occasionally some depth effects will be rendered over the player character's hands and equipped weapon. With this preset its barely noticeable due to the subtle passes of the individual shaders and use of a special masking shader. There are different solutions around for depth buffer access but this is where I stopped. Additionally, the depth buffer will occasionally blip out here and there at certain infrequent parts of the game.
====
Featured effects and extended details of the preset:
- Two layers of ambient occlusion - a wide sweeping radius to shade the edges of big rooms and large rock features and such, and a small radius AO to shade the details of faces and other smaller/complex geometry. They are tuned to overlap a little for extra shading underneath cars, behind furniture, etc.
- Screenspace ray tracing, teams well with the AO shader's indirect lighting to greatly increase lighting realism.
- Color correction: Colors are pulled back from highlights to reduce the game's heavy oversaturation. Shadows are also slightly desaturated to make room for increased low-light detail. Generally the game is given slightly cooler colors to de-warm this very yellow and orange game, at the cost of indoor areas having slightly cooler colors.
- Monocular Cues and Clarity - MC emulates light scattering over distance to increase perceived depth, also slightly enhances microcontrast. Clarity achieves its namesake by locally enhancing microcontrast, which brings details out of fog and reduces cloudiness from the game's bloom.
- Eye Adaptation, Unsharp, and a soberly-applied Bloom are deployed to recapture the game's increased dynamic range from the added shadows and lighting. Also restores the games color dynamics after the well-needed desaturation.
- A noise filter is applied before the adaptation to give a filmic ISO effect. Noise filters can be cringe but this is subtle and primarily affected by how bright the scene is. In photography bright images have low ISO and therefore low noise, while dark pictures require higher ISO have more noise/grain. Applying noise to shadows before eye adaptation gives it a natural look and fakes detail.
- A depthfog shader subtly adds a sickly yellow-green haze in the far distance to restore fog cleared up by the sharpening and clarity shaders, as well as to inch the game closer to the sinister post-apocalyptic atmosphere expected from a Fallout game. As it is not quite vanilla and the community seems to like clear skies in NV, it can be disabled with the PageDown key.
- Finally, there are two sharpening stages; one after the antialiasing stage and a smaller-radius finishing sharpener at the end of the stack.
====
A word on anti-aliasing:
Since the game's AA has to be disabled to free up the depth buffer, antialiasing shaders are deployed to make up the difference. Post-processing antialiasing will never be as good as aliasing done within the game engine.
Don't laugh, but 4(!) different AA shaders are deployed, each tuned to their different attributes to meet the best trade-off between aliasing and blurriness. FXAA as the base, TAA to reduce flicker, SMAA tuned to address depth edges, and NFAA to pick up the missed jaggies here and there. I try to avoid more than two AA shaders but sometimes you have to get surgical to avoid both aliasing and blurriness.
A better option would be to force superscaling in your GPU's firmware if you have the GPU to spare and if you can get it working with Fallout. Superscaling/Oversampling is still the GOAT antialiasing. Some solutions like New Vegas Reloaded also have superior antialiasing options than post-processing AA, which is always a serious compromise. If you use these instead, you'll want to disable this preset's AA shaders which can be done via the Delete key. In turn the image might be oversharpened after this, and you can disable the post-AA sharpening shader via the End key.
====
Performance Tweaks:
Few compromises of image quality were made for performance - if you need some more juice you can make these toggles and adjustments. In order of the largest gain verses least subjective visual impact:
- Disable the bloom shader (prod80_02_Bloom.fx) since it's subtle and mostly to make up for the game's bloom being lost to clarity and sharpening.
- Disable SMAA (SMAA.fx), it's the heaviest AA shader and you have 3 other AA filters lmao. If you are at a higher resolution, disabling TAA will probably be a better trade-off since flickering isn't nearly as bad at higher resolutions.
- Reduce the Sample Quality and Render Size Scale of the AO shader (qUINT_mxao.fx)
- Disable Unsharp (Unsharp.fx), a macrocontrast reducing shader being used as a subtle mastering touch
- Disable SharpContrast, the most subtle of the sharpening shaders used here.
At some point I'm going to make light versions of the Caticorn Reshades.
====
Hotkeys and Toggles:
Home - ReShade menu (defualt)
Delete - Anti-aliasing shaders
End - Sharpening shaders
PageUp - Depth-based shaders
PageDown - Depthfog
I recommend setting a toggle key for ReShade, found on the Settings page. I use Insert.
====
Recommended Mods: Kind of the main point of a preset like this is to avoid having to install a bunch of graphics mods as much as you can, but a ReShade preset can only get you so far.
Most indispensable is a good AI pack like Charge's which I heavily recommend over a community homebrew texture pack in order to retain good balanced vanilla artstyle.
That's about as far I went with this playthrough. But I do recommend finding good water and LOD mod.
====
Thank you for using my preset. I hope it lets your playthrough hit right again like it did the first time.