


0 of 0
Documentation
Readme
View as plain text
Hidden HUD Substitute by Sailing (mizutamari)
Readme v8
---
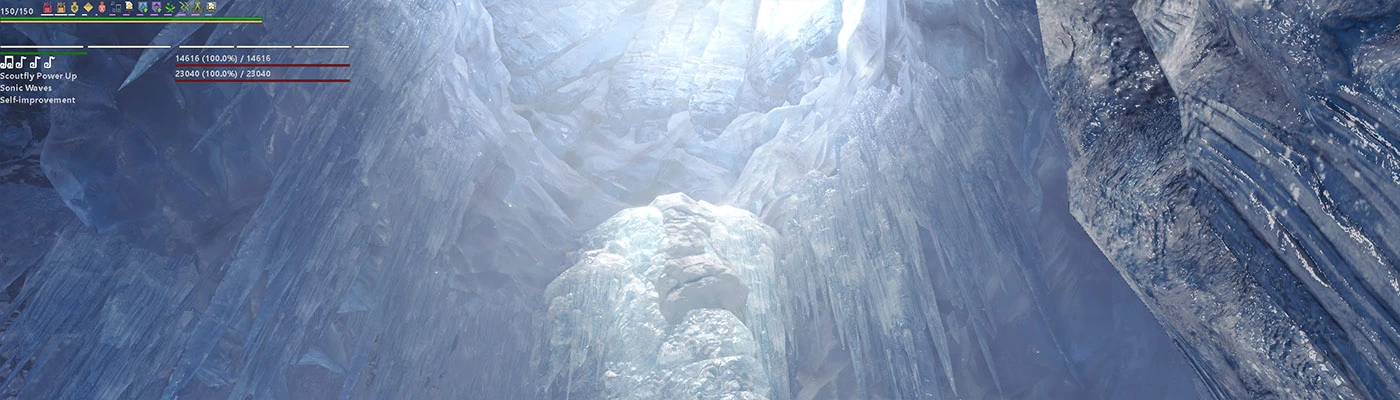
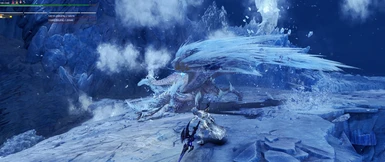
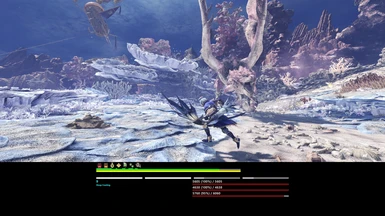
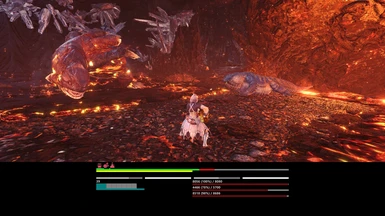
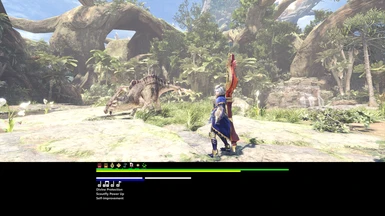
A replacement HUD that can be toggled on/off or placed offscreen so that vital information can still be seen when the in-game HUD is disabled.
---
Info:
In previous Monster Hunter games, setting the HUD to hidden still allowed vital information to be temporarily displayed by holding down the "camera" or "item selection" button. HUD elements could also be moved onto the second screen on DS titles. To simulate those behaviours, this Autohotkey script aims to act as a toggleable and moveable substitute for most HUD elements.
Iceborne brought with it several changes to the way the HUD works, including the option to toggle HUD elements individually. For a tool that manipulates these options directly, consider checking the other one I wrote linked below. However, this script is still intended for those who would like to do any of combination of the following:
- use it in conjunction with the other script
- display the information offscreen
- have an alternative version of existing HUD elements
It is not intended to "assist" in hunting - fighting monsters without the original HUD should be done with the expectation of being left, in the best cases, at a marginal disadvantage. However, some features that do expose information not readily visible on the HUD are included because they were convenient to implement. Please be considerate of other players' wishes and intentions.
There is one part of the script that optionally writes directly to memory in order to get certain parts of the overlay to update properly.
Alternative script to directly toggle in-game HUD:
https://www.nexusmods.com/monsterhunterworld/mods/580
---
Usage:
Extract the files to any folder.
Run the .ahk or the .exe - both should be the same.
If MHW is running at the same time, it *should* work regardless of which was started first.
Open the menu by double clicking the tray icon to change options if necessary or alternatively edit the settings.ini file directly
---
Notes:
Some parts of the overlay won't work properly when loading an area if certain parts of the in-game HUD are hidden. The "Temporarily toggle in-game HUD" option in the "Version" tab should fix that in most cases. However, the issue will still pop up after choosing "Claim Rewards" or "Report Investigation" while speaking to the Handler during an expedition. In this case, you'll have to toggle the corresponding options a couple times manually through the settings (or by using my other script). This may also happen when cutscenes play.
The HP bar flickers if the value is changed quickly - this is a side effect of the workaround used to display more than two colours in a single bar.
Party members' HP bars don't always display in the same order they do in-game.
In some cases, the overlay won't indicate correctly whether specialized tools or palico tools are on cooldown or available for use. This should only be temporary and only happen when switching between tools that are already on cooldown and those that aren't.
Restarting the overlay at certain times like when singing with the hunting horn can cause incorrect information to display temporarily.
Unfortunately, the overlay no longer works in fullscreen mode.
The "settings.ini" file should work across game updates as long as they work the same way with the main .ahk or .exe files - if this is not the case, it will be noted in the changelog.
---
About the Files:
The .exe version is a pre-compiled version of the .ahk file - it doesn't need AutoHotkey installed to run. However, it can't be edited. The .ahk version needs the "Lib\classMemory.ahk" file to work. Both versions pull settings, addresses and icons from "settings.ini", "addresses.ini" and the icons folder respectively.
---
An instance of Monster Hunter: World was found... but the version does not match the version of the address list...
If you're seeing this error message, it likely means that the game was updated and the addresses file is out of date. The short solution is to check if there's an update available for the script.
The script works by finding the correct addresses through a series of pointer chains (provided in the addresses.ini file). When the game gets updated, these pointers often need to change as well. Although there's only one part of the script that writes directly to memory, there is a chance that it can crash the game if the pointers don't get updated. This is prevented by using the game's version number as a safety check.
The warning can be disabled by opening the addresses file and updating the number in "MHWinTitle" to the game's installation, but this will only work if the pointers are the same. It can also be disabled permanently by setting it to "ahk_exe MonsterHunterWorld.exe" but this is discouraged for safety reasons.
---
Help with options:
Apart from some of the options in the "General" and the "Version" page, default values should be okay for most things. Unless the script isn't doing something you'd like it to, you probably won't need to change too many options - unless you want to play around with the settings for fun.
***VERSION***
"Temporarily toggle in-game HUD" is the only option that writes directly to memory, but it may be necessary to enable this - see "Notes" above for more info.
***HOTKEYS***
Avoid using hotkeys with more than one button for the "Hold" hotkey - append the desired modifier to the "Modifiers" option below it instead.
eg. if you want to use "Control + a" as the hotkey, leave the hotkey field as "a" and insert a "^" (caret, which AHK will use as "Control") into the modifiers box. More info on modifiers below.
The "Hotkey" option boxes automatically interpret pressed keys to use as hotkeys by default but if something isn't working, "Manual input" may need to be checked and the desired option typed in manually.
eg. the "Alt" key by itself won't be accepted properly, so tick "Manual input" and type "Alt" into the box.
Using manual input will be necessary for any gamepad keys. However, there's a chance that some keys will simply not work.
These are the useable key names for XInput gamepads:
Joy1: A
Joy2: B
Joy3: X
Joy4: Y
Joy5: LB
Joy6: RB
Joy7: Select
Joy8: Start
Joy9: Left Analogue Stick Press
Joy10: Right Analogue Stick Press
For other keys, you may need to set the gamepad button to press a keyboard button as a workaround. For example, in the Steam interface by adding it through a "regular press" activator on the desired button.
For "Manual input", options and info can be found at:
https://www.autohotkey.com/docs/KeyList.htm
Hotkey modifiers are appended to the front of the hotkey to change the way it activates. For example, the "~" (tilde) stops the key's original functions from being suppressed, and the "*" (asterisk) causes the hotkey to fire even when other modifiers (ctrl, alt, shift, etc.) are held down. These should probably be left as default unless you want to use multi-key hotkeys.
More info on hotkey modifiers can be found at:
https://autohotkey.com/docs/Hotkeys.htm#Symbols
***COLOURS***
Options that ask for a colour can accept RGB hex triplets in addition to the 16 predefined colours.
eg. FFFFFF is white while FF0000 is red. If unsure, search online for a colour picker.
***GENERAL OPTIONS***
Update interval is the amount of time the script waits before checking for changed values and updating the overlay accordingly. For example, if the update interval is set to 50 and your stamina is decreasing while sprinting in circles, the overlay will show the new stamina value after every 50 milliseconds.
Extremely low values may cause the HP bar to flicker more frequently when drinking potions or when the value changes quickly.
Value updates per address refresh refers to how frequently addresses get refreshed.
eg. if this is set to 10 and the update interval is 50 milliseconds, addresses will be updated after the values are checked 10 times (about 500ms).
Addresses generally only change when loading into different areas, changing weapons, party members change, etc. so the period when the script is reading invalid info shouldn't be that significant either way.
If the "Transparent BG" checkbox is enabled, pick any unused colour for "Background Colour". This option causes any pixels of the selected colour to disappear so avoid using colours that are used for other things unless you want to intentionally make them vanish.
X and Y position is the position of the top-left corner of the overlay relative to the top-left corner of the primary display. Sections will be "stacked" from there unless "Auto position" is unchecked in the corresponding page, in which case they can be moved elsewhere.
Options on the "General" page that refer to bars, boxes, fonts and icons (the last two columns) are used as defaults for the specific "sections" on the other pages. If an "Auto" checkbox is ticked, it will use the corresponding option from here or a default value based on other appropriate settings.
eg. unchecking a box that says something like "Auto background bar colour" will allow you to pick a specific colour to use as the background for that particular bar, while leaving it checked will probably take the "Colour of bars' backgrounds" option from the "General" page (default is "404040", a dark grey)
***WEAPON STATS WIDTH***
"(Auto) Max Width" on the "Weapons" page is the maximum amount of space that weapon parameters can take up, and defaults to half the "Width" given on the "General" page. Weapon bars, boxes or text labels that are "wider" than this max width will get chopped off. If both "Weapons" and "Monster HP" are enabled and automatically positioned, horizontal space will also be shared between them according to this setting. If unsure, leave width settings for weapons and monster stats at "Auto" unless you notice things aren't displaying properly.
---
Other options:
These options can be appended to the corresponding sections in the settings file to make specific changes.
***weaponProperties***
These weapon options are used to change the position of elements individually.
If either sharpnessStatsX or sharpnessStatsY are set to "default", the sharpness bar will just take the coordinates from weaponStatsX and weaponStatsY (which in turn default to "snapping" under the previous element). The same applies to gunAmmoStatsX or gunAmmoStatsY.
X and Y for each melee weapon will appear wherever the "sharpness" bar is if set to "default", while each ranged weapon will appear where "gunAmmo" is set.
Width values refer to the maximum allowed width. They take the value from "weaponStatsWidth" if set to default which in turn defaults to either the value of "width" from the general settings, or half of "width" depending on positioning. Generally, adjusting "weaponStatsWidth" instead of using the specific width options below should be adequate.
sharpnessStatsX=default
sharpnessStatsY=default
sharpnessStatsWidth=default
dualBladesStatsX=default
dualBladesStatsY=default
dualBladesStatsWidth=default
longSwordStatsX=default
longSwordStatsY=default
longSwordStatsWidth=default
hammerStatsX=default
hammerStatsY=default
hammerStatsWidth=default
huntingHornStatsX=default
huntingHornStatsY=default
huntingHornStatsWidth=default
gunLanceStatsX=default
gunLanceStatsY=default
gunLanceStatsWidth=default
switchAxeStatsX=default
switchAxeStatsY=default
switchAxeStatsWidth=default
chargeBladeStatsX=default
chargeBladeStatsY=default
chargeBladeStatsWidth=default
insectGlaiveStatsX=default
insectGlaiveStatsY=default
insectGlaiveStatsWidth=default
gunAmmoStatsX=default
gunAmmoStatsY=default
gunAmmoStatsWidth=default
bowStatsX=default
bowStatsY=default
bowStatsWidth=default
heavyBowgunStatsX=default
heavyBowgunStatsY=default
heavyBowgunStatsWidth=default
lightBowgunStatsX=default
lightBowgunStatsY=default
lightBowgunStatsWidth=default
***toolProperties***
These options can be used to change the colour of the 2nd specialised tool separately from the first (or the 2nd and 3rd Palico tools separately from the first Palico tool).
tool2BarColour=default
tool2CooldownBarColour=default
tool2BarBackgroundColour=default
palicoTool2BarColour=default
palicoTool2CooldownBarColour=default
palicoTool2BarBackgroundColour=default
palicoTool3BarColour=default
palicoTool3CooldownBarColour=default
palicoTool3BarBackgroundColour=default
---
Credits:
classMemory.ahk written by RHCP:
https://github.com/Kalamity/classMemory