Documentation
Readme
View as plain text
I've included a partial guide to Hearkenwold side-quests at the end of this ReadMe.
This includes spoilers, as indicted under the section below.
This Adventure Module requires the latest version of Knights of the Chalice 2 1.64
Water Animations and Elemental Particles for weather effects visuals can be toggled in display options
1. There is no requirement for gold to level up characters. This setting should be toggled under Difficulty:
Remove the gold cost of levelling up
The New difficulty settings might need to be tweaked. There are now drop down arrows next to some of the settings
Recovery of Hit Points After Each Encounter should be set to 0%
In addition, the module was balanced for the following settings:
Normal hit point bonus on level up
Normal selection of a new feat every three levels
Normal selection of an abaility score point every four levels
Normal initiative rolls of Enemies
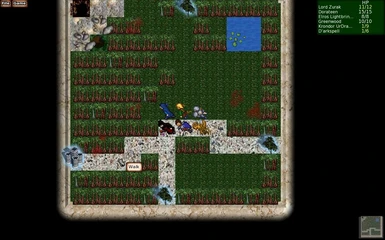
2. The module was designed with use of the original Knights of the Chalice sprites in mind,
and the low resoultion maps are not well suited to the new higher resolution sprites introduced.
Tokens also work quite well on the 2D map images.
To use the old sprites, toggle the following under the Display settings:
Display creatures using Animated Sprites.
The player will further need to open the character sheet for their characters and click on the
portrait to change token/sprite. Then Unselect the high-resolution option.
You can also choose to play with tokens instead of sprites, however, NPCs on the map will appear as
either the square image used for the framed icon during conversations, or as the custom Gold Box
style icon, depending on what is available for the NPC
Other display settings the module was run with include:
Display environmental particles
Display hit points during combat
Display combat log during combat
Display Spellbook using spell icons
3. Under Gameplay, please make sure Battle music and Diaglogue music is toggled OFF
Battle Music is off
Dialogue Music is off
This will allow the area music to persist in playing during combat and conversations. A separate music track
was not assigned to combat, so it is possible leaving this option checked would result in no music at all
during fights. Also, the default Dialogue music that plays is not always appropriate for the
area or conversation, so it is intended to continue playing the music used on the map.
In addtion, other Gameplay settings the module was balanced for include:
Thorough AI
Non-Accelerated Combat
Normal Walk Speed during combat
Pathfinding avoids Entangle
Skip turn after left-click attack
Automatic End of Turn
Confirm Personal Range Spells
Allow charging toward large-creature squares
4. Hearkenwold is a reconstruction of a module that was already built in another toolset, the IceBlink engine.
I have tried to be faithful to the original source material, while taking advantage of the
resources the KotC2 engine provides, wherever it seemed appropriate. Most importantly, Hearkenwold
features maps that were originally designed to be navigated by one character token
representing the full party. In KotC2, there is some party shuffling to be expected. I�ve
done as best I can to make sure the player won�t get their party stuck in narrow corridors or
behind locked doors. Exploring the Party Formation option could be helpful in a tight spot.
The Party Formation option also allows the player to switch the character designated as the
Party Leader mid-adventure. This could be useful in thematic areas where you might want a
more appropriate character to be recognized in conversations as the leader. (Such as a wizard
exploring a wizard tower, etc.)
The original version of Hearkenwold transitions combat to a separate map for each battle,
and I have done this where locations were too small to stage a proper fight, especially with
large sized monsters. In more open areas or in big rooms, combat plays out on the adventure screen.
5. I find Knights of the Chalice more point and clicky than the way Hearkenwold was originally
designed to be almost entirely trigger based as far as interactions in the gameworld.
IMPORTANT If you have read this far, at least at the beginning of the module, please consider
moving your party up to an NPC to converse with them. When I started building the module
in the Editor, I had placed triggers for the initial conversation the first time you meet an NPC.
Clicking on the NPC would bring up the subsequent dialogue interactions. In later areas of the module,
you can certainly click on NPCs and this will include their introduction accordingly. The module was
originally designed to move to the square directly in front of an NPC as the only option to talk.
The Knights of the Chalice 2 Editor provides interactive objects such as stair and door icons,
transition icons, and many others, and to be certain I have made use of these on the maps
in a lot of places. However the editor also allows a builder to draw �activable zones�, which
means you can make any space something the player can click on to interact with. Hearkenwold
uses pre-made 2d maps that already have things like stairs and doors and chests baked into
the image. In some cases, I do include a descriptive label that will appear when mouse hovering
over the object, but often I do not as I want there to be events in the world the player discovers
on their own. If you ever get stuck, the tab key will highlight all objects that can be interacted
with.
On another note, there are some objects such as books, rocks, and corpses I designed as creature tokens,
because it is the only way to make them disappear through scripting. This means a player should
be prepared to use the �talk� mouse command to interact with these objects.
SPOILER SECTION
Hearkenwold Guide to Sidequests
The Hearkenwold campign features side content constructed around a central narrative path.
While the adventure begins in a small outdoor "lobby" area where players can adjust their party and
fight an optional battle with a wolf, the game truly starts upon arriving at the Castle.
Hearkenwold Castle: center hall
1. Mugs the Cook is the first NPC the party will meet. He will suggest if they find any meal ingredients
from hunting, they can bring them back to him.
2. Abbot Thespar Wordsmith is the head of the Church, and leader of the city of Khyn. After first meeting
him, talking to this NPC a second time and offering to serve the Crown will result in the Abbot giving
a mission to find a priest in Khyn and warn him he is late on his leasehold payments to the Monastery.
3. Lady Abigail is an aspiring poet, and somewhat of a gossip. She will welcome the party to the Castle. If you
return to Abigail after speaking to the bard, Lady Madrigal, she will give you a poem and ask if you would
deliver it to Madrigal.
4. On the west wall is a torch that activates a secret passage. However, it is only operational
once the party receive instructions from Lord Randolph and Professor Karter in Khyn. Even then,
the party must find a way to get Thespar Wordsmith to leave the area. This is done by speaking
to Sebastian on the second floor, and asking him to call the Abbot for a meeting. Go back to
the torch, and the party will then be able to discover a secret room.
Hearkenwold Castle: east hall
1. Sly Silverfingers is a secret representative of the Midnight Shadows guild. After dismissing a new party
upon first meeting, you can find a parchment that he left somewhere in the Castle. Returning this note to Sly
he will then tell you about the guilds, as well as offer himself as a sponsor.
When all characters are level three or higher, speaking to Sly and demanding to talk now will get him to send them
on a mission to the Dwarf Village. He is looking for confirmation that the dwarves are preapring to be attacked, or
have already been attacked. Speaking to the Mayor of the Dwarf Vilage, or completeing the Halls of Hamhock
adventure, you can report back to Sly. He will then open the door in the Northwest corner of the hall, which
leads down to the guild area.
2. Xemne is the Magess of the Court, in charge of looking after young wizards. The first time you meet her,
she will gift the party an item to help restore spell slots. Talk to her again when you have completed the
Goblin cave (and reported to Commander Khas), and she will think the party strong enough for a test.
Xemne asks to find some wild berries, and bring them back to her.
You can also return to Xemne after defeating the lich, Lord Basil. This will result in an amusing exchange
and her growing confidence in the party.
Xemne is also involved with the Wands of Wonder guild for Arcane spellcasters. The party will have to speak to
the Guildmaster first, and then will be sent to Xemne for the details of the quest.
3. Clarefield is an innocuos cleric tending the shrine to the Creator King. Speak to him a second time, after
accepting the first assignemnt from Commander Khas, and Clarefield will give the party a healing potion.
4. Commander Corwyn Khas is the main quest giver for the overarching adventure. But he has a few sidequests
of his own. Interacting with the desk in his office, the party learns he is supersticious and interested in
any good luck charms they might find. There is one that can be obtained from the druid Odysserime, and bring the charm
back to place on the Commander's desk.
After receiving the first quest to patrol the road east of the Castle, Khas instructs the party to see the blacksmith
But the blacksmith is not at the forge. Returning to the Commander, you can tell him this information. Later
in the adventure, when you return from your second mission, Kas will tell you that Barham the blacksmith is
missing. In fact, Barham is now working in the city of Khyn. If you find him, you can bring message back to
Commander Khas.
There is a journal hidden in a secret antechamber of Thespar Wordsmith somewhere in the Castle. You can bring
this journal back to Commander Khas for some additional interaction.
Hearkenwold Castle: west hall
1. Garidan the Farmer escaped from the destruction of Kelton Manor, but he is very depressed about losing his
livlihood. When the party meets Harisko, the farmer of Witchlight Steading, you can tell Harisko there is
a farmer in the Castle who can help. Then returning to Garidan, you can tell him how he is needed in Witchlight.
This does not necessarily cheer him up, but at least the party plants the seeds of hope.
Hearkenwold Castle: second floor
1. Sebastian is a Bishop in charge of clerics at the Castle, but he himself is under the authority of the Abbot.
If the party asks him about anyway they can be of service, he will give an ominous warning about cult activity.
This is more of a foreshadow of a possible run-in with the cult down the road.
If the party pursues looking into the Abbot's suspicious activities, they will need to get Thespar Wordsmith
to leave his position near a torch in the hall below. This is done by speaking to Sebastian, and asking him to
request a meeting with the Abbot. The party should then proceed to interact with the torch.
2. Crushwater is a lizardman from a tribe in a swamp all the way to the east. You can mention his name to other
lizardmen you meet elsewhere, though it is doubtful you will get a favorable reaction. However, you can return
to Crushwater after completing the Lost Guardian guild quest for rangers and druids, and bring resolution
to his situation.
3. The southeast quadrant of this floor are barracks reserved for the party to rest. A cabinet contains some items
and a note that is of interest for Sly Silverfingers.
If the party speaks to Mason the soldier in Khyn, he will ask them to retrieve a locket he left behind. This
can be found by clicking on any of the beds, after you have talked to Mason.
It is important for the party to return to this room at least once after completing the first goblin mission
from Commander Khas. When using the stairs to leave again, it will initiate an encounter with Khas and his
request for the party to see him in his office.
Hearkenwold Castle: secret antechamber
1. This room is only accesible after speaking to Lord Randolph and Professor Karter in the
city of Khyn. Even then, the party must discover a way to have Abbot Wordsmith leave the area.
This is accomplished by speaking to Sebastian on the second floor, and asking him to call for
a meeting with the Abbot. Then the party can activate the torch on the west wall, and it
will open a passage into this chamber.
Within is a journal of accounting records for Khyn. The party can bring this to Commander
Khas for some insight.
Hearkenwold Castle Grounds (B1)
1. You can speak to a beggar, but need to give him one gold piece in order to get a prophecy about the larger
events threatening the realm. He will then disappear.
2. A message on a tree suggests a basilisk is wanted dead. It is as much a warning as a foreshadow that the
party will eventually run into these monsters.
3. A shrine is connected to the lower level guild hall of the Castle, but it can only be opened from the other
side.
Hearkenwold Forest (B2)
1. A giant frog dwells in the pond. It has swallowed a treasure wanted by Odysserime the Druid. Beware the
frog doesn't swallow any characters in the party!
Hearkenwold Forest (A2)
1. Odysserime, Steward of the Forest is found here. The party can ask him about good luck charms. He will
offer to trade one in exchange for a blue gem that was swallowed by a giant frog. If you make the trade, you can
bring the charm back to the Commander's desk. Or you can keep the charm for your characters.
2. There is a potential resting spot on this map, if the player has an elf or ranger in the party.
3. This area is a good place for hunting.
Hearkenwold Forest (B3)
1. The Ravenroost bandits are met here for the first time. This affiliation of thieves will be heard from
again elsewhere during the adventure.
2. There is a tree on this map, having a ranger in the party will allow you to make a special longbow.
Witchlight Steading (B4)
1. This is a sick village afflicted with plague. You will find the corpse of one who perished, and you can
bury the villager, if you have a shovel.
2. The homes of the villagers will not admit entry due to various diseases they are suffering from. This is important
to remember for the Crsytal Hearts guild quest for clerics and bishops.
Witchlight Farm (B5)
1. Harisko the farmer is holding out here. He will ask the party to take care of a problem with crows in the
cornfields. Return to Harisko after the crows have been dealt with. He will reward the party with a special
food item, which is one of the ways to gain information about Wrathack.
The party can also tell Harisko about Gardidan, if they have met him in the Castle. Likewise, the party can
return to Garidan, after meeting Harisko, and tell him there is work for him in Witchlight.
After completing the Crystal Hearts quest for clerics and bishops, the party can speak to Harisko for an
additional interaction.
2. There is a creepy scarecrow in the cornfields. It is key to ending the problem with crows.
3. Behind the barn can be found a shovel, a useful tool for the party to keep.
Wilderness (B6)
1. Inivo is a young shepherd being stalked by wolves. Rescue him, and he will tell you that one of his sheep
have gone missing. The sheep can be found in a nearby cave, and brought back to Inivo.
The party can also return to Inivo after the Crystal Hearts guild quest for clerics and bishops is completed,
to get some additional interaction.
Wilderness (B7)
1. Creighton Flintfinger, is a dwarf who offers to guide the party over a cliff to the north. But only if
they first defeat a monster and bring back proof. The monster is in the cave to the west, and the party can
bring its hide back to Creighton.
When the party interacts with some rocks to the north, Creighton will appear if they have done what he asked.
It is also possible if the player has a dwarf in the party, then Creighton is not needed.
2. There is a powerful hammer on this map.
Wilderness (B8)
1. Some trolls have set up camp in the foothills of this area. Interacting with some rocks gives a clue that
refers to the Troll King's quest to find missing fugitives.
Wilderness (C8)
1. A cave opens a tunnel that offers a shortcut to the Dwarf Village
2. A frost drgon flies over the mountains. Defeat it for a dragon scale, which is wanted by someone in the
city of Skardale.
Slaughtered Lamb Tavern
1. A clue on the west wall refers to buried treasure in a dark cave.
2. One of the mercenaries will give additional information about Wrathack, which the party can report to
Commander Khas.
Creighton Cave: Level 1 (B6 Cave)
1. A large pack of wolves have cornered a lamb. This is the missing sheep that belongs to Inivo.
Creighton Cave: Level 2
1. A Wyvern lives down here. Defeat the monster for its hide, which can be returned to Creighton Flintfinger.
2. The Troll King holds court in the northeast quadrant. He is quite mad, and will give the party a quest to
find two runaway trolls named Hurly and Burly. He then dismisses the party.
Hurly and Burly are found in the desert realm of Asherim. If they are killed by the party, when telling this to the
Troll King, he becomes sad and surrenders his crown. If Hurly and Burly have been convinced to return to the cave,
then when you speak to the Troll King, he will attack with his court, including the two trolls. This is an
alternative way to get his crown, and a powerful halberd.
3. Two large bugbear lords wait in the southeast corner. They demand the party bring them the crown of the Troll King.
Party has a chance to fight the bugbear lords, or agree and speak to them later with the crown. If the party has the
lost lamb in their inventory, the animal will bleat. If the party returns the crown to the bugbears, they will
explain their intentions are not evil.
4. A stream on the west side of the cave connects to the well under the steading of Witchlight.
King's Road South (C1)
1. Lady Madrigal is a bard who tells the party her instruments have been stolen by the half-goblin Rorn the Black.
If the instruments are brought back to her, it will be revealed that she had purchased them off the black market,
and they do not truly belong to her. The quest continues if the party seeks out the original owner. If Rorn
escapes with her instruments, Madrigal will be upset and tell the party to find them for her. This sets up
an encounter later during the adventure.
Speak to Lady Abigail in the Castle after meeting Madrigal.
If the party brings Lady Madrigal the poem written by Abigail, she will accept it. Party gains xp.
2. Rorn the Black is a half-goblin setting up camp. He really does not wish to fight the
party. Killing him will drop the instruments Lady Madrigal is looking for, or the party can
refrain from combat and he will remain in the area. After speaking to Madrigal about her
stolen insturments, Rorn can be confronted with this information. He will claim the instruments
belong to him. Again, the party can fight, or return to Madrigal. This time, however, if Rorn
is allowed to live, he will leave the area. The party will meet up with Rorn in a tavern in
the city of Khyn.
If the party returns to Madrigal empty-handed, because Rorn escaped with the instruments,
she will be upset and expect the characters to go after him.
3. There is a wild boar in the area. Killing the beast will drop the wild berries Xemne asked
the party to bring back to her.
Wilderness (C2)
1. Rylos the sage waits on a hill to talk to the party. He will tell of how he lost his daughter,
and the only reminder he has is a statue carved in her likeness. But the statue is somewhere
in the nearby Cave of Venture. He asks the party to bring the statue back to him. If they do,
then he will cast a spell on the statue, and it will turn back to his daughter.
But the daughter will then reveal her transformation was intentional, turned into a statue
as a means to guard against the return of the lich, Lord Basil. Now that the spell is broken
the lich is free, too. Rylos will then tell the party to seek his companion Alexandros for help
in tracking down Lord Basil.
If the party has returned the statue to Rylos, then Alexandros can be found in the Tower of
Secrets in the woods east of Khyn. Lord Basil can be encountered in the ruins of Kelton Manor.
Of course, defeating the lich will not be so easy.
Cave of Venture
1. On level 2, the room with spiders has the statue Rylos is looking for.
2. On level 3, the room with bats has an Ancient Urn. This urn can be delivered to a tavern
in the Thieves Quarter of the City of Skardale, which will allow characters to be raised
from the dead, even without a cleric or bishop in the party.
3. On level 3, the room with minor demons has a key needed to open the locked demon door
on this same level.
4. On level 3, defeating the three genies will give the party a magic lamp. When they attempt
to exit the cave, a genie will appear from the lamp and offer a choice of three wishes.
Two of the choices are traps, and only one will allow the party to leave, but also gives XP.
Kings's Road (D1)
1. Traveling merchants are met at the bend of the road. Their wagon has a broken wheel.
The party is given the choice to stay and guard their wagon while the merchants go for help,
or the party can offer to get a spare wheel from the city of Khyn and bring back to them.
They can also choose to do nothing, and leave the merchants to their fate.
If the party guards the wagon, after some time passes, goblins attack. When the merhants
return with a new wheel, they reward the party. They will also set up a coach servive in
the Lower District of Khyn, which will allow travel back to Castle Hearkenwold.
If the party offers to bring back a wheel, when they turn to leave the merchants, there are
noises from the forest. If the party goes back to investigate, goblins will attack. The merchants
realizing the road is too dangerous will suggest they hide in a nearby dark cave, and the party
can meet them there with a new wheel. If the party had continued to Khyn immediately, then when
they return, they will find the signs of attack and abduction. The merchants can be found again
in the nearby dark cave.
If the party does nothing, when they turn to leave the merchants, there are
noises from the forest. If the party goes back to investigate, goblins will attack. The merchants
realizing the road is too dangerous will suggest they hide in a nearby dark cave, and the party
can meet them there with a new wheel. If the party does not investigate, then when
they return, they will find the signs of attack and abduction. The merchants can be found again
in the nearby dark cave.
There is also an option if the party has been to Khyn already and picked up the spare wheel,
they can offer it to the merchants on the spot. The party will be rewarded, and the merchants
will also set up a coach servive in the Lower District of Khyn, which will allow travel
back to Castle Hearkenwold.
2. The dark cave requires a torch to enter.
Dark Cave
1. In the center of the cave, buried under a mound of dirt is the dwarven blade called The
Watchman's Torch. The party will need a shovel to dig it up. This short sword can be
returned to Elwor in the Upper District of Khyn. The coordinates given in the Slaughtered
Lamb tavern clue refer to this spot.
2. If the merchants on map D1 agreed to hide in the cave until the party returns with a new
wheel, they can be found on the west side of the cave. The wheel can be purchased from the
blacksmith in Khyn. The merchants reward the party and they will also set up a coach servive in
the Lower District of Khyn, which will allow travel back to Castle Hearkenwold.
City Outskirts (E1)
1. The circular wall of Khyn can be approached here. The party will get a glimpse of the
Monastery. They can use this as a reason for the gaurds to let them in the front gates
of the city.
2. A tree has a message about a powerful weapon. This is a reference to the hammer in
wilderness area B7.
City Outskirts (E2)
1. Guards block entry into the city of Khyn. The party will need a Paladin or Cleric in
the party, or mention seeing the Monastery from the outskirts (E1) in order to pass.
City Outskirts (F1)
1. If the party has met Rorn the Black and let him live, and if they have encountered him
a second time in the Khyn tavern, then he will wait south of the wall, ready for a fight.
2. If the party has defeated the slave traders in Khyn, and spoken to the mysterious stranger
outside the city gates, there is an ambush waiting in the grove of trees. This is one of
two ways to reach the desert land of Asherim.
City OUtskirts (F2)
1. Guards block entry into the city of Khyn. The party will need a Paladin or Cleric in
the party, or mention seeing the Monastery from the outskirts (E1) in order to pass.
2. After dealing with the slave traders in Khyn, a mysterious stranger will appear outside
the gates of the city. The party can speak to him to learn more about Asherim.
Khyn
Central District
1. Delphos Hesara is Captain of the Gaurd, stationed in the building near the city gates.
A paladin in the party can speak to him and learn about his suspicion of a smuggling operation
in the city. Return to Delphos after dealing with the slave traders in the Lower District.
The party can also return to Delphos for a reward for completing the Monastery's bounty on
Zhalimar the Wolf-mage.
2. Eshe is the flower girl who will greet the party. An elf or diplomatic charcter will be
able to get a rose from her. This rose can then be used as a gift in the Elven forest.
3. Mason the guard asks the party for a favor. He left a locket of his beloved back in the
barracks at Castle Hearkenwold. This is the room where the party rests. If they interact with
any of the beds, they will then find the locket and can bring it back to Mason.
Upper District
1. Elwor, an old dwarf, is in the southwest home of this district. He tells the party of his
dying wish to be buried with the blade of his ancestors. The blade is a shortsword known as
The Watchman's Torch, and it can be found in the Dark Cave (D1). The party can choose to
bring the sword back to Elwor. He will take the sword, but tell the party to speak to the
Mayor of the Dwarf Village of Hamhock, and the party will be rewarded with a different weapon.
2. A gnome sells a rope and grappling hook, which is a useful item to have. He also sells
a torch, which is needed to enter the Dark Cave on map D1.
3. In the northeast home is the merchant Lord Randolph and Professor Karter. They greet the
party, and invite them to discuss their thoughts on the city of Khyn. The two men wish to see
Abbot Wordsmith overthrown, but not through violence. If the party agrees, Randolph and Karter
will tell about a secret torch in the Castle's center hall. Interacting with the torch will
then initiate a sequence to try and open a secret passage.
The party can also tell Thespar Wordsmith about the plot against him. If Randoph and Karter
are named, then the next time the party returns to this home they will find it ransacked and
the two men missing.
Lower District
1. Barham the Blacksmith is working in this district. If the party has been told by Commander Khas
to look for Barham, then the blacksmith will tell why he left the Castle. The party can then report
this to the Commander.
Barham sells a wheel that is need by the stranded merchants from map D1.
2. The Gilded Pheasant Tavern. If the party encountered Rorn the Black (C1) and let him live,
then the half-goblin will be met at this tavern. He is obnoxious, and after being interrupted
by a town guard, will challenge the party to a fight. The meeting spot is south of Kyhn on
map F1.
If the party has encountered the river cultists and saved a girl from them, then Constantine
the town guard will greet the party to thank them and give a reward.
3. Jasper the Wine Merchant is offering samples right outside the tavern. Interact with the
round wooden table tile in order to talk to him. He will tell of his plan to open a trade
route through the Serion Forest. An elf in the party has the option to sample his wine for
an amusing reaction.
Rangers, Druids or Storm Warriors in the party that have been given the Lost Guardian guild
quest must talk to Jasper in order to travel to the Serion Forest.
4. Father Barnabas runs a worn-down old church in this district. The party can mention they
were sent by Thespar Wordsmith about rent payments, only to get a gruff reaction from the priest.
5. Franz Maestro runs a music shop and is the owner of the instruments stolen by Rorn the Black,
and sold to Lady Madrigal (C1). If the party has returned the instruments to Lady Madrigal,
they can inform Franz that she has them. He will make arrangements himself to collect them. If
the party returns to Lady Madrigal at this point, they will witness the matter resolved between
the two bards. Franz can also be met later during the adventure.
There is an ancient lute the party can find in the Serion Forest. Franz will offer to buy
it for a lot of gold.
6. The slave traders are holding a secret meeting in the southeast home. Busting in on them
will initiate a fight. Afterwards, a letter is found that points to Asherim as the destination
of the smuggling operation. This can be returned to Delphos Hesara at his guard station. The
document can also be given to the sage at the lyceum in this district, as it is written in
a foreign language.
7. Lyceum of Khyn. Bring the Asherim letter here, and the sage will give some insight.
8. A lonely horse is in the stables. After successfully completing the merchants quest from
map D1, they will set up a carriage operation here that will provide quick transport back to
Castle Hearkenwold.
9. The Monastery of Kyhn has posted a bounty board in center of the Lower District. Currently,
they are looking to bring Zhalimar Wolf-mage to justice. If the party confronts him, they can
return to Delphos Hesara at his guard station for reward.
Monastery
1. The Monastery of Khyn itself is closed at this time. It serves as an example of the Abbot
exerting his control, allowing only who he wishes into his seat of power.
2. Callistar Thul is the only other NPC of interest. He is a sponsor for the Holy Zephyrs
guild, which is open to Paladins and Champions. Callistar will tell the party about the
organization, before leaving.
Woods (F3)
1. The Master Wizard sits in the northwest corner of the woods. He is the one mentioned by
the goblin wizards on map F2. Defeat the bloated spellcaster and his pesky minions for treasure.
2. Torain Mirno is a sponsor for the Lost Guardians guild available for Rangers, Druids, and
Storm Warriors. He will ask the party an introspective question before leaving the area.
3. In the center of the woods is a mysterious tower. The party will need to either break the
chains that block the door, scale the walls to a second floor window, or use a rope and
grappling hook to do the same. Alexandros can be found in this tower, if the party has
returned the alabaster statue to Rylos on map C2. This is also where Lord Basil keeps his
phylactery.
Secret Tower: Level 1
1. The portal can be activated if the party has the scroll found on the table.
Secret Tower: Level 2
1. If the party has initiated the quest to track down Lord Basil, then Alexandros can be
found as a prisoner in the trap door on the west side of the map. He will give the party
a hand crank to operate the platform on this level. The party can also rest in the pit safely.
2. Interacting with the lever will operate the platform, which the party can take to the next
level. However, they must have the hand crank obtained by freeing Alexandros.
Secret Tower: Level 3
1. Defeat the guardian in this room. The phylactery of Lord Basil can be found in the cabinet.
Interact with the table, and use alchemical equipment to destroy the gem. Once the phylactery
is destroyed, Lord Basil can be defeated at Kelton Manor, and the alchemical equipment can
be sold.
Kelton Manor
1. If the party has initiated the quest to track down Lord Basil, then the lich can be
encountered in the ruins of the manor. Interact with the ruins in the center of the map,
and Lord Basil will appear. However, in order to truly vanquish the lich, the party must
destory its phylactery.
Return to Rylos on map C2, to bring closure to the quest to destroy Lord Basil.
The party can also speak to Xemne at Castle Hearkenwold, to boast of the deed. She will be
impressed.
Asherim
Desert Canyon
1. The gnoll on the watch tower can be defeated only after completing the Holy Zephyrs guild
quest for Paladins and Champions. Return here to fight the gnoll archer.
2. The altar among the skulls and spears on the north of the map can be destroyed with the
Blessed Hammer, which is found in the Ironworks.
Desert Canyon North
1. The troll fugitives, Hurly and Burly, are found in their caves in the northwest corner
of the map. If the party talks to Hurly, and mentions the Troll King's desire for his trolls
to return, then Hurly will offer a riddle in exchange for going back home. The answer to the
riddle is Fool's Gold, or False Gold. An incorrect answer will result in a fight with Hurly.
But these trolls are invincible, unless slain together at the same time.
Burly lives in the other cave, and he is only interested in eating the party. A fight is
unavoidable, but the troll cannot be destroyed unless it is slain together with Hurly at the
same time.
The way to engage both trolls in combat is to find the carcass of a camel, and bring it to
the bone pile in front of the cave. This will lure both trolls outside, and give the party
the chance to fight them at the same time.
Either way, the party can return to the Troll King, after answering Hurly's riddle or after
defeating both trolls at the same time.
2. In the center of the map are some skulls and spears. This is where the dead camel can be
found.
3. In the northeast corner of the map, lizardmen will confront the party. Mention the name
Crushwater, the lizardman visiting Castle Hearkenwold, for some additional dialogue. Note,
these lizardmen are not friends of Crushwater.
4. Inside the Ironworks is a powerful weapon known as the Blessed Hammer. It can be used to
destroy the altar of monsters in the desert Canyon. The party must speak to D'Eagle and his companions
here, before they can leave the desert.
River Astar (G1)
1. Tomin Blanderbass is found hanging upside down from a tree, the result of some mischievous
dark elves. Tomin is a sponsor for the Magnificent Blades guild for all fighting classes. The
party can rescue him after combat with the dark elves, or after the elves have left.
River Astar (G2)
1. Bundy the Boatman is down on his luck. His boat has been stolen by some river cultists of
Musidan. This is the cult Sebastian warned about, back at Castle Hearkenwold. After fighting
the cultists, the party can return to Bundy for a reward.
2. A dramatic scene of abduction unfolds on the east side of the map. One of the cultists
is trying to get away with a young girl, intending to drown her. A guard from Khyn wants to
stop them, but the cultist claims it is the girl's choice and the gaurd has no authority. At
the party's intervention, the girl is released and a fight breaks out with the cultists.
Return to the Gilded Pheasant tavern in Khyn's Lower District, and the guard will greet the
party with his thanks and a reward.
3. Zhalimar the Wolf-mage is found in the southeast corner of the map. He is wanted by the
Monastery of Khyn. Bring his head back to Delphos Hesara in Khyn's Central District to receive
a reward.
4. Magic fruit grows on one of the trees in the southwest of this map.
Radura Village (H1)
1. This village is presently under bugbear occupation. If the party speaks to the caretaker
in the southwest of the map, he will explain what must be done: The heart of the spider-demon
Cixtol, must be brought to twin trees at the north of the village.
2. In the southeast corner, a man in his home is paranoid and frightened out of his wits.
A cleric or bishop in the party can cast a bless spell to calm him. The villager will give
more information about the events in Radura, and the spider-demon who took over the village.
He will also offer his house as a place to rest.
3. A woman tells the party her two sons have gone missing. They are actually capable swordsmen,
and can be found in anotehr area further south. Interacting with the sons, the party can then
report back to their mother for xp.
4. An elderly woman has been scammed out of the last of her possesions by some Relmfur soldiers
who promised to take care of the bugbears, but had no such intentions. One of the items taken
is a sword known as the Cold Blade. It can be found with Ivar the Red in Fortress Relmfur.
Return with the weapon to the old woman, and she will let the party keep it.
5. The village barn is where the spider-demon Cixtol lurks. The party will need a rope and
grappling hook to enter through the hayloft in the back of the barn. Defeating the demon will
give the party Cixtol's heart.
6. Twin trees rise in the north of the village. Return with Cixtol's heart, and an apparition of
a knight will appear. A grand illusion will make the remaining bugbears think the King's Army
is riding forth, and the bugbears will run for their lives.
After visiting the trees, any hostile enounters will result in the monsters fleeing or already fled.
Speaking to the villagers will have some reactive dialogue for saving Radura.
Crossover Falls (H2)
1. The waterfall in the northeast corner allows transport to various locations, but only
based on specific core player classes.
Paladin: Castle Hearkenwold
Cleric: Khyn
Ranger: Hearkenwold Forest (A2)
Wizard: Mountain Wilderness (B8)
Rogue: Mountain Wilderness (C8)
Fighter: Fortress Relmfur
After Paladins or Champions accept the guild quest for the Holy Zephyrs, the name Asherim
can be spoken at this waterfall and the party will be teleported back to the desert canyon.
