


0 of 0
Documentation
Readme
View as plain text
The AutoRebuild mod is designed to work only with game Going Medieval v0.22.20.
Its goal is to transform destroyed objects into blueprint when destroyed by a raider or when destroyed because of the stability rule.
The main idea is to avoid having to rebuild manually potentially complex buildings after trebuchets hit them.
Install procedure:
1. Install BepInEx (https://github.com/BepInEx/BepInEx?tab=readme-ov-file)
2. Unzip the mod anywhere on your computer (a temporary directory is better as it can be deleted after install)
3. Copy the content of the 'Install' directory in the 'plugins' directory generated by BepInEx:
You should obtain a path like that:
Going Medieval
|
+---> BepInEx
|
+---> plugins
|
+---> AutoRebuild
|
+---> Assets
That's it, you can now launch Going Medieval, the AutoRebuild mod will be automatically loaded.
You can now delete the temporary unzipping of the mod as you have copied the relevant part into your game, or you can keep it for easier re-install (note that it also contain the complete source code of the mod).
User manual:
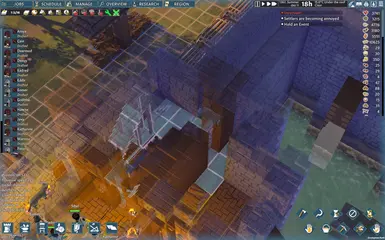
There are 2 additional buttons in the top-left toolbar, just next to the temperature heatmap button.
The first button (a wrench) is used to always activate the mod. In that case any time stability will destroy something, it will be replaced by a blueprint.
The second button (2 swords crossed) is used to activate the mod during raids. If the first button is off and this one is on, then destroyeds things will only be replaced by blueprints during a raid.
You can change the default values of the buttons in the configuration file located in '\Going Medieval\BepInEx\config\AutoRebuild.6A341E1C-F22D-4FE0-B09A-4700563425BE.cfg' by using any text editor (automatically generate after having started Going Medieval with the mod installed).
Limitations:
The blueprints replacing destroyed objects will appear blue but it may not be possible to build them because of stability problems.
The blueprints which may not be built because of stability problems will give no indication about why they cannot be built.
When a wall is completely destroyed (not replaced by a blueprint), the objects attached to its sides will not be transformed into blueprints (such as beams and wall torches), that's because internally they need to inform the wall they are attached to.
It will happen if you destroy manually a wall, any beam / objects attached to its sides will be destroyed and not transformed into blueprints.
If you destroy a wall with a wall placed on it, the upper wall will be transformed into a blueprint as any beam / objects attached to its sides.
Bug reports:
If you find bugs, please save the log files before re-starting Going Medieval, and provide them (zipped) along with the description of the bug.
You can find the 2 necessary logs at these location:
'<STEAM INSTALL>\steamapps\common\Going Medieval\BepInEx\LogOutput.log' for the BepInEx log file
The Unity log file location is here:
Windows %USERPROFILE%\AppData\LocalLow\CompanyName\ProductName\Player.log
Linux ~/.config/unity3d/CompanyName/ProductName/Player.log
macOS ~/Library/Logs/Company Name/Product Name/Player.log
If you want to modify the code of this mod, please read the following:
The 'Assets' directory contains the assets used by the mod.
The 'DLL' directory contains the Visual Studio 2022 solution.
The 'AutoRebuild' project is the main part of the mod.
The 'Starter' project is used to start Going Medieval when you press F5 (execute) in Visual Studio.
After having opened the solution with Visual Studio, you have to go into the properties of the 'AutoRebuild' project, and modify its post-build event.
The very first line of the post-build event is:
SET GoingMedievalDirectory=V:\Steam\steamapps\common\Going Medieval\
You have to change it to your own Going Medieval directory.
You also have to modify that line:
"C:\WinUtils\pdb2mdb\pdb2mdb.exe" "$(TargetFileName)"
Either you comment it (by adding 'REM ' before it or by removing the line) either you point to your own 'pdb2mdb.exe' file (it is used to place breakpoints in the code, see below how to do that).
That way, after a successful compiling the DLL (maybe also the MDB) and all assets will automatically be copied in the 'plugins' directory of BepInEx, so just pressing F5 will update Going Medieval and start it automatically.
If you want to debug the code by using breakpoints:
In the 'Advanced topics \ Debugging plugins and game assemblies \ Debugging plugins with Visual Studio' section of the install documentation of BepInEx you will find how to do it.
In short, you have to:
- install the same version of Unity than Going Medieval in order to get the debug X64 version of the 'UnityPlayer.dll' file and replace the one in the Going Medieval directory
- modify the 'Going Medieval_Data\boot.config' file to add (or modify) the line 'player-connection-debug=1'
- modify the 'BepInEx\config\BepInEx.cfg' configuration file so that its entrypoint type is 'Camera' instead of 'Application'
That will create a debug version of Going Medieval.
Now you have to generate the MDB corresponding to the AutoRebuild DLL (by using 'pdb2mdb.exe', see before) and to place it along with the 'AutoRebuild.dll' file in the 'BepInEx\plugins\AutoRebuild\' directory (automatically done if you have correctly configured the post-build).
After that you have to launch the game, and attach Visual Studio to it by using 'Debug -> Attach Unity Debugger'.
From there, you will be able to place breakpoints (in the mod's source code only) and inspect variables.