


0 of 0


(I do not consider myself a professional, it's just pressing F12 with extra steps)
I originally made this tutorial a while ago 'cause there's A LOT of screenshotters who won't give any explanations to certain / gatekeep basic functions of ENB and Reshade, or will simply pretend that it's a gift from god to take good / decent screenshots.
(It's not.)
So let's get into it!
Prerequisites

Camera Modes
Firstly you'll need a camera mode. The two most popular are FreeFlyCam and Photomode.
I prefer Photomode as it's much more straight forward and feels like an officially implemented feature w/ menus, visual settings and more.
Photomode
https://www.nexusmods.com/fallout4/mods/49997
FreeFlyCam
http://enbseries.enbdev.com/forum/viewtopic.php?t=5386
Visuals
Secondly you'll want an ENB and / or reshade. In this guide we'll be using both.
ENB Series
Fallout 4 (enbdev.com)
Reshade
https://reshade.me/
While not required, you'll also want a weather mod as they drastically help out with lighting and atmosphere.
NAC
https://www.nexusmods.com/fallout4/mods/7657
Vivid Weathers
https://www.nexusmods.com/fallout4/mods/15466
Utilities and Poses
And fourth, and imo most importantly, you'll need SAM (Screen Archer Menu)
This lets you changes poses, face morphs, and pretty much anything involving your character.
(Be sure to hotkey this via MCM)
https://www.nexusmods.com/fallout4/mods/66047
Just find one that you like.
https://www.nexusmods.com/fallout4/mods/categories/29/
ENB and reshade setup.
Both have A LOT of different settings, tabs and buttons that may look scary, but don't worry, for they all have a purpose.
I'm not gonna cover everything, as some are simply too obvious, and most presets usually have a guide of some sort.
Shader parameters

ENBDEPTHOFFIELD is a controller for your ENB's DOF.
ENBBLOOM is a controller for your ENB's bloom.
ENBLENS controls lens stuff (I don't use this)
ENBADAPTATION controls Adaptation settings
ENBEFFECT lets you control brightness via time of day, tonemapping, etc.
ENBEFFECTPOSTPASS let's you control a lot of the heavier things such as LUT's, Exposure, tint, vibrance, letterboxing, and more.
I should also note that ENBEFFECTPOSTPASS options vary heavily depending on what mod ENB you're using.
So you'll have to tweak all these to your liking, as I can't / am not willing do a guide for every version.
EnbSeries.ini

Effect
controls what effects below are enabled, play with those as you will, most are obviously named.
Sky
This lets you control the sky colour, sky brightness, sun flare intensity, etc. Really useful for darker nights or that perfect pink sunset.
Very important. This allows you to change the sunlight colour, intensity, and even how shiny things are in view.
I always find myself tweaking environment and Sky differently for each screenshot / set I take.
And the settings I didn't talk about are pretty straight forward or, to be honest, I simply don't know what they do / never needed to mess with them.
So tweak these until you're happy and have some kind of idea as to what you're looking for in terms of visuals.
(And save your preset frequently. Enb doesn't do this automatically)
Reshade.
This, like ENB has a lot of effects / shaders that you'll never use nor acknowledge, but I'll touch upon some of the essential ones.
Brightness, contrast, saturation for obvious reasons

LUTs if your ENB doesn't support them or you simply don't like the ones you have.

Sharpness, there's a few options for this, and they really add to detail of an image.

Adds a two tone layer of fog that can be positioned in front of or behind your character.


Magic border adds that overused / played out border to your screenshot. It can be positioned in front of or behind your character.


If Magic Border doesn't work / looks weird change your global preprocessor settings to these and / or change the picture frame colour to transparent.

Like the Enb settings, tweak whatever to your preference, and don't be afraid to experiment.
(Do know that Reshade automatically saves upon every tweak, so be mindful of your changes)
The Scene
Now that you have some of the above downloaded, installed, and hopefully set up to your liking, let's find a location, outfit, and maybe even prop.
For this I'll be using the Island Dream House (Can be found in my Discord server) as the location, neapolitan popsicle from Summer Beach, and the swimsuit from Vtaw Wardrobe 8.
Time of day
There's many ways you can do this, however I find using "set gamehour" to be the easiest.
You can type it via console commands manually, but it must be in 24hr format
"set gamehour to XXXX"
I've uploaded also uploaded some .TXT files you can launch w/ console that change the time of day.
Drop them into your Fallout 4 directory, then type "Bat filename" so if you want noon, type "Bat Noon", if you want sunset, type "Bat Sunset" etc, etc.
Weather
If you're running NAC or vivid weathers, both of those feature a controller that allow you to change the current weather.
Camera angling
Once you've gotten your time of day set up, open the camera mode, get it into position, angled and focused.
Then you can press your SAM hotkey and pick a pose.
As you can see the lighting is really bad, however we have our camera in position and ENB + Reshade set up, so the bulk work is done!

Back out to the main SAM tab and go to lighting > Add new > and pick one from the conveniently named tabs. Again, it all depends on your scene. So for a warm scene like this, you wouldn't wanna use cool lighting or anything out of place.

For this I used a large wide orange spotlight for the rim lighting.
(Do be careful with the usage of Wide Bright and Narrow bright Spotlights. They will often times illuminate things you don't want them to)
Then I'll use a mid wide dim and two small white bright spotlights for the frontal lighting.

Once you have some kind of lighting set up, you can tweak your face morphs and eye position. Again, this all depends on your scene.
(I gave her a slight smile and positioned her eyes to look into the camera)

And do know it never hurts to tweak your lighting rig, reshade or environment settings as you progress.
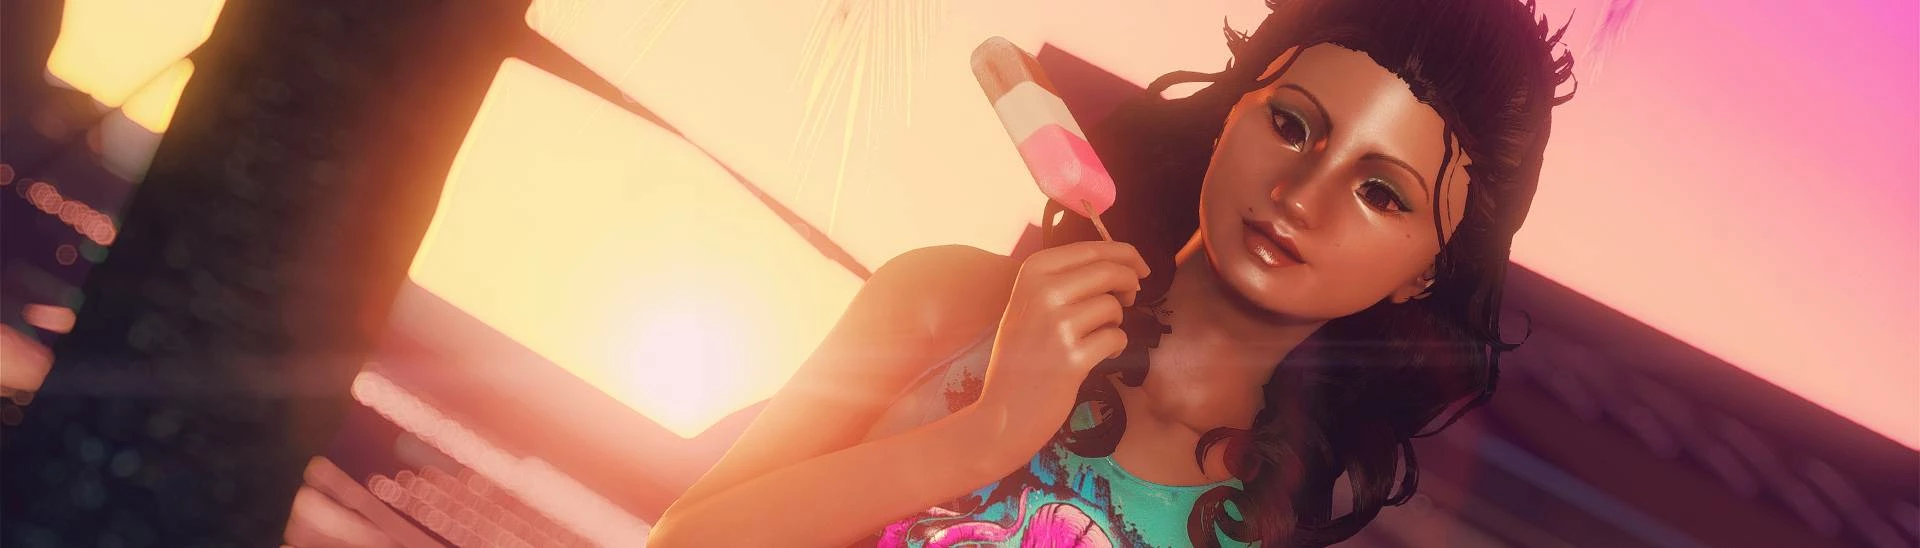
And the final result after having tweaked the neck position, sun size, sunlight intensity, sky colour and environment settings.

I hope this has been of help, and if you learned something from this tutorial, want to inspire or maybe help others get into the, please submit your screenshots to the mod so I can add them to the gallery or even share your work in our Discord Server!
Have fun and happy screenshotting, and please don't grow an ego in the process.
(You're not gifted, you're just too anxious to pick up a real camera)
(I do not consider myself a professional, it's just pressing F12 with extra steps)
I originally made this tutorial a while ago 'cause there's A LOT of screenshotters who won't give any explanations to certain / gatekeep basic functions of ENB and Reshade, or will simply pretend that it's a gift from god to take good / decent screenshots.
(It's not.)
So let's get into it!
Prerequisites
Camera Modes
Firstly you'll need a camera mode. The two most popular are FreeFlyCam and Photomode.
I prefer Photomode as it's much more straight forward and feels like an officially implemented feature w/ menus, visual settings and more.
Photomode
https://www.nexusmods.com/fallout4/mods/49997
FreeFlyCam
http://enbseries.enbdev.com/forum/viewtopic.php?t=5386
Visuals
Secondly you'll want an ENB and / or reshade. In this guide we'll be using both.
ENB Series
Fallout 4 (enbdev.com)
Reshade
https://reshade.me/
While not required, you'll also want a weather mod as they drastically help out with lighting and atmosphere.
NAC
https://www.nexusmods.com/fallout4/mods/7657
Vivid Weathers
https://www.nexusmods.com/fallout4/mods/15466
Utilities and Poses
And fourth, and imo most importantly, you'll need SAM (Screen Archer Menu)
This lets you changes poses, face morphs, and pretty much anything involving your character.
(Be sure to hotkey this via MCM)
https://www.nexusmods.com/fallout4/mods/66047
Just find one that you like.
https://www.nexusmods.com/fallout4/mods/categories/29/
ENB and reshade setup.
Both have A LOT of different settings, tabs and buttons that may look scary, but don't worry, for they all have a purpose.
I'm not gonna cover everything, as some are simply too obvious, and most presets usually have a guide of some sort.
Shader parameters
ENBDEPTHOFFIELD is a controller for your ENB's DOF.
ENBBLOOM is a controller for your ENB's bloom.
ENBLENS controls lens stuff (I don't use this)
ENBADAPTATION controls Adaptation settings
ENBEFFECT lets you control brightness via time of day, tonemapping, etc.
ENBEFFECTPOSTPASS let's you control a lot of the heavier things such as LUT's, Exposure, tint, vibrance, letterboxing, and more.
I should also note that ENBEFFECTPOSTPASS options vary heavily depending on what mod ENB you're using.
So you'll have to tweak all these to your liking, as I can't / am not willing do a guide for every version.
EnbSeries.ini
Effect
controls what effects below are enabled, play with those as you will, most are obviously named.
Sky
This lets you control the sky colour, sky brightness, sun flare intensity, etc. Really useful for darker nights or that perfect pink sunset.
Very important. This allows you to change the sunlight colour, intensity, and even how shiny things are in view.
I always find myself tweaking environment and Sky differently for each screenshot / set I take.
And the settings I didn't talk about are pretty straight forward or, to be honest, I simply don't know what they do / never needed to mess with them.
So tweak these until you're happy and have some kind of idea as to what you're looking for in terms of visuals.
(And save your preset frequently. Enb doesn't do this automatically)
Reshade.
This, like ENB has a lot of effects / shaders that you'll never use nor acknowledge, but I'll touch upon some of the essential ones.
Brightness, contrast, saturation for obvious reasons
LUTs if your ENB doesn't support them or you simply don't like the ones you have.
Sharpness, there's a few options for this, and they really add to detail of an image.
Adds a two tone layer of fog that can be positioned in front of or behind your character.
Magic border adds that overused / played out border to your screenshot. It can be positioned in front of or behind your character.
If Magic Border doesn't work / looks weird change your global preprocessor settings to these and / or change the picture frame colour to transparent.
Like the Enb settings, tweak whatever to your preference, and don't be afraid to experiment.
(Do know that Reshade automatically saves upon every tweak, so be mindful of your changes)
The Scene
Now that you have some of the above downloaded, installed, and hopefully set up to your liking, let's find a location, outfit, and maybe even prop.
For this I'll be using the Island Dream House (Can be found in my Discord server) as the location, neapolitan popsicle from Summer Beach, and the swimsuit from Vtaw Wardrobe 8.
Time of day
There's many ways you can do this, however I find using "set gamehour" to be the easiest.
You can type it via console commands manually, but it must be in 24hr format
"set gamehour to XXXX"
I've uploaded also uploaded some .TXT files you can launch w/ console that change the time of day.
Drop them into your Fallout 4 directory, then type "Bat filename" so if you want noon, type "Bat Noon", if you want sunset, type "Bat Sunset" etc, etc.
Weather
If you're running NAC or vivid weathers, both of those feature a controller that allow you to change the current weather.
Camera angling
Once you've gotten your time of day set up, open the camera mode, get it into position, angled and focused.
Then you can press your SAM hotkey and pick a pose.
As you can see the lighting is really bad, however we have our camera in position and ENB + Reshade set up, so the bulk work is done!
Back out to the main SAM tab and go to lighting > Add new > and pick one from the conveniently named tabs. Again, it all depends on your scene. So for a warm scene like this, you wouldn't wanna use cool lighting or anything out of place.
For this I used a large wide orange spotlight for the rim lighting.
(Do be careful with the usage of Wide Bright and Narrow bright Spotlights. They will often times illuminate things you don't want them to)
Then I'll use a mid wide dim and two small white bright spotlights for the frontal lighting.
Once you have some kind of lighting set up, you can tweak your face morphs and eye position. Again, this all depends on your scene.
(I gave her a slight smile and positioned her eyes to look into the camera)
And do know it never hurts to tweak your lighting rig, reshade or environment settings as you progress.
And the final result after having tweaked the neck position, sun size, sunlight intensity, sky colour and environment settings.
I hope this has been of help, and if you learned something from this tutorial, want to inspire or maybe help others get into the, please submit your screenshots to the mod so I can add them to the gallery or even share your work in our Discord Server!
Have fun and happy screenshotting, and please don't grow an ego in the process.
(You're not gifted, you're just too anxious to pick up a real camera)