Thank you very much for sharing this project. I have been using v.5 for about 50 hours of gameplay now and it is working as described. Image quality is surprisingly good. I have also been testing Unbound World Space which disables all precombines and previses from the game - great for settlement building, but reduces FPS a bit due to increased rendering requirements. The 1k Texture Project nearly compensates for that fps loss.
Unfortunately i downloaded and assembled v.6 of the 1k Texture Project with very disappointing results. The 9 texture BA2s for v.5 total about 13GB. The same 9 files from v.6 total more than 19GB with no noticeable improvement in texture quality. Loading time increased by 30 seconds. Many unexplained crashes. Is v.6 only meant to be used with an installation of the HighRes DLC?
So i've gone back to v.5 and am happy again. Thanks again for your hard work!
Thank you for your review of the mod. Sorry to hear that version 6 didn’t work out well for you, but thankfully, you can still use version 5 as a backup. It’s interesting that you mention crashes, as the only thing I edited were the textures from the High Res DLC. I used batch processing to first remove any textures that were 1K or smaller to reduce the workload. Then, I took the remaining textures and converted them to 1K. Most of these are set dressing and props, which is why the DLC is so massive.
I chose to use the High Res DLC because some textures had 1K diffuse maps, but their normal maps were sometimes either 1K or 512, and the same was true for the specular maps. I thought the High Res DLC would help resolve this inconsistency. For example, some clothes and armor had lower-resolution specular maps, which resulted in blurry edges.
But thank you again for the Unbound World Space mod, it's shocking that Bethesda didn’t optimize their game using their own built-in tools.
Thank you for your reply. Sorry if you misunderstood me, UWS is not my mod, it is totally the brainchild of Qrsr! If anyone wants total control of scrapping settlements, or are sick of the PRP patching nightmare, i highly recommend trying UWS. And of course also the 1k Texture Project to help reclaim some of the lost fps!
No problem! I forgot to mention that you can also use this method if you want to replace the vanilla textures with other texture mods, and it also keep a backup of the optimized ba2 files so that you don't have to do the process again. Backup to an external drive not a USB, you'll shorten the file span of those thumb drives!
You can also use BIMP for GIMP to perform the batch processing of the files to reduce the resolution while preserving the aspect ration, just remember to download gimp manually or else BIMP can't find GIMP.
Thanks for that. I have one such project in mind and was wondering how to do it.
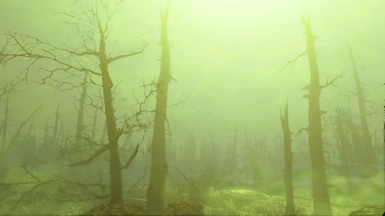
It might be useful to mention here that for those who use the A Forest mod, there is an AForest 1k Performance Textures mod which replaces the huge number of textures AForest places throughout the game. Looks very nice and is hard to tell the difference between the 1k and 2k versions.
Also there is the Game Visuals Configuration Menu which, among many other things, really improves the rendered quality of textures. It is very performance friendly and highly recommended for improving subjective visual quality when using 1k textures.
Just a mention that the Google BA2 files are packed with the NG version of Archive2. I use version 1.10.163 of Fallout. There's no problem playing the game with these NG BA2s if you have the Backported Archive2 Support System installed, but even with that you cannot view or edit the archives or see textures in BodySlide outside the game!
So i manually assembled the v.5 files with the robocopy method and my OG version of Archive2. Having the experience of doing this with v.6, I used a method which i found to be more practical and easier to keep track of:
Spoiler:
Show
PREPARE:
1. Make "Working" folder on desktop. Inside Working folder make these folders: 2 BA1 BA2 BA3 BA4 BA5 BA6 BA7 BA8 BA9 New
2. Unpack "1k Texture Resize Pack-74721-5-0" to the "2" folder. (This works with v.6 too)
UNPACK ALL VANILLA ARCHIVES:
Open Archive2.
3. Open the vanilla Fallout4-Textures1.ba2 (File>Open). Extract the files (Archive>ExtractAll) to the Working\BA1 folder. DO NOT CLOSE ARCHIVE2.
4. Repeat step 3 with each vanilla texture archive, Fallout4-Textures2.ba2 to BA2, Fallout4-Textures3.ba2 to BA3, etc.
8. Open Archive2. Start a New archive (File>New). Choose "DDS" as the archive type. Archive>AddFolder to add the textures folder from Working\BA1.
9. Save the new archive: File>SaveAs "Fallout4 - Textures1.ba2" in folder Working\New. DO NOT CLOSE ARCHIVE2.
10. File>New. (DDS setting is still there*) Add textures folder from Working\BA2. Archive2>File>SaveAs "Fallout4 - Textures2.ba" in folder Working\New. DO NOT CLOSE ARCHIVE2.
11. Repeat step 10 for each fileset, changing the destination filename to match the archive number
DONE
* Leaving console or Archive2 open during these steps keeps some settings/locations constant which reduces keystrokes and makes locating folders simpler.
There were several files that Archive2 reported as incompatible formats and skipped. I guess these are from NG stuff and shouldn't affect my game?
Thanks again, yeah this texture was made from the Next Gen version. I tried to downgrade but encountered loads of errors and so I took the software engineering approach and had to work the Next Gen version and start from scratch going and updating all my mods for Next Gen.
By the way you can ignore texture 7 and 8 archives since they only have the terrain textures of the Commonwealth and are only 512x512.
Also if you are not planning on using conversion mods, You can get FO4Edit to clean the esm and creation club content to reduce load times and fix any script lag. Remember to backup before cleaning! But if everything works well you can backup and save both esm and the creation club content.
Also if you are not planning on using conversion mods, You can get FO4Edit to clean the esm and creation club content to reduce load times and fix any script lag. Remember to backup before cleaning! But if everything works well you can backup and save both esm and the creation club content.
Oh wow thank you! I really think this mod can help reduce the VRAM usage for mid to low end systems and have buttery smooth fps with the high fps fix mod and your mod!
No as having loose files will slow down your game. You can find a google drive that Valerie1972 created which has the files already made that you can download and replace the originals. Although you should create a backup in case that you want to revert to the original textures.
If you don't want to go through all of the steps to make the ba2 files yourself, you can download them here: Google drive link
Extract the ba2 files into your game's data directory - don't forget to back up your originals, either by copying them elsewhere or by renaming them something like "Fallout4 - Textures9.ba2.backup" just in case I screwed something up.
Wait, do I just have to put those files in my game's Data folder, replacing the vanilla files, and that's it? Sorry, I'm new to this and having a hard time understanding
You could make a zip file named the file the same as the mod and create a Data folder inside and put the Textures folder (which has all the textures) inside of the Data folder and then take the zip file and install it using your mod manager.
Ah ok so if you use the zip file method you can remove the file or disable it on the mod manger as if you do the creation kit method that I did, you would want to backup the original ba2 texture files
Depends on the hardware and what textures that are being adjusted. Generally you would get increase in responsiveness, smoother animations and reduced VRAM.
As for FPS you would want to use an FPS counter before and after the mod is installed to see the differences. Personally I don't care about FPS as long as the frame timing is consistent.


31 comments
Thank you very much for sharing this project. I have been using v.5 for about 50 hours of gameplay now and it is working as described. Image quality is surprisingly good. I have also been testing Unbound World Space which disables all precombines and previses from the game - great for settlement building, but reduces FPS a bit due to increased rendering requirements. The 1k Texture Project nearly compensates for that fps loss.
Unfortunately i downloaded and assembled v.6 of the 1k Texture Project with very disappointing results. The 9 texture BA2s for v.5 total about 13GB. The same 9 files from v.6 total more than 19GB with no noticeable improvement in texture quality. Loading time increased by 30 seconds. Many unexplained crashes. Is v.6 only meant to be used with an installation of the HighRes DLC?
So i've gone back to v.5 and am happy again. Thanks again for your hard work!
I chose to use the High Res DLC because some textures had 1K diffuse maps, but their normal maps were sometimes either 1K or 512, and the same was true for the specular maps. I thought the High Res DLC would help resolve this inconsistency. For example, some clothes and armor had lower-resolution specular maps, which resulted in blurry edges.
But thank you again for the Unbound World Space mod, it's shocking that Bethesda didn’t optimize their game using their own built-in tools.
You can also use BIMP for GIMP to perform the batch processing of the files to reduce the resolution while preserving the aspect ration, just remember to download gimp manually or else BIMP can't find GIMP.
It might be useful to mention here that for those who use the A Forest mod, there is an AForest 1k Performance Textures mod which replaces the huge number of textures AForest places throughout the game. Looks very nice and is hard to tell the difference between the 1k and 2k versions.
Also there is the Game Visuals Configuration Menu which, among many other things, really improves the rendered quality of textures. It is very performance friendly and highly recommended for improving subjective visual quality when using 1k textures.
Just a mention that the Google BA2 files are packed with the NG version of Archive2. I use version 1.10.163 of Fallout. There's no problem playing the game with these NG BA2s if you have the Backported Archive2 Support System installed, but even with that you cannot view or edit the archives or see textures in BodySlide outside the game!
So i manually assembled the v.5 files with the robocopy method and my OG version of Archive2. Having the experience of doing this with v.6, I used a method which i found to be more practical and easier to keep track of:
PREPARE:
1. Make "Working" folder on desktop. Inside Working folder make these folders:
2
BA1
BA2
BA3
BA4
BA5
BA6
BA7
BA8
BA9
New
2. Unpack "1k Texture Resize Pack-74721-5-0" to the "2" folder. (This works with v.6 too)
UNPACK ALL VANILLA ARCHIVES:
Open Archive2.
3. Open the vanilla Fallout4-Textures1.ba2 (File>Open).
Extract the files (Archive>ExtractAll) to the Working\BA1 folder.
DO NOT CLOSE ARCHIVE2.
4. Repeat step 3 with each vanilla texture archive, Fallout4-Textures2.ba2 to BA2, Fallout4-Textures3.ba2 to BA3, etc.
ROBOCOPY ALL NEW FILESETS
5. Open the windows console and type:
robocopy C:\Users\username\desktop\Working\2 C:\Users\username\desktop\Working\BA1 /s /xl
Replace "username" with your windows user name. Press enter and watch the files fly. DO NOT CLOSE THE CONSOLE.
6. Press the Up arrow on the keyboard. This will recall the previous command. Change the line to read:
robocopy C:\Users\username\desktop\Working\2 C:\Users\username\desktop\Working\BA2 /s /xl
Press Enter. DO NOT CLOSE THE CONSOLE.
7. Repeat step 6 for each fileset.
SAVE ALL FILESETS TO NEW BA2 ARCHIVES
8. Open Archive2. Start a New archive (File>New). Choose "DDS" as the archive type.
Archive>AddFolder to add the textures folder from Working\BA1.
9. Save the new archive: File>SaveAs "Fallout4 - Textures1.ba2" in folder Working\New. DO NOT CLOSE ARCHIVE2.
10. File>New. (DDS setting is still there*) Add textures folder from Working\BA2.
Archive2>File>SaveAs "Fallout4 - Textures2.ba" in folder Working\New. DO NOT CLOSE ARCHIVE2.
11. Repeat step 10 for each fileset, changing the destination filename to match the archive number
DONE
* Leaving console or Archive2 open during these steps keeps some settings/locations constant which reduces keystrokes and makes locating folders simpler.
There were several files that Archive2 reported as incompatible formats and skipped. I guess these are from NG stuff and shouldn't affect my game?
By the way you can ignore texture 7 and 8 archives since they only have the terrain textures of the Commonwealth and are only 512x512.
Best video:
Best video:
Extract the ba2 files into your game's data directory - don't forget to back up your originals, either by copying them elsewhere or by renaming them something like "Fallout4 - Textures9.ba2.backup" just in case I screwed something up.
As for FPS you would want to use an FPS counter before and after the mod is installed to see the differences. Personally I don't care about FPS as long as the frame timing is consistent.