About this mod
A Template for making Faction Packs for SIm Settlements 2 Chapter 3.
Features a fully working faction, 5 load orders, 5 ranks, 3 special units, and 1 flag.
Each Flag pdn file contains 4 backgrounds for your to pick from.
And finally a tutorial is provided on the front page help you tweak the template.
- Requirements
- Permissions and credits
- Changelogs
*Important note* - All current faction packs, including this template, require you to start a new game. The Template was and ESL, but is now an ESP, do not change that or else the Script Injection will no longer work. Also, the information in this tutorial and the template itself are subject to change, SS2 Chapter 3 is new so as new updates are released for that, the tutorial and template will also be updated accordingly to reflect those changes, so if you plan to make a faction pack using this template then you must also plan to revise or possibly remake it when these updates come around later down the road.
1. You’ll want to rename the names of a few entries to the Faction name of your choosing or an a abbreviation of the faction name of your choosing, specifically you’ll need to rename the names
- In the Armor Section - The Ranks, Loadouts, Unit Types, Uniform, and Armor pieces labeled Custom Faction.
- In the Message Section – The Loadout and Unit Type Descriptions labeled Custom Faction; you will also need to add a description to each of these entries.
- In the Misc Item Section – The Weapons and Armor Lists descriptions, the descriptions are the names of these entries, really odd.
- In Non-Player Character (Actor) – The Units labeled Custom Faction.
- In Spell – The Faction Special Power Labeled Custom Faction Special Power.
- In Static – The Flag Labeled Custom Faction Flag
You may also want to change the EditorIDs by replacing the word Custom with either your chosen faction name or an Abbreviation of it. This isn’t super necessary, but it does make things easier for you to organize things.
2. To get different weapons go to the Leveled List Section and click on the “BL_Weapon_LL_Custom_Auto” entry and then change what’s in the “Leveled List Entries (sorted)” section to your liking. You can replace what’s there with weapon entries or with other level list entries and you can change the LVLF – Flags (sorted) to calculate for each entry or to use all items.
An important tip when changing stuff is to look at the “Referenced By” Section of a selected entry, “BL_Weapon_LL_Custom_Auto” entry connects to the “BL_Weapon_Custom_R1” thru “BL_Weapon_Custom_R5” in the Form ID List Section which in turn connects to something else which connect to something else, etc. Use the “Referenced By” section to follow the bread crumbs so to speak to make sure everything is lining up.
This tip is especially important if you plan to add new weapon Leveled lists because then you will need to use the “Referenced By” section to follow the bread crumbs and replace old weapon entries with new one. It’s not difficult, just tedious.
One Important point, special units that are not using the rank loadouts need to have their weapons added to their NPC entry, if you look at the “Referenced By” section of the “BL_Weapon_LL_Custom_Auto” you’ll see that it connects directly to the BL_CustomUnit_R3 "Custom Faction Extra Soldier"” in the Non-Player Character (actor) section and the “BL_Weapon_LL_Custom_HeavyWeapons” connects directly to the “BL_CustomUnit_PowerArmor_R2 "Custom Faction Power Armor"” in the Non-Player Character (actor) Section.
You must follow this procedure for all Special Units that don’t use rank loadouts, just duplicate the same patterns already in the template. The same goes for the clothes and armor which we will get to now.
3a. To get different clothes go to the Outfits Section and click on the “BL_Outfit_Loadout_Custom_R1” thru to the “BL_Outfit_Loadout_Custom_ExtraSoldier” entries and simply change the items in the INAM – Items (sorted) section to your liking. You can replace what’s there with level list entries or with armor entries.
To change the armor pieces go to the Leveled List Section and click on the “BL_Armor_R1” thru “BL_Armor_R5” and change the “Leveled List Entries (sorted)” section to your liking. You can replace what’s there with weapon entries or with other level list entries and you can change the LVLF – Flags (sorted) to calculate for each entry or to use all items.
You could also add the armor pieces directly to the entries in the Outfit Section, but putting them in a leveled list affords some flexibility, perhaps you want some randomness in what a soldier wears for example.
The “BL_Outfit_Loadout_Custom_ExtraSoldier” must connect to the “BL_CustomUnit_R3 "Custom Faction Extra Soldier"” entry in the Non-Player Character Section as that special unit doesn’t use ranked loadouts.
You must follow this procedure for all Special Units that don’t use rank loadouts, just duplicate the same patterns already in the template.
3b. To get different uniforms go to the Armor section and select the "BL_UniformSelector_Custom Faction Basic Outfit" entry and then with in it right at the top there is the "simsettlementsv2:armors:uniform" script and below that under Underarmor you should see the "BL_Clothes_Basic "Custom Faction Basic Outfit"" armor entry attached.
Change the "BL_Clothes_Basic "Custom Faction Basic Outfit"" armor entry to any armor entry you want, it must be an armor entry as level list entries don't work, and then change the editor id from "BL_UniformSelector_Custom Faction Basic Outfit" to match the name of the new armor you've chosen.
Now select the armor you've chosen to replace the "BL_Clothes_Basic "Custom Faction Basic Outfit"" armor entry and compare that armor entry to the "BL_UniformSelector_Custom Faction Basic Outfit" and copy all the data from that armor entry over to the "BL_UniformSelector_Custom Faction Basic Outfit".
If you compare the "BL_Clothes_Basic "Custom Faction Basic Outfit"" and the "BL_UniformSelector_Custom Faction Basic Outfit" you will notice they they are the same, except that the UniformSelector has a script attached to it and under keywords the "SS2_Tag_UniformSelector" keyword is attached.
4. Changing power armor is trickier; go to the Leveled Lists Section and click on the “BL_Armor_Power_T51_Custom” and then change what the items in the INAM – Items (sorted) section to your liking. You can replace what’s there with level list entries or with armor entries.
The “BL_Armor_Power_T51_Custom” must connect to the “BL_Custom_PowerArmorFurniture "Power Armor"” entry in the Furniture Section, which in turn must connect to the “BL_CustomUnit_PowerArmor_R2 "Custom Faction Power Armor"” in the Non-Player Character (actor) section.
You must follow this procedure for all Power Armor Special Units, just duplicate the same patterns already in the template.
As of SS2 3.1.0 you may also want to add a loadout entry for your Power Armor Units that connects to the “BL_CustomUnit_PowerArmor_R2 "Custom Faction Power Armor"” and has the BL_Custom_PowerArmorFurniture "Power Armor"” furniture entry attached.
You don't necessarily need to have a power armor unit Loadout, however, in the event that soldiers leave their power armor you will not be able to force them back into their power armor with out the loadout so its good insurance to have the loadout. If your troops leave their power armor all you need to do his click on that troop with the R key, then click Armory options, then change loadout, and then reequip them with their current loadout and they should reenter their power armor. You may need to do this repeatedly, however, as they may leave their armor again.
If you have the power armor Loadout then you don't necessarily need to attach the “BL_Custom_PowerArmorFurniture "Power Armor"” furniture entry to the “BL_CustomUnit_PowerArmor_R2 "Custom Faction Power Armor"” npc entry, but I do both to insure that the power armor units will wear their power armor.
5. New Special Units, Ranks, And Loadouts; if you wish to add new ones simply copy what is already in the template, but they must connect to specific FormID Entries which we will do with Script Injection.
New Special Units must connect to, as of SS2 v3.1.0
- "SS2_C3_AllUnitTypes"
- "SS2_C3_PlayerUnlockedUnitTypes"
The formID's to inject to for special units changed with SS2 v3.1.0 so If you are updating your injector then “SS2_C3_DefaultUnitTypes” Must be changed to “SS2_C3_AllUnitTypes” and “SS2_C3_DefaultPlayerUnlockedUnitTypes” Must be changed to “SS2_C3_PlayerUnlockedUnitTypes”
New Ranks must connect to the
- “SS2_C3_DefaultSoldierRanks”
- “SS2_C3_DefaultPlayerUnlockedSoldierRanks_TODO_SwitchMostEntriesToUnlockables”
New Loadouts must connect to the
- “SS2_C3_DefaultNPCLoadouts”
- "SS2_C3_DefaultPlayerUnlockedLoadouts_TODO_SwitchMostEntriesToUnlockables” entries.
New Uniforms must connect to the
- SS2_C3_Uniforms_Default
To make a script to Inject new Special Units, Ranks, and Loadouts into these form list you need a script called "Dank_FormListInjector" which is packed with the Template download and the Template Injector download, but I want to mention that I originally got it from the Injector Scripts - Leveled Item - Legendaries - INNR - Form List mod by Dank Rafft so special thanks for making these scripts available.
If you only plan to make 1 faction pack then you can add the script to your faction pack esp, but if you plan to make more than one faction pack I would suggest making a new esp just for the Injector Script. Also for the injector script to work the faction pack esp needs to be an esp, not an esl or an esp flagged as an esl, esl's change formId numbers based on where they are in the load order which messes with the way the script injector works, this is why the template is no longer an esl.
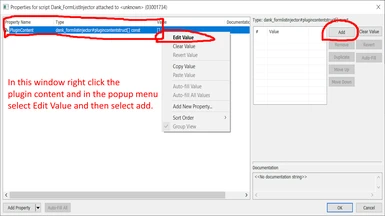
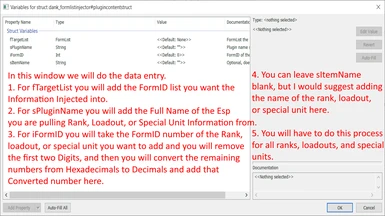
Now, to make the script (images are above to help guide you if needed) follow these steps or if you plan to just edit the existing script that comes with the template to add more stuff then follow steps 1-4 and then select the "BL_Custom_Injector" and then follow steps 9-15
- You will need to enter the Creation Kit, which you can download through steam.
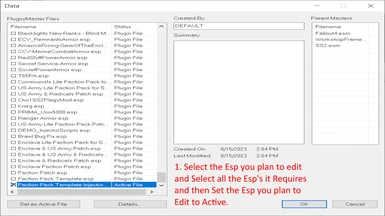
- Then need to select whatever esp you are planning to add this script to, set that esp as the active plugin, and you also need to select whatever other esp the active esp requires.
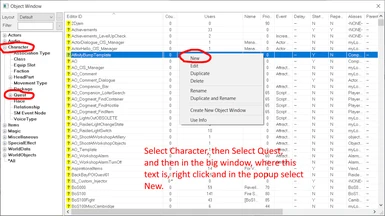
- When everything loads up go to the objects window then select character
- In character select quest.
- In the big window that shows all the quest files right click in that window and in the popup menu select new.
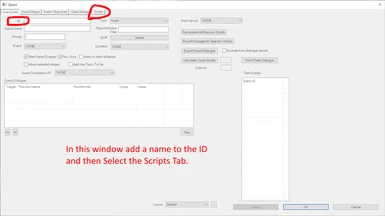
- In the quest popup menu you will start in the quest data tab, where it says ID add an ID for your quest that signals that it is a script injector.
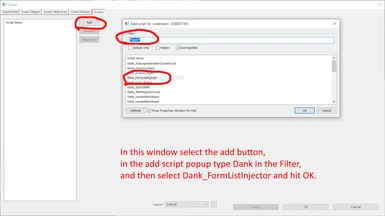
- Now select the Scripts tab and click add
- In the filter type "Dank" and then select the "Dank_FormListInjector"
- A new popup should appear displaying the properties of this script, right click the property and select in the popup menu edit value.
- Click the add button on the far right side and now a new popup should appear for you to edit the variables.
- For "fTargetList" you need to select the one of the 6 form list's above, start with one of the rank form lists for orderliness.
- For "sPluginName" you need to input what ever the esp file is that you are pulling data from, in the case of my template Injects the esp is "Faction Pack Template.esp" if you change the name of the esp you will need to change the name of the esp in this script, no exceptions otherwise things wont work.
- For "iFormID" things get tricky; you need to take the FormID number of whatever rank, loadout, or special unit you want to input and remove the first two digits and then you need to take the remaining numbers and change them from Hexadecimals into Decimals, then you take the decimal number and input it into the "iFormID" Field. For example, the BL_SoldierRank_CustomSet_R1 FormId is for me "03000001" which then becomes "000001" which is then converted to "1" so in the "iFormID" field I would put 1.
- For "sItemName" you would put the specific name of the item being injected, this step is optimal so you don't need to put anything here, but I would suggest you put something here in case you need to fix something later. If you were imputing data for BL_SoldierRank_CustomSet_R1you would put in this field something like Custom Faction Rank 1.
- Do this for all ranks, loadouts and special units. Just remember when leaving a popup menu to hit the ok button to leave, not the X or the Cancel buttons as that will undo your work, then when done go to the file tab and save.
The other thing you will need to do for the ranks and loadouts is to go into FO4Edit and the go to the quest section, there you will see the BL_Custom_OutfitManager quest. All ranks and Loadouts are attached to this quest so if you plan to add new ranks or loadouts you will also need to add them to this quest.
The BL_Custom_OutfitManager is just a copy of the SS2_outfitmanager with everything taken out, but my rank and load out entries. The SS2_Outfitmanger in the SS2.Esm will no longer be touched by this template.
6. To add a custom flag all you need to do is get Paint.net, its free, and then go to the textures folder and then the BL Flags folder and then edit either the the Custom Faction Flag 1.pdn file and the Custom Faction Flag 1 Working.pdn file in paint.net. I didn’t merge the layers of the images so you can still play around with the pieces.
Editing is really simple; make a flag in whatever program you want or get it premade from somewhere else and copy that flag you want, then while in paint.net select edit, then click paste into new layer, then select the layer with the flag and place it above the background layer, then click the wrench icon in the layer menu, then select Multiply from the Blend Mode drop down menu.
This will make your flag transparent and the background will now show giving your flag a nice textured look. However, sometimes bright or dark colors will make it hard to see the background effectively so you can either change the colors to be either brighter or darker depending on your circumstance or you can click on the wrench icon in the layer section and change the Opacity of the flag, turn the number down from 255 to between 200 and 210 and the background should become more apparent.
You can make all of these changes in the Custom Faction Flag 1 Working.pdn file, but if you do you will then need to copy and paste your creation over to the Custom Faction Flag 1.pdn twice because as you’ll see the Custom Faction Flag 1.pdn has the flag appear twice and yes it has to be that way, just resize the flag and then copy and paste the resided flag and move it down a bit, just follow what’s already in the pdn.
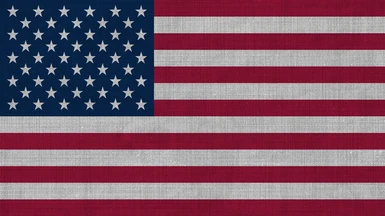
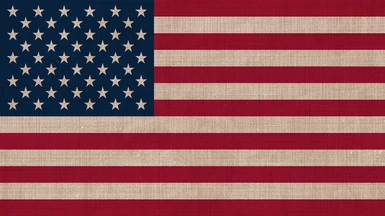
The pdn files that are provided each have 4 backgrounds for you to pick from; the default background, the default background sepia version, the seen some stuff background, and the seen some stuff sepia background version. The flag backgrounds can be seen in the images above.
Once you are done editing the Custom Faction Flag 1.pdn save it as a pdn to save your work and then save as a dds file which needs to be saved as “Custom Faction Flag 1.dds” or else you’ll need to change the material file.
If you want to change the name of the DDS file you will need to download the Material Editor Program and then go to the Material Folder and then the BL Flag Folder and then drag the Custom Faction Flag 1.bgsm into the Material Editor program, select the material tab and then change the diffuse from BL Flags/Custom Faction Flag 1.dds to whatever you renamed the dds file to.
If you also want to rename the material file then you will need to open the esp up in FO4Edit and then go to the Material Swap section and change the BL Flags\Custom Faction Flag 1.bgsm to whatever you need to change it to in all of the entries in the Material Swap Section.
Now if you want to add a new flag then you will need to add a new dds and connect it to a new material, you can just copy the one I already give you and rename it and change the diffuse, and then in FO4Edit you will need to add 5 new material swap entries to connect to 7 new static entries and 1 new moveable static which need to connect to 1 new armor entry, which needs to connect to the “BL_Custom_AddonItems_ThemeDefinitions_Flags” entry in the FormID List Section.
Again, none of this is truly difficult, it’s just really, really tedious.
7. Now this is very important, if you change the name of the esp you must go to the “BL_Custom_AddonData "Addon Config Template"” entry in the Misc. Item Section.
Scroll down through the scripts entry till you find a property labeled “sAddonFilename” underneath that you should see an entry labeled “Faction Pack Template.esp”
You must change the entry labeled “FactionPack Template.esp” to whatever you changed the esp name to or else your flags will not show up in game.
8. For testing purposes I would suggest getting SKK Fast Start new game to quickly get into the game, then hit the ~ key and type in TGM to enter god mode, then using the mcm menu go to Sim Settlements 2 and spawn in the City Manager 2078 Holotape, then open it and select tools, then cheats, and then select every option besides quest skipping.
Then go back into the MCM menu and go back to sim settlements 2 and turn off all the costs and then place the Warplanners desk in a settlement and once placed head to another settlement and place another Warplanners desk, the first warplanners desk placed will make that settlement the capital city which is useless for testing hence the need to go to another settlement after placing the first desk, at the second settlement place the second warplanners desk and then you should be able to turn said settlement into an outpost. I usually use Sanctuary as the capital and Red Rocket as the outpost.
Once your outpost is set up go through the radio and the quartermasters keys to see if the ranks, loadouts, and special units are there. Click on the flag next to see if our flag is in the list, if not then you need do step 7 or you need to clear the flag cache in the City Manager 2078 Holotape; to do so open the holotape and select tools, then Advanced Tools, then Reset Settlement Flags Cache.
Now we want to see if our troops are wearing their armor and using their weapons, the crude way is to hit ~ and type (only if you don't change unit names) "Help Custom 0" and you should see some NPC codes for the custom troops from this mod, type "Player.placeatme" and then the code to spawn the units in. This is a quick way to see if they are wearing their armor and using their weapons.
The other way keeps in line with how the SS2 Chapter 3 war mechanics work usually; in your outpost place a power source, a radio tower, an armory and recruitment martial plot, and place 10 or more beds. Go to the warplanners desk and hit the recruitment radio and then adopt some of the custom special units and then queue a few up, then sleep for 24 hours and a soldier should appear, where depends on the settlement. Once you have 5 warrior you may want to run a raid with them.
That's the process for testing a Faction pack, but remember, any change you make to the esp during testing will require a new game for the changes to appear.
9. Well, that's the most important stuff covered, I could go on and on, but this had to end somewhere and if there is anything you don't understand please leave a comment and I will try to help you out.


