


0 of 0
About this mod
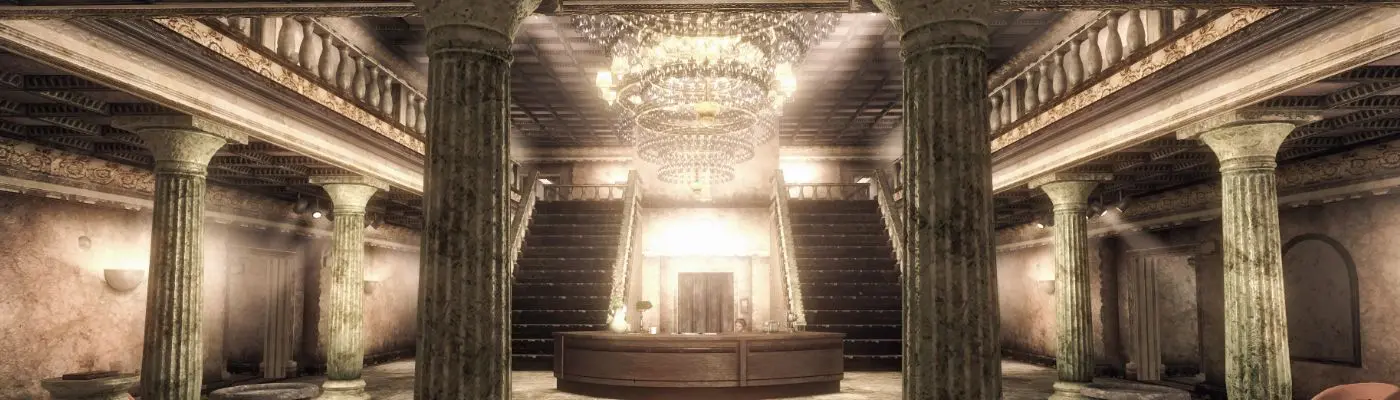
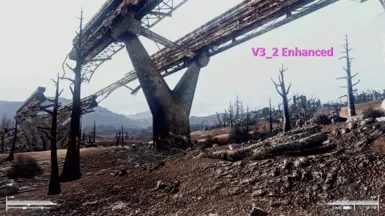
Just an INI preset I made after messing around with reshade, works with ENB, I tried to go for a "bright" and "realistic" look. Although depending on your monitor and personal tastes it may not look as good as it does for me. I'm using the project reality mod and HD retextures to upgrade the last gen console tier graphics F3 has.
- Permissions and credits
New ENB Version:
It's possible to use Reshade & ENB at the same time, to be able to take advantage of ENBs engine vRAM texture and lighting fixes, as well as Reshade's vast amounts of customizable shaders/fxs. To do so, you must first install reshade like normal (following the reshade install instructions below) then, rename its d3d9.dll file to d3d9_reshade.dll
Next install my ENB preset (or whichever you prefer) following the ENB installation instructions, included in my preset.
After installing the ENB, make sure the enblocal.ini includes Reshade's DLL. Change or replace the 3 lines under Proxy to the following:
[PROXY]
EnableProxyLibrary=true
InitProxyFunctions=false
ProxyLibrary=d3d9_reshade.dll
Make sure it's EnableProxyLibrary=true InitProxyFunctions=false , and you use the correct DLL
You should now be able to run Reshade with ENB, please be aware that due to the renaming of Reshade's DLL file, your existing reshade settings will be reset unless you revert the DLL. None of your presets will be reset, only the menu settings. Which means you will have to manually add all the effect and texture folders in the in game Reshade menu settings and re-select the preset you were using. At least for me I did.
The ENB preset Requires ENB http://enbdev.com/download_mod_falloutnv.htm & the Nevada Preset https://www.nexusmods.com/newvegas/mods/55112?tab=files, the RWL mod is not required. In fact, you should either delete or skip the "Data" folder from the Nevada preset.
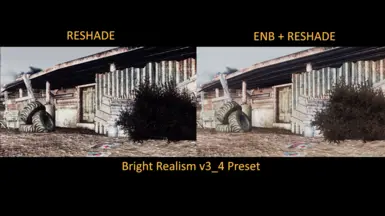
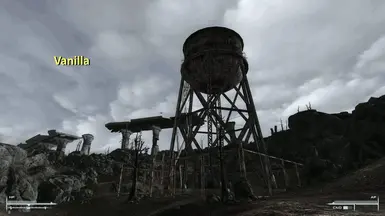
While it doesn't look as bright or colorful as the reshade version (unless you also use reshade on top), ENB adds an out of memory fix when using large textures, it also fixes some of the weird lighting the FO3 engine has, the ENB version also adds a cool DOF and enchances lights and shadows. Installation instructions included in the download.
Reshade Update v3_2:
Depending on your monitor calibration/settings my preset may not look as good for you as it does for me. I've also changed my monitors brightness and Icolor settings, and I've messed with the nvidia color settings to lower the saturation and increase the brightness and contrast as well...
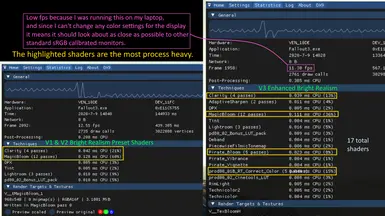
IMO having a really dark contrast is unrealistic and I like being able to see the details of objects, especially in low light conditions, however having the brightness set to 11 can also make everything appear washed out and terrible. Therefore I recommend you play around with the shader parameters (you need to disable performance mode in the in-game menu first) to satisfy your own personal preferences. You can also enable or disable the individual shader FXs, if you go to the statistics tab you can see what shader FX is using up the most processing. Magic Bloom for instance is the most process heavy shader, Eye Adaptation is another heavy one, but even with both enabled I noticed no observable perormance loss at 1080p since this game isn't too demanding on newer hardware.
Reshade Instructions:
2) Install it to the fallout3.exe as dx9 or Direct3D 9, and when it asks to choose shaders just click the uncheck all button then click it again to check all of the shader packs, an internet connection is required to download the shaders. After installing you don't need to have an internet connection to use reshade. Shaders used in this preset are listed at the bottom of the description, though I suggest you install all of the shaders if you want to do some customization.
You don't need to configure anything but if you already extracted the .ini you can browse for it after installing. Though I recommend choosing the preset in game to use relative "./preset" paths instead of the full "C:\" directory location.
This is how your paths should look like (it may be changed in the future as more shaders are added/changed):
Each folder is seperated by a comma, the ".\" represents the game.executable directory. You can add or remove these depending on which shaders you have installed. The paths should be automatically set but here they are in case they aren't set for some reason.
Effects Path:
.\reshade-shaders\Shaders,.\reshade-shaders\Shaders\PD80,.\reshade-shaders\Shaders\Depth3D,.\reshade-shaders\Shaders\OtisFX,.\reshade-shaders\Shaders\Pirate,.\reshade-shaders\Shaders\qUINT,.\reshade-shaders\Shaders\Daodan,.\reshade-shaders\Shaders\Fubax
Textures Path:
.\reshade-shaders\Textures
3) Extract my .ini preset to the reshade-shaders folder that was created in the \Fallout 3\ game folder. You can create a new "preset" folder if you want to be organized.
4) Just load into the game, and hopefully it doesn't crash, if you get a CTD, make sure compatability mode for the fallout3.exe is disabled as that's been known to cause crashes. Press the home button to open the reshade settings and change the preset. You may have to either go into the "reshade-shaders" folder or click the 3 ... dots to go up the directory tree. After you find the .ini preset the shaders will be applied and your game will hopefully look a bit more "bright" :)
----------------------------------------------------------
Highly Recommended Eye Candy Mods:
This one is a MUST, as it upgrades the dull fallout 3 lighting and makes the game world more immersive.
Project Reality MKI https://www.nexusmods.com/fallout3/mods/17418
Not required but will make the game look more modern.
Upscaled 4x textures https://www.nexusmods.com/fallout3/mods/24340
NMCs Texture Pack https://www.nexusmods.com/fallout3/mods/12056
I was using the Maximum NMC texture pack but decided to compress my larger 4K textures to 2K (after making a compressed 7z backup of the original ones of course) with The Ordenador Texture Optimizer
So far it has improved the game performance while still looking like a modern game, most of the compressed landscape textures are a bit blurry if you look really close but for normal gameplay it makes no difference and while I used to stutter with the maximum 4k textures, I've been running a smooth and stable 60fps @ 1080p.
Ordenador Optimized Textures:
Texures size before = 22.9GB
Texures size after = 19.5GB
size reduction = ~14.84%
I haven't done any fps comparisons since even with the HD 4k textures I ran with max fps, though I did get some stuttering before optimizing the larger textures to 2K.
I recommend you install this mod last, to copy over NMCs textures.
Natural Landscapes https://www.nexusmods.com/fallout3/mods/24086
Though personally I didn't really like the bland mud/dirt and stone/concrete floor textures so I'm still using NMCs (IIRC) darker ground textures.
----------------------------------------------------------
ProTip: You can set a toggle key (mine is the End button below the Home button) to toggle reshade off and on.
Also I recommend enabling the "save before and after" option for screenshots so that you have an unmodified vanilla image you can use for say, as your own custom loading screens since using a bright reshaded image in-game with the same bright reshade shaders enabled will make the loading screen TWICE as bright... (found that out the hard way) Link to my DIY Load Screen Mod
Effects Used:
[Clarity] - You don't really need to mess with this shader, it basically adds sharpness, I always leave it default but if you don't want too much sharpness you can tweak the parameters, or disable it entirely to increase performance.
[MagicBloom] - This is the most process heavy shader in this preset, it adds a glow effect to bright lights/things, it's only noticable when there's a bright light, I personally really like this shader as it makes the game less dark and gives bright objects a beautiful glow, but it does significantly lower performance. Like by ~30-50% depending on the amount of lighting. Since I get constant 60fps regardless, it doesn't bother me but if you're getting performance issues try disabling this shader.
[DPX] - Adds some brightness and makes the game look less "cartoony" by lowering the saturation.
[Tint, A.K.A. - Sepia.fx] - I used this to tweak the overall color, and make things a bit brigher. You can play around with this shader if you want to change the coloring or brightness, reset to default for a warm color.
[Lightroom, A.K.A. - qUINT_lightroom.fx] - The main shader used in this preset, it basically modifies the individual colors and luminosity. The parameters I used lower the saturation but make it a bit more vibrant, and make things look bright but not too washed out. I also tweaked the colors a bit to make the game a bit more life like. If you enable the LUT overlay, it will show the color effects this shader uses, if you are playing in a resolution lower than 1080p, then you'll have to lower the amount of tile count to fit in your screen, if you're playing in a resolution higher than 1080p, you can either increase the LUT or just leave it the way it is. You can also tweak the whitebalance to change the brightness. Increase the saturation if you want more color, and lower the vibrance if it's too colorful, increase the contrast and lower the gamma if you want it to be darker.
[pd80_02_Bonus_LUT_pack] - Similar to lightroom, but less customizable, it's basiaclly like ~50 color LUT presets you can choose from and comes with a few basic sliders to tweak the gamma and intensity. This is a quick and easy way to get a good looking LUT shader, no complex settings to mess with.
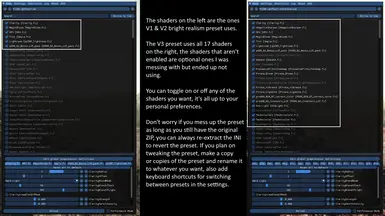
Don't worry if you mess any of the parameters up, you can just quit the game and re-extract the INI preset to restore the parameters. If you don't want to loose your edited INI just rename it to something else before copying over my preset.
[Copy Restrictions]
This isn't really that important to me, nor do I care much about this mod.
You're free to mess with and make your own versions of this mod, as well as share/upload it.
Just don't break any laws/copyright infringements like reuploading others people work or what not
I'm not sure what else there is for me to say or mention, so happy modding I guess :D
Spoiler:
Show
It's possible to use Reshade & ENB at the same time, to be able to take advantage of ENBs engine vRAM texture and lighting fixes, as well as Reshade's vast amounts of customizable shaders/fxs. To do so, you must first install reshade like normal (following the reshade install instructions below) then, rename its d3d9.dll file to d3d9_reshade.dll
Next install my ENB preset (or whichever you prefer) following the ENB installation instructions, included in my preset.
After installing the ENB, make sure the enblocal.ini includes Reshade's DLL. Change or replace the 3 lines under Proxy to the following:
[PROXY]
EnableProxyLibrary=true
InitProxyFunctions=false
ProxyLibrary=d3d9_reshade.dll
Make sure it's EnableProxyLibrary=true InitProxyFunctions=false , and you use the correct DLL
You should now be able to run Reshade with ENB, please be aware that due to the renaming of Reshade's DLL file, your existing reshade settings will be reset unless you revert the DLL. None of your presets will be reset, only the menu settings. Which means you will have to manually add all the effect and texture folders in the in game Reshade menu settings and re-select the preset you were using. At least for me I did.
The ENB preset Requires ENB http://enbdev.com/download_mod_falloutnv.htm & the Nevada Preset https://www.nexusmods.com/newvegas/mods/55112?tab=files, the RWL mod is not required. In fact, you should either delete or skip the "Data" folder from the Nevada preset.
While it doesn't look as bright or colorful as the reshade version (unless you also use reshade on top), ENB adds an out of memory fix when using large textures, it also fixes some of the weird lighting the FO3 engine has, the ENB version also adds a cool DOF and enchances lights and shadows. Installation instructions included in the download.
Reshade Update v3_2:
Spoiler:
Show
Turned off rim light fx since it was causing some weird blue artifacts, the deband fx was displaying some green dots in low light areas so that was also turned off. Added a 2nd INI in v3_2 preset that reduces the saturation and contrast.
If you're using the V3 Enhanced preset, the blue tint is caused by Rim light A.K.A. [RimLight.fx] & prod80_02_Cinetools_LUT A.K.A. [PD80_02_Cinetools_LUT.fx] So disable those two shaders if you don't want everything to have a greyish blue tint to it. I found this out after a bit of playing with the preset, they colored pitch black areas with blue so I ended up toggling them off.
If you're using the V3 Enhanced preset, the blue tint is caused by Rim light A.K.A. [RimLight.fx] & prod80_02_Cinetools_LUT A.K.A. [PD80_02_Cinetools_LUT.fx] So disable those two shaders if you don't want everything to have a greyish blue tint to it. I found this out after a bit of playing with the preset, they colored pitch black areas with blue so I ended up toggling them off.
Depending on your monitor calibration/settings my preset may not look as good for you as it does for me. I've also changed my monitors brightness and Icolor settings, and I've messed with the nvidia color settings to lower the saturation and increase the brightness and contrast as well...
IMO having a really dark contrast is unrealistic and I like being able to see the details of objects, especially in low light conditions, however having the brightness set to 11 can also make everything appear washed out and terrible. Therefore I recommend you play around with the shader parameters (you need to disable performance mode in the in-game menu first) to satisfy your own personal preferences. You can also enable or disable the individual shader FXs, if you go to the statistics tab you can see what shader FX is using up the most processing. Magic Bloom for instance is the most process heavy shader, Eye Adaptation is another heavy one, but even with both enabled I noticed no observable perormance loss at 1080p since this game isn't too demanding on newer hardware.
Reshade Instructions:
Spoiler:
1)
You will need reshade in order to use this preset: https://reshade.me/Show
1)
2) Install it to the fallout3.exe as dx9 or Direct3D 9, and when it asks to choose shaders just click the uncheck all button then click it again to check all of the shader packs, an internet connection is required to download the shaders. After installing you don't need to have an internet connection to use reshade. Shaders used in this preset are listed at the bottom of the description, though I suggest you install all of the shaders if you want to do some customization.
You don't need to configure anything but if you already extracted the .ini you can browse for it after installing. Though I recommend choosing the preset in game to use relative "./preset" paths instead of the full "C:\" directory location.
This is how your paths should look like (it may be changed in the future as more shaders are added/changed):
Each folder is seperated by a comma, the ".\" represents the game.executable directory. You can add or remove these depending on which shaders you have installed. The paths should be automatically set but here they are in case they aren't set for some reason.
Effects Path:
.\reshade-shaders\Shaders,.\reshade-shaders\Shaders\PD80,.\reshade-shaders\Shaders\Depth3D,.\reshade-shaders\Shaders\OtisFX,.\reshade-shaders\Shaders\Pirate,.\reshade-shaders\Shaders\qUINT,.\reshade-shaders\Shaders\Daodan,.\reshade-shaders\Shaders\Fubax
Textures Path:
.\reshade-shaders\Textures
3) Extract my .ini preset to the reshade-shaders folder that was created in the \Fallout 3\ game folder. You can create a new "preset" folder if you want to be organized.
4) Just load into the game, and hopefully it doesn't crash, if you get a CTD, make sure compatability mode for the fallout3.exe is disabled as that's been known to cause crashes. Press the home button to open the reshade settings and change the preset. You may have to either go into the "reshade-shaders" folder or click the 3 ... dots to go up the directory tree. After you find the .ini preset the shaders will be applied and your game will hopefully look a bit more "bright" :)
----------------------------------------------------------
Highly Recommended Eye Candy Mods:
Spoiler:
Show
This one is a MUST, as it upgrades the dull fallout 3 lighting and makes the game world more immersive.
Project Reality MKI https://www.nexusmods.com/fallout3/mods/17418
Not required but will make the game look more modern.
Upscaled 4x textures https://www.nexusmods.com/fallout3/mods/24340
NMCs Texture Pack https://www.nexusmods.com/fallout3/mods/12056
I was using the Maximum NMC texture pack but decided to compress my larger 4K textures to 2K (after making a compressed 7z backup of the original ones of course) with The Ordenador Texture Optimizer
So far it has improved the game performance while still looking like a modern game, most of the compressed landscape textures are a bit blurry if you look really close but for normal gameplay it makes no difference and while I used to stutter with the maximum 4k textures, I've been running a smooth and stable 60fps @ 1080p.
Ordenador Optimized Textures:
Texures size before = 22.9GB
Texures size after = 19.5GB
size reduction = ~14.84%
I haven't done any fps comparisons since even with the HD 4k textures I ran with max fps, though I did get some stuttering before optimizing the larger textures to 2K.
I recommend you install this mod last, to copy over NMCs textures.
Natural Landscapes https://www.nexusmods.com/fallout3/mods/24086
Though personally I didn't really like the bland mud/dirt and stone/concrete floor textures so I'm still using NMCs (IIRC) darker ground textures.
----------------------------------------------------------
ProTip: You can set a toggle key (mine is the End button below the Home button) to toggle reshade off and on.
Also I recommend enabling the "save before and after" option for screenshots so that you have an unmodified vanilla image you can use for say, as your own custom loading screens since using a bright reshaded image in-game with the same bright reshade shaders enabled will make the loading screen TWICE as bright... (found that out the hard way) Link to my DIY Load Screen Mod
Effects Used:
Spoiler:
Show
[Clarity] - You don't really need to mess with this shader, it basically adds sharpness, I always leave it default but if you don't want too much sharpness you can tweak the parameters, or disable it entirely to increase performance.
[MagicBloom] - This is the most process heavy shader in this preset, it adds a glow effect to bright lights/things, it's only noticable when there's a bright light, I personally really like this shader as it makes the game less dark and gives bright objects a beautiful glow, but it does significantly lower performance. Like by ~30-50% depending on the amount of lighting. Since I get constant 60fps regardless, it doesn't bother me but if you're getting performance issues try disabling this shader.
[DPX] - Adds some brightness and makes the game look less "cartoony" by lowering the saturation.
[Tint, A.K.A. - Sepia.fx] - I used this to tweak the overall color, and make things a bit brigher. You can play around with this shader if you want to change the coloring or brightness, reset to default for a warm color.
[Lightroom, A.K.A. - qUINT_lightroom.fx] - The main shader used in this preset, it basically modifies the individual colors and luminosity. The parameters I used lower the saturation but make it a bit more vibrant, and make things look bright but not too washed out. I also tweaked the colors a bit to make the game a bit more life like. If you enable the LUT overlay, it will show the color effects this shader uses, if you are playing in a resolution lower than 1080p, then you'll have to lower the amount of tile count to fit in your screen, if you're playing in a resolution higher than 1080p, you can either increase the LUT or just leave it the way it is. You can also tweak the whitebalance to change the brightness. Increase the saturation if you want more color, and lower the vibrance if it's too colorful, increase the contrast and lower the gamma if you want it to be darker.
[pd80_02_Bonus_LUT_pack] - Similar to lightroom, but less customizable, it's basiaclly like ~50 color LUT presets you can choose from and comes with a few basic sliders to tweak the gamma and intensity. This is a quick and easy way to get a good looking LUT shader, no complex settings to mess with.
Don't worry if you mess any of the parameters up, you can just quit the game and re-extract the INI preset to restore the parameters. If you don't want to loose your edited INI just rename it to something else before copying over my preset.
[Copy Restrictions]
This isn't really that important to me, nor do I care much about this mod.
You're free to mess with and make your own versions of this mod, as well as share/upload it.
Just don't break any laws/copyright infringements like reuploading others people work or what not
I'm not sure what else there is for me to say or mention, so happy modding I guess :D