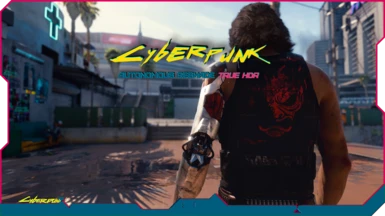
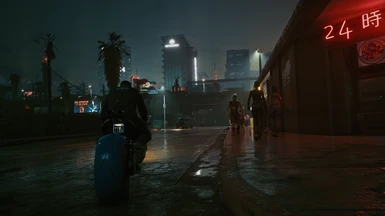
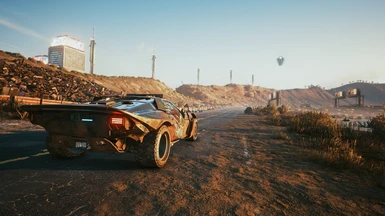
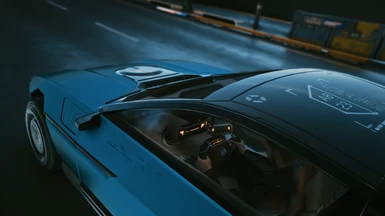
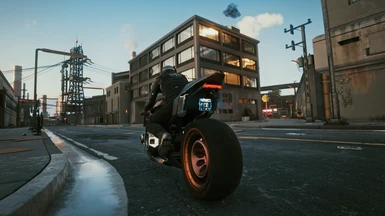
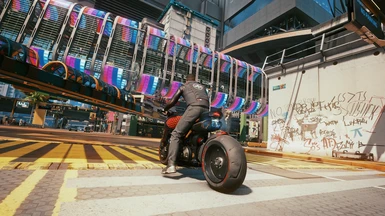
Cyberpunk Autonomous ReShade - True HDR v2.FX and E3v2.0!
Better Colors, Sky/Fog, increased sex appeal.
Disable the CAS/AdaptiveSharpening and/or FXAA shaders if you want to sharpen/soften the image.
Don't forget to disable the in-game Film Grain and HDR. Enjoy! :wink:
NOTE: I've included 4 presets to choose from: "Rockerboy", "Samurai", "Militech", and "Classic".
Performance
The default preset will lower performance by roughly 11%.
No need to tell us how many FPS you're losing, it's different for each user and we can do our own math.
How to Install
Here are the Long instructions, follow this Exactly and it will work.
1.) Install ReShade v4.7.0. Choose your Cyberpunk2077.exe and the DirectX 10/11/12 option.
2.) Uncheck all "Effect Packages" from the list that it wants you to install, click Ok.
3.) Uncheck all "Standard effects" from the list, click Ok.
4.) Click the "Edit ReShade settings" button, and make sure the "Skip Tutorial" box is unchecked. We want to do the tutorial. Click Ok to close, and then close the installer.
5.) Launch the game and press the Home key to bring up the GUI. It will start the Tutorial, but just click "Continue" a couple of times and then click "Finish". Close the GUI and quit the game.
6.) Copy my files from the "Main files" folder into your "Cyberpunk2077/bin/x64" folder (where Cyberpunk2077.exe is located) and overwrite all.
Launch the game and have a good time.
How to Uninstall
Remove the "reshade-shaders" folder, dxgi.dll, ReShade.ini, and the TrueHDR.ini's from your "Cyberpunk2077/bin/x64" folder.
Hi, great work! was using v1.0 flawlessly, but when i used the v1.1 i got the error DisplayDepth.fx failed to compile. I downloaded the latest reshade 4.8 on their website. when I hover over the error it says: error X3004: undeclared identifier 'RESHADE_DEPTH_INPUT_X_PIXEL_OFFSET'. wondering if this can be fixed? does your preset use it? Thanks!
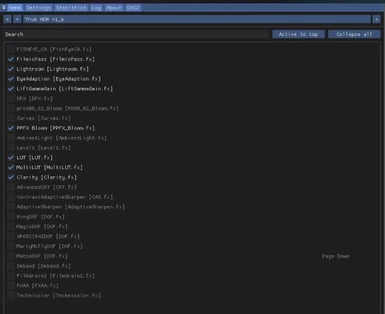
Filmicpass - Useful in many ways (can be set up for an artistic look, or as a governor mechanism for the gamma-space). Lightroom - Is like a mini photoshop toolset that allows you to tweak many properties of the image, and create a LUT of your settings. EyeAdaptation - Brightens areas of the image when it gets too dark (and visa-versa), based on the threshold that you set. LiftGammaGain - For adjusting the color/brightness of the highlights, midtones, and shadows. PPFX_Bloom - A powerful bloom toolset, which includes the HDR and tonemap functions. LUT/MultiLUT - The palettes (Look Up Tables) that transform the colors, brightness, etc., based on what was cooked into the LUT. Clarity - I used it to make the image more robust (less haze as well). ContrastAdaptiveSharpening (CAS) - A very effective, performanced based sharpening method developed by AMD.
Included in the "High Quality" preset....
AdaptiveSharpening - This is a more advanced sharpening method that will cost additional FPS compared to CAS. Deband - Helps to remove or reduce colorbanding artifacts (disabled since v1.2, not needed in this game). FXAA - An old, yet highly effective AA solution, but can cause slight image blurring (it's not that bad with adequate sharpening).
Rockerboy: Mostly adheres to vanilla color tones, with my own mix added in there for a filmic look (not cartoony) . Samurai: More dramatic depth perception, and emphasis on blues to replace some warm colors, and reds to replace some cool colors. Militech: Mostly adheres to vanilla color tones, but with more depth and richer color than Rockerboy, slightly adds red to shadows. Classic: Adheres to vanilla color tones more than the other presets while removing more of the green tint, colors are not as interesting.
I wanted to ask, everything works fine, but I would like some help with editing some stuff :
Since I have no real experience when tinkering with shaders, I did the install without messing with anything, but I find the game TOO BRIGHT, somehow I get very bright lighting especially in the character menus, and no amount of ajusting gamma, constrast or brightness seems to fix it. I probably have to play with the actual shaders of reshade itself, but I am... not well versed.
If anyone could lend me a hand, I am in no hurry !
I know this is an old mod, but just wanted to post thank you! And a quick troubleshooting tip for anyone trying to get this working with FSR3 framegen mod.
The instructions stickied are still accurate to the letter; follow them and finish setting up ReShade BEFORE installing FSR3 framegen. Once you replace the dxgi.dll file, the home key will no longer bring up the ReShade GUI.
Is there a way to make it still pull it up. Even after changing the hotkey to home + f12 it doesnt work. Updating re-shade allows me to bring up the re-shade menu but this mods menu never works no matter what.
After installing ReShade, repeatedly pressing the ESC key in the game causes it to freeze and crash. Has anyone else experienced this issue? I'm certain that ReShade is causing this issue. After removing it, I pressed the ESC key repeatedly for several minutes, and everything was fine.
Is there a way to remove/edit the Page Down and Page Up keys? I don't see them in the input section and I already use those keys for other inputs in the game.
Thank you for sharing such an amazing mod! I only wish I had discovered it sooner :) Was using a reshade from a Youtube video I had seen long ago and never knew the quality + performance could so drastically improve after switching to your mod. Feels like a completely different experience!
It's just not working for me... I did the installation properly, but the effect is not visible in game, I cannot bring out the menu using Home/End keys, just nothing is happening.
Here's my folder structure. https://imgur.com/a/MmcCXoV


693 comments
Here are the Long instructions, follow this Exactly and it will work.
1.) Install ReShade v4.7.0. Choose your Cyberpunk2077.exe and the DirectX 10/11/12 option.
2.) Uncheck all "Effect Packages" from the list that it wants you to install, click Ok.
3.) Uncheck all "Standard effects" from the list, click Ok.
4.) Click the "Edit ReShade settings" button, and make sure the "Skip Tutorial" box is unchecked. We want to do the tutorial. Click Ok to close, and then close the installer.
5.) Launch the game and press the Home key to bring up the GUI. It will start the Tutorial, but just click "Continue" a couple of times and then click "Finish". Close the GUI and quit the game.
6.) Copy my files from the "Main files" folder into your "Cyberpunk2077/bin/x64" folder (where Cyberpunk2077.exe is located) and overwrite all.
Thank You! My preset doesn't need it, delete the DisplayDepth.fx file. Please install ReShade v4.7.0, and not other versions.
Here is a workaround. Open the ReShade.ini file and go to this section:
[INPUT]
ForceShortcutModifiers=1
InputProcessing=2
KeyEffects=35,0,0,0
KeyMenu=36,0,0,0
KeyNextPreset=0,0,0,0
KeyPreviousPreset=0,0,0,0
KeyReload=0,0,0,0
KeyScreenshot=44,0,0,0
Use this sheet as a reference to enter your new key codes. Keyboard Codes
Filmicpass - Useful in many ways (can be set up for an artistic look, or as a governor mechanism for the gamma-space).
Lightroom - Is like a mini photoshop toolset that allows you to tweak many properties of the image, and create a LUT of your settings.
EyeAdaptation - Brightens areas of the image when it gets too dark (and visa-versa), based on the threshold that you set.
LiftGammaGain - For adjusting the color/brightness of the highlights, midtones, and shadows.
PPFX_Bloom - A powerful bloom toolset, which includes the HDR and tonemap functions.
LUT/MultiLUT - The palettes (Look Up Tables) that transform the colors, brightness, etc., based on what was cooked into the LUT.
Clarity - I used it to make the image more robust (less haze as well).
ContrastAdaptiveSharpening (CAS) - A very effective, performanced based sharpening method developed by AMD.
Included in the "High Quality" preset....
AdaptiveSharpening - This is a more advanced sharpening method that will cost additional FPS compared to CAS.
Deband - Helps to remove or reduce colorbanding artifacts (disabled since v1.2, not needed in this game).
FXAA - An old, yet highly effective AA solution, but can cause slight image blurring (it's not that bad with adequate sharpening).
Rockerboy: Mostly adheres to vanilla color tones, with my own mix added in there for a filmic look (not cartoony) .
Samurai: More dramatic depth perception, and emphasis on blues to replace some warm colors, and reds to replace some cool colors.
Militech: Mostly adheres to vanilla color tones, but with more depth and richer color than Rockerboy, slightly adds red to shadows.
Classic: Adheres to vanilla color tones more than the other presets while removing more of the green tint, colors are not as interesting.
I wanted to ask, everything works fine, but I would like some help with editing some stuff :
Since I have no real experience when tinkering with shaders, I did the install without messing with anything, but I find the game TOO BRIGHT, somehow I get very bright lighting especially in the character menus, and no amount of ajusting gamma, constrast or brightness seems to fix it. I probably have to play with the actual shaders of reshade itself, but I am... not well versed.
If anyone could lend me a hand, I am in no hurry !
The instructions stickied are still accurate to the letter; follow them and finish setting up ReShade BEFORE installing FSR3 framegen. Once you replace the dxgi.dll file, the home key will no longer bring up the ReShade GUI.
otherwise Home key will not work to bring up the UI
https://reshade.me/downloads/ReShade_Setup_6.4.1_Addon.exe
Also how can I get this working with FSR mod? https://www.nexusmods.com/cyberpunk2077/mods/14726?tab=posts&BH=0
Seems I can never bring up the FSR mode menu.
I'm certain that ReShade is causing this issue. After removing it, I pressed the ESC key repeatedly for several minutes, and everything was fine.
Here's my folder structure.
https://imgur.com/a/MmcCXoV