Documentation
Readme
View as plain text
MOM - Multiple Oblivion Manager ReadMe.
v1.2 12/16/2011
by: InsanitySorrow and Hanaisse
See ChangeLog at end of document.
Requirements:
----------------
----------------
.Net Framework 3.5 or 4.0
(If you don't have it, find it at: http://www.microsoft.com/download/en/details.aspx?id=17851 )
Oblivion 1.2.416
Description:
----------------
----------------
MOM is a new take on managing multiple Oblivion installs. It's a small app with a powerful punch that will ease the confusion of trying to manually switch between two or more Oblivion setups.
Multiple installs are becoming an increasingly popular trend. For anyone who has ever wanted to have a testing environment without messing with their current install, this is for you. Or for retaining an OOO oriented install but want to try a new TIE install. MOM will create and manage each completely seperate Oblivion setup (called "images").
Best of all, MOM will swap out these images with a click of a button. No more manually renaming folders!
Installation:
----------------
----------------
1. Place the MOM.7z file anywhere you'd like (i.e.: a temp folder C:\My Apps).
** Do NOT place/run from Program Files.
** Do NOT place/run from inside your Oblivion directory.
2. Unzip the file.
Un-Installation:
------------------
------------------
1. It is highly recommended to RELEASE all the images first (see below), it will save time renaming the folders manually.
2. You can then simply delete the MOM folder.
MOM: Initial Setup
--------------------
--------------------
1. Run the Multiple_Oblivion_Manager.exe. MOM will (should) auto-detect the Oblivion install location.
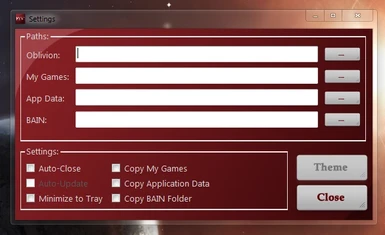
2. Click on SETTINGS to make sure all the install paths are correct. While there, you can select/deselect any of the other options that you would like MOM to perform (all options are on by default). All of MOM's settings will be saved to an XML file called Settings which is located inside the MOM folder next to the MOM.exe
* Paths: If these are incorrect (due to custom installs) correct them here to point to install locations.
* Auto-Close: Will close additional screens when a task is completed or close MOM when launching other apps.
* Minimize to Tray: Will leave MOM running in the system tray when minimized.
* Copy My Games: Optional if you want your saved games copied or leave unchecked if you prefer to do it yourself.
* Copy Application Data: Optional if you want your game settings copied or leave unchecked if you prefer to do it yourself.
* Copy BAIN Folder: Optional if you want to copy all your BAIN Installation archives or leave unchecked if you prefer to do it yourself or prefer to retain one BAIN folder (see MOM and BAIN section below).
MOM: Managing Multiple Images:
----------------------------------
----------------------------------
Using MOM is pretty straight forward, but some settings and options could potentially confuse users, namely newcomers. So to help out let's have a good look at what MOM is capable of doing and more importantly HOW she does it.
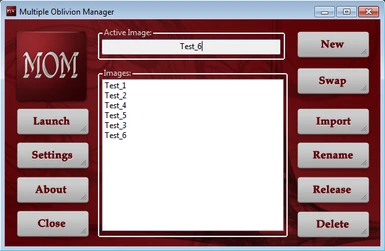
Main Screen
-------------
LAUNCH:
You can choose to launch Oblivion (with or without OBSE), the Construction Set (with or without OBSE), Wrye Bash or BOSS from here on the Active Image, or your can close MOM and launch the apps the normal way.
Note: Launching BOSS will launch the BOSS.exe. The Run BOSS GUI option runs BOSS's new GUI instead of running BOSS itself.
Settings:
This button opens up MOM's settings screen, as described above in Initial Setup.
Help:
Click this button to open up MOM's ReadMe, it'll open it in your default browser. Always a great option if you get stuck or are a little unsure of what something does.
Close:
Does what it says really, closes MOM, simple.
Those are the basic buttons, the next set (To the right) are the Image options, here we can manage our Images with a small selection of options.
New:
The new button allows you to make a new Image; this Image is created based on your current Active Image. So for example if your Active Image is called say Vanilla and you make a New Image, the New Image will be a copy of the Vanilla Image. To make MOM copy a different Image you just swap in the new one you want to copy.
SWAP:
To make another image in the images list as the Active Image, highlight the image to change to and click the SWAP button. MOM will switch images, in the background renaming the new image to Oblivion and switching the old image to whatever you named it in the first step. MOM will also switch the related My Games and AppData folders if they are there.
You can now do whatever you'd like on that Active Image.
Import:
The first time you click Import (First time you run MOM too) you'll be Importing your current Oblivion install. MOM will ask you to name it and then do her thing. This install will then become your first Active one. Now After the initial Import you'll be prompted to select the Folder you want to Import, if you have the Copy Application Data, Copy My Games and Copy BAIN selected MOM will prompt you to locate these folders too.
Note: During the Import process MOM will move these folders to your Oblivion directory, Application Data directory and My Games Directory. She'll name them MOM_YourChoseName.
RENAME:
If at any time you'd like to rename an image to something else, highlight the image and click the RENAME button. You'll be prompted for the new name. Click ok and the image name will change in the Images list. MOM will rename the related My Games and AppData and BAIN folders.
Note: You cannot rename an active image. Swap it out to something else to change it.
RELEASE:
If at any time you'd like to simply remove an image from MOM's control but still retain the folders associated with it, highlight the image and click the RELEASE button. The image name will be removed from the Images list. You'll notice in Windows Explorer that the affected folders are renamed with the MOM_ prefix removed, but will still be named the image name. This is an excellent way to create a back up. You can safely move the folders somewhere else. (Don't try to move folders that are still in MOM's Image list). MOM will also release the related My Games and AppData and BAIN folders.
Note: You cannot release an active image. Swap it out to something else to change it.
DELETE:
Delete an image at any time by highlighting the image in the image list and click the DELETE button. Give MOM awhile to process the delete and you'll be notified when the task is finished (Note: all other buttons are disabled during this process). The image name will be removed from the Images list and the image deleted. MOM will also delete the related My Games and AppData folders.
Note: You cannot delete an active image. Swap it out to something else to delete it.
Warning: This permanently removes all files, it DOES NOT send them to the recycle bin. Backup any data you want to keep before removing it. If you want to keep all the files then choose the Release option instead.
MOM: First time use:
---------------------------------
---------------------------------
The first thing to do is IMPORT your current Oblivion install (as identified in the Settings page). This can be a clean vanilla install or a fully modded install, whatever you decide. (The more mods you have, the longer it will take) It is highly recommended that all utilities (BASH, OBMM, BOSS) be installed to your current install first.
1. Click IMPORT and you'll be prompted for a unique name. Call it anything except Oblivion (seriously, don't do that). MOM will update with the new name as the Active Image and add it to the Images list.
(See below for importing multiple existing installs)
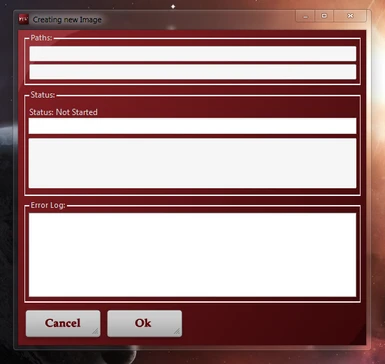
2. All the other buttons will now become active. Click NEW. You'll be prompted for a new name for the image you're about to create. Name it and click OK. The copy process will now begin, with all processes shown. If you have not selected Copy My Games and Copy AppData in the Settings page MOM will ask again at this point if you would like to.
If an error is detected during this process it will be displayed in the error box as well as logged to an error.log. You can choose to cancel the process if an error is encountered or leave it to continue and fix it at the end.
MOM will prompt when the copy image process is finished.
3. Click OK when finished. The new image is now listed in the Images list. In windows explorer you'll now see the new copy appended with MOM_(whatever you named it).
Congratulations, you now have multiple Oblivion installs!
Anything you do from here on in will be on the Active Image. Play, modify your load order, install/uninstall mods, build something in the CS, whatever you'd like.
MOM: Importing Existing Multiple Installs:
-------------------------------------------
-------------------------------------------
For anyone who currently has existing multiple installs and would like MOM to manage them all.
1. After creating the FIRST main install using the IMPORT button, click the IMPORT button again and you'll be prompted to browse to the location of the install you want to import. Name the new image. Click OK to import.
2. MOM will also prompt for the location of the My Games and AppData and BAIN folders.
3. Continue importing other existing installs until finished. Each new image will be added to the Images list when completed.
MOM: Updating versions:
------------------------
------------------------
New releases are inevitable as we correct any bug reports or add new functionality into MOM. Check the forum thread regularly for update notices.
To ensure nothing is lost in the process, follow these steps;
1. Extract and run the updated .exe. This is important to have MOM create the new folders for the images and settings profiles.
2. Close MOM.
3. Copy the old images.xml file into the Images sub-folder and copy the old settings.xml file into the Settings sub-folder, overwriting the new files. Re-run MOM again and all your images will be there.
MOM: Working with Wrye Bash/BAIN:
-----------------------------------
-----------------------------------
There are a couple of ways you can decide to manage all of your installs with regards to BAIN.
1) Use a separate BAIN folder for each image.
You may find maintaining seperate BAIN folders easier to manage. When Copy BAIN folder is checked, when Swapping images the Oblivion_Mods_(yourimagename) folder is swapped as well.
2) Use one BAIN folder for all images.
All your images will read from one Oblivion_Mods folder. Mods you have installed and/or active are retained in plugins.txt which is stored in the AppData folder for each image.
BASH/BAIN settings are stored seperately and requires the information to be in a place that MOM will copy it and requires an update to the Bash.ini to find/read these settings. The best way to set this up is as follows;
BEFORE you start making clones;
A) In your Oblivion\Mopy folder, create a new folder called BAIN.
B) Find and copy the following files into the new BAIN folder;
* \Oblivion Mods\Bash Mod Data\Table.dat
* \Oblivion Mods\Bash Mod Data\Table.dat.bak
* \Oblivion Mods\Bash Mod Data\INI Data\Table.dat
* \Oblivion Mods\Bash Mod Data\INI Data\Table.dat.bak
* \Oblivion Mods\Bash Installers\Bash\Converters.dat
* \Oblivion Mods\Bash Installers\Bash\Converters.dat.bak
* \Oblivion Mods\Bash Installers\Bash\Installers.dat
* \Oblivion Mods\Bash Installers\Bash\Installers.dat.bak
C) Edit your bash.ini:
sInstallersData=
sBashModData=
i.e.: C:\Games\Oblivion\Mopy\BAIN
D) Launch Wrye Bash, double check to make sure everything looks OK.
E) Now you can make images and that data will be moved along with Wrye Bash, and the bash.ini file. Bash will retain all the settings for each image seperately; if you change Bash settings in one image, it will not affect the others.
MOM and Steam:
-----------------
-----------------
MOM can handle making copies of a Steam installed Oblivion by making sure the Settings Path points to the Steam install location.
MOM and OBMM:
--------------
--------------
OBMM will be copied into each of your images if your original Imported install already has OBMM installed.
If using OBMMEX, there is an additional Scripts folder that will need to manually be copied into the new Image, as it is outside of the Oblivion folder that MOM copies.
MOM and BOSS:
--------------
--------------
BOSS will be copied into each of your images if your original Imported install already has BOSS installed.
MOM: Reporting Issues:
-----------------------
-----------------------
One of MOM's unique features is error log reporting. If MOM encounters an error at any point during use, a log will be generated in the MOM folder. When reporting issues please copy the contents of the error log.
One of the most common errors is Access Denied to a folder during Swapping. If you are sure your Oblivion is not installed in a folder protected by UAC (Program Files), close MOM, relaunch, close all other apps/utilities associated with Oblivion that may be using the folder (BASH, OBMM, Notepad (if you�re reading a ReadMe in a mod folder)) and try again. MOM will now prompt you as a reminder.
Official support threads can be found at:
TES Alliance: http://tesalliance.org/forums/index.php?/topic/4231-relz-mom-multiple-oblivion-manager/
BGS: http://forums.bethsoft.com/index.php?/topic/1221695-relz-mom-multiple-oblivion-manager/
Change Log:
-----------
-----------
16/12/2011 - 1.2.0
Tweak - Added Swap warning message
Tweak - Saves UI window position (4.0 only)
26/10/2011 - 1.1.0 (not released)
Change - Directory has been restructured
Change - MOM has a new, much better error log format
Improvment - MOM will no longer replace spaces in Image names with underscores
Improvment - MOM will now remove all special characters from Image names (Not previously created Image names)
Addition - Added Help button - links to online ReadMe
Addition - Added a Theme setting with two themes, Red and Black
Tweak - Removed About Button
Tweak - Updated the ReadMe - ReadMe is now a new format
Core - Optimized the graphics (Reduced the exe size)
Core - Requirement is now .Net 3.5 or 4.0
23/08/2011 - 1.0.1
Improvment - Added additional error message notification if a SWAP fails and aborts for some reason.
Improvment - Included BAIN mods folder in SWAP and RENAME functions.
19/08/2011 - 1.0
Initial Release
Contact:
---------
---------
Insanity Sorrow @ TESAlliance.org or BGS
Hanaisse @ TESAlliance.org or BGS
Credit:
---------
---------
Thanks to Bethesda for creating Oblivion.
Thanks to Darkstone, ThomasKaira and Max for giving MOM a good testing before release.
Thanks to all who have downloaded MOM and have given support/feedback.
Licensing/Legal:
-----------------
-----------------
You may NOT use this or anything from it elsewhere.
Do not change or copy this file in any way.
Please do NOT re-host this file without our explicit permission.


