


0 of 0


About this mod
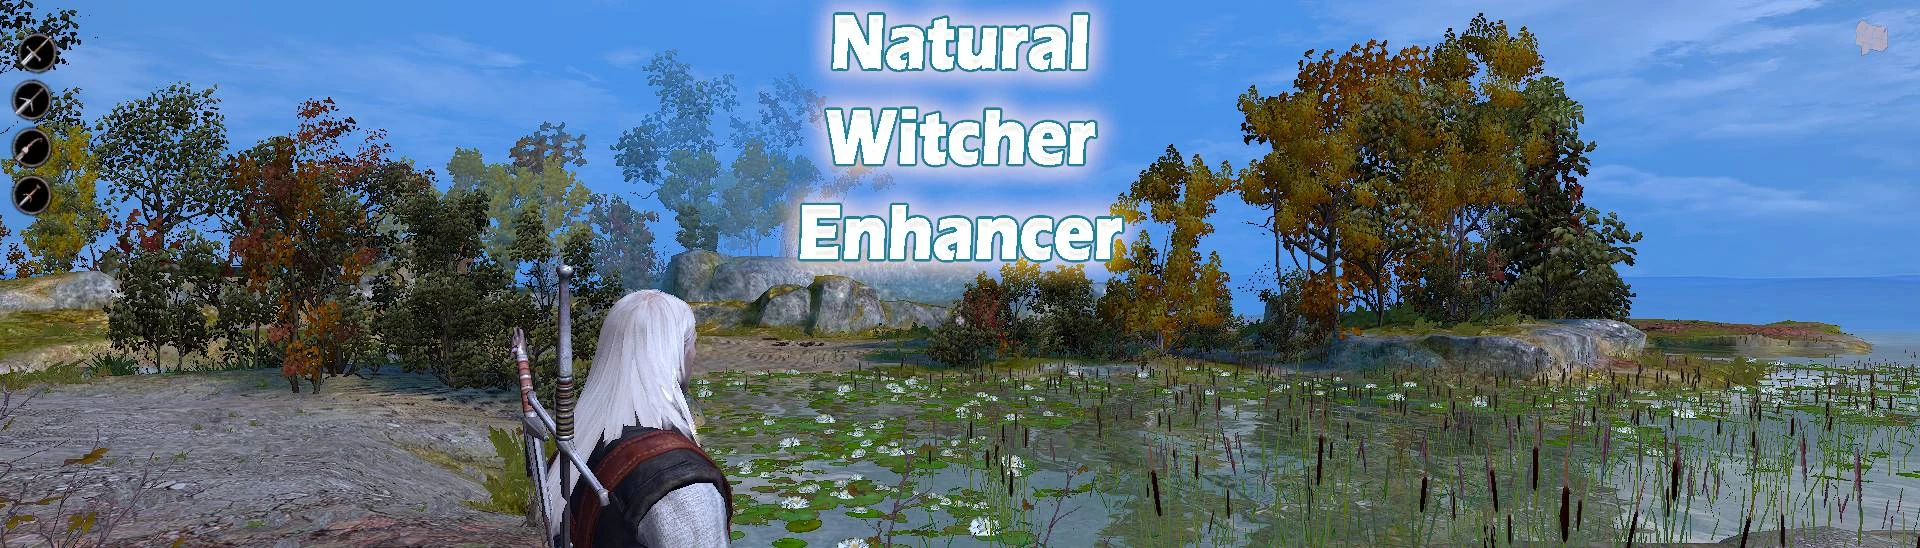
Play Witcher Enhanced with color looks like Witcher 3
- Requirements
- Permissions and credits
Install Mods Used below to match the images published it enhance Lighting source and remap shadow ambient occlusion
Created to making the game looks like Witcher 3 as possible depends on environment area and weather while keep RGB balance
Fully Tested in 30 hours gameplay
Preset file Option
NW Enhancer Base : Only change color looks and Fidelity CAS
NW Enhancer SSAO : Change color, Fidelity CAS and enhance graphics with SSR and ambient occlusion
NW Enhancer RTGI : Change color, Fidelity CAS and enhance graphics with RayTrace Global Illumination
Note : this mod can be install without RTGI by using Base or SSAO preset
Compatible with Directx 9 or Vulkan renderer
How to Install in Directx 9
1. Place preset file downloaded near witcher.exe is (right click on Witcher in steam library > manage > browse local files)
witcher.exe file location is in System Folder inside Witcher game folder
C:\Steam\steamapps\common\The Witcher Enhanced Edition\System
1. Open Reshade Installer downloaded
2. Find witcher.exe in witcher game folder then click next
3. Choose Directx 9 option, click next
4. Choose .ini file Preset you downloaded, click next
5. Wait for downloading, then click finish when prompted to, then run the game
6. Open options in-game -> choose advanced and turn lighting quality to the lowest to turn off blurry exposure
7. turn off antialiasing then other setting can be set to High to appear like in images published above
8. go to Video options and turn gamma to 1.0 for balance looks
Follow step below if want to use Vulkan render
How to Install in Vulkan
Download latest dxvk renderer
1. Open dxvk zip file downloaded
2. Open x32 folder and extract d3d9.dll and dxgi.dll to near witcher.exe
Replace existing when prompted to
3. Now open ReShade.ini near witcher.exe
4. Add this line
6. Now you can run the game in Vulkan render
if doesn't run, open dxvk.conf then change dxvk.hud = 0 into dxvk.hud = 1 , then change to = 0 after able in vulkan
7. Open options in-game -> choose advanced and turn lighting quality to the lowest to turn off blurry exposure
8. turn off antialiasing then other setting can be set to High to appear like in images published above
9. go to Video options and turn gamma to 1.0 for balance looks
Note : turn gamma to 1.10 up to 1.20 will make colorful a bit oversaturated
How to use RTGI
Please download latest RTGI Files version
Delete or rename dxvk d3d9.dll file if you installed vulkan render
Open and Place reshade-shaders folder to \The Witcher Enhanced Edition\System
Then place NW Enhancer RTGI.ini to System Folder
Choose NW Enhancer RTGI.ini during Reshade installation
then paste or rename dxvk file to d3d9.dll again
Note : by default it use Software RayTracing for GTX gpu
Mods Used in Images Published
Improved HD Lightsources making lighting more vibrant
Nvidia HBAO High Quality Ambient Occlusion remap shadow occlusion source
Geralt face and leather jacket retextured use the Retextured folder
The Witcher Overhaul Project only extract files in Texture Overhaul folder
Rise of The White Wolf Enhanced Edition only install Interface, New dialogue fonts and Item icons
Hiuuz's Witcher 3 Triss Merigold Triss reworked texture
Full Video Pak Witcher 1080p upscaled Upscale movie cutscene in 1080p display, (Alternatively Movie Upscale 4K Project for 4K Display monitor)
Texture mods extract location : C:\Steam\steamapps\common\The Witcher Enhanced Edition\Data\Override
How to Install Nvidia HBAO Ambient : Download the Nvidia Profile Inspector link provided in its mod page, open the .exe
type or search The Witcher in Profiles, then click import user defined (arrow down icon)
choose .nip file from the main files then apply changes
If you like this mod, leave a comment or share, endorse
thank you for using the mod
Note
i have no idea how to remap HBAO for AMD card, i also only use GTX 1650 nvidia,
maybe there's an ProfileInspector AMD, but you can use this mod without Nvidia HBAO above
Created to making the game looks like Witcher 3 as possible depends on environment area and weather while keep RGB balance
Fully Tested in 30 hours gameplay
Preset file Option
NW Enhancer Base : Only change color looks and Fidelity CAS
NW Enhancer SSAO : Change color, Fidelity CAS and enhance graphics with SSR and ambient occlusion
NW Enhancer RTGI : Change color, Fidelity CAS and enhance graphics with RayTrace Global Illumination
Note : this mod can be install without RTGI by using Base or SSAO preset
Compatible with Directx 9 or Vulkan renderer
How to Install in Directx 9
1. Place preset file downloaded near witcher.exe is (right click on Witcher in steam library > manage > browse local files)
witcher.exe file location is in System Folder inside Witcher game folder
C:\Steam\steamapps\common\The Witcher Enhanced Edition\System
1. Open Reshade Installer downloaded
2. Find witcher.exe in witcher game folder then click next
3. Choose Directx 9 option, click next
4. Choose .ini file Preset you downloaded, click next
5. Wait for downloading, then click finish when prompted to, then run the game
6. Open options in-game -> choose advanced and turn lighting quality to the lowest to turn off blurry exposure
7. turn off antialiasing then other setting can be set to High to appear like in images published above
8. go to Video options and turn gamma to 1.0 for balance looks
Follow step below if want to use Vulkan render
How to Install in Vulkan
Download latest dxvk renderer
1. Open dxvk zip file downloaded
2. Open x32 folder and extract d3d9.dll and dxgi.dll to near witcher.exe
Replace existing when prompted to
3. Now open ReShade.ini near witcher.exe
4. Add this line
 [PROXY]
 EnableProxyLibrary=1
 InitProxyFunctions=0
 ProxyLibrary=d3d9.dll
5. Now paste dxvk.conf downloaded from Optional File near witcher.exe6. Now you can run the game in Vulkan render
if doesn't run, open dxvk.conf then change dxvk.hud = 0 into dxvk.hud = 1 , then change to = 0 after able in vulkan
7. Open options in-game -> choose advanced and turn lighting quality to the lowest to turn off blurry exposure
8. turn off antialiasing then other setting can be set to High to appear like in images published above
9. go to Video options and turn gamma to 1.0 for balance looks
Note : turn gamma to 1.10 up to 1.20 will make colorful a bit oversaturated
How to use RTGI
Please download latest RTGI Files version
Delete or rename dxvk d3d9.dll file if you installed vulkan render
Open and Place reshade-shaders folder to \The Witcher Enhanced Edition\System
Then place NW Enhancer RTGI.ini to System Folder
Choose NW Enhancer RTGI.ini during Reshade installation
then paste or rename dxvk file to d3d9.dll again
Note : by default it use Software RayTracing for GTX gpu
Mods Used in Images Published
Improved HD Lightsources making lighting more vibrant
Nvidia HBAO High Quality Ambient Occlusion remap shadow occlusion source
Geralt face and leather jacket retextured use the Retextured folder
The Witcher Overhaul Project only extract files in Texture Overhaul folder
Rise of The White Wolf Enhanced Edition only install Interface, New dialogue fonts and Item icons
Hiuuz's Witcher 3 Triss Merigold Triss reworked texture
Full Video Pak Witcher 1080p upscaled Upscale movie cutscene in 1080p display, (Alternatively Movie Upscale 4K Project for 4K Display monitor)
Texture mods extract location : C:\Steam\steamapps\common\The Witcher Enhanced Edition\Data\Override
How to Install Nvidia HBAO Ambient : Download the Nvidia Profile Inspector link provided in its mod page, open the .exe
type or search The Witcher in Profiles, then click import user defined (arrow down icon)
choose .nip file from the main files then apply changes
If you like this mod, leave a comment or share, endorse
thank you for using the mod
Note
i have no idea how to remap HBAO for AMD card, i also only use GTX 1650 nvidia,
maybe there's an ProfileInspector AMD, but you can use this mod without Nvidia HBAO above