Been trying to accomplish pretty much that, but when applied to other weapons, the mesh has a tendency to come out cartoonishly oversized. No idea how to go about this, hopefully the mod author can help us when he's got some time.
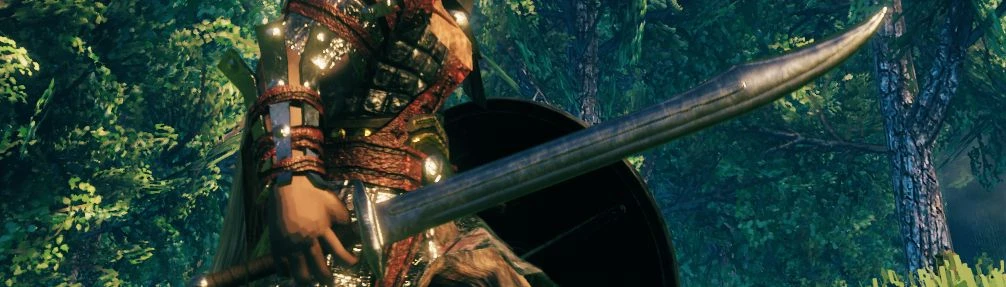
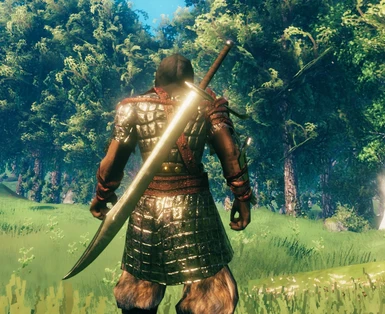
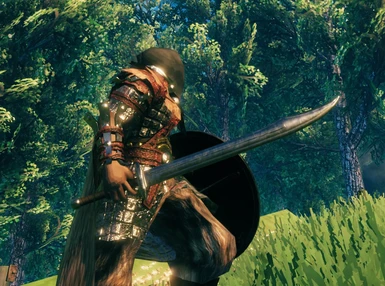
This morning I took a stab at it in Blender and several youtube how to videos I was able to successfully convert it into the black sword and well...
It looks Great!
So you'll need to get Blender installed and working, open Blender and tell it to start an new General project.
Now delete the all the default stuff, the camera, the cube and the light so you've got a clean slate.
Now click File > Import > .fbx and import the Viking_Sword (1).fbx file.
Now find the Scaling Tool (on the left) and then click on the sword model in the preview. It should be highlighted. Now on the right, find Transform and under it, down a bit, you should see Scale.
Leave the Mode at the default of XYZ Euler. Now change all the x, y, and z values from 1.000 to 0.300.
Now, making sure the sword model is selected, press Crtl+A on the keyboard to bring up the Apply Menu. Click Scale. The numbers you set to .3 should now show 1.0 again.
This will set sword to the proper scale in game. However this alone will result in the character not properly holding the weapon. It will appears as though the character is holding the sword above the hilt and by the base of the blade so the position needs to be adjusted too.
So in the same menu, adjust the Location for z (and ONLY z) to 0.15 m.
Now, making sure the sword model is selected, press Crtl+A on the keyboard to bring up the Apply Menu again. Click Location. The z location to .15 should now show 0 again.
All done with the model editing at this point, now we need to export a new fbx file from Blender, so click File up top again, then > Export > . fbx. Save the new model named as default.fbx
Now to finish, take the new default.fbx file you just exported and place it in Valheim\BepInEx\plugins\CustomMeshes\SwordBlackmetal\attach folder (created folders as needed).
Now take the original textures and rename then as follows: - Rename - object_SwordSilver_MetallicGlossMap.png to - to - texture_blackmetalsword_m_MetallicGlossMap.png - Rename - object_SwordSilver_MainTex.png - to - texture_blackmetalsword_d_MainTex.png - Rename - object_SwordSilver_BumpMap.png - to - texture_blackmetalsword_n_BumpMap.png
Place the renamed textures files in SteamApps\common\Valheim\BepInEx\plugins\CustomTextures
And you're done.
Please know that no matter the textures colors or model (other than black), the Black Sword is always GREEN tinted as Odin has ordained!
for anyone who needs to know, the naming scheme for these texture replacements should be like this objectrenderer_prefabID_meshLayerName_maintex.png objectrenderer_prefabID_meshLayerName_bumpmap.png otherwise it tries to replace all the "_maintex" within the gameobject.
for this particular sword the mesh layer name is "Viking_Sword (1)"
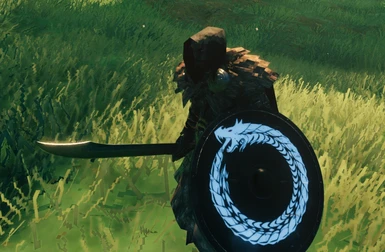
I manually downloaded and put the files in the appropriate structure as instructed with the custom textures and mesh mods - yet I cannot seem to get either this or the serpent shield to work. A shame because they look great!
If you're not going to follow the correct folder structure for this to work with Vortex then you should check the box in your mod options to disable the vortex button, but there should be no reason this can't be installed correctly with Vortex if you pack it correctly.


13 comments
It looks Great!
So you'll need to get Blender installed and working, open Blender and tell it to start an new General project.
Now delete the all the default stuff, the camera, the cube and the light so you've got a clean slate.
Now click File > Import > .fbx and import the Viking_Sword (1).fbx file.
Now find the Scaling Tool (on the left) and then click on the sword model in the preview. It should be highlighted. Now on the right, find Transform and under it, down a bit, you should see Scale.
Leave the Mode at the default of XYZ Euler. Now change all the x, y, and z values from 1.000 to 0.300.
Now, making sure the sword model is selected, press Crtl+A on the keyboard to bring up the Apply Menu. Click Scale. The numbers you set to .3 should now show 1.0 again.
This will set sword to the proper scale in game. However this alone will result in the character not properly holding the weapon. It will appears as though the character is holding the sword above the hilt and by the base of the blade so the position needs to be adjusted too.
So in the same menu, adjust the Location for z (and ONLY z) to 0.15 m.
Now, making sure the sword model is selected, press Crtl+A on the keyboard to bring up the Apply Menu again. Click Location. The z location to .15 should now show 0 again.
All done with the model editing at this point, now we need to export a new fbx file from Blender, so click File up top again, then > Export > . fbx. Save the new model named as default.fbx
Now to finish, take the new default.fbx file you just exported and place it in Valheim\BepInEx\plugins\CustomMeshes\SwordBlackmetal\attach folder (created folders as needed).
Now take the original textures and rename then as follows:
- Rename - object_SwordSilver_MetallicGlossMap.png to - to - texture_blackmetalsword_m_MetallicGlossMap.png
- Rename - object_SwordSilver_MainTex.png - to - texture_blackmetalsword_d_MainTex.png
- Rename - object_SwordSilver_BumpMap.png - to - texture_blackmetalsword_n_BumpMap.png
Place the renamed textures files in SteamApps\common\Valheim\BepInEx\plugins\CustomTextures
And you're done.
Please know that no matter the textures colors or model (other than black), the Black Sword is always GREEN tinted as Odin has ordained!
objectrenderer_prefabID_meshLayerName_maintex.png
objectrenderer_prefabID_meshLayerName_bumpmap.png
otherwise it tries to replace all the "_maintex" within the gameobject.
for this particular sword the mesh layer name is "Viking_Sword (1)"
Amazing work, btw.
Thanks again.