


Some info before we begin
1) I am by no means an expert, nor a teacher. But I will try to explain as best I can.
2) The process is fairly straightforward. It's mainly renaming files.
3) This process should be repeatable with other mods and game items.
(More on that later)
Let's Start
After installing the mod open your game folder. You can find this by right-clicking on the game in your Steam library, hovering over "manage" and selecting "Browse Local Files"
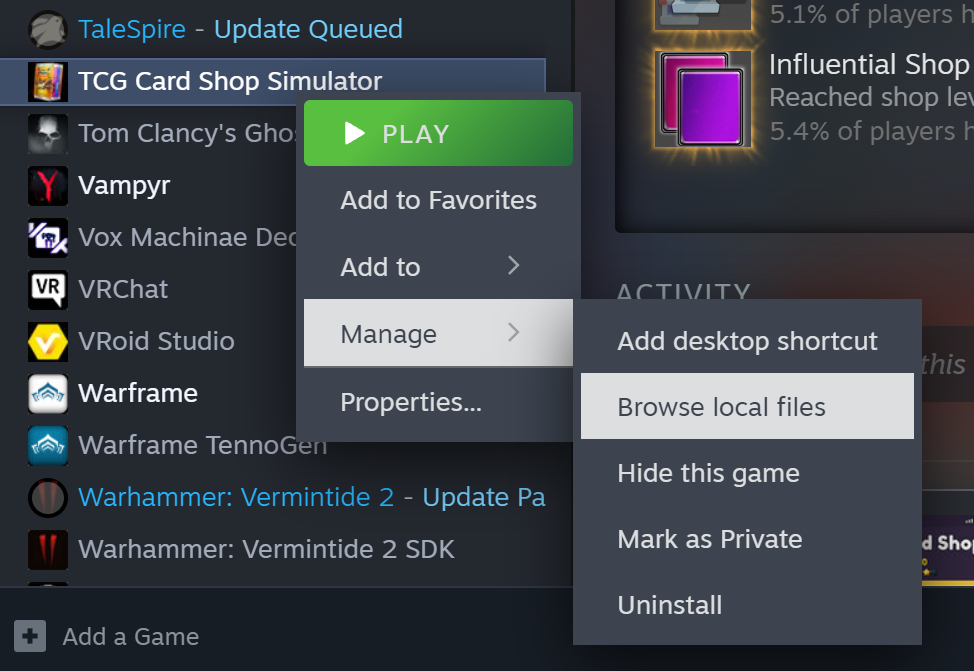
Your game folder should popup in a new window
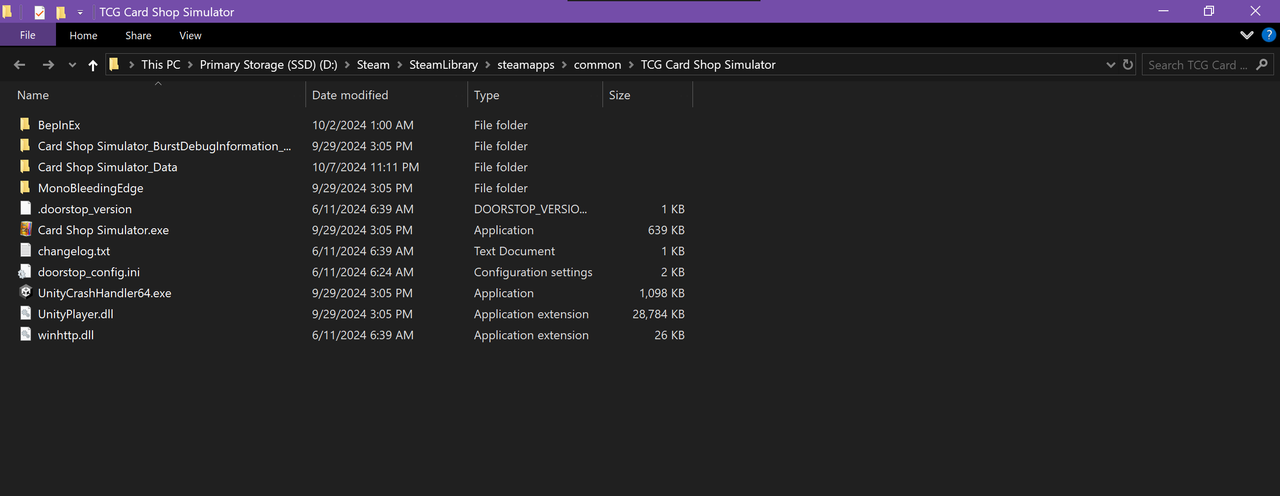
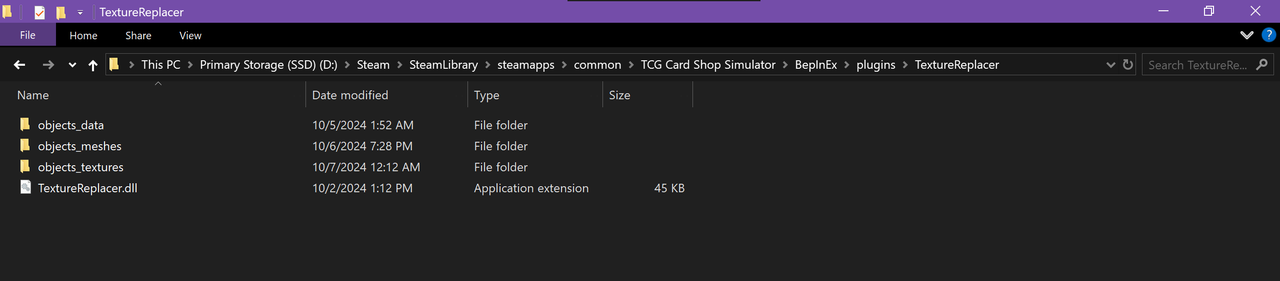
Navigate to the TextureReplacer folder (BepinEx-> plugins-> TextureReplacer)
Here you'll find the 3 folders we'll be messing with (objects_meshes, objects_textures, and objects_data)
To change which plushie the mod alters, you'll need to rename the files in those folders to the corresponding names of the plush you want replaced. For example, if you want Gir to replace the ToonZ plush instead of Ministar, you'll open the Mesh folder and rename StarfishA_Mesh.obj to "ToonZ_Plushie.obj"
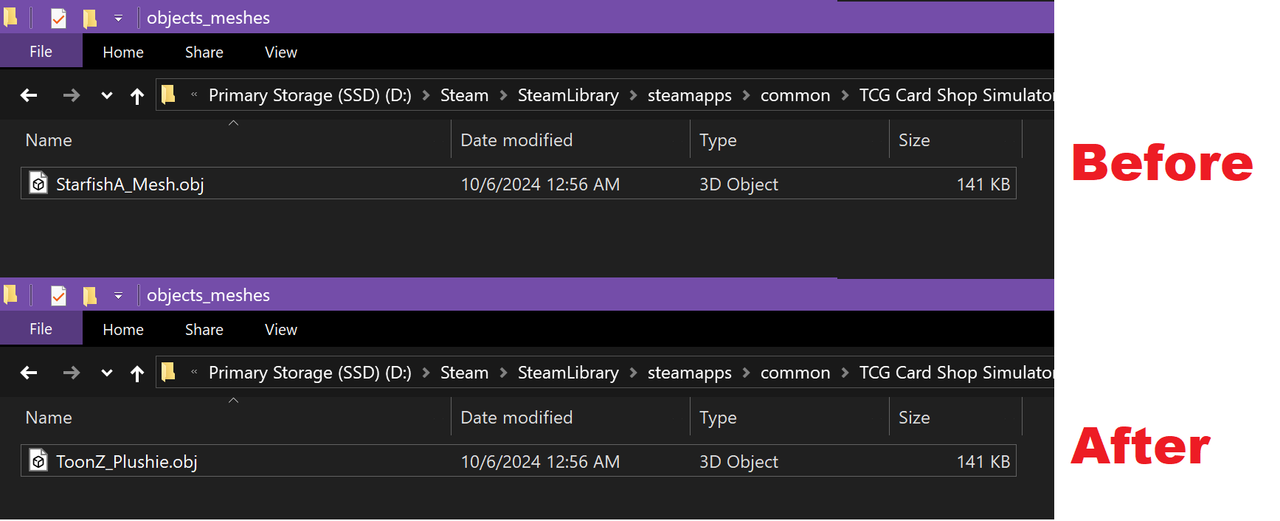
Then open the Textures folder and rename the 2 files in it.
T_StarfishA.png is the texture for the plushie itself and Icon_StarfishA.png is the icon used on price tags.

Following the same ToonZ plush example, T_StarfishA.png would need to be renamed to "T_ToonZPlushie.png" and Icon_StarfishA.png would need to be renamed to "Icon_Toy_ToonZ"
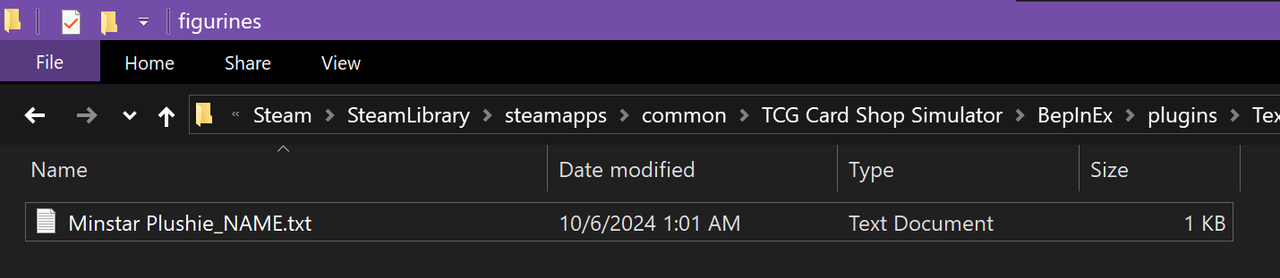
Now open the Data folder and then the Figurines folder inside. Rename Minstar Plushie_NAME.txt to "Minstar Plushie_NAME.txt"
Launch your game and you're good to go!
Some More Info
Although I was only able to test this with my own mod, theoretically it should work with any mod that uses Texture Replacer Mod in the same manner. It should even work with other in-game objects such as figurines, dice, etc. You would only need to figure out the file names for the object in question. For plushies specifically, there's a handy dandy cheat sheet below. Hope this helps and happy modding!
Pigni
Mesh: PiggyA_Mesh
Textures: T_PiggyA and Icon_PiggyA
Data: Pigni Plushie_NAME.txt
Nanomite
Mesh: GolemA_Mesh
Textures: T_GolemA and Icon_GolemA
Data: Nanomite Plushie_NAME.txt
Ministar
Mesh: StarfishA_Mesh
Textures: T_StarfishA and Icon_StarfishA
Data: Minstar Plushie_NAME.txt
Nocti
Mesh: BatA_Mesh
Textures: T_BatA and Icon_BatA
Data: Nocti Plushie_NAME.txt
Blazoar
Mesh: PiggyD_Mesh
Textures: T_PiggyD and Icon_Toy_PiggyD
Data: Blazoar Plushie_NAME.txt
Kingstar
Mesh: StarfishD_Mesh
Textures: T_StarfishD and Icon_Toy_StarfishD
Data: Kingstar Plushie_NAME.txt
Bonfiox
Mesh: FoxB_Mesh
Textures: T_FoxB and Icon_Toy_FoxB
Data: Bonfiox Plushie_NAME.txt
ToonZ
Mesh: ToonZ_Plushie
Textures: T_ToonZPlushie and Icon_Toy_ToonZ
Data: ToonZ Plushie_NAME.txt
1) I am by no means an expert, nor a teacher. But I will try to explain as best I can.
2) The process is fairly straightforward. It's mainly renaming files.
3) This process should be repeatable with other mods and game items.
(More on that later)
Let's Start
After installing the mod open your game folder. You can find this by right-clicking on the game in your Steam library, hovering over "manage" and selecting "Browse Local Files"
Your game folder should popup in a new window
Navigate to the TextureReplacer folder (BepinEx-> plugins-> TextureReplacer)
Here you'll find the 3 folders we'll be messing with (objects_meshes, objects_textures, and objects_data)
To change which plushie the mod alters, you'll need to rename the files in those folders to the corresponding names of the plush you want replaced. For example, if you want Gir to replace the ToonZ plush instead of Ministar, you'll open the Mesh folder and rename StarfishA_Mesh.obj to "ToonZ_Plushie.obj"
Then open the Textures folder and rename the 2 files in it.
T_StarfishA.png is the texture for the plushie itself and Icon_StarfishA.png is the icon used on price tags.
Following the same ToonZ plush example, T_StarfishA.png would need to be renamed to "T_ToonZPlushie.png" and Icon_StarfishA.png would need to be renamed to "Icon_Toy_ToonZ"
Now open the Data folder and then the Figurines folder inside. Rename Minstar Plushie_NAME.txt to "Minstar Plushie_NAME.txt"
Launch your game and you're good to go!
Some More Info
Although I was only able to test this with my own mod, theoretically it should work with any mod that uses Texture Replacer Mod in the same manner. It should even work with other in-game objects such as figurines, dice, etc. You would only need to figure out the file names for the object in question. For plushies specifically, there's a handy dandy cheat sheet below. Hope this helps and happy modding!
Pigni
Mesh: PiggyA_Mesh
Textures: T_PiggyA and Icon_PiggyA
Data: Pigni Plushie_NAME.txt
Nanomite
Mesh: GolemA_Mesh
Textures: T_GolemA and Icon_GolemA
Data: Nanomite Plushie_NAME.txt
Ministar
Mesh: StarfishA_Mesh
Textures: T_StarfishA and Icon_StarfishA
Data: Minstar Plushie_NAME.txt
Nocti
Mesh: BatA_Mesh
Textures: T_BatA and Icon_BatA
Data: Nocti Plushie_NAME.txt
Blazoar
Mesh: PiggyD_Mesh
Textures: T_PiggyD and Icon_Toy_PiggyD
Data: Blazoar Plushie_NAME.txt
Kingstar
Mesh: StarfishD_Mesh
Textures: T_StarfishD and Icon_Toy_StarfishD
Data: Kingstar Plushie_NAME.txt
Bonfiox
Mesh: FoxB_Mesh
Textures: T_FoxB and Icon_Toy_FoxB
Data: Bonfiox Plushie_NAME.txt
ToonZ
Mesh: ToonZ_Plushie
Textures: T_ToonZPlushie and Icon_Toy_ToonZ
Data: ToonZ Plushie_NAME.txt
6 comments
Here's what I did to get everything how I wanted when making the mod: After opening the game and seeing that Gir was too small and clipping through the back of the shelf, I eyeballed how much bigger I wanted him. I opened the model in blender and roughly doubled it's scale. Went back in game. He was a bit too big now and still clipping since I didn't reposition the model. Went back in blender. Resized and moved it forward a smidge. Repeated the cycle a few times until everything looked good in game. I spent around 45 minutes going back and forth between blender and the game. But depending on how well you eyeball it, and where your "good enough" threshold is, your mileage may vary.
Side note: After seeing the plushies on the wire rack in game (more clipping yay!) I decided to shrink the model a smidge more. So maybe check how it looks on multiple different shelves just in case?
Hope this helps!
The handy dandy cheat sheet helped the most. :)
Thank you it helped so much lets gooo!!!