Other user's assetsAll the assets in this file belong to the author, or are from free-to-use modder's resources
Upload permissionYou are not allowed to upload this file to other sites under any circumstances
Modification permissionYou must get permission from me before you are allowed to modify my files to improve it
Conversion permissionYou are not allowed to convert this file to work on other games under any circumstances
Asset use permissionYou must get permission from me before you are allowed to use any of the assets in this file
Asset use permission in mods/files that are being soldYou are not allowed to use assets from this file in any mods/files that are being sold, for money, on Steam Workshop or other platforms
Asset use permission in mods/files that earn donation pointsYou are not allowed to earn Donation Points for your mods if they use my assets
Author notes
This author has not provided any additional notes regarding file permissions
File credits
This author has not credited anyone else in this file
Donation Points system
Please log in to find out whether this mod is receiving Donation Points
Changelogs
Version 1.1.0
couple of toggles added to the options menu for hiding hotkeys
game* console commands added
bug with Right Alt on some keyboard layouts fixed
Version 1.0.0
initial release
Contents:
TL;DR
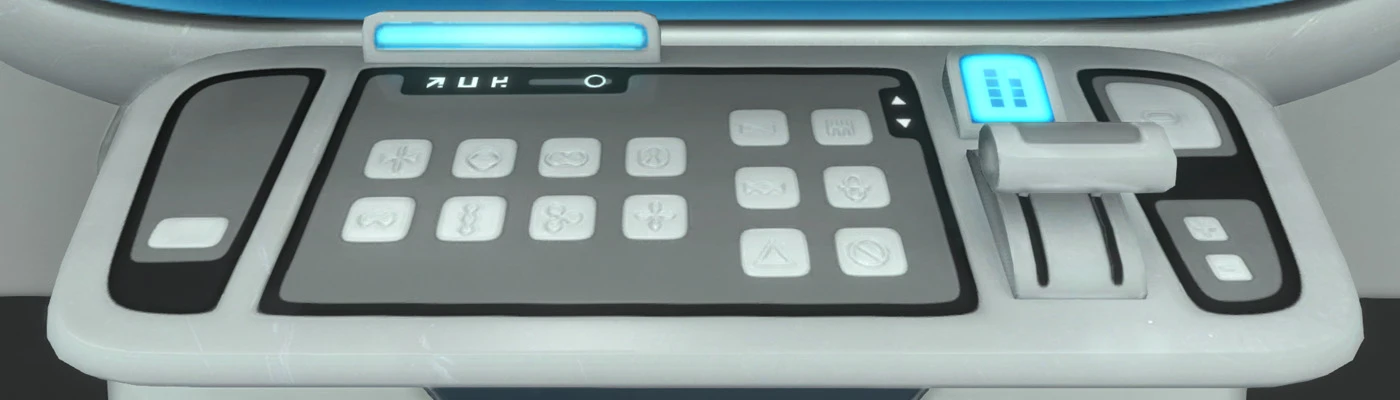
Mod options menu
hotkeys.json
Fields description
Command separators
New commands 6.1. Gameplay commands 6.2. General commands 6.3. Game* commands 6.4. Developer tools
Commands examples
1. TL;DR
This mod can be useful for both players and modders. You can add/edit hotkeys by editing the hotkeys.json (changes will be applied immediately). Key bindings can be changed in the mod options menu (key + key modifier).
Some features:
you can execute multiple console commands with a single keypress
you can use a hotkey as a switch between multiple states (execute different commands on each keypress)
you can repeat a command continuously while a hotkey is pressed
you can use an optional key modifier for a hotkey
a lot of new console commands are added (e.g. for using/equipping items and for toggling autoforward mode)
2. MOD OPTIONS MENU
All the hotkeys are added to the mod options menu by default. There are two bind buttons for each hotkey, but unlike the vanilla bindings, they are not for primary/secondary keys, but for key and optional key modifier. Both buttons can be used for binding key as well as for binding modifier.
You can use Control, Alt and Shift keys as modifiers (left and right keys are treated as different keys). You can also use these keys alone, in that case they'll work just as ordinary keys.
If you bind two modifier keys or two non-modifier keys simultaneously, then only first of them will be used.
You can clear binding by pressing Delete button while hovering mouse pointer over a bind button (no need to click on a button).
3. HOTKEYS.JSON
All the hotkeys are specified in the hotkeys.json in the mod folder. You can open this file right from within the game (button in the mod options menu). Changes in the hotkeys.json are applied immediately (the moment you switch back to the game), you don't need to reload the game in order to add or edit hotkeys.
Fields key and command are required, other fields are optional.
"key" (required): Can be an empty string (""), can be a single key (e.g. "A" or "LeftAlt") or key with one modifier (e.g. "LeftShift+F1").
"command" (required): Console command(s) that are associated with this hotkey. You can use any valid console command here and two kinds of separators - semicolon (;) and vertical bar (|). See section 5 for more info.
"mode" (optional, default: "Press"): Hotkey mode. Hotkeys can work in three different modes:
press mode (0 or "Press"): command will be executed once when the key is pressed
press/release mode: (1 or "PressRelease"): command will be executed once when the key is pressed and will be executed again when the key is released
hold mode (2 or "Hold"): command will be executed on each frame while the key is held down
"label" (optional, default: ""): A label for the option in the mod options menu. If this field is omitted or empty, then the command itself will be used as a label.
"hidden" (optional, default: false): If true, the option will be hidden from the mod options menu, but hotkey will still be active.
5. COMMAND SEPARATORS
You can use two kinds of separators in the "command" field - the semicolon (;) and the vertical bar (|).
If you need to execute more than one command with a single keypress, you can separate them by the semicolon, e.g. "command": "item titanium 5; item silver 10; item gold 15". All these commands will be executed as a single action (each command on its own frame). Also you can use wait command to add a delay between commands (see section 6.2 for more info).
For more complex behaviour you can use the vertical bar as a separator. The vertical bar splits the command string into the list of separate commands. Each command from the list will be executed subsequently on the separate hotkey activation.
E.g. let you have this command string: "command": "speed 10 | speed 1" and use default "Press" mode for the hotkey. Then, when you press the hotkey for the first time, the command "speed 10" will be executed. On the next press of the hotkey the command "speed 1" will be executed. The third press will execute "speed 10" again and so on.
With the same command string and "PressRelease" mode the second command "speed 1" will be executed when you release the hotkey. With "Hold" mode the first and the second command will be executed alternately on the each frame while the hotkey is held down.
You can use both separators in the same command string, e.g. "daynightspeed 10; speed 10 | daynightspeed 5; speed 5 | daynightspeed 1; speed 1". The vertical bar have higher precedence than the semicolon.
6. NEW COMMANDS
This section describes new console commands added by this mod.
Required parameters are enclosed in angle brackets (e.g. <width>), optional parameters are enclosed in square brackets (e.g. [itemtype]).
6.1. Gameplay commands
autoforward [{true|false}] Enables/disables the autoforward mode (toggles it if the parameter is omitted). The autoforward mode emulates holding down the "Move forward" key. Example: autoforward true
bindslot <slotID> [itemtype] Assigns certain item from the inventory to the quickslot slotID (slotID is zero-based index). If itemtype is omitted then slot will be cleared of the previous binding. Example (bind flashlight to the first quickslot): bindslot 0 flashlight
equipslot [slotID] Equips an item in the quickslot slotID (slotID is zero-based index). If slotID is omitted then the currently equipped item will be holstered. Example (equip item in the first slot): equipslot 0
useitem <itemtype> [itemtype2] .. [itemtypeN] Uses consumable item or equips equippable item from the inventory. If more than one itemtype is specified, first found item in the list will be used. Example (drink one bottle of water): useitem filteredwater disinfectedwater bigfilteredwater
vehicle_enter Command for entering nearby Seamoth or Prawn Suit.
vehicle_upgrades Command for opening upgrade interface for nearby Seamoth or Prawn Suit.
6.2. General commands
addhotkey <command> Adds a hotkey with specified command and opens options menu. Use it from the console to quickly add a template for a hotkey to the hotkeys.json. Example: addhotkey item titanium 10
setresolution <width> <height> [fullscreen:{true|false}] Sets Subnautica window resolution. Third parameter is true by default. Example: setresolution 1280 720 false
fov <value> Changes field of view. The diver mask can block the vision with low values, use devtools_hidegui command to hide it (section 6.4). Example: fov 60
showmessage <message> Shows message at the top left corner of the screen. Example: showmessage Hello, world!
clearmessages Clears all messages currently displayed at the top left corner of the screen.
showmodoptions Opens options menu and switches to the "Mods" tab.
lastcommand [index] Executes last entered console command. Parameter is zero-based index of command from the end of the console history (default is 0). Example (execute second-to-last command): lastcommand 1
wait <seconds> Adds a delay between commands separated by semicolon (see section 5 for more info). Example (add a half-second delay between two commands): command1; wait 0.5; command2
6.3. Game* commands
game_startnew [game_mode:{survival|freedom|hardcore|creative}] Starts a new game in specified game mode. Works in the main menu only. Parameter is 'creative' by default. Example: game_startnew survival
game_load [slot_id] Loads a saved game with specified slot id (you can use UITweaks to see a slot id for a save). Works in the main menu only. Loads a last saved game by default. Example: game_load 10
game_save Saves the current game to its slot.
game_quit [to_desktop:{true|false}] Quits the game. Parameter is false by defalut (quits to the main menu). Example: game_quit true
6.4. Developer tools
devtools_toggleterrain Toggles debug information menu (F1 in vanilla).
devtools_togglegraphics Toggles debug graphics menu (F3 in vanilla).
devtools_hidegui [state:{none|mask|hud|maskhud|all}] Hides/shows interface (F6 in vanilla). There are five possible states:
0 or none - don't hide anything
1 or mask - hide diver mask
2 or hud - hide HUD
3 or maskhud - hide mask and HUD
4 or all - hide mask, HUD and player model
Command will loop through all the states in case the state parameter is omitted. Example: devtools_hidegui mask
7. COMMANDS EXAMPLES
This section shows various usage examples of commands for playing the game and for mod developing. You can use them as a starting point for your own commands. These and other sample commands can be found in the hotkeys.sample.json in the mod folder (you can copy some of the commands or just rename it to hotkeys.json).
"bindslot 0 flashlight; equipslot 0" Simple command for equipping flashlight (flashlight must be in the inventory).
"bindslot 1 propulsioncannon; equipslot 1 | bindslot 1 repulsioncannon; equipslot 1" Command for switching between propulsion and repulsion cannons (both cannons must be in the inventory)
"bindslot 0 seaglide; equipslot 0; autoforward true | bindslot 0 flashlight; equipslot 0; autoforward false" Command for switching between seaglide and flashlight (also toggling autoforward)
"devtools_hidegui mask; fov 5 | fov 60; devtools_hidegui none" Command for zooming in (useful in various situations). The dive mask don't work well with low FoV values, so it's necessary to hide it. You may want to use it with PressRelease hotkey mode.
"setresolution 1280 720 false; setwindowpos 10 10 | setresolution 2560 1440" Command for toggling fullscreen mode (useful mainly while mod developing). Also moves the game window to the corner.
"spawn seamoth; warpforward 10; speed 10; vehicle_enter; wait 2; speed 1; clearmessages" Command for spawning Seamoth and entering inside (supposed to use while mod developing). Uses speed and wait commands to speed up animations for spawning and entering (wait command is affected by speed command, so it actually waits 0.2s).


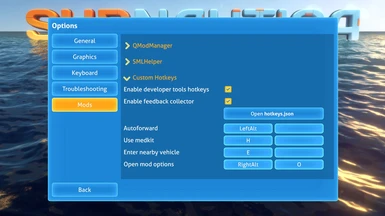
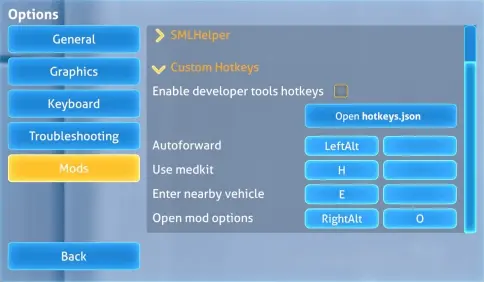 All the hotkeys are added to the mod options menu by default. There are two bind buttons for each hotkey, but unlike the vanilla bindings, they are not for primary/secondary keys, but for key and optional key modifier.