


0 of 0
Documentation
Readme
View as plain text
[]===========================[]
|| BLISS ||
|| Stunts Track Editor ||
|| Version 2.5.8 ||
|| ----------------------- ||
|| By Lucas Pedrosa ||
[]===========================[]
INDEX
1. Introduction
2. License and disclaimer
3. Installing and running Bliss
4. Track and terrain editing
5. Advanced editing
6. Selection and block editing
7. The switch bar
8. The menu options
9. On file formats
10. Scenery generation
11. Track analysis
12. Tournaments
13. Taking a track-shot
14. Colouring
.1.
--=[ + Introduction + ]=--
Bliss is a track editor for Stunts. If you're reading this, you
surely are familiar with Stunts, but in case you're not, Stunts is a
1990 cars game for DOS which, despite being old, not supporting online
play and having low resolution graphics, is so fun and unique that it
earned a great number of fans around the world and online tournaments
are still being held as of today, in 2018!
When Stunts was made by DSI in the early 90s, it came with its own
built-in track editor, which is one of the features that has made it so
popular and loved. Yet, this track editor has important limitations.
Bliss is designed to go beyond those limitations while providing a very
comfortable environment that's designed for today's computers and
operating systems.
Because Stunts is a DOS game, I considered it important to make
sure that Bliss could run under DOS. It's been tested to run perfectly
well in FreeDOS and should run on other compatible platforms. It will
also run in DOSBox, although significantly slower and with some loss in
graphic quality, since DOSBox does not support the resolution Bliss
uses by default. Specifically, DOSBox does not seem to support
1024x768x32bit, so when this mode cannot be used, Bliss will use 16bit
colour instead. If the 32bit mode can somehow made to run in DOSBox,
then Bliss will use it. Bliss can also run natively under GNU/Linux and
Windows and likely in compatible OSs (like some Unix flavours and
ReactOS).
.2.
--=[ + License and disclaimer + ]=--
Starting from version 2.5, Bliss is FREE SOFTWARE. It can be used,
modified and distributed under terms of the GNU General Public License
vesion 3. Feel free to share with your friends or post on your website.
Together with the program, you should have received the source code. If
you redistribute it, make sure to also include it in your distribution.
For exact details on the GPLv3, read the file named COPYING or
license.txt included with Bliss or visit http://www.gnu.org/licenses/
If you are entirely unfamiliar with FREE SOFTWARE, I recommend that
you take the time to read about it or at least, view online videos on
this topic. In particular, if you are a programmer, it will be a great
contribution to our community if you become familiar with this concept.
The word "free" in FREE SOFTWARE refers to "freedom", not to
"free-of-charge". You are allowed, however, to not charge for this
software and to get it free-of-charge.
Bliss is made in the hope that you will find it useful and
enjoyable. It comes with ABSOLUTELY NO WARRANTY. The author has put all
effort in making it efficient and as bug-free as possible and you are
unlikely to encounter any problem, yet this is not guaranteed. The
features described in this manual are expected to work as explained,
but bugs may occur, including bugs that could cause the functioning to
differ from that described. So again, NO WARRANTY.
.3.
--=[ + Installing and running Bliss + ]=--
Bliss is designed to be portable and transcendent. Portable,
meaning that, ideally, you have all you need to run the program in the
files that come included, you can place them wherever you like and the
program will run. Transcendent, meaning that the program should not
just stop working one day because a part of it has to be updated or
because it was updated. If a new version of Bliss is released, old
versions will continue to function normally. You can just keep the
program files in a flash drive for years and then come back to them and
they will run.
So to install Bliss, you simply create a directory somewhere you
like on your computer file system and copy the files there. Then you
run Bliss by executing the program file for your operating system. The
executable files included are:
bliss - GNU/Linux 64bit executable
bliss32 - GNU/Linux 32bit executable
bliss.exe - Windows/ReactOS/Wine 32bit executable
bliss.com - FreeDOS 32bit executable
In order to run the DOS executable, since Bliss is a 32bit program,
you will need to have DPMI services in your system. Depending on the
version, this may be granted under DOSBox and likely, in other DOS
emulators, but if you're running a true DOS, such as FreeDOS, make sure
you have a DPMI server (such as CWSDPMI or HX-DOS). Most 32bit DOS
software uses DPMI so you likely already have one of these. Otherwise,
you can find them online easily. As long as the license is compatible,
you may have received one of these with your package of Bliss.
The package may or may not include the 32bit binary executable for
GNU/Linux. Only the 64bit executable is always available. It is clear
that mostly everyone is using a 64bit OS nowadays. However, if you
would like to run Bliss on a 32bit GNU/Linux system and you didn't
receive the corresponding binary, compiling should be pretty
straightforward. Obtain FreeBasic from its website at freebasic.net,
install the necessary dependecies and run it in Bliss' main directory
on bliss.bas. The source is still perfectly compatible with 32bit mode.
.4.
--=[ + Track and terrain editing + ]=--
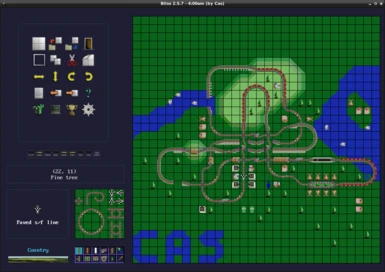
Stunts circuits are based on two layers: the top track-layer and
the bottom terrain-layer. These two are represented on a 30x30 tile
grid. When you start Bliss, the grid is empty, meaning that there's
only grass and no track to race. You'll see the grid on the right side
and the control panel on the left. Bliss has been mostly thought of as
a mouse-driven environment, yet it is almost as powerful when
controlled with the keyboard. As you move the mouse pointer on the
grid, you'll notice how the coordinates change on the left. If you
press any of the arrow keys, the keyboard cursor will show up too and
you'll be able to move it all over the map.
Below the coordinate display, there's the current tile indicator on
the left, and the tile palette on the right. You can place the
currently selected element on the grid by clicking on it with the left
mouse button or by pressing ENTER while the keyboard cursor is shown.
The element will be placed at the position corresponding to the mouse
pointer or keyboard cursor respectively. Likewise, use the right mouse
button or the DEL key to clear the grid at the current position. When
editing with the mouse, the left or right button can be held down while
moving the pointer, allowing for very quick edition. What you edit from
the moment you press a button until you release it will be referred to
in this manual as a "stroke". It is not possible to create strokes with
the keyboard by just keeping the ENTER key down, but as you will see,
many tools are availble to aid keyboard-based edition.
The most intuitive way of editing is by selecting the item you need
from the palette and then using the mouse or keyboard to place it on
the grid. With the mouse, you can select an item by just left-clicking
on it. With the keyboard, you need to press TAB to switch from the grid
to the palette, ENTER to pick an element and then TAB again to return
to the grid. The palette is divided in twelve "pages". What you see at
the palette when you just start Bliss is the first page. You'll notice
the page selector and indicator right under the palette. The first page
(depicted with a straight paved road) is highlighted. Click on any of
the palette indicators with the mouse to change the page. You can
achieve this with the keyboard by using the functional keys F1 through
F12. Pages 1 through 10 contain track elements that you can use to edit
the top layer. Pages 11 and 12 will instead edit the lower layer, the
terrain. Editing the terrain with palette page 11 (F11) may look very
trivial at the beginning, since it's done exactly the same way I have
explained for track edition. But it's page 12 that provides the most
comfortable approach, although that one can only be used with the
mouse. While on page 12, select either mountain or water, then use the
left mouse button to raise terrain or flood at a point and the right
mouse button to lower terrain or dry a spot. This brush-like editing
mode will also take care of unfinished terrain edges for you.
Finally, on the bottom left corner of the program window, there's
the background selector. Every track contains a background landscape.
Click on the selector and pick any of the five available backgrounds
for your track.
With these tools, it is already possible to produce a complete
track, but Bliss is a lot more powerful than that! Read the next
section to learn about advanced editing tools. After that, we'll delve
into the menu options.
.5.
--=[ + Advanced editing + ]=--
The previously described is the most intuitive way of editing with
Bliss, made so with the purpose that you always remember how to do
things and never get stuck. However, there are a number of shortcut
keys and functions that may take a little more to get used to, but will
make your editing a lot more comfortable and powerful. They are very
simple to use too, it's just at the beginning you tend to forget
they're there, so I recommend you to try to force yourself a little to
use them until it becomes natural.
The simplest example is the ability to pick an item from the grid
instead of from the palette. You can do this by pressing the mouse
middle button, if you have one. Alternatively, use the P shortcut. P
will pick the element at the mouse pointer position, unless the
keyboard cursor is visible at the time, in which case it will pick the
tile at the keyboard cursor position instead. Using P will save you a
lot of time of palette search.
Nothing takes more time in Bliss than having to select the correct
palette page and then the right track item and P is only the first
alternative. Besides directly selecting an item, you can also transform
the one you're already using. Press R to rotate the current track
element clockwise or SHIFT+R to rotate it counter-clockwise. Also, you
can use F to flip it horizontally or SHIFT+F to flip it vertically.
While editing regular roads (pages 1, 2 and 3), you can switch between
the different materials (paved, dirty or icy) by pressing M.
Additionally, track elements are grouped by type and each type has
a one-letter shortcut that selects it directly. For example, L for
loops, K for crossroads, T for tunnels and slaloms, etc. You can see a
full list of these shortcuts at the Help menu (F1 twice, or once if
you're at the first palette page). Use SHIFT plus a shortcut letter to
follow the element list in the other direction. If you don't remember
an element shortcut, you can still find it quickly by pressing the
SPACE bar and then starting to type part of the element's name.
Some track elements are very definite, like an elevated road or a
banked road. Others, like ramps or banked road entrances serve as
connectors between two definite tiles. We call these "transition"
elements. In the shortcut list, they are grouped under the V shortcut
key. Of course, they are many and it may take some time to go through
all of them by pressing V again and again. An alternative is the U
shortcut key, which does not select an element, but instead, tries to
complete a track tile with an element that can connect the bordering
tiles. Try placing a paved straightway and a banked road separated by
an empty tile, then point at the tile with the mouse and press U. A
banked entrance will be generated. When more than one tile can connect
the surrounding ones, you can keep pressing U to find alternatives.
This is very useful also to generate splits.
One tool that could not have gone missing is that of undoing and
redoing. At any time, use CTRL+Z to undo the last change made to the
grid. If you're editing with the mouse, this will be the last stroke.
With the keyboard, it will be the last item inserted or deleted. Did
you undo too much? Press CTRL+Y to redo the changes.
If you are experienced with Stunts' track format and would like to
have more freedom, you can enable "manual edition" (read more about it
in the section about the "switch bar"). While manual editing mode is
active, the backslash key can be used to enter a hexadecimal code and
select any track or terrain element directly. This includes invalid
codes. Also, the background scenery selection will allow custom scenery
codes when this mode is enabled. In case you don't know what this is
about, it is better to first experiment with a new empty track and be
aware that Stunts may crash or behave unpredictably when manually
edited tracks are loaded. When the backslash option is activated, the
currently selected brush will be temporarily replaced with a question
mark. You can then proceed to type a two digit hexadecimal code. After
three seconds, if no code was entered or an invalid key was pressed,
the function is disabled. If you make a mistake while typing, you can
use the Backspace or Delete keys to start over entering the code.
.6.
--=[ + Selection and block editing + ]=--
Even with all the tools explained before, edition is still made
tile by tile. Bliss is capable of selecting areas to transform, copy,
cut or paste or to generate structures. This will not just make your
work easier, but also assist you in achieving symmetry or in making
space for something you didn't expect to need by moving a large set of
tiles together.
To select a region of the grid, stand at a tile with the mouse
pointer or keyboard cursor and hold down the CTRL key. If using the
mouse, also hold down the left mouse button (once the button is down,
you can realese the CTRL key and continue dragging). If using the
keyboard, just use the arrows to move the cursor and the shape of the
selection and release CTRL when you're done selecting.
The selected area can be transformed in-situ by using F or SHIFT+F
to flip and R or SHIFT+R to rotate. In order to rotate, however, the
selection has to be a perfect square. If it is not, you will be given
the option to correct the shape based on the X or Y axis. Pressing DEL
at this point will delete the whole region. To select the whole track,
press CTRL+W. This same key combination can be used to cancel a
selection with the keyboard.
Bliss also has a clipboard so that copying regions is possible.
With a region selected, press CTRL+C to copy the region to the
clipboard. CTRL+X will work as a combination of CTRL+C and DEL,
resulting in a "cut" operation. The clipboard indicator in the panel
will light up, meaning the clipboard is in use. Press CTRL+V to paste
the contents of the clipboard. The region will appear hovering over the
grid and can be moved with the mouse pointer or keyboard cursor to the
desired position before releasing with the left mouse button or ENTER.
Before releasing the paste, the hovering region can be transformed on
the fly with F, SHIFT+F, R and SHIFT+R. In this case, there is no need
for the region to be a perfect square.
If more than one instance of Bliss is open, the clipboard will
automatically be exported when created and imported by other instances
if it has been modified. You can use this feature to easily copy parts
of a track onto another or to have more space to work on.
Selections can also be used to produce a closed-circuit. Select a
rectangular region and press ENTER. If the current element is a piece
of track, a closed-circuit of the same type will be produced. For
paved, dirty and icy roads, ENTER can be pressed again to switch
between small and large corners. If the region is only one tile wide, a
long straightway of the selected type will be generated. If the current
tile is scenery, the region will be filled with that tile.
By default, all on-the-fly region transformations affect only the
track layer. This behaviour can be changed by using CTRL+T to toggle
terrain being affected and CTRL+K for the track layer. This default can
also be changed and saved into the configuration file. In-situ
transformations (except DEL) always affect both track and terrain
layers. It may be important to notice that the copy operation always
reads both track and terrain. It is pasting that changes depending on
the layer flags. Because of this, you can press CTRL+K or CTRL+T while
pasting before releasing the hovering region and see the effect.
.7.
--=[ + The switch bar + ]=--
Right above the coordinates box, there's the switch bar. A row of
buttons, usually with an indicator, appear side by side. Most of these
are toggles whose indicator will be lit when active.
The clipboard indicator turns on whenever there's something on the
clipboard (after a copy or cut operation). Clicking on the button will
cause the clipboard to be freed, which doesn't have much use, but it's
better than it doing nothing :P
The two buttons on the right end ("TRK" and "TER"), we have already
discussed, as they correspond to shortcuts CTRL+K and CTRL+T. They
indicate whether the track and/or terrain layers are affected by paste
and delete operations.
The GRID button is very intuitive. Use it to hide or show the map
grid. It can also be toggled by pressing CTRL+G. At start up, the grid
is on by default, but this behaviour can be changed in the Settings
menu.
The three following toggles deserve deeper explanation. Normally,
when you move the mouse pointer or the keyboard cursor on the map,
you'll see the coordinates and the name of the track element at that
position, but while many track elements are 1x1, there are other track
elements that are 2x1, 1x2 or 2x2 tiles. Each of these individual tiles
actually has a unique code and also the terrain tiles have their codes
too. The DEB switch turns on "debug mode". In debug mode, Bliss will
display not the track element name, but the codes in the track and
terrain layers at that exact location. The keyboard cursor will be
fixed at a 1x1 square shape and larger track elements will be
decomposed in their parent sub elements and fillers (complementary sub
elements). You will be able to see the track exactly like Stunts sees
it internally. Fillers are represented as arrows that point in the
direction of their parent sub element. This mode is useful when
experimenting or to create "illusion tracks". Debug mode can be
activated/deactived with the CTRL+Q shortcut.
You may have noticed that even in debug mode, it is not possible to
remove individual sub elements, unless they are orphan fillers. This is
so because most of the time, doing so could cause undesired conflicts.
But when you know what you're doing, it's useful to be able to handle
each tile separately. To do this, press the MAN button, for "manual
edition". Bliss will no longer try to prevent you from generating track
element conflicts. You can achieve the same result by pressing CTRL+E.
If you've been playing with manual editing mode or if you simply
placed a track element on top of a terrain corner or an incompatible
border, you'll see some warnings. Missing fillers will show up like a
yellow square around the tile and track-terrain conflicts will display
as the track tile with a yellow background. This means the track as it
is will not look or behave normally when raced in Stunts and may, in
some cases, even be rejected by the game. Another warning appears when
you place large track elements on water. You'll see one or more of the
tiles showing a whirlwind backgound. This means the terrain may appear
as grass but behave as water or vice-versa. If you just don't want to
see these warnings, you can disable them by pressing the WAR button or
the CTRL+D key combination. Warnings are very useful, but maybe you
want to take a snapshot of the track map or see what's underneath a
track element that's in conflict with the terrain.
The COL switch toggles between track/terrain editing mode and
colouring mode. In colouring mode, you can add some markings to the
grid. This switch can be triggered with the CTRL+O key combination.
Read more about it in section 14.
The TRK SHOT button opens up the TrackShot dialog to save a
snapshot of the current track. Read section 13 for more details on this
option.
.8.
--=[ + The menu options + ]=--
The most conspicuous part of the panel is precisely the one we
haven't talked about yet. That box at the top left corner of the
program window with a set of icons arranged in a four-times-five
rectangular area is the Menu. Hover the icons with the mouse pointer
and you'll see them highlight. The option titles will be displayed just
below.
The first row of icons represents our "File Menu". The empty plot
icon starts a new track design, while the next two save and load
tracks. The door, at the end of the row, is the Exit option. When
starting a new track, you will be given the option to pick one of 28
available terrains, including empty terrains based on grass, water or
mountain, the five terrains that come built-in with Stutns and many
custom ones. You just click on one and then on "Create Track" or press
ENTER and you're back at the grid, ready to start a new track. When
loading, you're allowed to navigate the directories and select a TRK or
RPL file (corresponding to tracks and replays). Yes, Bliss can read
tracks from replays! By default, the directory will start browsing at
Bliss' home path, but this can be changed in the Settings menu. When
saving a track, you'll notice one new thing: a pull-down selector at
the bottom-left corner of the Save dialog. This is to select the file
format you will use. If you're not sure, just leave it as it is. Bliss
will usually make a good guess on the best format for the track. If you
want to know more about track file formats, read on the corresponding
section.
The second row is the "Selection menu" and does pretty much the
same as the shortcut combination keys we've discussed in the section on
selections. The first option activates selecting, as if you were
holding down the CTRL key. The other three correspond to Copy, Cut and
Paste. It is always more comfortable to do these things with shortcut
keys, but the icons are a lot more evident.
The third row is the "Transformation menu" and also, we've
discussed most of what it does. The same flipping and rotating you can
do with F, SHIFT+F, R and SHIFT+R can be achieved with these icon
options. There's one difference, however. If there's no selection, the
shortcut keys will affect the current track element, whereas the icon
options will affect the whole track. Everything else is the same. You
can even use these options while pasting.
The fourth row contains two options we have already talked about:
the two middle icons are the Undo and Redo options and are equivalent
to the CTRL+Z and CTRL+Y shortcuts. The question mark is the Help Menu
and contains a complete list of the shortcut keys. The option at the
left end of the row is the Track Information Menu. With this option,
you can give your track a title (which is important, since Stunts track
names can only be 8 characters long and cannot contain just any
character) and add a comment and championship information. You can also
sign as the author of the track. Upon installation, the default author
is anonymous, but if you don't want to have to enter your name on every
track, you can change the default author's name in the Settings menu
option. Bliss will also fill the track creation date and keep track of
the editing time for you. When you save your track, this information
will be saved with it (unless you save it in raw format; read the next
section to know more about track file formats).
On the fifth row, you'll recognise the option at the right end as
the Settings menu option we've mentioned many times. Use it to
configure the default track path, author's name and toggle status at
start up. You'll see also a "racer calibration time" field. This will
be explained in more depth in the section on Track Analysis. Saving the
changes will update the configuration file that can also be edited
manually. The other three menu options in this row are complex enough
to deserve a manual section each.
.9.
--=[ + On file formats + ]=--
Tracks created and handled by Stunts normally consist of two files:
a TRK (proper track) file and a HIG (highscore table) file. Stunts
makes sure that the highscore table is cleared whenever the track
edited and that the track contains no conflicts. When using an external
tack editor like is the case of Bliss and of the famous Track Blaster
editor, the highscore table is irrelevant (which means high scores will
be kept in spite of the track having been edited) and conflicts can be
entered in the track file if the author so wishes. Although Stunts will
never create these effects, the track file can still be considered
valid and standard (as usually is by the online community) since
usually Stunts can read and race these tracks.
Another thing that Stunts never does is create TRK files of a size
other than 1802 bytes, yet Stunts CAN read files smaller or larger than
that and they work. For example, a 901 byte long track file contains a
track with no terrain layer. When loaded by Stunts, the previously
loaded terrain will be kept and only the track layer will be modified.
Therefore, such file is also valid and if used, would become standard.
If a track file is longer than 1802 bytes, Stunts will load the track
normally and ignore all bytes after the first 1802. A track file will
still be valid up to a maximum length of 13802 bytes, which, if
surpassed, will typically crash Stunts.
Bliss makes use of this possibility to add additional bytes to
tracks and keep the track title, author's name, etc., all in one file.
When you save a track, the selector option "One file" refers to this
format. I believe this is the most convenient and reliable option
because it causes no problems to Stunts and it is the safest way to
store the title and author's name, as wherever your track goes, the
text goes with it.
Because Bliss was created many years after Stunts, there exist
other tools designed for Stunts for different purposes. A few of them
have assumed the track file length was 1802 bytes and may fail to work
normally if this is not met. Two important examples are the Track
Blaster editor and ZakStunts website. For compatibility with these and
other tools that may require a fixed track file lenght, Bliss includes
another option, the "Split files" format, with which the track title,
author's name, etc., are saved to a separate file of extension ".smd".
Use this format if you also work on the tracks with a tool that does
not support sizes other that 1802. The inconvenience is that, for
distributing, you need to pass two files instead of one and the SMD
file tends to get lost in the process. Also, renaming a TRK file
requires the SMD file to also be renamed so that the meta-data can be
found. I do not recommend using this format unless you want to export
the track to be worked on with another tool or to post it to ZakStunts.
A third option is saving your track ir Raw format, which means only
saving the 1802 bytes of track and terrain and dropping (losing) your
track additional information. You may use this to export your track
with another name.
My recommendation on how to use the formats: when you create your
own tracks and keep them in your computer hard drive or share them with
friends to race them in Stunts, use the "One file" format. If you want
to open your track with another tool, try that same format. If the tool
does not accept it, save the track as "Split files" and work on the TRK
file. You may later want to save it back to "One file" format. If you
want to submit your track to a tournament, check on the prefered file
format for that tournament. ZakStunts uses raw track files, so you can
save a copy of your track as "raw" and send it. Race For Kicks allows
uploading single files for tracks. If the file contains metadata, it
will be read. Otherwise, you will have to submit it manually.
Tournaments that receive replays via e-mail typically will be
indifferent about the file format.
From version 2.5.5, two split formats are available: binary (which
keeps metadata exactly as it would be overlaid in one-file format) and
text (which saves it as plain ASCII/UTF-8 text). If you're saving your
track in split format for compatibility with some software, it may not
be important which one you use, but if it is your personal preference,
then the text mode may be more convenient, as you can manually edit it
whenever you want.
Replays created with the same track are identical regardless of the
format in which the track is saved. There will be no problem with
replay posting.
.10.
--=[ + Scenery generation + ]=--
In case you don't have much time to decorate your track, Bliss
includes an intelligent automatic scenery generation option. The first
option of the last menu row will take you to a dialog box where you can
configure this. By default, values are optimised to match the
background landscape you have selected, but you can specify a
percentage for each scenery element. What parts of the grid will be
affected by each element can be configured with the selector beside of
the percentage bar. Most items have the options "Everywhere" or "By the
road", while ships have the options "On water" and "Everywhere". Bliss
will first place as many elements "by the road" as configured and then
proceed to fill the water and land according the the other percentages.
Items placed by the road will be automatically set to face it.
Another selector is available at the bottom left corner. By
default, only free space will be used to place the scenery items. You
can use this selector, however, to force Bliss erase all scenery before
generating. Taking up only the free space is often useful when an item
is to be placed by the road with a certain proportion, but everywhere
with another or when boats are to be placed both on water and on land.
Press "Generate" to see the result or "Cancel" to return to the
grid. You'll notice that, if you choose to place non-symmetrical
objects (such as the office building) "everywhere", they will be facing
random directions. If they happen to be placed by the road, they will
therefore not necessarily face it, like they would when you choose "by
the road". So some fine-tuning after generating can help if a
non-standard set up is used.
.11.
--=[ + Track analysis + ]=--
Probably the most complex tool in Bliss is the Track Analysis
option. It is composed of two parts. One is a track error checking
system that you can access by pressin C. The other one is the Track
Analysis icon in the last menu row. To make use of any of these two
features, you first need to have a track.
Create or load a track and try pressing C. Bliss will check all
possible paths and issue a verdict. If the track contains errors, it
will show you where the error is. If it does not, it will follow the
path from start to finish to complete the track. You can cancel
path-following at any time by pressing any key.
There are three types of errors the checking system detects. The
most serious type is that of "track-fatal" errors. If any of these
errors exists in the track, it will fail when loaded by Stunts, even if
there is a valid path reaching the finish line. Bliss will always point
on these errors. An example of a track-fatal error is the infamous
"Straightway before jump is too short". The ones of the second type are
the "path-fatal" errors. These errors will cause a path to be
considered invalid, but will not invalidate the track unless all paths
are invalid. Bliss will point out path-fatal errors only in those
cases. A path-fatal error would be, for example, a discontinous piece
of track or a path that leads to a cycle. The third type are
"warnings". Warnings are not errors from Stunts' perspective, but from
the track author's, they may be, so Bliss will warn you if it thinks
there may be a problem with your track. For example, if you set up a
jump so that the receiving ramp is higher than the jumping ramp, Bliss
will warn that it is not possible to perform this jump without leaving
the track. You can ignore warnings if know what you're doing.
Bliss will only come up with warnings if no fatal-errors are found.
Therefore, if you do get a warning and you know it's OK, you can ignore
it and take the track for valid.
If you need a more profound analysis of your track, go to the Track
Analysis menu option and a dialog will come up with some general
information about your track. Say you open DEFAULT.TRK, the most famous
Stunts track. Bliss says there are two paths and both of them are
winning paths. Internally, Bliss divides a track in "sections" and a
path is a sequence of sections which starts at the start/finish line
and hopefully, also ends there. If a section were to cause a cycle and
a path were possible through that cycle, then in theory, there would be
an infinite number of paths, but Bliss does not count paths that go
through cycles. You can see that DEFAULT.TRK contains no cycles and
that the shortest winning path is 70 tiles long. There is more
information, in particular, about "safe" paths. A path is considered
"safe" if it contains nothing that would trigger a warning. Because
these things are not detected by Stunts, a path could be taken for
valid by Stunts and still be "unsafe". For instance, opponents will
invariably crash on unsafe paths, but still stubbornly continue to
choose them if they are shorter than other paths. DEFAULT contains no
unsafe paths.
You can see more details on the different paths by clicking on "See
paths". The first path is marked both as the "fastest" and the
opponent's choice. If more than one path is valid (reaches the finish
line), the opponent will always choose the shortest, that is, the one
with the smaller number of tiles. The second path is 92 tiles long, so
the opponent will not take that one. Of course, sometimes a shorter
path may be a slower option, if it contains too many obstacles. For
this reason, a time estimate has been implemented in Bliss. The time
estimates for each path are, by default, on the track being raced with
a Porsche March Indy in OWOOT mode (i.e.: One Wheel On or Over the
Track), meaning no shortcuts and all stunts executed. The car can be
changed by clicking on the pull-down car list near the bottom of the
dialog. The default time estimation is calibrated like that of an
average racer, but you can recalibrate to get a better estimate for
yourself. Race any track with a Porsche March Indy and executing every
stunts, then load that track in Bliss and set your calibration time in
the Settings menu. If no track is loaded or the current track is
invalid, Bliss will suggest the track 4AM, which comes included. It's a
very good option, as it contains almost every kind of stunt and track
type.
For a quicker and rough estimate, you can select "See times" and
Bliss will offer you the time estimates for some famous racers. Older
versions of Bliss based these estimates on different races on the 4AM
track. But in October 2016, a special event was held named Race for
Immortality. The resulting replays are included with Bliss and the new
estimates are based on those results. When bliss.trk and Porsche March
Indy are selected, the times shown match those of that race.
Because Bliss makes its analysis by separating the track in
sections and then combining these sections, tracks with too many splits
may quickly cause the number of sections or paths to get really big.
Bliss can handle up to 254 sections and 1000 paths. Sounds like a lot,
but if you build your track with the purpose of making it complex, it
is very easy to reach that (or any number) of sections or paths. In
such case, track analysis will be disabled and you'll get an error
message saying the track is too complex.
.12.
--=[ + Tournaments + ]=--
While Stunts was designed to race alone or with computer opponents
and it has no network support, as it was created in 1990, today,
tournaments are a fundamental part of Stunts. Stunts would be just one
more classic game from the DOS era if it weren't for online
tournaments. Bliss was made with this in mind and to make it apparent,
it offers a menu option to interact with tournament sites.
Click on the competition cup icon in the last menu row and a dialog
will come up with a list of tournaments. Depending on the distribution
of Bliss, it may be empty or contain one or more tournament options.
Each option will display a tournament name and web address. Click "Add
New" to create a tournament item or "Remove" to take it out of the
list. To connect to a tournament, click on the "Connect" button. If the
web address is valid, the connection working and the tournament
supports Bliss tournament protocol, a new dialog will show up with
details of the current race. You can take a look at the scoreboard or
get the current track. Accessing tournaments this way is pretty
straightforward, although the competition websites surely contain a lot
more information. Yet, this integration greatly facilitates interaction
between the game and the websites.
If you're a tournament manager and would like to make your site
compatible with Bliss, here's how:
Always include a text file called "tour.cfg" at the root of your
competition's site directory. This is going to be a text file in which
each line contains an assignment of the form: property=value. The first
line should begin with "tour" and ideally, this property should be
assigned the tournament name (e.g.: "tour=My tournament"). The rest of
the file should contain the current tournament information necessary
for Bliss. To specify the current track title, add a line starting with
"tracktitle=" followed by the track title with no quotes. For the track
author's name, "trackauthor=" and the author's name. To give the track
file name, use "trackfile=" followed by the file name. If it is in a
subdirectory, enter the full path to the file. It must be a valid TRK
file. Add a "deadline=" line to specify the deadline time and date. If
the track file contains meta-data, they will be loaded; otherwise, the
meta-data given in this text file will be taken. Empty lines, lines not
containing an equal sign and lines specifying a property not recognised
by Bliss will be ignored, so you can safely add more information that
could be of use to your tournament.
To support scoreboard display, a line should be added to the
tour.cfg file that assigns "scoreboard=" followed by the scoreboard
file name. If the file is not there, Bliss will display an error when
trying to load the scoreboard. If you don't want to share the
scoreboard, but don't want the error, you can leave it at zero bytes
and Bliss will just say there's no scoreboard.
To properly share the scoreboard, fill the text in the scoreboard
file. Scoreboard entries should be sorted in the order in which they
are to be displayed in Bliss (usually the best lap first). Each entry
must start with a line beginning in an opening square bracket, like
"[1]". Ideally, each entry will include the entry number between
brackets. After that, assignment lines like the ones in the tour.cfg
file can be added to specify the racer, the lap time, the car, etc.
Following are examples of what a tour.cfg file and its corresponding
scoreboard file should look like:
-- tour.cfg file --
tour=Great Stunts Tournament
trackfile=thehills.trk
tracktitle=The Hills
trackauthor=Jack
deadline=2021-05-27 00:00 GMT+1
scoreboard=sb.cfg
-------------------
-- sb.cfg file --
[1]
name=Tom
laptime=1:20.00
car=Indy
[2]
name=Peter
laptime=1:27.25
car=Jaguar
[3]
name=Matt
laptime=1:49.10
car=Lancia
-----------------
Some additional details can be added to the scoreboard. Instead of
"car", you can use "carid" if you prefer. Bliss will display whatever
you give it, but it's understood you're passing a 4-character car ID
instead of a car name and this could be used in future versions. Also,
instead of "laptime", which just copies whatever you specify, you can
use "lap" and give the length of the replay file. In that case, Bliss
will calculate the lap time for that file length. It's also possible to
specify a handicap percentage, like in ZakStunts by entering
"handicap=37%", for example. Any value from -100% to 100% is valid. You
can use "style" to specify the racing style. Make it short. For
example, Race For Kicks uses "style=RH" for Replay Handling and
"style=NoRH" for No Replay Handling. Finally, if you wish to specify
that a lap has been verified, add "status=verified". This will add an
OK mark at the end of the scoreboard entry.
It is possible to disable some entries from the scoreboard so that
they won't be shown in Bliss. Suppose a scoreboard item is invalid
because the racer didn't follow the tournament rules, but you don't
want to remove it from the list in your website, but only specify that
it's not competing. You can include a property "competing=no" and Bliss
will ignore that entry.
.13.
--=[ + Taking a track-shot + ]=--
In case you want to take a snapshot of your track (or
"track-shot"), you no longer need to capture the screen and crop the
track out of the image. You can press CTRL+S or click on the TRK SHOT
button located in the switch bar. A dialog will pop-up so you can
select an image format. After pressing "Save", an image file will be
created in Bliss' working directory. It will have the name of the
current track unless it doesn't have a name, case in which it will just
be called "track". The grid and warning display can be activated or
disabled prior to the track-shot depending on preference and the image
will show as configured. If a selection is active, only the selected
region of the track will be saved in the image. This is very practical
when creating tutorials or race analysis blogs.
Bliss supports two image image formats natively: Targa (.tga) and
Bitmap (.bmp). By default, images are saved in the TGA format because
they take up less space, but you can change this by editing the
configuration file and looking for (or adding) an "imageformat" line,
for example: "imageformat=bmp".
Although Bliss cannot produce output in other formats, it
recognises GIF, PCX, JPG and PNG. If you select any of these formats,
Bliss will try to use ImageMagick. If you're using GNU/Linux, you
likely have this installed. If you don't, you may be interested in
installing it. It's a very powerful free software tool.
.14.
--=[ + Colouring + ]=--
The most common reason for taking a track-shot is to just be able
to display a track map on a website or somewhere else, but it is also
common for track designers and tournament managers to use a track image
with some drawing on it to illustrate a racing strategy or set of
rules. A power tool in cases like those is the colouring system that
Bliss provides starting version 2.5.7.
The "COL" toggle button activates colouring mode. This toggle can
also be triggered with the CTRL+O key combination. In colouring mode,
you no longer draw track or terrain on the grid. Instead, you paint
borders and backgrounds. To the right side of the cursor position
display, there is now a border and background colour indicator. With
the left mouse button, paint with the currently selected colours or
erase the colouration with the right moust button. Click on the
indicators with the right mouse button to set them to "clear" or with
the left mouse button to access the Colouring menu, where you can
configure the colours you wish to use. Also, the mouse wheel rolled on
the indicators allows for changing them in a quick manner.
The border colour is usually less invasive than the background
colour, as the terrain features can still be seen, but you can use any
one of them or the two together. Within the Colouring menu, click on
"Set colours" to apply the changes or "Clear" to set both colours to
"clear". The "Uncolour map" option will rid the complete grid of
colouration, which can be undone like any other change in the track.
The "Cancel" button will take you back to editing without changing the
colours. Colours can be selected either from the palettes to the right
or by manually setting their red, green and blue components with the
bars on the left. To return to track editing mode, click on the "COL"
toggle again or press CTRL+O once more.
Track colouration will be stored in the track file if a non-RAW
binary format is used (either combined/default Bliss format or split
binary) but will be lost otherwise. If you do not want the colouration
stored in your file, make sure to uncolour the map before saving.