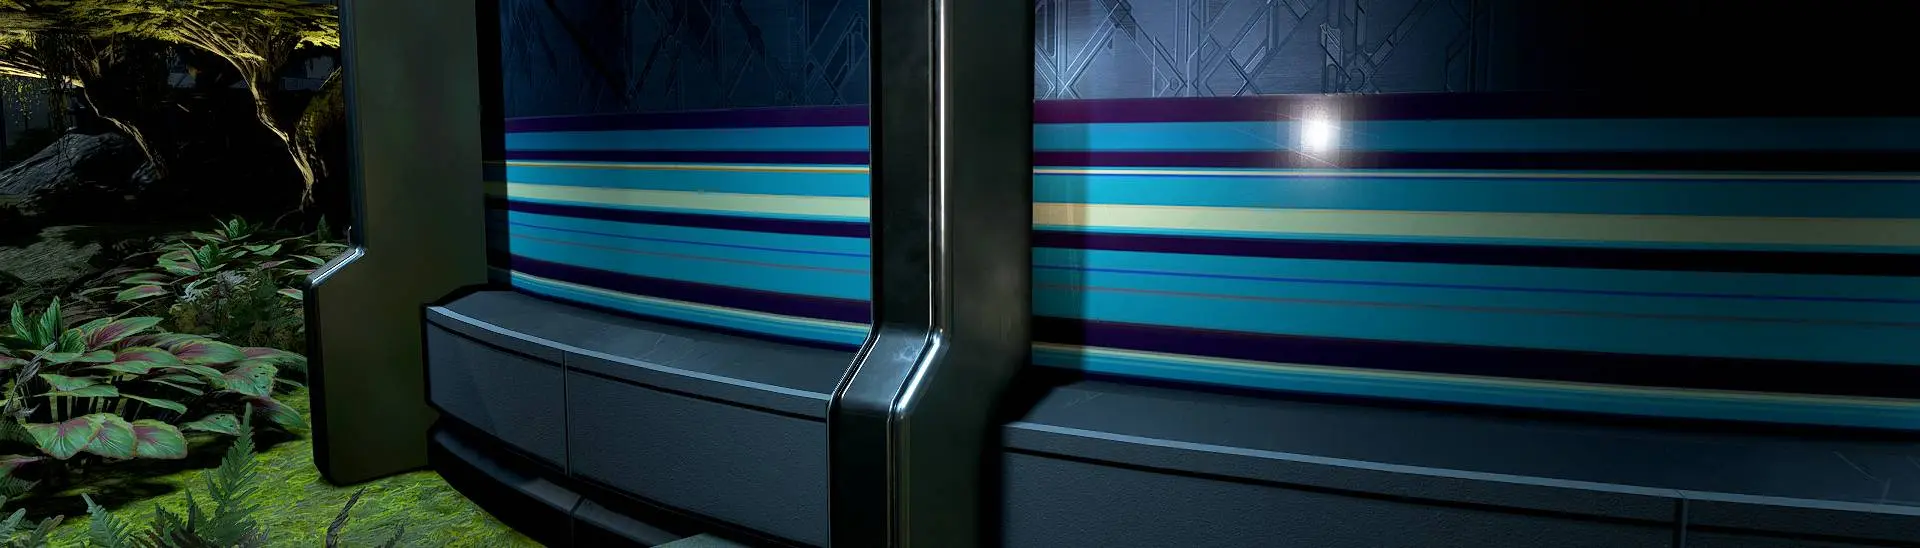
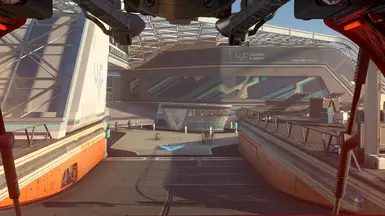
V3.2 fixes the final CTD in NA when using the train from a certain location, Improved two building decals and added one additional.
Installation esm and ba2. Drop the ba2 and the esm into your starfield data folder (Or use vortex) This mod uses the ba2 format for better performance, with no loss of quality. - Vortex or manual - Requires Plugins.txt Enabler
Add the line to your load order in your plugins.txt file: *ZMDNewAtlantisPaintjob.esm
IMPORTANT: LOOSE FILE MODS MAY CONFLICT OR OVERWRITE THIS MOD uninstall any mods that replace the same things as this mod does, if some textures from this mod don't appear then check your textures folder manually and remove the other mods texture files that conflict. Or remove the other mods with vortex. Then re install this mod.
Apart from bodies/skin textures/cosmetics/eyes & all that kind of stuff: I recommend packing all your loose files into a ba2 and use with plug in text enabler via esm (xedit) OR your StarFieldcustom.ini both with a ba2 for a considerable increase in performance, the games not optimised to run large amounts of loose files. or even a small amount of4/8k files can and likely will degrade your performance, regardless of your PC. tools here: Bethesda Archive Manager - Create and extract BA2 Plugins.txt Enabler BAE - Bethesda Archive Extractor SF1Edit/Xedit
Temp work around after the CK and june update released. I am out of action for a few weeks.
Temp solution is : The updated plugin text enabler SFPTE version 1.3 is provided as a workaround for everyone hardcoding it as a dependency. It acts as a placeholder and has no effect. Drop to your Data SFSE folder
StarfieldCustom.ini (alternative method of install/usage)
You can also use this mod as a BA2 and StarfieldCustom.ini version by extracting the zip Place the BA2 in your data folder and adding the line to your custom.ini file located in your documents (create one if doesnt exist and add the lines using the Correct formatting with no duplicates at all throughout the ini)
You need a (,) between each new Mod under the (sResourceIndexFileList=Starfield -) line, if you have other mod lines already add my mod to the end of your existing list.
I'll be aiming to finish the main bridge ,internal signs remaining and train door now the ck is out...prob be a while before done but it will get done ! goodbye retro orange !
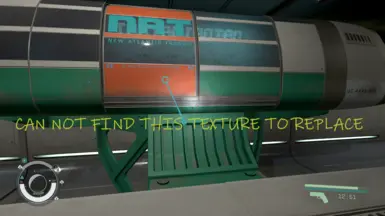
The texture you were having a hard time finding for the NAT is data\textures\architecture\city\newatlantis\transit\natransitstationdecal01_color.dds.
Edit: I replied too quickly, as I remembered seeing that file before, but I looked again and the normal and opacity files for that one reveal it's just the colours for the NAT lettering. So never mind,m that's not the file you're looking for. But if I figure out the texture you need, I'll let you know.
Huh... I would not have expected that colour to come from anything but a DDS file. Is it a value in a game record? If so, why wouldn't it also be editable in xEdit? Or is it set in a MAT file? In which case, you could honestly just edit that in a text editor.
it is not found in the loose dds files and as someone else stated at the botom of this thread,likely that the material must be swapped/changed via .esm/.nif, in the ck or xedit, and I'm not sure what Im doing with the ck /xedit to find it , ill be looking into it all.
If the colour is from a MAT file, then that would be referenced inside the NAT train's NIF file. And that wouldn't be edited in xEdit. I believe the CK has material editing, but I just manually edit MAT files with nothing more than a simple text editor, personally. I'm assuming you want to match it to the blue colour you replaced other things with, so I'll send you a MAT file and a new NIF that should work once I'm back home from PT today. No xEdit or CK needed, though you can let me know if you ever need help with xEdit stuff. https://discord.gg/UVbrBWeq
Check your Nexus mail. Just sent you the updated NIF file that updates that NAT transit car colour. It'll be the correct light blue now (and that includes the seating inside the NAT train as well). Optionally, if you'd like the seating inside the cars to be a different colour from the material on the car doors, let me know. A new MAT can be made for that and the string for the geometry nodes in the NIF for the seating can be updated to use that new MAT.
I dare say, I think this time I helped successfully.
Also, big fan of your work, btw. I appreciate tasteful retexturing and it satisfies my highly nit-picky brain. And if you ever need any help with anything, let me know. Thank you.
You asked me in PM to explain how I made this edit, and I thought I'd respond here in case anyone else reading this finds this information useful. I'll put it in a spoiler, though, so anyone who doesn't care about this info isn't bombarded by it, and it doesn't flood the page.
Spoiler:
Show
Rough, Undetailed Overview Version: The vanilla NIF for the transit car (meshes\architecture\city\newatlantis\transit\na_transit_car_01.nif) has a string (String 17) that includes a MAT file (materials\architecture\city\newatlantis\NAPaintScuffed01_Orange01.mat), and the string is attached to the following BSGeometry nodes:
So what I did was simply make a new, original MAT file (materials\architecture\city\newatlantis\transit\NATDoorColor.mat) and replace String 17 with the new NATDoorColor.mat file, so the aforementioned BSGeometry nodes would instead use that material instead of the orange material.
The reason for doing it this way is that after looking inside the NAPAintScuffed01_Orange01.mat file, it became clear to me that there are common rusted metals in the game that use this same material file. So if I were to just change the fuzzy RGB float values in that MAT file to make the blue colour for your mod, then it would also be affecting the colour of certain rusted metals. So to make sure the change only affects the organge colour on the NAT car, I just replaced the string with a new material file for the relevant geometry nodes. That is the reason I sent you not just a material file, but also the NIF, because I had to make a change in the NIF as well.
And so, because the transit car NIF is now the only NIF in the game using my custom MAT, then there can be 100% confidence the colour change doesn't affect anything else except for the orange parts of the NAT transit car (so no orange bridges affected, as you asked about). Although, your question about the orange bridge implies maybe you want the orange bridge recoloured as well? I'll look for that NIF for you and fix it, if so, unless after reading these instructions you wish to do so yourself for practice.
Detailed, Thorough Version:
Here's the workflow:
Make sure you have the latest version of NifSkope, which at the time of this writing is 2.0 Dev9, and I get it from here (links to all Starfield modding tools and software can be found in my Discord).
Make sure it is setup to use your Starfield installation, which is done by opening Options -> Settings -> Resources, and then under the Games tab, set Starfield to your game's root folder (for me it's D:/SteamLibrary/steamapps/common/Starfield, but may be different for you). And then under the Paths tab, click on Starfield and make sure all of the paths you see in the following screenshot are included (may need to adjust these paths to match your actual game root path, if different from mine, and also the order matters* - make sure the BA2 resources are loaded first and the loose files resources loaded last):
* Well, the order doesn't really matter to NifSkope, but the reason I set it up like this is because this matches the order in which the game will load assets, where Starfield.ini loaded archives load first, official ESL plugin loaded archives load next, and loose files will override anything in those previously loaded archives, rather than vanilla assets from the archives being used instead of the ones you're trying to test. Although you aren't limited to resource paths that are in the game root, as you can add paths to alternate locations where you wish to keep assets that are just for testing (just make sure those paths don't contain anything that NifSkope can't load and are placed at the bottom of this list). And if you have a custom BA2 archive with meshes or NIFs or textures that you wish to use, I'd place it after all of the vanilla archives and before the loose files paths. And also, should an update to the base game introduce any changes to the archives shown in the above screenshot (not internal changes, but, for example, let's say they add Starfield - Textures12.ba2 or they rename an archive), it is wise to go back into your NifSkope settings and update your resource paths accordingly. So don't forget to always check this after a base game update.
With that setup, if you need to open a NIF either for the purposes of finding out what materials its using, or to edit the NIF itself, then you can look around inside the Starfield - MeshesXX.ba2 archives looking for what you need. I don't remember exactly which Starfield - MeshesXX.ba2 archive I found the NAT Transit car NIF inside of, but just look in one after the other until you find the NIF you're looking for. Then extract that NIF from the archive and save it somewhere (I use Archive2 to both create and extract from BA2 archives, and that tool comes with the Creation Kit). And also note that when you don't already know what NIF you're looking for, you can also open Starfield.esm in xEdit and find the record of the thing you're trying to edit, and find the relevant NIF referenced within the Model properties of those records, in order to get your clue what NIF you're looking for.
Open the NIF with NifSkope, and the model should appear with all of its textures and materials included and rendered as well. But you're interested in what can be found in the Header section, which you'll find on the left side of the window, in the middle between the upper and lower panes, as a tab surrounded by the Block List tab and the Archive Browser tab.
Inside the Header tab, you'll see a section in the upper left pane containing a collection of strings (numbered 0 and up). Strings are used to attach material files, generally. So you would find the material file that's relevant to whatever colour you're trying to change. You may not know what MAT you're looking for ahead of time, so just look around and figure it out. In this case it's not that hard, because we're trying to fix an orange colour, and there's one MAT file included in these strings with the word "orange" in its name (Materials\Architecture\City\NewAtlantis\NAPaintScuffed01_Orange01.mat). That's how I figured out the correct MAT file. But if Bethesda's MAT file naming conventions ever fail you (e.g. the MAT file you need to change some colour is named something like "NAStuff01.mat"), another way to quickly identify the correct MAT file is to switch to the Block List tab (to the left of the Header Tab) and find a BSGeometry node that uses the colour you're trying to change (in this case the orange colour). You can just select the top-most BSGeometry node, and if that doesn't already highlight something orange in the render, use the '↓' key to cycle through the BSGeometry nodes until one of them highlights something orange in the render (this way you know you have selected a node using the MAT file you want to edit). With a relevant BSGeometry node selected, in the bottom left pane you'll see the correct MAT file listed as the Shader Property.
It is possible at this point to extract that MAT file directly from NifSkope (Spells -> Material -> Extract All...), and this is usually the best option for you, as many of the vanilla MAT files are actually contained in a .cdb file within the Starfield - Materials.ba2 archive, and Starfield modders haven't entirely figured out yet how to read that database (to my knowledge - please someone inform me how to do it if I'm wrong). However, there are some material files (especially for actors) that can be found in SFBGS007 - Main.ba2. However you get your hands on it, you ultimately just want an editable copy of that MAT file on your machine.
Once you have the MAT file extracted somewhere, open it in a text editor of your preference (Notepad, Vim, Visual Studio Code, etc.), and what you're looking for are W, X, Y, Z values set to floating point values between 0 and 1. You can identify which object is the correct one by comparing the floats to the values of the colour you're replacing (more on how to do that below), and the object component type will be a BSMaterial::Color component:
It may be confusing at first, but the way to read this is that "w" = alpha or opacity. A floating point value where 1 means fully opaque and 0 means fully transparent "x" = Red. A floating point value between 0 and 1 indicating the amount of red "y" = Green. A floating point value between 0 and 1 indicating the amount of green "z" = Blue. A floating point value between 0 and 1 indicating the amount of blue
Since most people understand colours in either HEX values (e.g. #ff0083) or RGB values (e.g. 255,0,131), the floating point values might be confusing. But don't worry, as you can use this HEX-to-RGB tool to see the floating point values for those colours (just enter the desired HEX value and hit Convert). In this case, we're trying to change #BD6944 to #42B1BD. I know the original orange colour is #BD6944 from opening the vanilla copy of Data\textures\architecture\city\newatlantis\transit\natransitstationdecal01_color.dds in Paint.net and using the Color Picker tool to grab the orange colour's HEX value. When you convert that orange colour's HEX value using that site I shared a moment ago, you'll get the following floats: x = 0.7411764705882353 , y = 0.4117647058823529, and z = 0.26666666666666666, which are close to, but not quite exactly the floats that Bethesda had in that NAPaintScuffed01_Orange01.mat file in the above example (why the imprecision, Bethesda? Was it supposed to be a tad off?), and hence how I was able to easily identify the exact component in the MAT file that I was replacing. And then if you go and convert #42B1BD, you'll see that the floats for this colour are: x = 0.25882352941176473, y = 0.6941176470588235, and z = 0.7411764705882353. Then in the MAT file, you replace the X,Y,Z values with your new floats, rounding up to 6 decimal places of precision for each. So your updated MAT file should look like this:
Save the file as something new, if you're replacing the MAT file in the NIF, or just save it as is if keeping the same MAT but in edited form. In this case, I saved the edited MAT as a new file called NATDoorColor.mat.
If you are saving it as a new MAT, then you'll need to go back to NifSkope, and under the Header tab as before, in the upper left pane, find the String referring to the file you just edited, and double click it to edit the String. In this case it's String 17. Set it to your newly made MAT, and then save the NIF and close NifSkope. Changes you made to externally loaded assets, like the MAT, won't show until re-opening the NIF (although it's possible that there may be ways to force a re-render without closing NifSkope that I don't know about yet).
You now have an edited NIF and a new MAT file, and you can install them to your game (if you didn't already edit them in the correct locations) and then test your change(s) in-game.
As a bonus, I took things a step further. The NAT Transit car is too white, and I don't care for that green, and I figured I might as well match the warning text colour from your textures\architecture\city\newatlantis\transit\natransitstationdecal01_color.dds file to the colour in the material, and also recolour the trim. I also made several options. Check these out:
I shared the files for this in PM, in case you want to include them in your mod, or tweak them to different colours.
To accomplish the car colour (black, blue, galaxy, or something else):
Copy materials\architecture\city\newatlantis\basematerials\napaintscuffed01_base.mat to materials\architecture\city\newatlantis\transit\NATCarColor.mat.
Edit NATCarColor.mat, which you just created, and replace "FileName": "Data\\Textures\\Common\\Metal\\MetalDullScratched01_color.DDS" with "FileName": "Data\\Textures\\Architecture\\City\\NewAtlantis\\Transit\\NATCarColor_color.DDS"
Copy textures\common\metal\metaldullscratched01_color.dds to textures\architecture\city\newatlantis\transit\NATCarColor_color.dds.
Open NATCarColor_color.dds in Paint.net, and if you're comfortable with using Paint.net for editing, change the white colour to black, blue, or whatever other colour you want. Otherwise, Save As... and select the .png file type in the drop down and then save. Then open NATCarColor_color.png in your favourite photo editor and then make the colour change, save changes to the PNG, and then open the PNG in Paint.net and then save it to DDS (BC7 - sRGB, DX 11+). And if you want the galaxy colour, you just get a galaxy image from somewhere online that looks nice, and make sure it's perfectly square, and that the width/height is a power of 2 (e.g. 4096x4096), and then use Paint.net to save it as DDS (BC7 - sRGB, DX 11+).
Open meshes\architecture\city\newatlantis\transit\na_transit_car_01.nif and change String 5 in the Header tab to Materials\Architecture\City\NewAtlantis\Transit\NATCarColor.mat and save.
To accomplish the trim colour (black, blue, or something else):
Copy materials\common\metal\metalsteelscratched02.mat to materials\architecture\city\newatlantis\transit\NATTrimColor.mat.
Edit NATTrimColor.mat, which you just created, and replace all instances of "metalsteelscratched02" with "NATTrimColor."
Now replace "FileName": "Data\\Textures\\common\\metal\\metalpainted01_color.DDS" with "FileName": "Data\\Textures\\Architecture\\City\\NewAtlantis\\Transit\\NATTrimColor_color.DDS"
Now find the following BSMaterial::Color component: "Data": { "Value": { "Data": { "w": "1", "x": "0.760784", "y": "0.760784", "z": "0.760784" }, "Type": "XMFLOAT4" } }, "Index": 0, "Type": "BSMaterial::Color"and replace it with the following: "Data": { "Value": { "Data": { "w": "0", "x": "0", "y": "0", "z": "0" }, "Type": "XMFLOAT4" } }, "Index": 0, "Type": "BSMaterial::Color"
Copy textures\common\metal\metalpainted01_color.dds to textures\architecture\city\newatlantis\transit\NATTrimColor_color.dds.
Open NATTrimColor_color.dds in Paint.net, and if you're comfortable with using Paint.net for editing, change the silver colour to black, blue, or whatever other colour you want. Otherwise, Save As... and select the .png file type in the drop down and then save. Then open NATTrimColor_color.png in your favourite photo editor and then make the colour change, save changes to the PNG, and then open the PNG in Paint.net and then save it to DDS (BC7 - sRGB, DX 11+).
Open meshes\architecture\city\newatlantis\transit\na_transit_car_01.nif and change String 9 in the Header tab to Materials\Architecture\City\NewAtlantis\Transit\NATTrimColor.mat and save.
To accomplish the purple bottom:
Copy materials\architecture\city\newatlantis\napaintscuffed01_green02.mat to materials\architecture\city\newatlantis\transit\NATBottomColor.mat.
Edit NATBottomColor.mat, which you just created, and find the following BSMaterial::Color component: "Data": { "Value": { "Data": { "w": "1", "x": "0.321569", "y": "0.6", "z": "0.505882" }, "Type": "XMFLOAT4" } }, "Index": 0, "Type": "BSMaterial::Color"and replace it with the following: "Data": { "Value": { "Data": { "w": "1", "x": "0.227451", "y": "0.125490", "z": "0.258824" }, "Type": "XMFLOAT4" } }, "Index": 0, "Type": "BSMaterial::Color"
Save NATBottomColor.mat, and then open meshes\architecture\city\newatlantis\transit\na_transit_car_01.nif and change String 11 to Materials\Architecture\City\NewAtlantis\Transit\NATBottomColor.mat and save.
To accomplish the warning text being the same purple you use in your other NA Paint Job textures:
Copy materials\architecture\city\newatlantis\napaintscuffed01_yellow02.mat to materials\architecture\city\newatlantis\transit\NATWarningColor.mat.
Edit NATWarningColor.mat, which you just created, and find the following BSMaterial::Color component: "Data": { "Value": { "Data": { "w": "1", "x": "1", "y": "0.902393", "z": "0.582088" }, "Type": "XMFLOAT4" } }, "Index": 0, "Type": "BSMaterial::Color"and replace it with the following: "Data": { "Value": { "Data": { "w": "1", "x": "0.580392", "y": "0.647059", "z": "0.807843" }, "Type": "XMFLOAT4" } }, "Index": 0, "Type": "BSMaterial::Color"
Save NATWarningColor.mat, and then open meshes\architecture\city\newatlantis\transit\na_transit_car_01.nif and change String 48 to Materials\Architecture\City\NewAtlantis\Transit\NATWarningColor.mat and save.
The thing is, though, I'm not a big fan of that light purple for the warning text on the door. It doesn't stand out enough for a realistic warning sign. So I also made a version where the warning text matches the yellow colour you use in your version of textures\architecture\city\newatlantis\signage\na_signage_ucstripes_02_color.dds. It involves a change to materials\architecture\city\newatlantis\transit\NATWarningColor.mat: "Data": { "Value": { "Data": { "w": "1", "x": "1", "y": "0.984314", "z": "0.772549" }, "Type": "XMFLOAT4" } }, "Index": 0, "Type": "BSMaterial::Color"
That version is included in what I sent to your PM as well, along with all other options I have showcased here. My personal favourite is the galaxy car with the black trim and yellow warning message.
I hope that helps. Notice how no xEdit or CK was used to carry out that edit. Only NifSkope and a text editor.
Many thanks for all that effort in putting together : Tutorial of Editing Mat files and meshes with Nifksope, and a text editor ! (see above spoiler) You should post that in the community too or as a mod upload for tut's and resources here on nexus...
However: Just tested your mesh and material edits in game and nothing changes. orange train doors still BUT I am still running game version:1.11.36.0 I Will be updating game soon and re test once I can.
Also I have just manually dropped your Mesh and Materials folder to my data folder as a quick test without replacing the whole mod.. and No luck.. it must be the game version i'm using. or my custom ini as I am not using any mesh mods that require the custom ini as yet.. do you have the correct lines for adding custom meshes to my custom ini?
ton of work to do everytime beth break (update) base game and given up for now until injury recovered more.
I certainly will be uploading articles (I did write one on my mod page for Concept Art Venator), and I setup my Discord as a Starfield Community sort of Discord that will be complete with info channels and tutorials.
For clarification, I didn't touch any meshes with the edits I made. NIFs and meshes are two somewhat different things, although I can appreciate the confusion that's created by the fact that NIFs are found inside the Data\meshes folder, and so they get referred to as meshes a lot just kind of as a convenience. But actual meshes, which are often referred to as geometries both to avoid confusion with NIFs and because they are found in the Data\geometries folder, have the .mesh extension. It is now possible to edit meshes with NifSkope, but my practice is generally to force external mesh handling in NifSkope only and to edit meshes in Blender 4.0 instead using the Starfield Geometry Bridge plugin (tutorials on that to come as well). I actually don't know very much about how to edit meshes in NifSkope. In what I showed in my above tutorial for how I edited the NAT transit car, we simply went over editing colour components in material files using a text editor, basic levels of NIF editing using NifSkope, and some minor editing of DDS texture files using photo editing software. Where a NIF differs from a mesh is that the NIF (which stands for NetImmerse File, and is a format created by Bethesda and used exclusively in Bethesda games) can be thought of as a modeling platform that pulls in external assets (such as meshes and materials and textures) and configurably assembles these assets for final model rendering, and the game engine uses the NIF as a sort of instruction set for that asset assembly (i.e. that's how the game knows what meshes to use, and what materials and textures to slap onto those meshes). So rather than being meshes themselves, NIFs are model assemblies that use meshes.
Anyway, I'm sorry you had trouble getting the files to work. I simply grabbed the vanilla NIF for the NAT transit car from the vanilla BA2 archives and edited that one, which means that the game should already use it if it's placed correctly as a loose file, or if you package it into your BA2 that is loaded by your ESM plugin (or alternatively loadable via StarfieldCustom.ini). However, if you're using an older version of the game, it's possible Beth has changed the path of that NIF, and so my file won't work for you in the older version of the game. I'll also test again in the game just to double check and make sure nothing weird is going on or that I didn't do something stupid (I some times make the mistake of working tired).
Okay, so there's a reason that the files didn't work for you in the game, and it has nothing to do with the game being an older version. I took another look, and turns out I did do something stupid. I'll admit, I only ever tested this in NifSkope as I haven't actually been able to play the game in a little while (if I had tested this in the game, I would have gotten the same failed result you did and would have caught my mistake sooner). And the thing is, what I did would have worked fine if I had extracted and modified the correct NAT transit car NIF that the game actually uses. I did not. I edited the wrong one.
There's only one NIF in all of Bethesda's vanilla archives with a name that tells you even before you open it that it's the NAT transit car, and that's Data\meshes\architecture\city\newatlantis\transit\na_transit_car_01.nif. I figured that had to be the one. And opening it in NifSkope, it surely was a NAT transit car, so why would I think I had the wrong NIF? However, right next to na_transit_car_01.nif, in the vanilla archives, is na_transit_car_doors01\na_transit_car_doors01.nif... I saw that before and knew it was there, but based on the name, I assumed it was just the model for the door of the transit car, and since the model I edited already had a door, I thought that file was probably just one of Bethesda's many unused vestiges still lingering around the archives. It's got the word "car_doors" in it and the one I picked only has the word "car," what was I supposed to think?! Anyway... turns out, na_transit_car_doors01.nif is the real NAT transit car model that the game actually uses, not the one I edited and sent to you. And now I realize that the one I edited may have been the first model that Bethesda made, and then they made an updated version that fixed doors and calling it na_transit_car_doors01.nif was their way of saying "it's the one with the better doors." I found this out because after you said my NIF didn't work for you, I got the suspicion that there might be another NAT transit car NIF somewhere that I missed, and after a while I finally decided to just open na_transit_car_doors01.nif in NifSkope just to see what that was, and it was the entire car. A cleary updated and more correct version of the car, too. So let this be a lesson to me not to share mods that I haven't yet tested in the game haha.
So now I'm remaking it with the correct transit car model, and this time I verified it's the model the game actually uses by checking in xEdit. So the next update I send you will be an actually working version. And the next version I send you will still include the modified version of na_transit_car_01.nif (the one I initially edited) just in case that model actually is used somewhere in the game as a special case (like during a specific quest, or something). And instead of updating my above tutorial to reflect how to do this specific mod with the correct NIF (instead of the one I mistakenly worked on), I'll just save that for when I post the article. The above tutorial is still relevant, in the sense that it does still teach you the essentials of what you'd need to know to edit the correct transit car model.
Edit: Alright, I finished with the remake (and also added a few more options/variants to the overhaul version of the transit car). This one should work when you test it in the game. But please let me know if you experience any issues of any kind, or have any requests for tweaks. Be sure to check your PMs for the link!
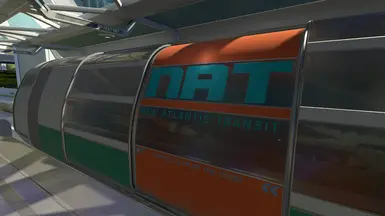
Enjoy, This one's bugged me for months glad it's done, but that damn train door orange ! can't find it after sifting through thousands of texture files 4 times..if anyone knows Pleeaassee let me know
You can find what you need into: "textures\architecture\city\newatlantis\transit" 😉
LjTiger69, you can see my latest response to ZMD78 in a more recent comment to see how this is actually done. But this would not be done in a .esm. Just .nif.
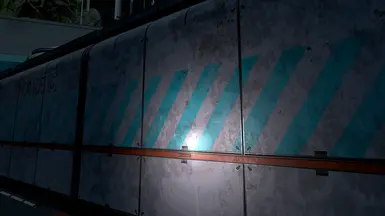
Just pretend the orange on the train is to make sure it doesnt blend in with the rest of the city. It needs to be brightly colored so people have perspective and don't get too close when the train arrives. I dunno. It makes me feel better lolol.


22 comments
Improved two building decals and added one additional.
Installation
esm and ba2.
Drop the ba2 and the esm into your starfield data folder (Or use vortex)
This mod uses the ba2 format for better performance, with no loss of quality.
-
Vortex or manual
-
Requires
Plugins.txt Enabler
Add the line to your load order in your plugins.txt file:
*ZMDNewAtlantisPaintjob.esm
Example of plugin.txt formatting:
#
*Starfield.esm
*BlueprintShips-Starfield.esm
*ZMDNewAtlantisPaintjob.esm
IMPORTANT:
LOOSE FILE MODS MAY CONFLICT OR OVERWRITE THIS MOD uninstall any mods that replace the same
things as this mod does, if some textures from this mod don't appear then check your textures folder manually and remove the other mods texture files that conflict. Or remove the other mods with vortex. Then re install this mod.
Apart from bodies/skin textures/cosmetics/eyes & all that kind of stuff:
I recommend packing all your loose files into a ba2 and use with plug in text enabler via esm (xedit) OR your StarFieldcustom.ini both with a ba2 for a considerable increase in performance, the games not optimised to run large amounts of loose files. or even a small amount of4/8k files can and likely will degrade your performance, regardless of your PC.
tools here:
Bethesda Archive Manager - Create and extract BA2
Plugins.txt Enabler
BAE - Bethesda Archive Extractor
SF1Edit/Xedit
Temp work around after the CK and june update released.
I am out of action for a few weeks.
Temp solution is :
The updated plugin text enabler
SFPTE version 1.3 is provided as a workaround for everyone hardcoding it as a dependency.
It acts as a placeholder and has no effect.
Drop to your Data SFSE folder
SFPTE-1_3 (SFSE-1_12_30)-4157-1-3-1718056014
You can also use this mod as a BA2 and StarfieldCustom.ini version by extracting the zip
Place the BA2 in your data folder and adding the line to your custom.ini file located in your documents (create one if doesnt exist and add the lines using the Correct formatting with no duplicates at all throughout the ini)
Example:
[Archive]
bInvalidateOlderFiles=1
sResourceDataDirsFinal=
sResourceIndexFileList=Starfield - ZMDNewAtlantisPaintjob - Textures.ba2
You need a (,) between each new Mod under the (sResourceIndexFileList=Starfield -) line, if you have other mod lines already add my mod to the end of your existing list.
Edit: I replied too quickly, as I remembered seeing that file before, but I looked again and the normal and opacity files for that one reveal it's just the colours for the NAT lettering. So never mind,m that's not the file you're looking for. But if I figure out the texture you need, I'll let you know.
Cheers for trying to help :)
I dare say, I think this time I helped successfully.
Also, big fan of your work, btw. I appreciate tasteful retexturing and it satisfies my highly nit-picky brain. And if you ever need any help with anything, let me know. Thank you.
:)
Rough, Undetailed Overview Version:
The vanilla NIF for the transit car (meshes\architecture\city\newatlantis\transit\na_transit_car_01.nif) has a string (String 17) that includes a MAT file (materials\architecture\city\newatlantis\NAPaintScuffed01_Orange01.mat), and the string is attached to the following BSGeometry nodes:
- MirroredHalf_ExteriorShell_DeInstancedToFixExport(Temp):4[16]
- MirroredHalf_BenchR_DeInstancedToFixExporft(Temp):4[19]
- MirroredHalf_BenchL_DeInstancedToFixExport(Temp):4[21]
- ExteriorShell:4[30]
- BenchR:4[32]
- BenchL:4[34]
- BenchEnd:4[36]
- DoorIn_Back:4[46]
So what I did was simply make a new, original MAT file (materials\architecture\city\newatlantis\transit\NATDoorColor.mat) and replace String 17 with the new NATDoorColor.mat file, so the aforementioned BSGeometry nodes would instead use that material instead of the orange material.The reason for doing it this way is that after looking inside the NAPAintScuffed01_Orange01.mat file, it became clear to me that there are common rusted metals in the game that use this same material file. So if I were to just change the fuzzy RGB float values in that MAT file to make the blue colour for your mod, then it would also be affecting the colour of certain rusted metals. So to make sure the change only affects the organge colour on the NAT car, I just replaced the string with a new material file for the relevant geometry nodes. That is the reason I sent you not just a material file, but also the NIF, because I had to make a change in the NIF as well.
And so, because the transit car NIF is now the only NIF in the game using my custom MAT, then there can be 100% confidence the colour change doesn't affect anything else except for the orange parts of the NAT transit car (so no orange bridges affected, as you asked about). Although, your question about the orange bridge implies maybe you want the orange bridge recoloured as well? I'll look for that NIF for you and fix it, if so, unless after reading these instructions you wish to do so yourself for practice.
Detailed, Thorough Version:
Here's the workflow:
* Well, the order doesn't really matter to NifSkope, but the reason I set it up like this is because this matches the order in which the game will load assets, where Starfield.ini loaded archives load first, official ESL plugin loaded archives load next, and loose files will override anything in those previously loaded archives, rather than vanilla assets from the archives being used instead of the ones you're trying to test. Although you aren't limited to resource paths that are in the game root, as you can add paths to alternate locations where you wish to keep assets that are just for testing (just make sure those paths don't contain anything that NifSkope can't load and are placed at the bottom of this list). And if you have a custom BA2 archive with meshes or NIFs or textures that you wish to use, I'd place it after all of the vanilla archives and before the loose files paths. And also, should an update to the base game introduce any changes to the archives shown in the above screenshot (not internal changes, but, for example, let's say they add Starfield - Textures12.ba2 or they rename an archive), it is wise to go back into your NifSkope settings and update your resource paths accordingly. So don't forget to always check this after a base game update.
"w" = alpha or opacity.  A floating point value where 1 means fully opaque and 0 means fully transparent
"x" = Red.  A floating point value between 0 and 1 indicating the amount of red
"y" = Green. A floating point value between 0 and 1 indicating the amount of green
"z" = Blue. A floating point value between 0 and 1 indicating the amount of blue
As a bonus, I took things a step further. The NAT Transit car is too white, and I don't care for that green, and I figured I might as well match the warning text colour from your textures\architecture\city\newatlantis\transit\natransitstationdecal01_color.dds file to the colour in the material, and also recolour the trim. I also made several options. Check these out:
I shared the files for this in PM, in case you want to include them in your mod, or tweak them to different colours.
To accomplish the car colour (black, blue, galaxy, or something else):
"FileName": "Data\\Textures\\Common\\Metal\\MetalDullScratched01_color.DDS"with"FileName": "Data\\Textures\\Architecture\\City\\NewAtlantis\\Transit\\NATCarColor_color.DDS"To accomplish the trim colour (black, blue, or something else):
"FileName": "Data\\Textures\\common\\metal\\metalpainted01_color.DDS"with"FileName": "Data\\Textures\\Architecture\\City\\NewAtlantis\\Transit\\NATTrimColor_color.DDS""Data": {and replace it with the following:"Value": {
"Data": {
"w": "1",
"x": "0.760784",
"y": "0.760784",
"z": "0.760784"
},
"Type": "XMFLOAT4"
}
},
"Index": 0,
"Type": "BSMaterial::Color"
"Data": {"Value": {
"Data": {
"w": "0",
"x": "0",
"y": "0",
"z": "0"
},
"Type": "XMFLOAT4"
}
},
"Index": 0,
"Type": "BSMaterial::Color"
To accomplish the purple bottom:
"Data": {and replace it with the following:"Value": {
"Data": {
"w": "1",
"x": "0.321569",
"y": "0.6",
"z": "0.505882"
},
"Type": "XMFLOAT4"
}
},
"Index": 0,
"Type": "BSMaterial::Color"
"Data": {"Value": {
"Data": {
"w": "1",
"x": "0.227451",
"y": "0.125490",
"z": "0.258824"
},
"Type": "XMFLOAT4"
}
},
"Index": 0,
"Type": "BSMaterial::Color"
To accomplish the warning text being the same purple you use in your other NA Paint Job textures:
"Data": {and replace it with the following:"Value": {
"Data": {
"w": "1",
"x": "1",
"y": "0.902393",
"z": "0.582088"
},
"Type": "XMFLOAT4"
}
},
"Index": 0,
"Type": "BSMaterial::Color"
"Data": {
"Value": {
"Data": {
"w": "1",
"x": "0.580392",
"y": "0.647059",
"z": "0.807843"
},
"Type": "XMFLOAT4"
}
},
"Index": 0,
"Type": "BSMaterial::Color"
The thing is, though, I'm not a big fan of that light purple for the warning text on the door. It doesn't stand out enough for a realistic warning sign. So I also made a version where the warning text matches the yellow colour you use in your version of textures\architecture\city\newatlantis\signage\na_signage_ucstripes_02_color.dds. It involves a change to materials\architecture\city\newatlantis\transit\NATWarningColor.mat:
"Data": {
"Value": {
"Data": {
"w": "1",
"x": "1",
"y": "0.984314",
"z": "0.772549"
},
"Type": "XMFLOAT4"
}
},
"Index": 0,
"Type": "BSMaterial::Color"
That version is included in what I sent to your PM as well, along with all other options I have showcased here. My personal favourite is the galaxy car with the black trim and yellow warning message.
I hope that helps. Notice how no xEdit or CK was used to carry out that edit. Only NifSkope and a text editor.
Tutorial of Editing Mat files and meshes with Nifksope, and a text editor ! (see above spoiler)
You should post that in the community too or as a mod upload for tut's and resources here on nexus...
However:
Just tested your mesh and material edits in game and nothing changes. orange train doors still
BUT I am still running game version:1.11.36.0
I Will be updating game soon and re test once I can.
Also I have just manually dropped your Mesh and Materials folder to my data folder as a quick test without replacing the whole mod.. and No luck.. it must be the game version i'm using. or my custom ini as I am not using any mesh mods that require the custom ini as yet..
do you have the correct lines for adding custom meshes to my custom ini?
ton of work to do everytime beth break (update) base game and given up for now until injury recovered more.
For clarification, I didn't touch any meshes with the edits I made. NIFs and meshes are two somewhat different things, although I can appreciate the confusion that's created by the fact that NIFs are found inside the Data\meshes folder, and so they get referred to as meshes a lot just kind of as a convenience. But actual meshes, which are often referred to as geometries both to avoid confusion with NIFs and because they are found in the Data\geometries folder, have the .mesh extension. It is now possible to edit meshes with NifSkope, but my practice is generally to force external mesh handling in NifSkope only and to edit meshes in Blender 4.0 instead using the Starfield Geometry Bridge plugin (tutorials on that to come as well). I actually don't know very much about how to edit meshes in NifSkope. In what I showed in my above tutorial for how I edited the NAT transit car, we simply went over editing colour components in material files using a text editor, basic levels of NIF editing using NifSkope, and some minor editing of DDS texture files using photo editing software. Where a NIF differs from a mesh is that the NIF (which stands for NetImmerse File, and is a format created by Bethesda and used exclusively in Bethesda games) can be thought of as a modeling platform that pulls in external assets (such as meshes and materials and textures) and configurably assembles these assets for final model rendering, and the game engine uses the NIF as a sort of instruction set for that asset assembly (i.e. that's how the game knows what meshes to use, and what materials and textures to slap onto those meshes). So rather than being meshes themselves, NIFs are model assemblies that use meshes.
Anyway, I'm sorry you had trouble getting the files to work. I simply grabbed the vanilla NIF for the NAT transit car from the vanilla BA2 archives and edited that one, which means that the game should already use it if it's placed correctly as a loose file, or if you package it into your BA2 that is loaded by your ESM plugin (or alternatively loadable via StarfieldCustom.ini). However, if you're using an older version of the game, it's possible Beth has changed the path of that NIF, and so my file won't work for you in the older version of the game. I'll also test again in the game just to double check and make sure nothing weird is going on or that I didn't do something stupid (I some times make the mistake of working tired).
There's only one NIF in all of Bethesda's vanilla archives with a name that tells you even before you open it that it's the NAT transit car, and that's Data\meshes\architecture\city\newatlantis\transit\na_transit_car_01.nif. I figured that had to be the one. And opening it in NifSkope, it surely was a NAT transit car, so why would I think I had the wrong NIF? However, right next to na_transit_car_01.nif, in the vanilla archives, is na_transit_car_doors01\na_transit_car_doors01.nif... I saw that before and knew it was there, but based on the name, I assumed it was just the model for the door of the transit car, and since the model I edited already had a door, I thought that file was probably just one of Bethesda's many unused vestiges still lingering around the archives. It's got the word "car_doors" in it and the one I picked only has the word "car," what was I supposed to think?! Anyway... turns out, na_transit_car_doors01.nif is the real NAT transit car model that the game actually uses, not the one I edited and sent to you. And now I realize that the one I edited may have been the first model that Bethesda made, and then they made an updated version that fixed doors and calling it na_transit_car_doors01.nif was their way of saying "it's the one with the better doors." I found this out because after you said my NIF didn't work for you, I got the suspicion that there might be another NAT transit car NIF somewhere that I missed, and after a while I finally decided to just open na_transit_car_doors01.nif in NifSkope just to see what that was, and it was the entire car. A cleary updated and more correct version of the car, too. So let this be a lesson to me not to share mods that I haven't yet tested in the game haha.
So now I'm remaking it with the correct transit car model, and this time I verified it's the model the game actually uses by checking in xEdit. So the next update I send you will be an actually working version. And the next version I send you will still include the modified version of na_transit_car_01.nif (the one I initially edited) just in case that model actually is used somewhere in the game as a special case (like during a specific quest, or something). And instead of updating my above tutorial to reflect how to do this specific mod with the correct NIF (instead of the one I mistakenly worked on), I'll just save that for when I post the article. The above tutorial is still relevant, in the sense that it does still teach you the essentials of what you'd need to know to edit the correct transit car model.
Edit: Alright, I finished with the remake (and also added a few more options/variants to the overhaul version of the transit car). This one should work when you test it in the game. But please let me know if you experience any issues of any kind, or have any requests for tweaks. Be sure to check your PMs for the link!
You can find what you need into: "textures\architecture\city\newatlantis\transit" 😉