


How to create music replacer mods for Starfield
a penguin's humble technical workflow
a penguin's humble technical workflow
In this guide, I will document for myself and henceforth share with anyone interesting the technical aspects of working with music (sound) for Starfield. This is based on my experiences, and I am thankful and happy about any corrections or additions you might provide.
For the purpose of this article, we will assume you already created your audio files in a way suitable for you and have them available in .wav format. This may look something like this:

Inside one of the folders, in this case Akila City:

Overview
A quick overview about the different process steps, each described in detail further below.
- Create your audio Files with a creative process of your choice. I will describe mine in another comprehensive guide here soon.
- Starfield identifies which sound to play at which location by a numerical code. Rename the audio files appropriately.
- Assuming you have a bunch of .wav files, you import them into adobe Audition and do post-processing
- meaning adjusting volume, adding a fade in and fade out to each track and tweaking the equalizer in a way to make your son
- You take your post-processed .wav files and import them into wwise where you convert them to .wem files
- Most certainly you will end up with a bunch of wem files that might need renaming because wwise adds a _<hex number> suffix to each file. You batch rename your files by using Microsoft Windows power toys
- In order to test, create a zip file with the appropriate folder structure inside and use vortex mod manager to easily deploy and remove locally.
- Test for volume and other specifics and if necessary repeat steps 3 to 6.
Now, let's do it in detail step by step
1. Creation
As said before, this is highly individual, I will share my flow in a separate article. I highly recommend using some replacement mos already out there like
Popcorntime or Faded Memories and see how they work for you and how they make you feel. It is also worthwhile to look into the file structure of these mods and read the posts sections on their respective mod pages. I personally found the images provided for the tracks contained here and here very helpful. For this step, we will simply assume you have a bunch of .wav files created in a way of your own that match locations. I have set up mine in a way where I have a folder for each location with the .wav Files in it. Each location has a number as a suffix for the number o tracks I know I can replace there in Starfield, so I can work towards having at least enough tracks for each location.
A good introduction to the very basics of digital music creation can be found here
My preferred DAW is Logic Pro. It is not free but worth the price. That said, there are many very, very good free ones as described in the video above. I myself just like Logic Pro best, similar to how I prefer Adobe Photoshop to Gimp (although they are similarly powerful).
You can get a good impression and start regarding how to go about using Logic Pro here.
A great source for a base layer audio creation and playing around with audio in regard to AI is mubert.ai ... which basically is an AI that can create different types of audio for you depending on various input parameters. In order to use it for modding, you would probably need the pro-license as I understood it.
2. Naming (IMPORTANT)
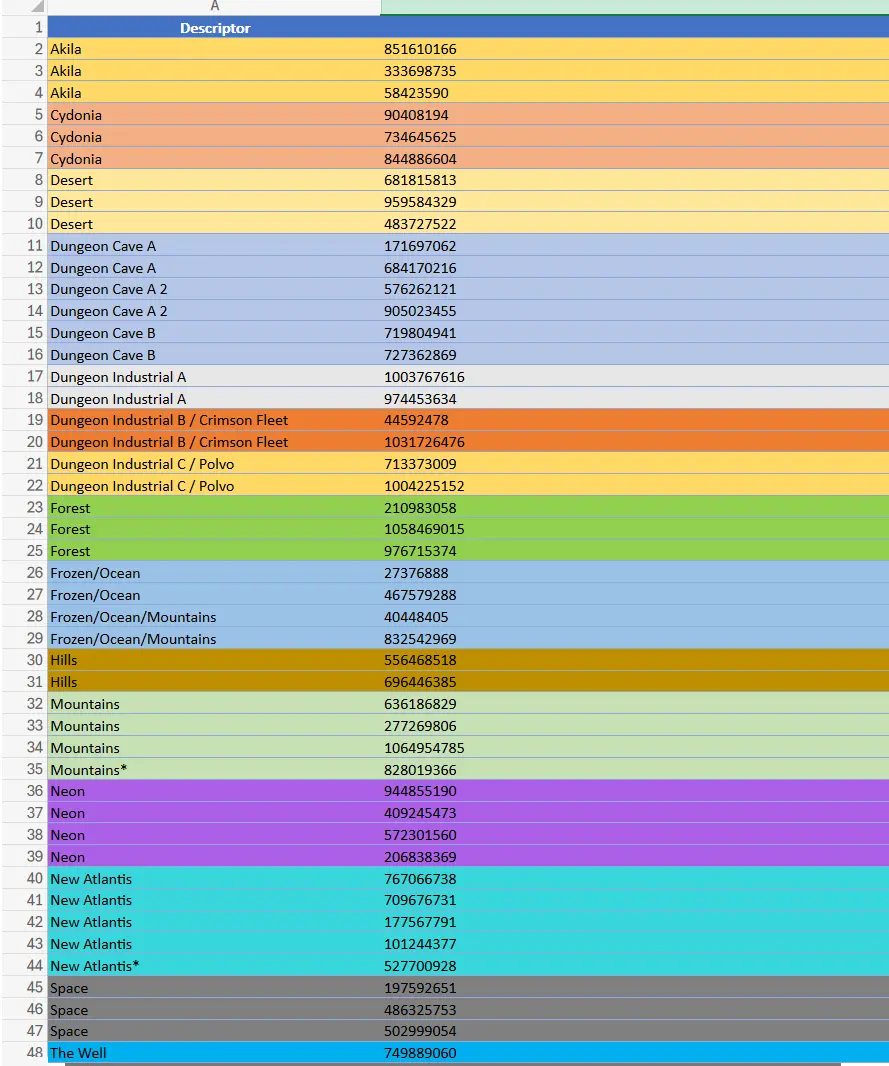
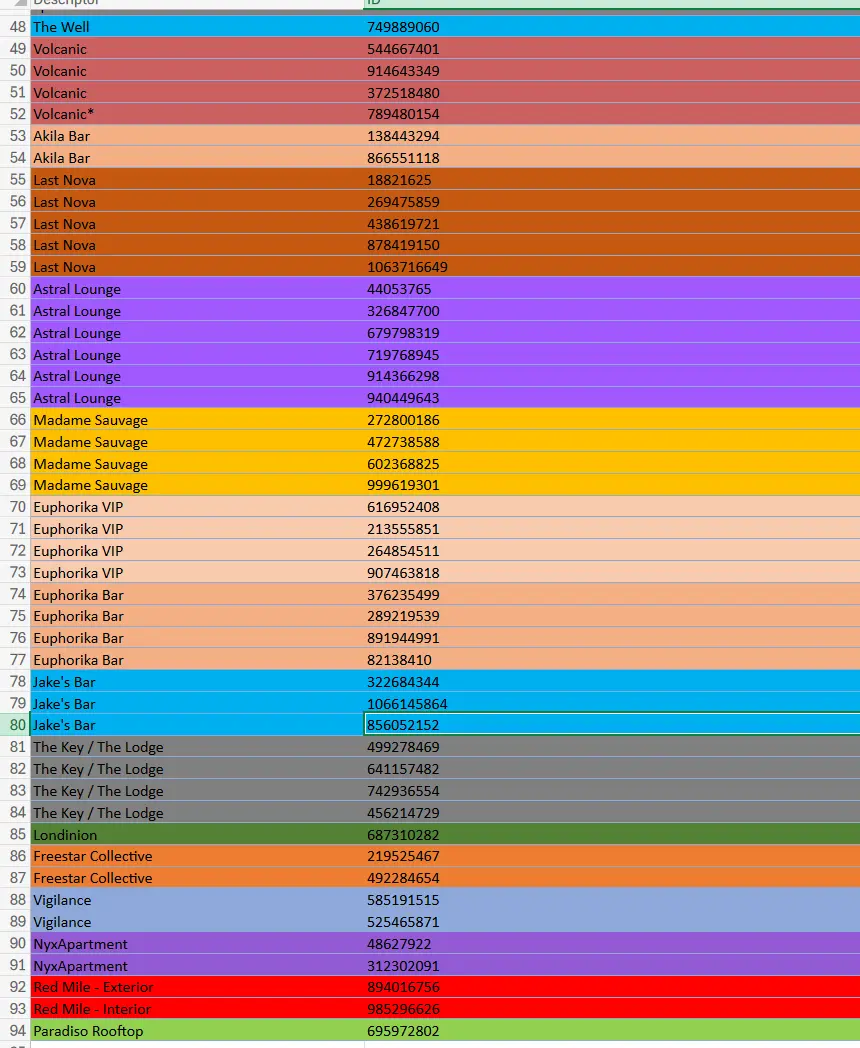
Assuming you have a number of tracks you want to use for each location, you need to rename these in order to later understand Starfield when and where to play them. For this, you need to know what numbers / names are required.
I obtained mine via the screenshots from Popcorntime linked above. Alternatively, you can Soundbank Sorter and there is also an Excel file to be found somewhere (well... I can't find it right now, so if someone has it and would want to share the link or file, I would be grateful and update it here). I like to keep my sources as a copy within the location folder, leading to something that looks like this

3. Postprocessing
Ambient music and sound in a composition like a video game sounds best, when it is fairly equal in volume and characteristic.
Before I do this, I copy all the renamed tracks from their source folders into one big shared folder, which will be the source folder for all further operations and is also a goof fallback, should I mess up somewhere in the process.
Therefore, I use Adobe Audition for post-processing. There are two stages in this:
STAGE I
3.1.a) Equalize
Order to be useful source material, I like to adjust the tracks' frequency bands within an audio signal by an equalizer. What this does is basically allow you to make manual adjustments and, for example, make things that are too shrill sound less so or add boom to deep sounds that are too flat.
3.1.b) Normalize
This is used to prevent clipping (sound that is too loud and therefore becomes distorted) and creates a uniform volume shell around your audio track. When done to all tracks with the same parameters, it contributes a lot to providing a common basis for all the audio you are supplying. There is a lot more to explain to this, and maybe I just haven't explained it well here, so just try it out and see if you notice a difference. It is done to avoid audio clipping. Although there is a lot of debate around this, in this case I would simply always apply it as it makes working with man files a lot easier, as you will see below. You can find the background and technical explanation for this here, should you be interested.
3.1.c) Dynamic range compression (DRC) or simply compression
This is similar to Normalization but also affects the tone of the audio. What this does is basically reducing the volume of very loud areas in your audio and raising the volume of very quiet areas. The waveform becomes more compressed over the frequency scale overall which in turn allows the overall volume to be raised again, hence step 3.1d
3.1d) Normalize again
I like to normalize again after compression as it leads - in my humble opinion generally to a full and voluminous sound with crisp characteristics.
So, I will not get into the difference between Normalization and Compression here, let's just say, both are tools for making a soundscapes volume and tone more balanced. If you are interested, here is a fantastic guide to what the difference is and how both work in tandem.
Play around with the steps above until you have the sound you like. If you know your way around Adobe Audition or any other audio editor you are good to go, in case you don't, there is a good guide to this for Adobe Audition to be found here.
STAGE II
As soon as you have a process you would which to apply to all your audio tracks, I strongly recommend taking the time to learn how to let your software do batch processing for all your files. It is a time investment repaid manyfold, especially should you find later, that you which to change properties (such as for example volume) of all your tracks.
I usually record a workflow (so-called 'favorite') in Adobe Audition, import all relevant tracks and let the batch processing do its work. There is a good tutorial for this to be found here.
You are finished with this step when you have a list of audio files that looks something like this, the .pkf files being metadata files created by Adobe Audition, that might not be visible on your computer if you have the display of hidden file types disabled (default). Thats no big deal as it does not hurt to delete them.

4. Conversion
Starfield keeps its audio in .wem files. In this step, we will convert your collection of .wav files to .wem files.
For this I downloaded wwise and basically followed the guide. Another nice video where you can follow along a guy doing conversions can be found here.
I struggled a little to find the output .wem files wwise creates and finally found them at this path: <Audio Converter>\.cache\windows\sfx\ with <Audio converter> being the project folder you create when setting up the project in wwise (see tutorial from Jakub Mareček linked above)
4.1 troubled names
you now will probably recognize, that your wwise output has a suffix appended to each file. I do not know how to set wwise up in order to avoid this. If anyone who reads this knows ho to do it, please tell me so I can add the info here. I fixed the issue by doing the next best thing and batch renamed all the files, removing the suffix via Microsoft Windows Power Toys, I downloaded from Microsoft.
You are finished with this step when you have a list of audio files in .wem format that looks somewhat like this... a folder with all your .wem files ready for packaging.

5. Packaging / Testing / Deployment
I wanted a way to test my audio replacer without any danger o breaking my installation. I learned that I might accomplish this, by simply creating the appropriate file structure, in this case Data\Sound\SoundBanks put all the .wem files inside and make a .zip file out of it.
I then used Vortex (Install form file) in order to do the import and deployment for me:

By going this route, I could simply disable or remove my mod from Starfield like any other mod I had installed. I tested it and recognized, that the music was still too loud. Luckily I could just take my sound banks-source folder, import all the .wav files into Adobe audition, record a favorite action that reduced volume by 2db and batch run all my files through it. Repeat steps 4 and 5 after this and that was that.
6. Testing and Troubleshooting
During testing, I realized, that some of the music did not play. I mentioned it in my mods description, and DaVinciWorks explained to me, that some of the files (Akila bar, Londinion, Red Mile, Main menu song) need pcm encoding rather than vorbis.
I will so, repeated steps 4 and 5 for these files and updated the mod.
and that... well concludes this Article. Have Fun I hope I helped a litte with this :D
2 comments
If you tell me the name (well,, number) of the original .wem file I can try t find out what encoding it uses.