


0 of 0
Documentation
Readme
View as plain text
/\/\/\/\/\/\/\/\/\/\/\/\/\/\/\/\/\/\/\/\/\/\/\/\/\/\/\/\/\/\/\/\/\/\/\/\/\/\/\/\/\/\/\/\/\/\/\
| |
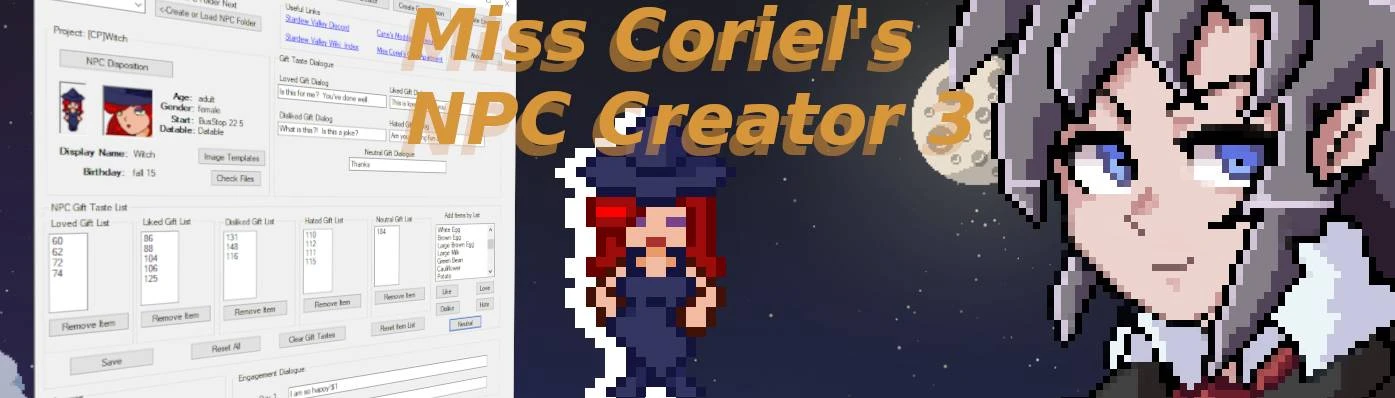
| Miss Coriel's NPC Creator |
| Version 1.0 |
| Designed by Miss Coriel |
| |
\/\/\/\/\/\/\/\/\/\/\/\/\/\/\/\/\/\/\/\/\/\/\/\/\/\/\/\/\/\/\/\/\/\/\/\/\/\/\/\/\/\/\/\/\/\/\/
==============================================================================================
-=Introduction=-
One of the first mods most beginners make in Stardew Valley is an NPC Mod. It is also the first
abandoned. NPCs are a intricate process filled with small moving parts that take time to
understand the full weight of each item. You have to be good at dialogue and events as well as
pixel art for the sprites. Even then.. you have to read about the NPC's different parts to
learn how to make one into a spouse and plenty of submods are needed to flesh them out. Who has
time to chase their dream if they are shoved in an endless sea of reading?!
No more.. This NPC Creation tool has been created by me to make the process not only simpler, but
faster and more likley to succeed than fumbling in a text file. You can acheive a fully set up
NPC with most of the basics in less than a fraction of the time normally needed! At last
even the most neophyte of modders can bring their dream to life!
===============================================================================================
1. - Install Instruction
2. - Explaination of Controls, Main Window
3. - Explaination of Controls, Manifest Creator
4. - Explaination of Controls, Schedule Studio
5. - Explaination of Controls, Dialogue Boutique
6. - Building an NPC! -Step by Step-
A. Set up
B. Create Schedule
C. Create Dialogue
D. Create Manifest
E. Finalize
7. Troubleshooting
===============================================================================================
1. -=Install Instruction=-
NPC Creator is not a mod that relies on Stardew Valley. Place the application in any folder you
find easier for you to get to. All NPC projects will be saved in the program folder "Export" as
[CP]
===============================================================================================
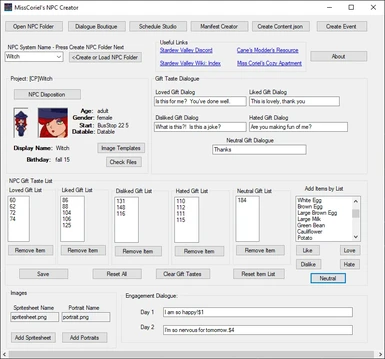
2. -=Explaination of Controls, Main Window=-
NPC System Name - This is how the gamecode identifies your character, It cannot be changed!
The system name can be anything so long as it doesn't get in the way of
an existing NPC. (eg. Haley)
Create NPC Folder - Press this after entering a NPC System Name. This creates the your
filestructure for your NPC. The program may crash if you do not do
this before you start.
Links - These links contain the collective knowledge of the SDV Modding community. Also the
SDV Discord is there for you to talk to modders directly as well as the WIKI page.
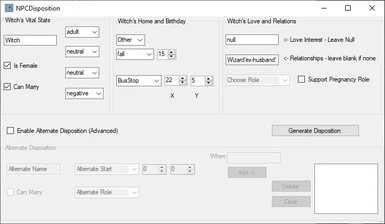
NPC Dispositions - This is a collection of data needed for Manifestation:
NPC Age - As it says. You can set your NPC to be a child, teen, or Adult.
Manners - Influences generic dialogue. Choose one that suits the NPC.
Social - Influences generic dialogue. Choose one that suits the NPC.
Optimism - Influences generic dialogue. Choose one that suits the NPC.
Gender - Select the gender that defines the NPC.
Datable? - This will cause the NPC to need further work. You must
generate Marriage Dialogue and Engagement Dialogue.
Love Interest - not really used. If no interest, set as null
Home Region - Affects hearts in certain festivals. Select what fits NPC.
Birthday - When NPC's birthday is. Select season and day (1-28).
Relationships - Leave blank if no relation to any other NPCs. If there is
put NPC's name with info in ' ' (ex: Caroline 'mom').
Starting Location - The exact place your NPC starts. It needs a Location
as well as X Y coords. (ex: BusStop 22 5)
Display Name - This is what dialogue and maps use to show the character
name. It can be changed using CP conditions if desired.
It doesn't need to match the System Name:
(ex: Wizard system name Rasmodius display name will
reference Wizard as Rasmodius.)
NPC Gift Tastes - When giving your NPC a gift it looks through the universal lists and special
information you gave it through the Gift Tastes on how to react to the Item.
Simply add the Item ID to the number field and click Add to List. See
Cane's Modder's Resource for the Item IDs and Categories.
Images - The Creator tool does NOT import images. Once the file structure is made, place your
spritesheet and portrait images in assets/img and fill out the fields with the names.
Mispells will cause the NPC to fail.
Engagement Dialogue - You are engaged for two days with a datable NPC. Fill out these fields
or your datable NPC will not accept a pendant.
Dialogue Boutique - Opens the Dialogue Boutique Menu.
Schedule Studio - Opens the Schedule Studio
Manifest Creator - Opens the Manifest Creator
Manifest NPC - Clicking this will create the content.json with all the information needed to put
the other parts together. Clicking again will overwrite the last one.
================================================================================================
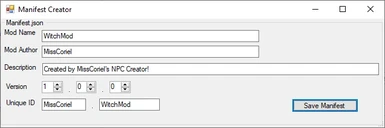
3. -=Explaination of Controls, Manifest Creator=-
Mod Name - This is the official name of your mod.
Mod Author - This is you and anyone who helped you.
Description - Do a small description of your mod.
Version - The three numbers represent Major Version.Minor Version.Bug fix (x.x.x). You have to
have at lease one item over zero. 0.0.0 is not allowed.
Unique ID - This distinguishes your Mod to SMAPI. A format example is provided.
Save Manifest - Creates the manifest.json in your [CP]
=================================================================================================
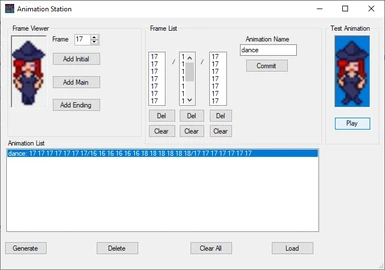
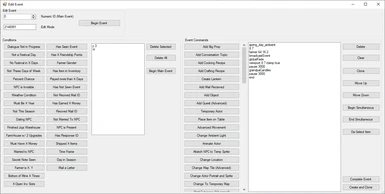
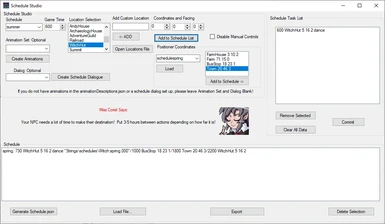
4. -=Explaination of Controls, Schedule Studio=-
Schedule - This is the Key. You can use seasons, days or even certain situations. See Modder's Wiki
for more information.
Game Time - Set the time of current task. (600 - 2400) Incriments of 10.
Location Selection - List of locations from the default maps in vanilla. Select the NPC's Destination.
Add Custom Location - Place mapname of a custom area or something not on the list. (Town isn't on there)
<- Add - Adds the Custom Location entered above.
Coordinates and Facing - The X and Y coordinates of the destination map. Facing is which way the NPC will
face. ( 0 = up 1 = right 2 = down 3 = left )
Animation Set: Optional - If you have edited the data/animationDescriptions with custom animations, this
is where you put them for use in the schedule. (ex: sitting)
Leave Blank if you haven't added in your own animations to the animationDescriptions!
Dialog: Optional - A special schedule dialogue must be made to target string/schedules/
be used. Leave blank if you have not made this.
Add to Schedule List - Adds the Task to the Schedule Task List.
Schedule Task List - Shows the list of schedule tasks you added. The order will be top to bottom.
Remove Selected - Made a mistake? Select the mistake and click this to remove it from the list.
Clear all Data - Clears out the Schedule Task List - use if you want to make a new schedule.
Commit - This sends the Task list to the Schedule list below. This is where it is finalized and waiting to be saved.
Schedule - The bottom list is complete Schedules (Format:
Delete Selection - Removes selected Schedule.
Generate Schedule.json - Creates your Schedule.json to assets/schedules/Schedule.json
==============================================================================================
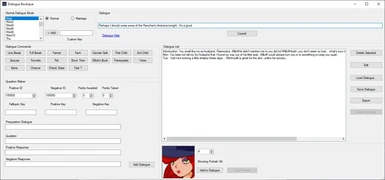
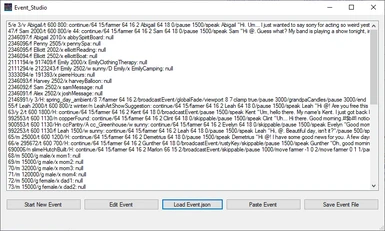
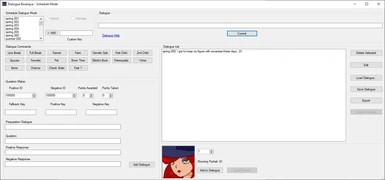
5. -=Explaination of Controls, Dialogue Boutique=-
Dialogue Key - This is a premade list of common dialogue keys. Select a key you need.
(Warning) There is Marriage Dialogue keys there too.. do not put them in a normally
Dialogue.json.
Custom Key - If what you need isn't there, you can add it by typeing it into the Custom Key field and
click <- Add. It will appear at the bottom of the list.
Generate Spouse Dialogue - This gets your NPC's system name and adds more dialogue to the bottom of the list
(ex: patio_
Dialogue - This is a blank text field where you can add your standard and advanced dialogue. Need help?
Click the Dialogue Help link to go to the Dialogue section of the Modder Wiki.
Commit - Add the Selected Key + your Dialogue to the Dialogue List below.
Question Maker - Designed to make simple questions with a positive or negative response. Advanced users can
use the normal Dialogue field to create advanced questions.
Positive and Negative ID - These are number IDs for the game to remember your response to the
question. Make them high and random numbers off by 1 with each other.
(ex: 129801 and 129802)
Points Awarded and Taken - This gives and takes friendship points depending on the answer.
Max give is 250(1 heart) and Max take is -2500 (10 hearts).
Fallback Key - Custom Key that if you speak to the NPC next time (if the question should come up)
instead of asking the question, the NPC will say the Prequestion along with the
Fallback. (see use of $p).
Positive Key - This MUST be filled out. If you answer positively, the NPC will respond with this.
The NPC will also award you with the points you designated.
Negative Key - This MUST be filled out. If you answer negatively, the NPC will respond with this.
The NPC will also take away the points you designated.
Add Dialogue - Will add the question to the Dialogue List with the Key you selected on the top.
Will Also add the Fallback Key, Positive Key and Negative Key to the key list
above. Check the bottom of the list.
Dialogue List - List of completed dialogue before saving.
Delete Selected - Removes Selected Dialogue from the list.
Generate Dialogue - Creates Dialogue.json to assets/dialogue/Dialogue.json
Generate Marriage - Creates MarriageDialogue.json to assets/dialogue/MarriageDialogue.json
(Only certain keys are usable with marriage dialogue)
===============================================================================================================
6. -=Building an NPC, Step by Step Guide=-
A. Setup
Now that you have the NPC Creator opened your first action will be to create the NPC System Name.
Choose something that has no spaces for compatibility and then click Create NPC Folder.
If you go to this program's folder, there is an Export folder, within will be a [CP] folder with
your NPC's system name on it. Don't hesitate to take a look around. The folders are empty but the
file structure should be:
[CP]
|
|_____assets
|
|____dialogue
|
|____img
|
|____schedules
Now that you are familliar, let's make the NPC Dispositions. Click on one item each field that suits
your NPC. If you have no place to put the NPC yet, try BusStop 22 8. This will place the NPC next to
you in a test run. Remember if your NPC has no relation to another NPC, LEAVE IT BLANK.
With NPC Dispositions created, you can add gift tastes. You can customize their response by editing the
textfield of each reaction as you please. To add items, referr to Cane's Modder's Resource for ITEM IDs,
find the ID you want to add, put the number in the Item ID or Category field, then Click Addto List.
You can do this with as many Items as you want, however there are universal reactions that will apply.
Just make sure you get the items you want your NPC to react accordingly to.
Assuming you already made your spritesheet and portrait images, place those images in assets/img. Then in
the appropriate field, place their complete filenames. (ex: sprite.png)
Finally, create the Engagement Dialogue if you decided your NPC is datable. If the NPC is not-datable,
the dialogue will not be added.
At this point you can click Manifest NPC or move on to the next step...
B. Create Schedule
Click Schedule Studio to open the Schedule Studio. The first key you should use is spring, if you are new
to modding this will cover the schedule of the entire season of spring. As you see, I have already provided the
appropriate key for you. For more possibilites, see the Schedule section of the Wiki.
If you want to see if your schedule is working always make your first entry to 610 and move the NPC just a little.
Collecting coordinates can be done using either a third party program like Stardew Editor, or playing a new save in
SDV with the Debug Mode mod turned on. Gather your coordinates for each map, write them down somewhere and so you
can use/reuse them. If your NPC enters maps from mods, you can add the map name to the Location selection by typing
it's system name into the Add Custom Location text field and clicking <-ADD. The location will be placed at the bottom
of the list. After setting the time, location, and the Coordinates and Facing, you have the option to add animations
if you added them through your content.json. (This will be implemented into the Creator at a later time.) You may also
add schedule dialogue if you added a ScheduleDialogue.json targeting strings/schedules/
to add schedule dialogue is to use the key.000 and onward. [ex: spring.000, Mon.000]. If you don't have any of those done,
or don't know how.. leave those blank.. they are not needed. Click Add to Schedule List and the task will appear on the Task List.
Keep the key until you completed all the task for that schedule. When all tasks on the list are there, click Commit to create the
schedule line at the bottom with the key as it's indicator. Try to make a schedule for spring, summer, fall, and winter. Those are the most
basic of schedules.
Once you are done.. click Generate Schedule.json and it will add the list to assets/scheudles/Schedule.json.
C. Create Dialogue
Click Dialogue Boutique to open the Dialogue Boutique. Each dialogue requires a key, which common keys are listed by default.
If you wish to add more, you can fill out the Custom Key text field and click <-Add. Additionally, if you have a datable NPC,
Click Generate Spouse Dialogue to add custom keys for your spouse NPC that needs it's name. [Ex: patio_
Select the key you wish to use.. understand that there are some keys that only work with a spouse (Indoor_Day, Indoor_Night,
Indoor_Rainy_Day, Indoor_Rainy_Night, Outdoor, patio_
you may add text to the dialogue field. There is a link to the Dialogue page on the wiki availabe if you wish to learn how to
structure dialogue. When you dialoge is complete, click Commit, and the Key + the dialogue will appear in the Dialogue list.
You may also click on a Key, then fill out the Question Maker to create simple questions. Filled properly, it will generate
the question dialogue to the key you selceted and add 3 new custom keys that you MUST create. The Fallback Key is for when
you speak to the NPC the next time the question would come up. Instead of the question.. the fall back replaces it depending
on what you put there. See the Wiki on how to use the $p command. The Positive Key is an immediate response to your positive
choice in the questions. It will give you the points you chose to award as well. The Negative Key is the same except it will
be for the bad answer you designate and take points away.. though you can have it take none. Click Add Dialogue for it to
add the Question to the Dialogue list with the key you selected and add the three Custom Keys.
Create all the dialogue you want with the keys provided and any custom keys you wish to make. When done, click Generate Dialogue to
get your Dialogue.json placed in assets/dialogue/Dialogue.json. Clear out the list, and add in MarriageDialogue to the list then click
Create Marriage to add MarriageDialogue.json.
D. Create Manifest
The Manifest is needed to allow SMAPI to see your mod. Without it it will just error and not load. Click Manifest Creator. A couple
of the fields have something there.. you can change those. Give the Mod a name, put your name in the author section, Add a description, and
make sure the Version is not 0.0.0. The usual unique ID we use is your name.modname (misscoriel.witch). This can be used in other mods.
When you're done, Click Save Manifest.
E. Finalize
Now that all of that is done, click Manifest NPC (Even if you did before.). Ensure that your sprites and portraits are in the right place.
Then copy your [CP] folder and place it in your Mods folder. If you filled out everything right, you will have a fully functional NPC waiting.
7. Troubleshooting
NPC didn't show up? Why?
A. Mod had an error - goto log.smapi.io and follow the directions there to parse a log. You can submit the link it provides to the Modding community.
It's likley that you inputted something wrong and can be easily fixed.
B. No Error, but NPC is not where I told it to be. - Did you put the NPC somewhere it shouldn't be? Also download the mod CustomNPCFixes.
When in doubt, talk to the modders.
Schedule works a while then NPC stops or NPC doesn't move. - Likley you are sending them to an invalid place to stand. If they can't find a way
to the area they will stop and not move. Talking to the modders will help resolve this.
NPC just says Hi on
NPC has a question to ask.. but instead says "..." - If you made a custom question without the question maker, you may of messed up a part of the question.
NPC Asks question but I get a sea of red in the SMAPI console. - Likley you did not fill out the responses.. Be sure to do that. If you didn't see a modder
and your problem can be resolved quickly.
NPC Doesn't want to get married - Do you have an upgraded house? What about engagement dialogue. IS the NPC Datable? Do you have Unique Courtship Mod installed?
If you have UCR, you need to add some dialogue to repond to bouquets and pendants. The keys needed
are already in the Dialogue boutique near the bottom.
================================================================================================================================================================
Special thanks to Pathoschild, Bwdy, and spacechase0 for helping me learn what I need to get this program started.