


0 of 0


About this mod
Another remake of my Little Cottage, this time using no modder's resources, with SE users in mind.
Also includes a tutorial in the optional files on how to create your own aquarium with the Fishing CC add-on.
- Permissions and credits
- Changelogs
Original Skyrim version here: http://www.nexusmods.com/skyrim/mods/79957/?
Bethesda.net PC version here: https://mods.bethesda.net/#en/workshop/skyrim/mod-detail/3029272
Bethesda.net XB1 version here: https://mods.bethesda.net/#en/workshop/skyrim/mod-detail/3029515
Bethesda.net PS4 version here: https://mods.bethesda.net/#en/workshop/skyrim/mod-detail/3029618
Description:
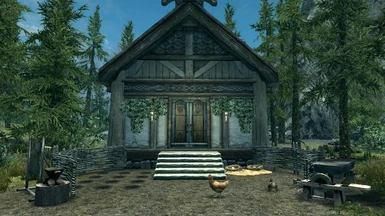
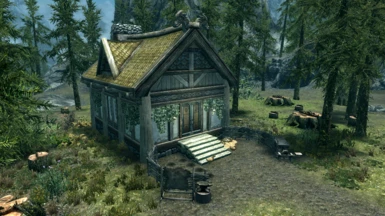
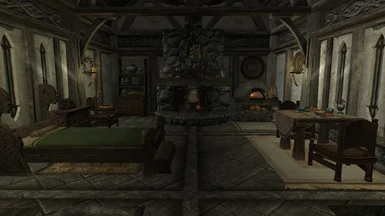
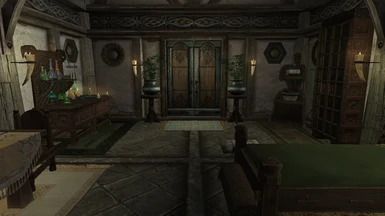
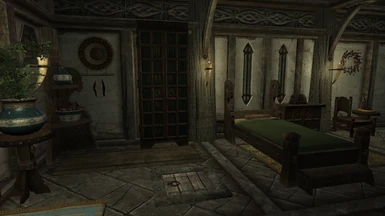
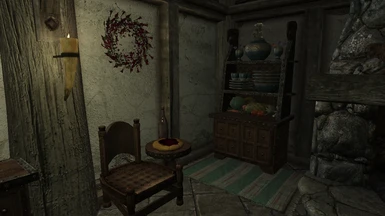
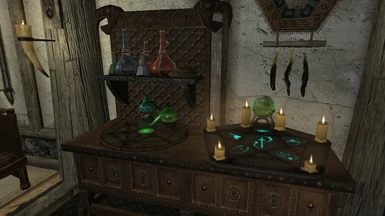
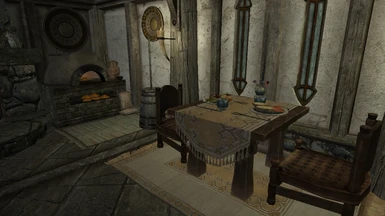
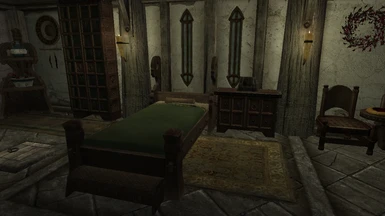
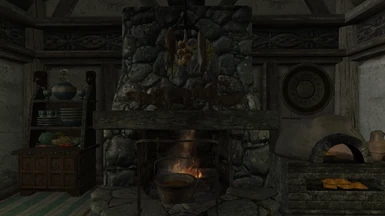
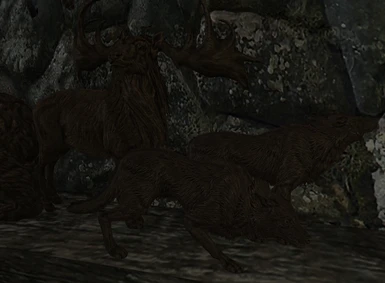
This is another remake of my Little Cottage player home. This uses no modder's resources and was made in mind after it was revealed that PS4 user's will have access to mods but no assets. This was also sort of done for my dad. This is the Skyrim Special Edition version. How it was done: Most assets are static copies of the original assets and have had been set to not havok settle to prevent the player from interacting or taking the particular object. Some have only been set to not havok settle in the case of the food items on the tables and snowberries. Two custom containers were set up as activator boxes linked to unseen containers in the void and using the collection of static copies to display as something unique. The planter pottery also had their textures swapped by creating copies of the original planters and using a texture set to switch it to the other glazed pottery textures. It is located near the Half-Moon Mill and the Hunter's Rest.
Features:
-Two custom containers put together with static copies of vanilla assets (Food and Potions).
-Plenty of non-respawning safe containers
-A bed with a well rested bonus
-Nine garden plots
-A cooking pot, oven, anvil, tanning rack, workbench, and grindstone
Version 1.2 Additions (requires the most recent Skyrim update and the free Creation Club Fishing add-on enabled):
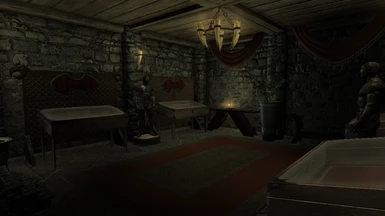
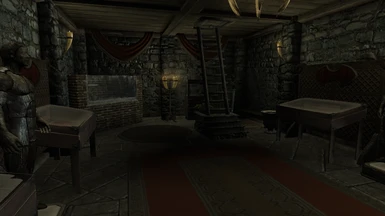
-A brand new basement featuring numerous weapon and armor displays 4 weapon plaques (8 weapons and 4 shields), 4 weapon display cases, 2 mannequins
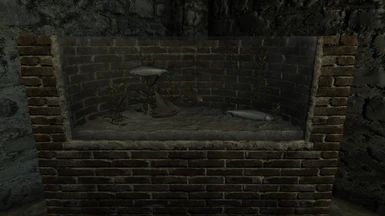
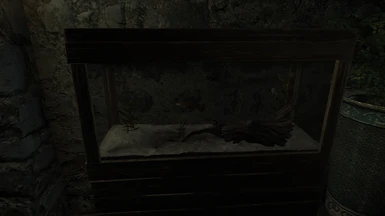
-A large aquarium and a small aquarium (fish in the screenshots not included)
-A total of 12 garden plots outside, plus 2 more inside the basement
Version 1.2 - Alternate Basement optional file:
Same as the above, although there are two small aquariums instead. Choose either this or the main file! Do not install this over the other/main version of 1.2, and vice versa. This is an alternate version of 1.2 with a basement more closer to the style of the LE version 1.2. See the images. Also requires the Creation Club Fishing add-on enabled. If bethesda.net users (for any platform) have interest in this particular version let me know in the comments tab.
Additionally I have included and created a tutorial in the optional files for how to set up your own custom aquarium for use in house mods and the like.
Tutorial here (or optionally download it, which has the images as well):
Bethesda.net PC version here: https://mods.bethesda.net/#en/workshop/skyrim/mod-detail/3029272
Bethesda.net XB1 version here: https://mods.bethesda.net/#en/workshop/skyrim/mod-detail/3029515
Bethesda.net PS4 version here: https://mods.bethesda.net/#en/workshop/skyrim/mod-detail/3029618
Description:
This is another remake of my Little Cottage player home. This uses no modder's resources and was made in mind after it was revealed that PS4 user's will have access to mods but no assets. This was also sort of done for my dad. This is the Skyrim Special Edition version. How it was done: Most assets are static copies of the original assets and have had been set to not havok settle to prevent the player from interacting or taking the particular object. Some have only been set to not havok settle in the case of the food items on the tables and snowberries. Two custom containers were set up as activator boxes linked to unseen containers in the void and using the collection of static copies to display as something unique. The planter pottery also had their textures swapped by creating copies of the original planters and using a texture set to switch it to the other glazed pottery textures. It is located near the Half-Moon Mill and the Hunter's Rest.
Features:
-Two custom containers put together with static copies of vanilla assets (Food and Potions).
-Plenty of non-respawning safe containers
-A bed with a well rested bonus
-Nine garden plots
-A cooking pot, oven, anvil, tanning rack, workbench, and grindstone
Version 1.2 Additions (requires the most recent Skyrim update and the free Creation Club Fishing add-on enabled):
-A brand new basement featuring numerous weapon and armor displays 4 weapon plaques (8 weapons and 4 shields), 4 weapon display cases, 2 mannequins
-A large aquarium and a small aquarium (fish in the screenshots not included)
-A total of 12 garden plots outside, plus 2 more inside the basement
Version 1.2 - Alternate Basement optional file:
Same as the above, although there are two small aquariums instead. Choose either this or the main file! Do not install this over the other/main version of 1.2, and vice versa. This is an alternate version of 1.2 with a basement more closer to the style of the LE version 1.2. See the images. Also requires the Creation Club Fishing add-on enabled. If bethesda.net users (for any platform) have interest in this particular version let me know in the comments tab.
Additionally I have included and created a tutorial in the optional files for how to set up your own custom aquarium for use in house mods and the like.
Tutorial here (or optionally download it, which has the images as well):
Spoiler:
Things needed:
ccBGSSSE001_AquariumLarge OR ccBGSSSE001_AquariumSmall (under Static)
ccBGSSSE001_FishTankLargeChest OR ccBGSSSE001_FishTankSmallChest (under Container)
9x ccBGSSSE001_FishTankCritterMarker (under Static)
Some general Creation Kit knowledge
Please refer to the images included with the download, in case my explanations are not helpful enough on their own.
Step 1:
First place either the ccBGSSSE001_AquariumLarge OR ccBGSSSE001_AquariumSmall. Make sure to name it in the Reference Editor ID box. Attach ccBGSSE001_FishTankHitScript to the aquarium in the Scripts tab. No properties to set here.
Step 2:
After the aquarium is placed and named, and making sure it is still selected, select the Trigger button (the button in the toolbar with a T inside a cube). Search and add the ccBGSSSE001FishTankLargeAct OR ccBGSSSE001FishTankSmallAct depending on the size of the aquarium. Size it to be about as big as the glass, and slightly in front of it. Next edit it, and select the Primitive tab and make sure the Player Activation box is checked.
You may also need to offset it in the 3D Data tab (on the Rotation side), by adding 0.1 to the X and Y boxes, otherwise it may not be interactable in game (same issue as Weapon Plaques and whatnot).
Step 3:
After that deselect everything and select the aquarium static again, and add the CollisionMarker (click the C inside the cube in the toolbar). Move the arrow down to size it slightly below the glass, and make sure it covers the sides of the aquarium as well.
Step 4:
Place the ccBGSSSE001_FishTankLargeChest OR ccBGSSSE001_FishTankSmallChest if you have not yet. Make sure it is a good distance from the aquarium out in the void. Select and edit the aquarium again and in the Linked Ref tab, select the ccBGSSSE001_FishTank_Chest. Select and edit the ccBGSSSE001_FishTank_Chest again. Make sure the ccBGSSSE001_FishTankContainerScript is there under the scripts tab. All of the properties should be set by default and should not need to be touched. In the Activate Parents tab make sure to select the ccBGSSSE001FishTank_Act. 0.00 delay is fine here.
Step 5:
Make sure to place 9x ccBGSSSE001_FishTankCritterMarker. These will determine where the fish spawn, and there will need to be a path of 3 of these, done 3 times. Alternatively you can copy the ones from any of the Hearthfire homes. Make sure to give each of these a unique name to make it easier to figure which is which. I did this for my Little Cottage mod, after setting them up individually and did not feel as satisfied with the placement.
If you do use the copy route, then the Linked Ref chain will already be established. Just be sure to select and edit one, name it, view the reference in the Linked Ref tab, and edit that one's name, and so on. The names will be helpful for the next step. For my Little Cottage mod, I have named mine aaaFaelLittleCottageFishTankCritterMarker_01 and so on.
Step 6:
In the Linked Ref tab on the ccBGSSSE001_FishTank_Chest select three of the ccBGSSSE001_FishTankCritterMarker. Make sure each one is tagged with ccBGSSE001_FishTankMarkerKW01-03. If you are using the copied Bethesda ones, then make sure to select the first, fourth, and seventh. The rest of the work will be done. If not then you'll need to do the next step.
Step 7:
Select and edit the first ccBGSSSE001_FishTankCritterMarker tagged ccBGSSE001_FishTankMarkerKW01 (example: aaaFaelLittleCottageFishTankCritterMarker_01). In the Linked Ref tab select another ccBGSSSE001_FishTankCritterMarker (example: aaaFaelLittleCottageFishTankCritterMarker_02). If you named them you can easily add them from selecting the cell they've been added to and selecting the name from the drop down list, or you can add them by selecting the reference in the render window.
Then select and edit that marker (example: aaaFaelLittleCottageFishTankCritterMarker_02) and repeat this process with another different one (aaaFaelLittleCottageFishTankCritterMarker_03). Then select and edit that third marker and in the Linked Ref tab, select the first ccBGSSSE001_FishTankCritterMarker tagged ccBGSSE001_FishTankMarkerKW01 (example: aaaFaelLittleCottageFishTankCritterMarker_01).
This process will be repeated for the markers tagged with ccBGSSE001_FishTankMarkerKW02, and ccBGSSE001_FishTankMarkerKW03. Again having the markers named ahead of time will make this much easier and less confusing to keep track of.
It should be something like this:
ccBGSSSE001_FishTankCritterMarker #1 -> ccBGSSSE001_FishTankCritterMarker #2 -> ccBGSSSE001_FishTankCritterMarker #3 -> ccBGSSSE001_FishTankCritterMarker #1
and so on.
Step 8:
Test it in game, to see if you like the placement and paths of the fish when they swim. Lastly feel free to decorate the aquarium with the new statics, kelp, etc.
Show
Things needed:
ccBGSSSE001_AquariumLarge OR ccBGSSSE001_AquariumSmall (under Static)
ccBGSSSE001_FishTankLargeChest OR ccBGSSSE001_FishTankSmallChest (under Container)
9x ccBGSSSE001_FishTankCritterMarker (under Static)
Some general Creation Kit knowledge
Please refer to the images included with the download, in case my explanations are not helpful enough on their own.
Step 1:
First place either the ccBGSSSE001_AquariumLarge OR ccBGSSSE001_AquariumSmall. Make sure to name it in the Reference Editor ID box. Attach ccBGSSE001_FishTankHitScript to the aquarium in the Scripts tab. No properties to set here.
Step 2:
After the aquarium is placed and named, and making sure it is still selected, select the Trigger button (the button in the toolbar with a T inside a cube). Search and add the ccBGSSSE001FishTankLargeAct OR ccBGSSSE001FishTankSmallAct depending on the size of the aquarium. Size it to be about as big as the glass, and slightly in front of it. Next edit it, and select the Primitive tab and make sure the Player Activation box is checked.
You may also need to offset it in the 3D Data tab (on the Rotation side), by adding 0.1 to the X and Y boxes, otherwise it may not be interactable in game (same issue as Weapon Plaques and whatnot).
Step 3:
After that deselect everything and select the aquarium static again, and add the CollisionMarker (click the C inside the cube in the toolbar). Move the arrow down to size it slightly below the glass, and make sure it covers the sides of the aquarium as well.
Step 4:
Place the ccBGSSSE001_FishTankLargeChest OR ccBGSSSE001_FishTankSmallChest if you have not yet. Make sure it is a good distance from the aquarium out in the void. Select and edit the aquarium again and in the Linked Ref tab, select the ccBGSSSE001_FishTank_Chest. Select and edit the ccBGSSSE001_FishTank_Chest again. Make sure the ccBGSSSE001_FishTankContainerScript is there under the scripts tab. All of the properties should be set by default and should not need to be touched. In the Activate Parents tab make sure to select the ccBGSSSE001FishTank_Act. 0.00 delay is fine here.
Step 5:
Make sure to place 9x ccBGSSSE001_FishTankCritterMarker. These will determine where the fish spawn, and there will need to be a path of 3 of these, done 3 times. Alternatively you can copy the ones from any of the Hearthfire homes. Make sure to give each of these a unique name to make it easier to figure which is which. I did this for my Little Cottage mod, after setting them up individually and did not feel as satisfied with the placement.
If you do use the copy route, then the Linked Ref chain will already be established. Just be sure to select and edit one, name it, view the reference in the Linked Ref tab, and edit that one's name, and so on. The names will be helpful for the next step. For my Little Cottage mod, I have named mine aaaFaelLittleCottageFishTankCritterMarker_01 and so on.
Step 6:
In the Linked Ref tab on the ccBGSSSE001_FishTank_Chest select three of the ccBGSSSE001_FishTankCritterMarker. Make sure each one is tagged with ccBGSSE001_FishTankMarkerKW01-03. If you are using the copied Bethesda ones, then make sure to select the first, fourth, and seventh. The rest of the work will be done. If not then you'll need to do the next step.
Step 7:
Select and edit the first ccBGSSSE001_FishTankCritterMarker tagged ccBGSSE001_FishTankMarkerKW01 (example: aaaFaelLittleCottageFishTankCritterMarker_01). In the Linked Ref tab select another ccBGSSSE001_FishTankCritterMarker (example: aaaFaelLittleCottageFishTankCritterMarker_02). If you named them you can easily add them from selecting the cell they've been added to and selecting the name from the drop down list, or you can add them by selecting the reference in the render window.
Then select and edit that marker (example: aaaFaelLittleCottageFishTankCritterMarker_02) and repeat this process with another different one (aaaFaelLittleCottageFishTankCritterMarker_03). Then select and edit that third marker and in the Linked Ref tab, select the first ccBGSSSE001_FishTankCritterMarker tagged ccBGSSE001_FishTankMarkerKW01 (example: aaaFaelLittleCottageFishTankCritterMarker_01).
This process will be repeated for the markers tagged with ccBGSSE001_FishTankMarkerKW02, and ccBGSSE001_FishTankMarkerKW03. Again having the markers named ahead of time will make this much easier and less confusing to keep track of.
It should be something like this:
ccBGSSSE001_FishTankCritterMarker #1 -> ccBGSSSE001_FishTankCritterMarker #2 -> ccBGSSSE001_FishTankCritterMarker #3 -> ccBGSSSE001_FishTankCritterMarker #1
and so on.
Step 8:
Test it in game, to see if you like the placement and paths of the fish when they swim. Lastly feel free to decorate the aquarium with the new statics, kelp, etc.