


0 of 0


About this mod
A quest about a realm lost to myth, an ancient city of ghosts, and a small house in the woods. Includes three new groups of magic, unique boss fights, custom enemies, two endings, and more.
- Requirements
- Permissions and credits
-
Translations
- Spanish
- Russian
- Polish
- German
- Changelogs
- Donations
Arkay's Blessing prevents the souls of men, beastmen, and elves from being used without consent. Arkay's Law prevents those buried with the proper rituals from being raised to serve the necromancer's will. As you know, Arkay's Blessing is flexible to those with daring, but Arkay's Law is unwavering.
Orkey, an enemy god, had always tried to ruin the Nords, even in Atmora where he stole their years away. Seeing the strength of King Wulfharth, Orkey summoned the ghost of Alduin Time-Eater again.
This mod introduces a mysterious old Nordic legend that tells of Orkey, walking shadows, and the death of an old priestess countless centuries ago. And at the heart of it all, the strange realm of Gravewind. A realm of undead, an afterlife conjured by a witch now forgotten by all, except the most devout of undead hunters and priests of Arkay.
Journey through the halls haunted by those who fell into the strange world of death, just like you, and try to make it back home without having your soul enthralled. Or worse.
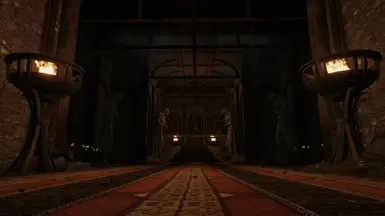
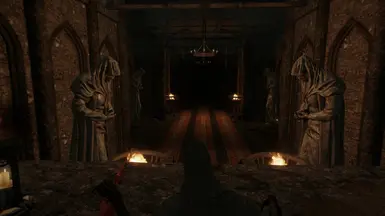
Gravewind is explorable as an expansive multi-layered dungeon littered with unique forms of undead.
Within you will find abandoned homesteads, catacombs, traps, and an underground city populated entirely by ghosts and golems.
Survive to the end, and you might be able to reign over it as a lord of lost undead.
Or maybe you'd rather see it crumble into nothing, and free the souls trapped inside?
Regardless, Gravewind anticipates your arrival.
Recommended Level: 25ish+. Probably an emphasis on +.
Safe to install mid-playthrough.
How to Start the Quest:
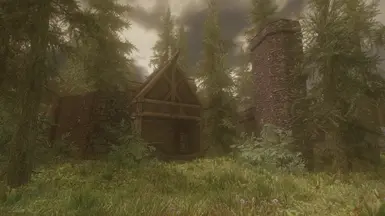
Travel just northwest of the Roadside Ruins in Falkreath, and enter the abandoned homestead.
Note that you WILL be trapped from the moment the quest begins, so stock up on supplies beforehand. Or don't. I'm not your mom.
Compatibility and Important Notes:
Game Settings:
Make sure your Object Fade is set high for intended experience. If you play on lower settings, make sure to also grab the Non-Animated Sludge file.
ENB:
Depending on your ENB or ENB settings much of the weather effects, lighting, etc won't look as they're intended to. Such is modding. My screenshots are with a mostly unchanged NAT III ENB, and I tried to balance the lightning between that and vanilla lightning, but I can't say how other ENBs will perform.
Location:
Mods that edit the location of the house are not compatible, and if you experience issues with these mods please let me know so I can put together a list! So far this includes:
Fabled Forests (A single tree, should be able to be disabled through console)
Followers:
For the best experience, take on this one alone. Followers have trouble keeping up with you throughout Gravewind.
Known Issues & Bugs:
See the Bugs tab of the mod page.
Full Guide:
Spoiler:
Show
The House:
The Forest and the Mausoleum:
Gravewind Proper:
Postgame:
Spoiler:
Show
Beginning from the inside of the house, go upstairs and read the book to get a good idea of the mod's lore.
Then, go back downstairs and into the door to the basement that just appeared.
Explore the basement, return upstairs, and then notice that the door is now locked.
Return to the basement, which now opens to the halls of a flooded catacomb.
Explore the catacombs, find and activate the lever leading to the rest of the dungeon, and defeat the boss.
Take the key, and leave.
The Forest and the Mausoleum:
Spoiler:
Show
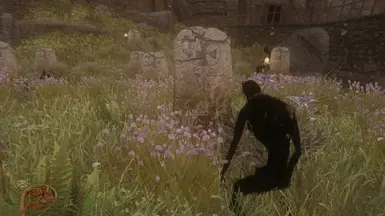
Take note of the ruins in front of the house, and continue to explore the forest.
Most of the houses here are blocked off, but the one with a wheat farm contains an alchemy shop.
Find and enter the mausoleum, the building opposite the farm, and choose either path inside. Both must be completed to open the coffin ahead, but the order doesn't matter.
Right-hand Path
This guide will start with the path to the right, decorated in red sludge.
Like any other dungeon, trek through the labyrinthine halls. After the first coffin-decorated room there will be a fork in the road. Take the path to the right first, which will lead to another fork. On the left are enchantment and alchemy tables, and straight ahead will lead to a spell tome.
Return to the original fork in the road and go left. This will lead to a small maze, which will lead to a staircase that opens to the Corpse Fissure.
The shades are born through cooking a dead soul in their own corrupted flesh, and this room is where the Wraithmother gathers that flesh.
Defeat the Walking Mound, and take the Token of Rebirth from its body. Activate the portal to return back to the Gravewind forest, the Mound's death signified by a small change to the stone gateway in front of you.
Left-hand Path
The path to the left is similar. Proceed through the traps and fire until you reach the Scrawled Note and unique spell tome.
After reading the note, taking the spell, and continuing through more traps, you will reach a dead end at the end of the hall.
After reading the taunt left by the Wraithmother, activate the wall left of the tablet. Our anonymous pen-pal has offered us a way deeper.
Follow the tunnel, and enter the door at the end of the hall. Get in the cage, and descend deeper.
This is where the oldest of Gravewind's shades were left to incubate within their stone vessels. Thankfully, only one of them seems ready enough to hatch.
The Awakened Vessel simply needs to be defeated to proceed. Activate the portal after its death to return to the Gravewind forest, the Vessel's death signified by a small change to the stone gateway in front of you.
The Coffin
After going through both paths, you will find that the coffin at the end of the Mausoleum Hall is now open.
Go through the door, unlocking it with the Token of Rebirth, and get ready to confront the Wraithmother in her own throne room.
Take the Homeward Idol from her body, and proceed back to the portal.
Gravewind Proper:
Spoiler:
Show
The Pit of Rejects
Did I get anyone with that Homeward Idol thing? I hope so.
Exit your cage, and take in the surroundings. Another note, as well as some supplies, lie to your left.
Use the cages melting into the tar around you to proceed through the Pit of Rejects, collecting loot and dodging the darts shot by the Grave Guardians above.
Towards the end you might notice a small altar/ritual site on one of the islands to the side. Take the torn journal page from it for a bonus reward later.
At the end of the pit is another elevator. This time taking you much higher.
The Undercity lies at the top.
The Undercity
The Undercity, set aflame by our note-writing friend, is straightforward enough.
The wraiths here revive once upon death, so be careful as you make your way closer to the storm-shrouded temple. It's very easy to get swarmed here.
As you approach the temple, you will find our anonymous companion at the top of the staircase.
Take everything he offers (this will be the last time you get the enchanted variants of his gear. Unenchanted variants can be crafted as a forge if you have an Amulet of Arkay in your inventory), and go to the building he mentions.
WHETHER YOU TAKE THE NECKLACE OR NOT IS IMPORTANT REGARDING THE OUTCOME OF THE MOD. Read the spoiler below if you would like to know how.
Gravewind Study
In the Gravewind Study, simply continue ahead, reading the Wraithmother's research as you go. It seems like the Woodland Man always worms his way into the minds of the occult.
The spell tombs for two Scarlet Lightning spells are here, so make sure to grab them too.
Read On Mortality for some journal entries written by the Wraithmother over the past few centuries. She might not realize it, but it seems like Mora isn't the only prince at fault for corrupting our Big Bad.
Activate the suspicious cabinet, follow the stairs down to her hidden shrine, read her Prayer to Orkey, and then activate the totem.
The temple is now open. You know what to do from here.
Did I get anyone with that Homeward Idol thing? I hope so.
Exit your cage, and take in the surroundings. Another note, as well as some supplies, lie to your left.
Use the cages melting into the tar around you to proceed through the Pit of Rejects, collecting loot and dodging the darts shot by the Grave Guardians above.
Towards the end you might notice a small altar/ritual site on one of the islands to the side. Take the torn journal page from it for a bonus reward later.
At the end of the pit is another elevator. This time taking you much higher.
The Undercity lies at the top.
The Undercity
The Undercity, set aflame by our note-writing friend, is straightforward enough.
The wraiths here revive once upon death, so be careful as you make your way closer to the storm-shrouded temple. It's very easy to get swarmed here.
As you approach the temple, you will find our anonymous companion at the top of the staircase.
Take everything he offers (this will be the last time you get the enchanted variants of his gear. Unenchanted variants can be crafted as a forge if you have an Amulet of Arkay in your inventory), and go to the building he mentions.
WHETHER YOU TAKE THE NECKLACE OR NOT IS IMPORTANT REGARDING THE OUTCOME OF THE MOD. Read the spoiler below if you would like to know how.
Spoiler:
Show
If you take it into the temple like he asks, you will be able to get his ending BUT miss out on most of the "ruler of Gravewind" perks. Likewise, if you don't take it, you will lock yourself out of his ending but you will get the most out of Gravewind's throne.
If you want to be evil and still keep the necklace, just take it and drop it on the floor for later or something. As long as you don't take it into the temple, you will still get the Gravewind lordship perks.
If you want to be evil and still keep the necklace, just take it and drop it on the floor for later or something. As long as you don't take it into the temple, you will still get the Gravewind lordship perks.
Gravewind Study
In the Gravewind Study, simply continue ahead, reading the Wraithmother's research as you go. It seems like the Woodland Man always worms his way into the minds of the occult.
The spell tombs for two Scarlet Lightning spells are here, so make sure to grab them too.
Read On Mortality for some journal entries written by the Wraithmother over the past few centuries. She might not realize it, but it seems like Mora isn't the only prince at fault for corrupting our Big Bad.
Activate the suspicious cabinet, follow the stairs down to her hidden shrine, read her Prayer to Orkey, and then activate the totem.
The temple is now open. You know what to do from here.
Postgame:
Spoiler:
Show
If you took the Fingerbone Necklace, summoning Richter's Flame:
If you did not take the necklace (or put it in a chest somewhere before going in the temple):
Benefits that exist regardless of whether or not you brought the necklace with you:
That should be everything.
Thank you for playing! Also you didn't beat the mod until you endorse it.
I don't make the rules, sorry :)
Spoiler:
Show
The Wraithmother sank into the void, you are free, and the portal out of Gravewind is now open...
To you.
The souls within are still trapped against their will. You can still store anything you want in the containers here without them despawning, and still trade with the souls that have set up shop, but you got help from a priest of Arkay for a reason. You're here to free them all.
Thankfully, our friend left a gift where he was before you entered the temple. A glowing orb of holy light, Arkay's Light, that will erupt and collapse the realm back where it came from when activated. You only need to pop it, Arkay will handle the freeing of the souls and letting everything sink back into the void part.
Just make sure not to sink in with the rest of the realm amidst the chaos.
Upon leaving you will gain a permanent protection against damage inflicted by undead opponents, and a decorative trophy if you kill the guy. You'll know what that means when you get there.
If you did not take the necklace (or put it in a chest somewhere before going in the temple):
Spoiler:
Show
After letting the Wraithmother succumb to the depths of who-knows-where, and rejecting Richter's offer, you will have control over Gravewind. You might also notice that the streets of the undercity are much more populated, now that a certain pyromaniac is no longer running around setting everything on fire.
As ruler of the dead, you will be able to do the following:
Demand the servants walking around the Undercity to give you offerings, and get a buff to Illusion magic through the Mark of the Tyrant on top of it.
Give them some of your health instead, granting you a Conjuration buff through the Mark of Benevolence
Use any of the containers throughout Gravewind EXCEPT for those in the two shopkeeper's houses. Their containers technically should be safe, since they're set not to respawn, but their cells are the only two in the dungeon that respawn and I wouldn't chance it.
Ask one of the servants to join you in battle, who will transform into a guardian circle equilibrium spell that eats the health of those inside (including you). Ask another one what that was about, and they'll also turn into a spell.
Benefits that exist regardless of whether or not you brought the necklace with you:
Spoiler:
Show
You will be able to teleport to and from the Mausoleum throne and the Undercity throne using the ball of darkness next to each throne.
You will also find spell tomes to summon a Putrid Mass and Shade in the Mausoleum throne room.
Other post-game spells can be found in the three main boss arenas (Gravewind Temple, Corpse Fissure, and Sunken Hatching Grounds.) These include Expel Greater Spirit, Summon Walking Mound, and Grasp Soul respectively. Check them out!
You can craft unenchanted variants of Richter's gear at any forge, so long as there's an Amulet of Arkay in your inventory and you have the perk to craft Steel Plate.
And for those of you who picked up the torn journal page in the Pit of Rejects, Falion will have a minor branch of dialogue "addressing" it. Ever mysterious, that guy.
That should be everything.
Thank you for playing! Also you didn't beat the mod until you endorse it.
I don't make the rules, sorry :)
Spells:
Three main forms of magic can be found in Gravewind:
Spoiler:
Scarlet Lightning:
A form of lightning magic themed around life and health.
Heavy Fire:
A form of weighted fire magic.
Shadow:
A type of magic in which the caster directly manipulates the lifeforces of both the target and the caster.
As well as the following Conjuration/other spells:
Show
Scarlet Lightning:
A form of lightning magic themed around life and health.
Spoiler:
Show
Spark of Life - A red lightning bolt that absorbs the caster's health to heal the target, regardless of whether they are living or undead.
Scarlet Shock - A red lightning bolt that absorbs the target's health.
Scarlet Cloak - A cloak of bright red lightning that absorbs the health of all nearby targets.
Lifesurge - Runs a stream of Scarlet Lightning through your veins, completely restoring your health once a day.
Scarlet Shock - A red lightning bolt that absorbs the target's health.
Scarlet Cloak - A cloak of bright red lightning that absorbs the health of all nearby targets.
Lifesurge - Runs a stream of Scarlet Lightning through your veins, completely restoring your health once a day.
Heavy Fire:
A form of weighted fire magic.
Spoiler:
Show
Heavy Flame - A weighted ball of fire that falls at an angle and does increased damage to undead.
Overbearing Flames - A flame cloak that massively decreases movement speed, but does more damage than the ordinary flame cloak.
Overbearing Flames - A flame cloak that massively decreases movement speed, but does more damage than the ordinary flame cloak.
Shadow:
A type of magic in which the caster directly manipulates the lifeforces of both the target and the caster.
Spoiler:
Show
Expel Shade - Expels a ball of soul energy that has a chance to force the target to drop their weapon.
Expel Greater Spirit - Once a day, expel the spirit of a monster once captured by the Wraithmother, which will slowly deplete enemy health.
Grasp Soul - Hold the target in the air, at the cost of the player's defenses.
Gravewind Servant - A dark guardian circle that replenishes magicka, but absorbs the health of the player and all combative opponents within the circle.
Gravewind Wisp - Little guy :)
As well as the following Conjuration/other spells:
Spoiler:
Show
Conjure Walking Mound - Conjures the Walking Mound boss, who will vomit entire shades at opponents.
Conjure Shade - Conjures the defensively weak but offensively strong Shade.
Conjure Putrid Mass - Conjures the defensively strong but offensively weak Putrid Mass.
Infuse Ingredient - Converts ectoplasm to shadestuff and nightshade to scarlet nightshade.
Conjure Shade - Conjures the defensively weak but offensively strong Shade.
Conjure Putrid Mass - Conjures the defensively strong but offensively weak Putrid Mass.
Infuse Ingredient - Converts ectoplasm to shadestuff and nightshade to scarlet nightshade.
Console Port:
XB1 Gravewind