


Auriel's Dream - A Skyrim VR Overhaul Guide
1. Introduction
This modlist started as a manual modding guide but is now a Wabbajack auto installer. Follow these install steps to set up the modlist. You can find the old manual steps at the bottom of this page. Click the Discord image to join our server for chat and support.
A common question is "How is this modlist different from Vanilla SkyrimVR?". The very short answer to this is:
Difficulty: it's very near vanilla SkyrimVR.
Content: it has all the essential and popular VR mods.
Visually: it's much more vibrant and warm. The overall color profile can also be changed by the Sensorium ENB LUT option.
Gameplay: except adding VR mods, this mod does not default overhaul crafting, leveling, spells and so on.
Optional Content: This modlist does offer lots and lots of optional content that can be added without messing up the load order.
I also made this article to go more in-depth into how it is different.
Link to all the content (you can search for mods as well) See all mods here
Here are two videos, one showing some of the modlist visuals, the other is a full install video.
Small graphical trailer:
System Requirements
Minimum system requirements:
- Storage Space: 98 GB (rounded up)
- RAM: 32 GB (Or 16GB with a 20GB Windows page file)
- CPU: Intel Core i7-7700HQ, 4 cores at 2.80 GHz
- GPU: GTX 1660
2. Installation
Let us start the install process.
2.1 Prepare your PC for Wabbajack
Before you can install the modlist, you need to prepare your PC for the setup. This page shows you how.
2.2 Downloading and Installing Auriel's Dream
This page will take you through the process of downloading and installing the modlist.
2.3 Problems with Wabbajack
If you are having any issues with Wabbajack completing the installation, Check this page.
3. Optional steps to do after Auriel's Dream is installed
The game is now ready to launch. But you can make a few optional selections before booting.
3.1 Choose optional mods
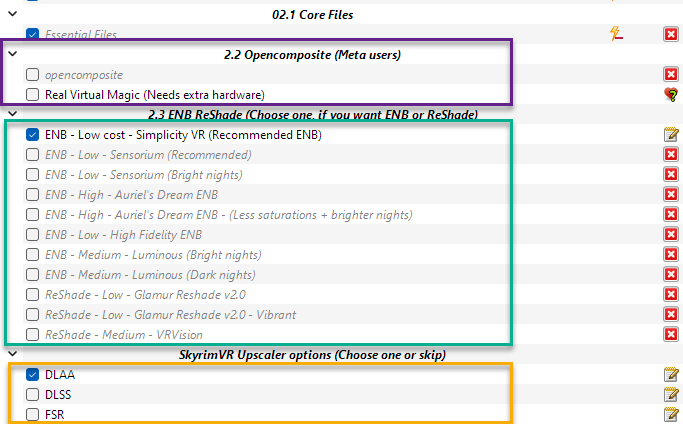
Mods in the top light blue category are all optional mods
Opencomposite is recommended. It also now works with Virtual Desktop. This option gives you a huge performance boost.
ReShade is a visual improvement, but it cost some FPS. May also not look too great in fos, mist, dust scenes.
Upscaler is also kind of recommended. Choose one.
DLAA cost more FPS but also removes pretty much all shimmer in the game. Need RTX graphics card.
DLSS gives a performance boost but lowers the visual quality a little. Also removes shimmer. Need RTX graphics card.
FSR works for both AMD and Nvidia cards. Applies foveated rendering, boosting performance by reducing the resolution of stuff that is not in the center of the lenses.
This modlist comes with several optional mods that can be activated at will to change the gameplay in small or big ways.
This page will cover what you need to know about the optional mods in Auriel's Dream.
3.2 Optional Game Modes
Auriel's Dream comes with 3 different game modes. Survival Mode, Hard Mode and Classes. These are all compatible with eachother and change the gameplay in a major way.
- Survival Mode
Lets you make camps anywhere, but you also need to eat, drink, rest and stay warm - Hard Mode
Makes the game significantly harder - Classes
Choosing a class will restrict what you can master.
DO NOT RUN LOOT! Every time you run LOOT a kitten dies and we cry in the corner. The load order is exactly as it should be, do not change it.
4. How to start up Auriel's Dream
Head over to the installation folder and locate an executable named `ModOrganizer.exe` and launch it. Once it's launched there will be a dropdown box on the top right and a big run button next to it. Ensure it is set to "Play" by selecting it in the dropdown box and then hitting the run button.

4.1.1 Setup VRIK
Setting up VIRK is important. The first thing you do when you launch the game is to go to "Powers" and choose the spell "VRIK Calibration". Cast this, and choose "VR Scale". This will make sure your hands/head are not floating all over the place.
4.1.2 Controller Bindings
This page
Setup Weapon Holsters & Gestures
I made these 2 videos for VRIK Holsters and Gestures
In the first video, you learn how you can attach weapons to your avatar body in VR. Meaning you can grab a bow from your back, a sword from your hip and so on.
In the second video, you learn how to set up Gestures. Gestures are VERY powerful in VR. By making hand gestures you can instantly equip a spell, weapon or even armor. You can instantly cast spells by waving your hand or consume potions. Playing this way allows you to avoid opening the menu too frequently.
5. Performance / Quality Guide
This page will help you out if you have performance issues or if you want to try and improve the visual quality.
6. Updating
6.1 The update syntax
Auriel's Dream follows a versioning syntax that explains if an update is save file compatible or not. As an example, version 8.0.3, you see three different numbers. The first number, 8, is increased on major list changes. If this number has increased compared to the version you are on, then the update is not save file compatible for you. The second number, 0, is increased for minor updates, but this update is also not save file compatible. The last number, 3, increases on minor updates that are save file compatible. If this Modlist receives an update please check the Changelog before doing anything. Always backup your saves or start a new game after updating.
6.2 What happens if I have installed any mods myself, and then I try to update the modlist?
Wabbajack will delete all files that are not part of the Modlist when updating!
This means that any additional mods you have installed on top of the Modlist will be deleted. Your downloads folder will not be touched. To get around this, you can rename the mods you wish to keep, by adding a prefix to the name "[NoDelete] ". This way WJ will not delete your mods. Keep in mind that there is no official support if you change the modlist. Updating is like installing. You only have to make sure that you select the same path and tick the _overwrite existing Modlist_ button.
Custom profiles are also deleted. You should back up these if you made one.
7. Removing the Modlist
You can remove the MO2 folder and be done with it.
0 comments