


To be honest, some of the BodySlide made for another Mods look better than some of my BodySlide or at least are better for your body type. Of course you can convert my "COCO BodySlide" if is matter of body types but usually that cause some deformations on the hairs for some slider values that can be corrected but is annoying event with the knowledge.
But you can't just use another BodySlide of another mod for 2 main reasons:
- The meshes (NIF files) in most of the cases have different address and names.
- The colors properties on those meshes aren't compatible with the NIOverride Tint function i use to set the hair color so in the best of the cases you won't get any change on the color while in the worst case the pubic hair will emit a glow so bright that won't let you see anything else.
With this method you will be able to convert any NIF file to make it compatible with my addons and use it as replacement for any of my pubic hairs.
Required Tools:
- BodySlide and Outfit Studio
- NifSkope [ Download ]
- SSE NIF Optimizer or the Cathedral Assets Optimizer.
Conversion Steps:
- Install on your mod manager (Vortex, MO2, ...), the BodySlide of the Mod you want to convert. For example the Simple Pubic Hair for Bodyslide - 3D Mesh CBBE Pubes
- Go and open in the explorer the folder where is the base NIF file you want to convert. For the current example is "\CalienteTools\BodySlide\ShapeData\Simple Pubes\"
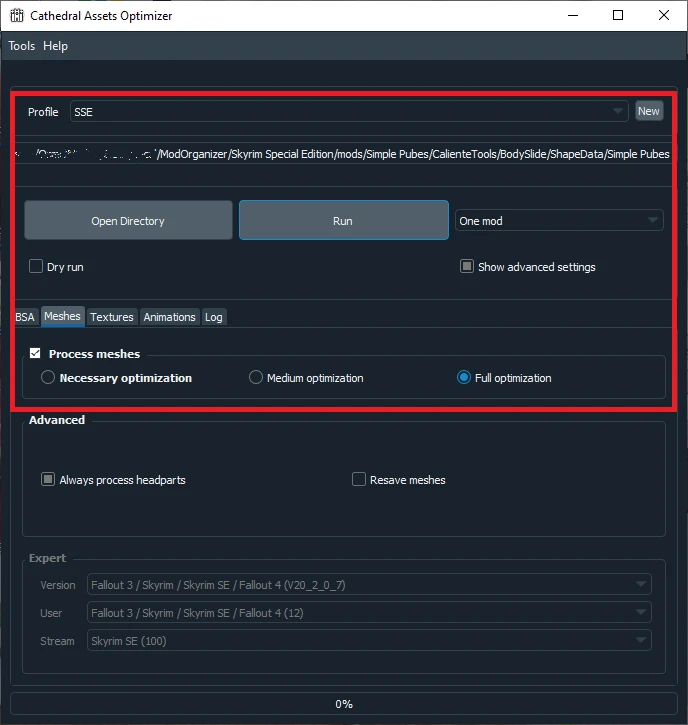
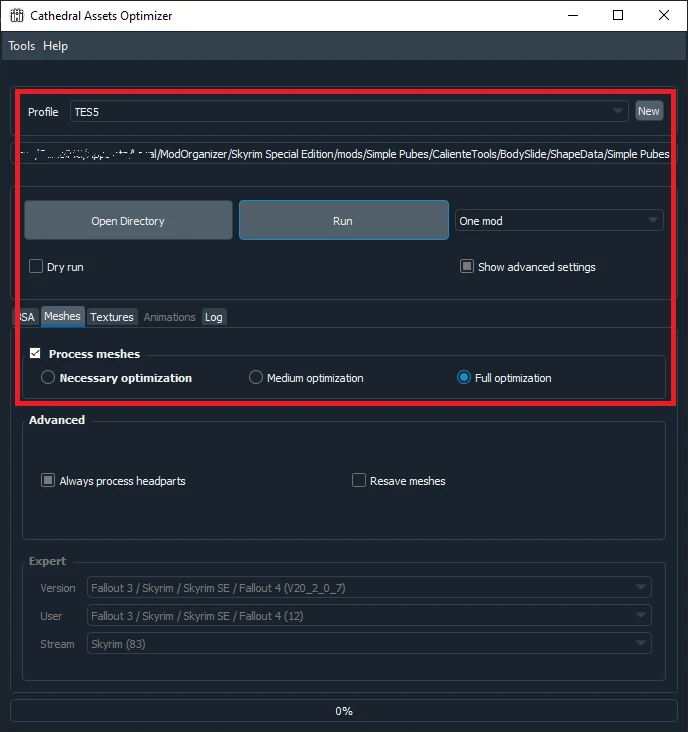
- Open the same folder "\CalienteTools\BodySlide\ShapeData\Simple Pubes" and Optimize or Run it with the "SSE NIF Optimizer" or the "Cathedral Assets Optimizer" to make sure of have the NIF file Fully Optimized for SE before the next step . Like in the ScreenShot01 or ScreenShot02. Otherwise you probably won't be able to find the BSTriShape on the step 5.
- Open the NIF file there with the NifSkope. For the current example is "Simple Pubes.nif"
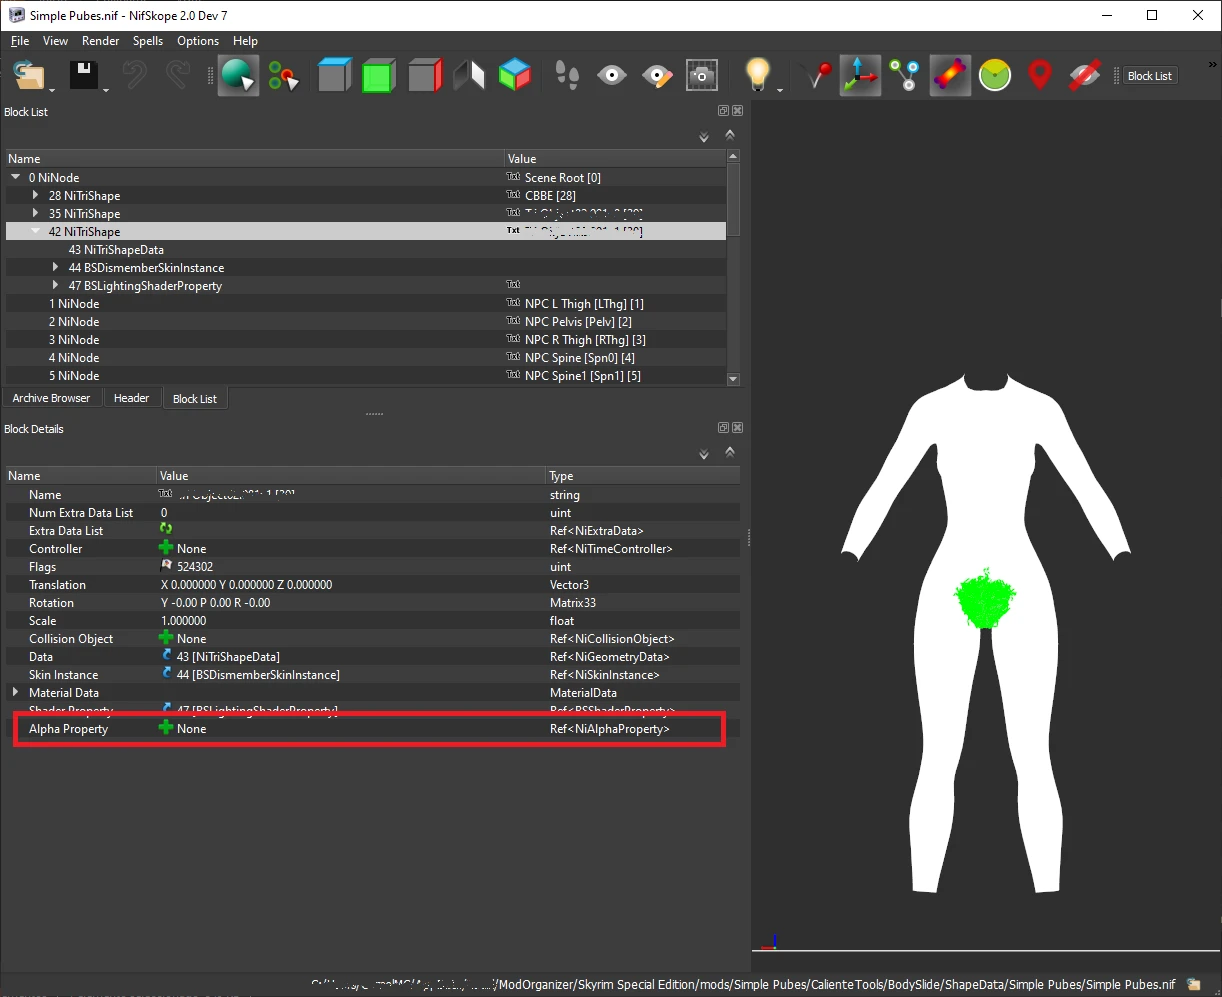
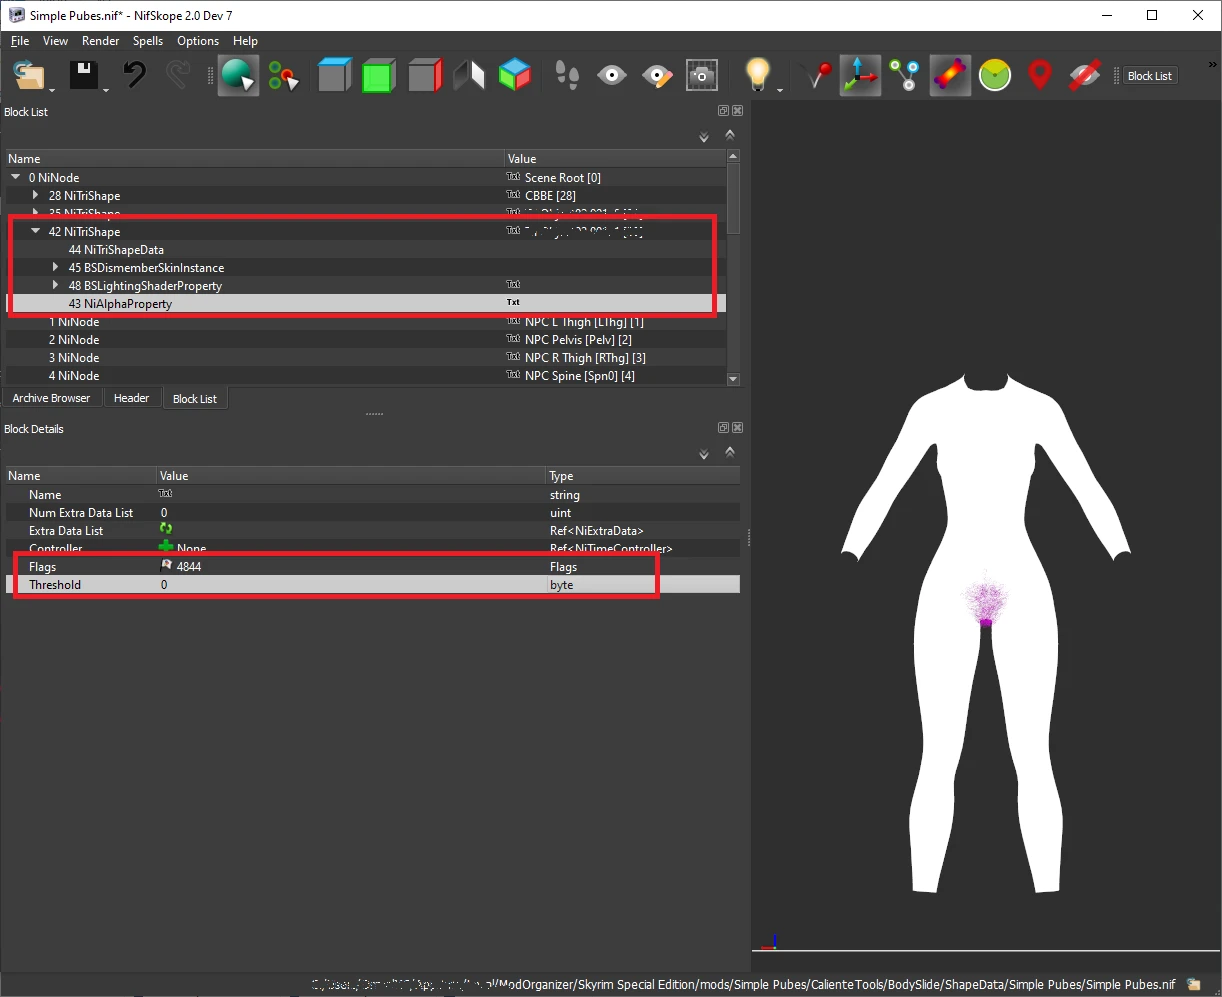
- Select the BSTriShape of the hair which name don't matter. While is selected the pubic hair will be Green like in the ScreenShot03.
- Make Double Click over it's "Flags" option and set it to "524302" like in the ScreenShot03.
- Make Right Click over it's "Vertex Desc" option and select "Vertex Flags" on the menu, to set it to "Vertex|UVs|Normals|Tangents|Colors|Skinned" like in the ScreenShot03.
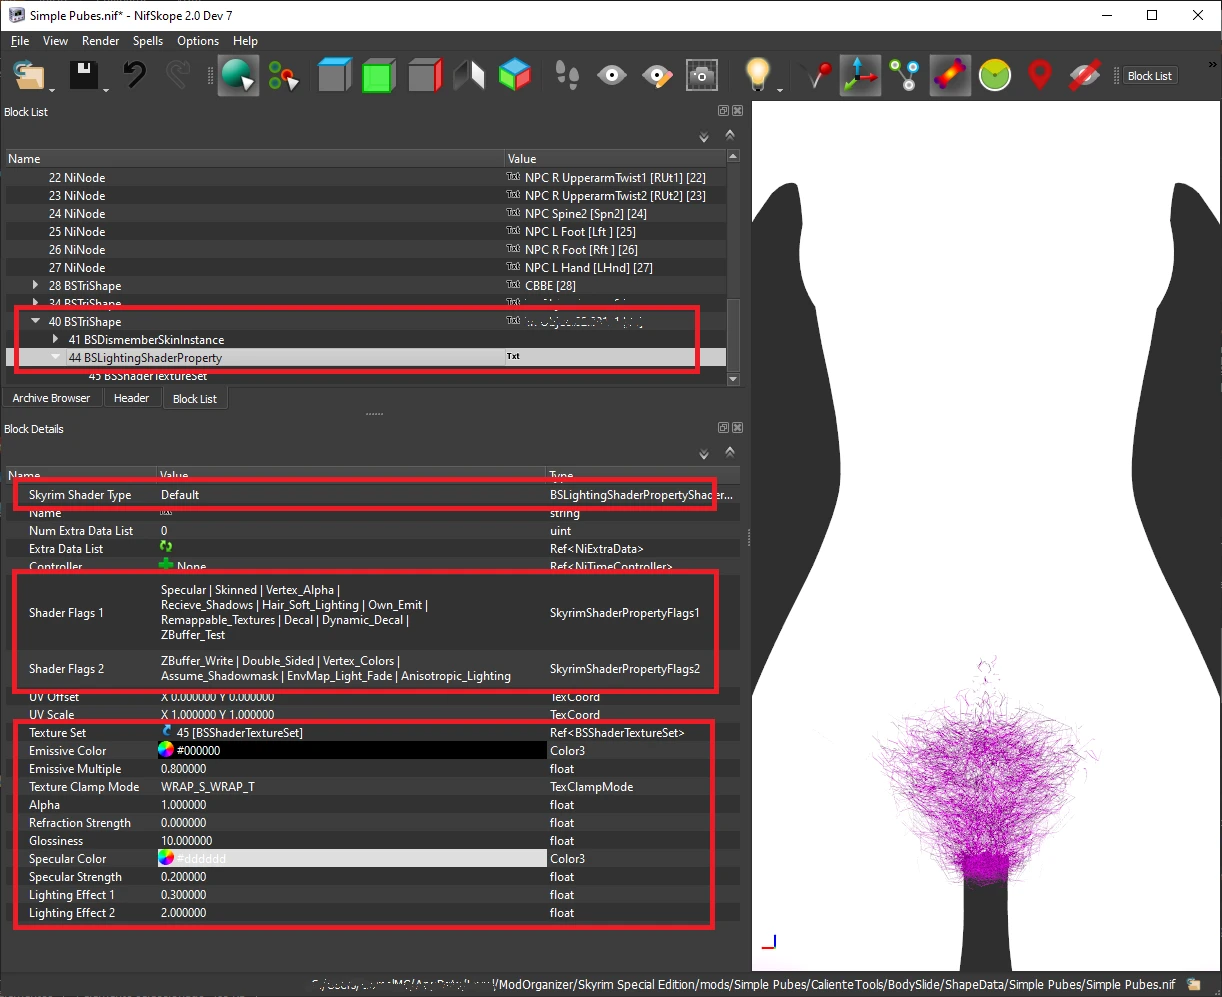
- Select the BSLightingShadeProperty inside the BSTriShape of the hair and set the value of it's options like in the ScreenShot04. By the way the Specular Color is "DDDDDD" that is like said R 0.870, G 0.870, B 0.870 if you edit it making Double Click over the value. I usually open one of my hair meshes and with both open side by side, use the Ctrl+C and Ctrl+V to copy - paste the options from my hair and avoid me some work.
- Save the NIF file and then Close it.
- Open the same folder "\CalienteTools\BodySlide\ShapeData\Simple Pubes" and Optimize or Run it with the "SSE NIF Optimizer" or the "Cathedral Assets Optimizer" to make sure of have the NIF file Optimized for Skyrim LE before the next step . Like in the ScreenShot05 or ScreenShot06. To allow you edit some options that are only possible on the NiTriShapeData of the Skyrim LE.
- Open again the NIF file with the NifSkope. That now should be compatible with LE and between other things have NiTriShape's instead of BSTriShape's
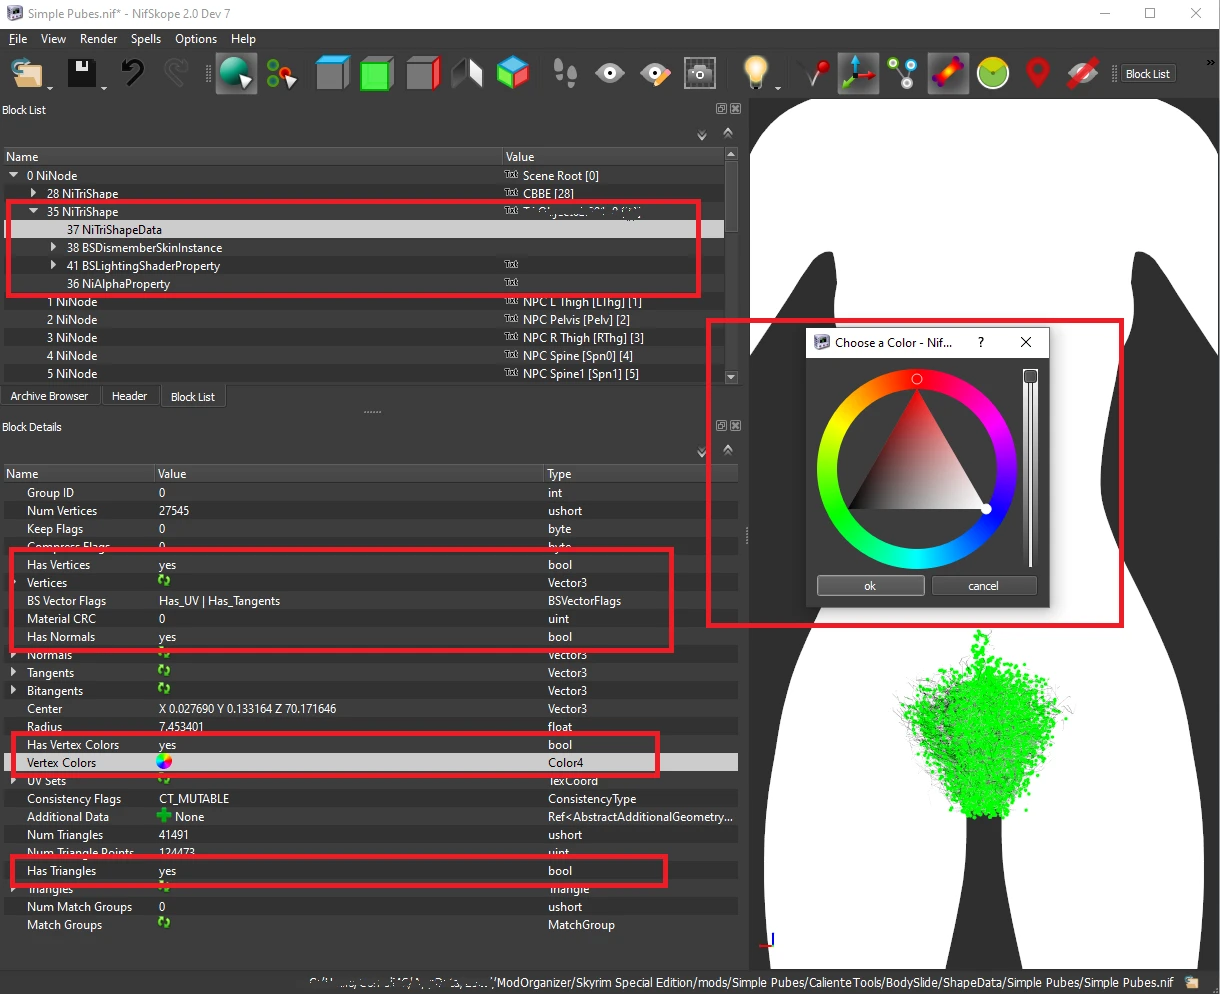
- Select the NiTriShadeData inside of the now NiTriShape of the pubic hair and like in the ScreenShot07, make Right Click over it's "Alpha Property" and select the "Attach" or "Follow Link" on the menu, to add one NiAlphaProperty and go to it or just go to the NiAlphaProperty if was previously added.
- On the NiAlphaProperty of the pubic hair make sure of set it's "Threshold" option to 0 like in the ScreenShot08.
- Now return to the NiTriShadeData of the hair set it's options like in the ScreenShot09. The "Vertex Color" option will be accessible when the "Has Vertex Color" option be "Yes", then you should make Right Click over the main "Vertex Color" option and select "Color->Choose" on the menu to set it to white with the alpha at top like in the ScreenShot09. The "Vertex Color" should be now FFFFFFFF; if not you can try edit it again.
- Save the NIF file and Close it.
- Open the same folder "\CalienteTools\BodySlide\ShapeData\Simple Pubes" and Optimize or Run it with the "SSE NIF Optimizer" or the "Cathedral Assets Optimizer" to make sure of have the NIF file Fully Optimized for SE before the next step . Like in the ScreenShot01 or ScreenShot02.
- Open once more time the NIF file with the NifSkope and do again the steps 5 and 7 because probably the Optimization remove some vertex flag from the "Vertex Desc". Based on this probably the steps 9,10,11 and 14 don't be required but better go for the sure.
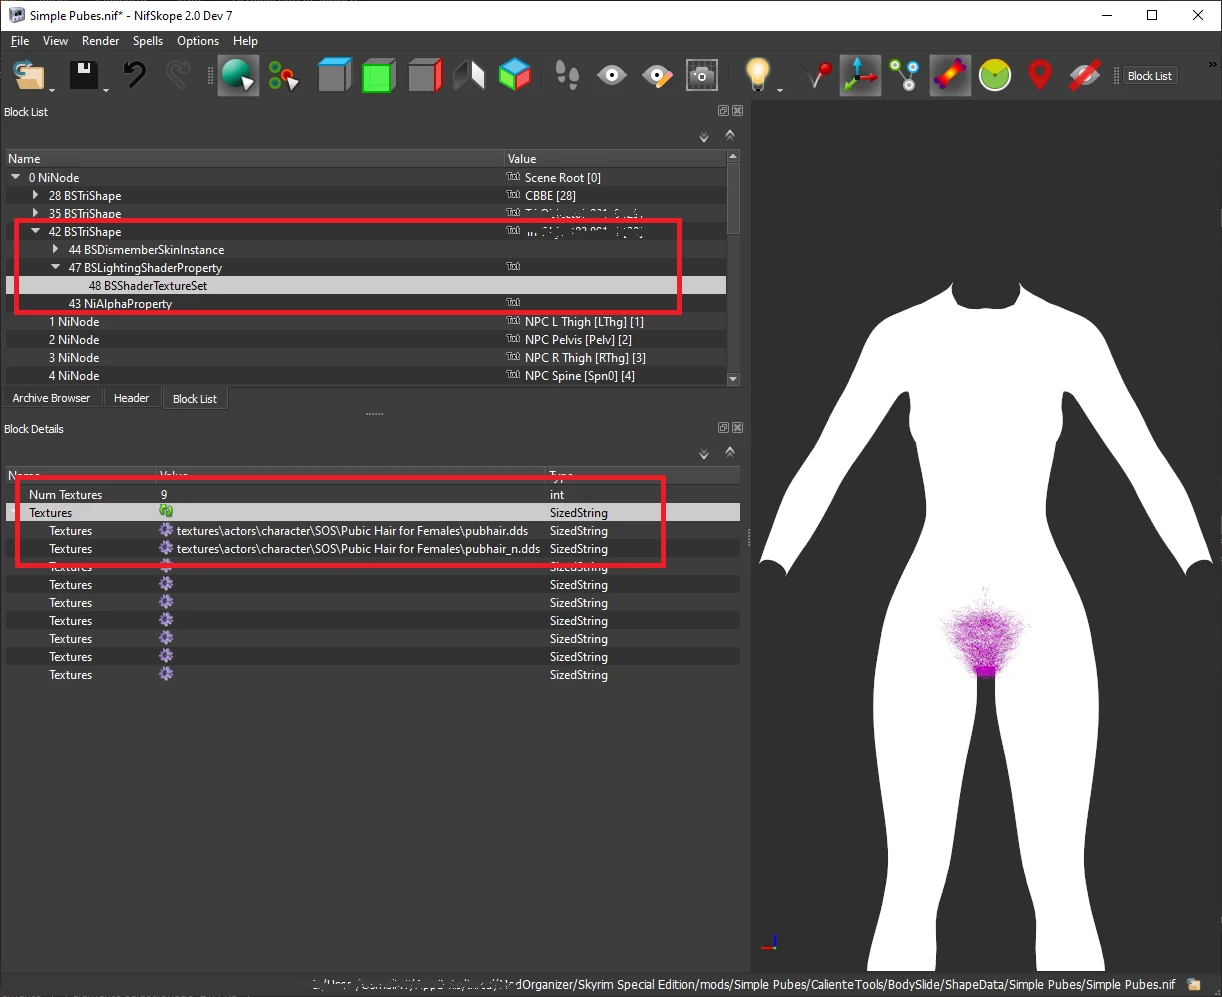
- Select the BSShaderTextureSet of the hair like in the top of the ScreenShot10 and set the first texture as "textures\actors\character\SOS\Pubic Hair for Females\pubhair.dds" and the second texture as "textures\actors\character\SOS\Pubic Hair for Females\pubhair_n.dds" with the "Num Textures" as 9 like in the ScreenShot10.
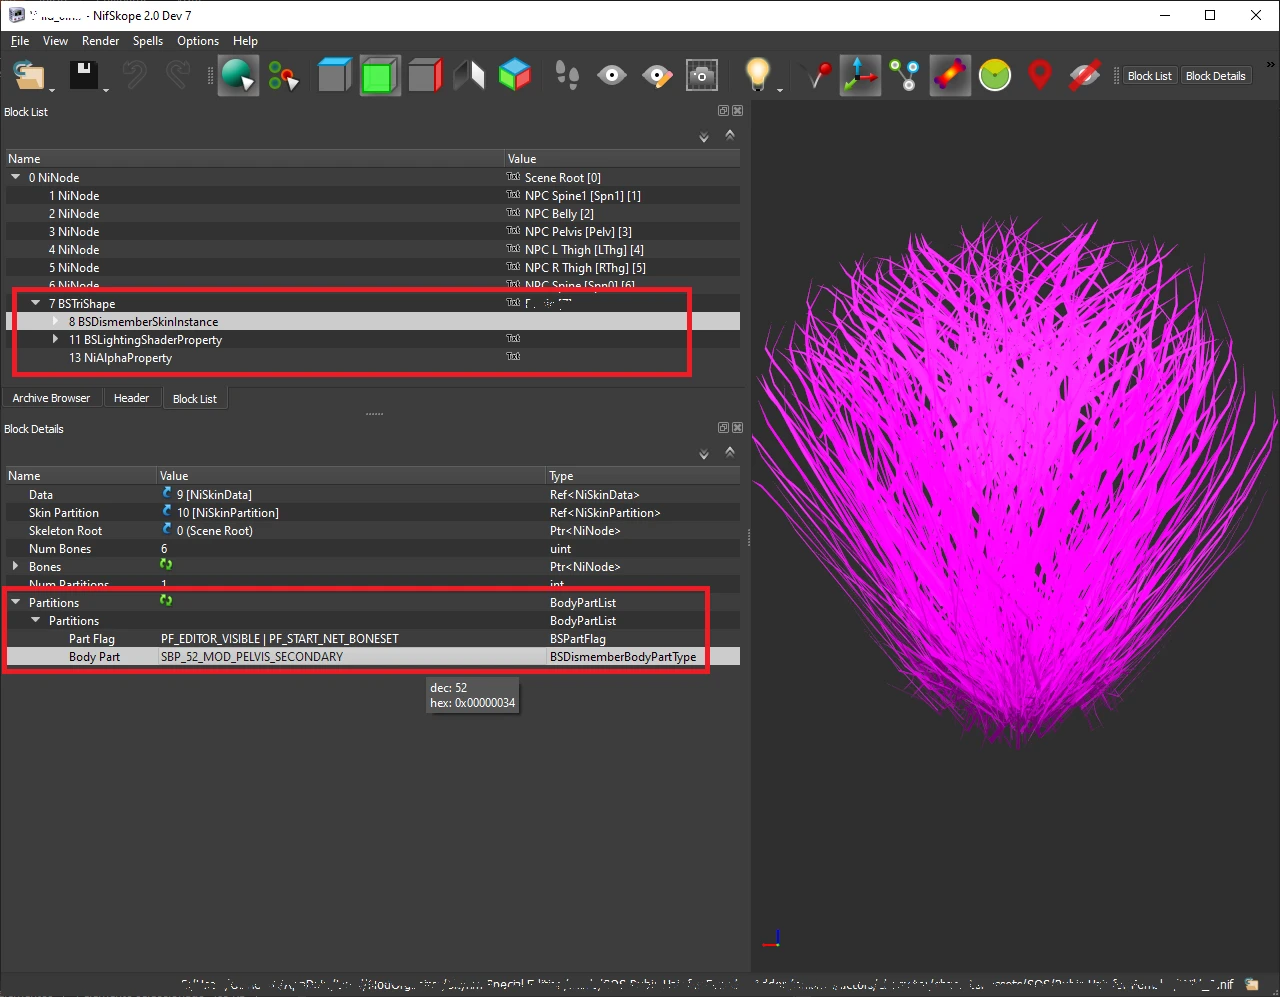
- Select the BSDismemberSkinInstance of the hair and set the "Body Part" option in it's "Partitions" options as "SBP_52_MOD_PELVIS_SECONDARY" like in the ScreenShot11.
- The BSTriShape of the hair is usually just one but in the case of this example are two, so you will have to repeat all the steps between the 4 and this, for the other BSTriShape or NiTriShape of the hair (only for the hairs since any other BSTriShape like the one of the body should be ignored at least for now)
- Save the NIF file and Close it.
- Open the SliderSet of this BodySlide on the Outfit Studio to edit the last things. The SliderSet should be one of the files on the folder "\CalienteTools\BodySlide\SliderSets"
- To open this BodySlide on the Outfit Studio first make sure that is enable on your mod manager (Vortex, MO2, ...) and execute the "BodySlide x64" through your mod manager (Vortex, MO2, ...)
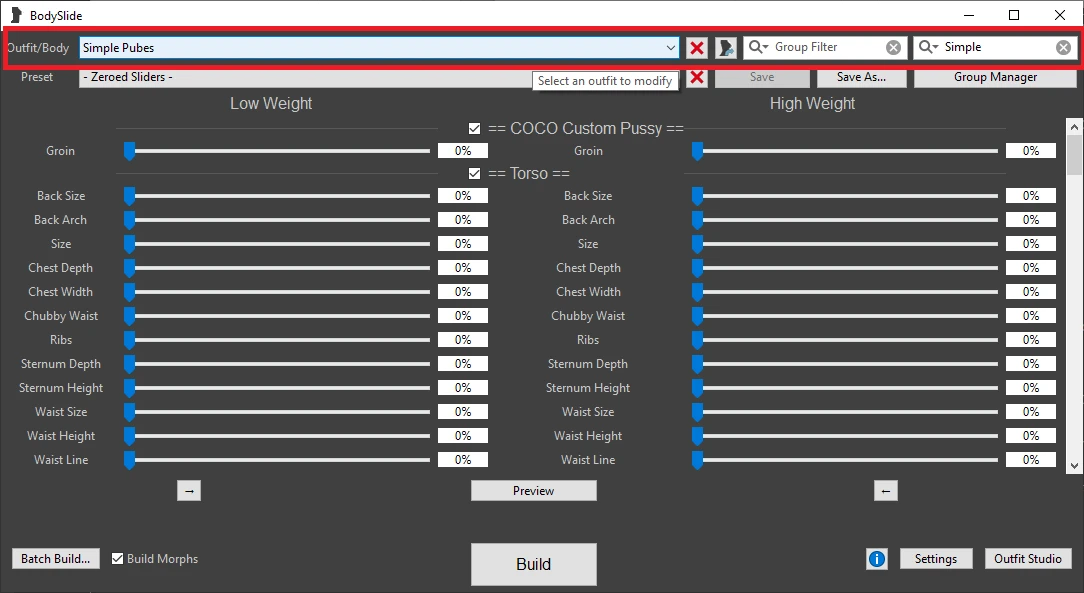
- On the BodySlide go to the Filter text box at your top-right of the window and start to write the name of the SliderSet to edit. For this example is enough with write "Simple" like in the ScreenShot12.
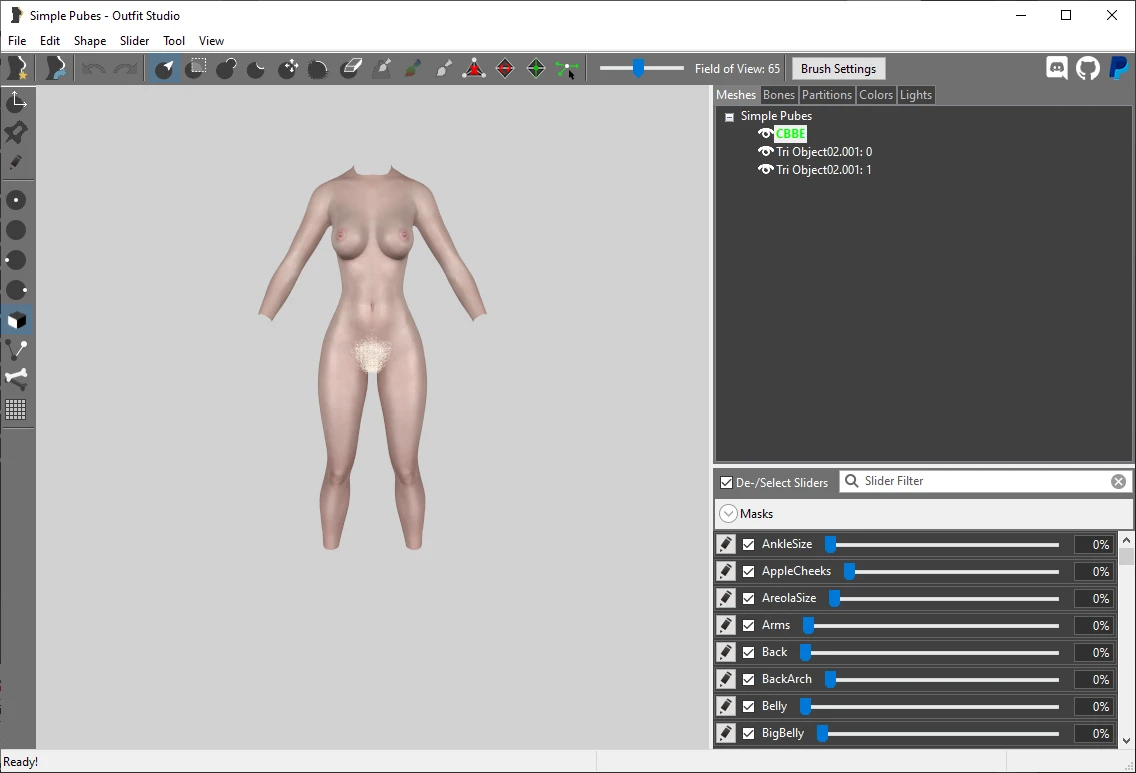
- Select it on the selection box of your top-left of the BodySlide window like in the ScreenShot12 and make Click on the button of your top-center that will open the current project on the Outfit Studio like in the ScreenShot13.

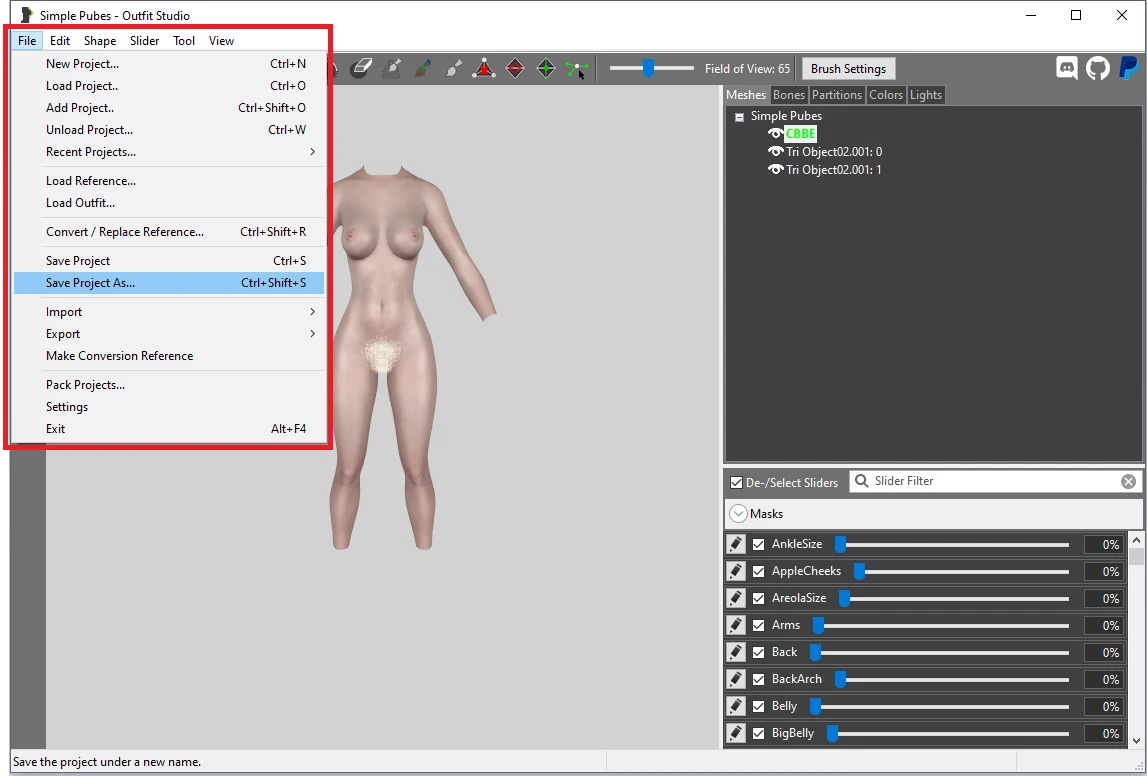
- Now with the project open on the Outfit Studio go to the menu File on the menu bar of the top of the Outfit Studio window and select the option "Save Project As..." like in the ScreenShot14.
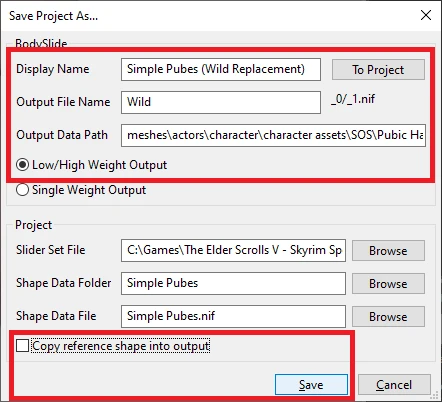
- On the "Save Project As..." window change the values like in the ScreenShot15. Were:
- The "Display Name" should include the name of the hair that will be replacing. In this example is " (Wild Replacement)"
- The "Output File Name" have to be one of my hair meshes that for the Female Addon are "Bush, Bushy, Hart, Landing_Strip, Neet_Trim, Sparse_Bush, Strip, Untamed, Very_Bushy, Very_Small_Strip and Wild". In this example is "Wild" that is the one that locks more like this one.
- The "Output Data Path" is "meshes\actors\character\character assets\SOS\Pubic Hair for Females" because is where are the pre builded meshes of the Female Addon.
- The option "Low/High Weight Output" need to be toggled ON.
- The option "Copy reference shape into output" should be disabled to remove the Body meshes used as reference if exist.
- Once saved the Project, Close the Outfit Studio and th BodySlide to open the BodySlide again and be able to see the new "Sample Pubes (Wild Replacement)" like you name it.
- Now you can Build it.
Screenshot Gallery:
ScreenShot01:
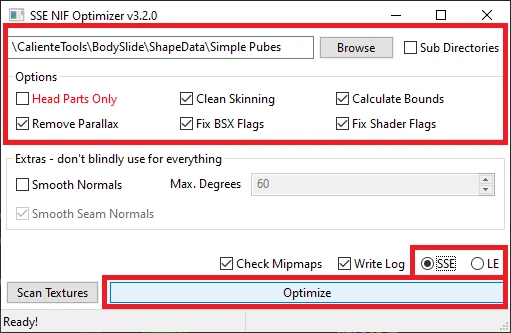
ScreenShot02:
ScreenShot03:

ScreenShot04:
ScreenShot05:
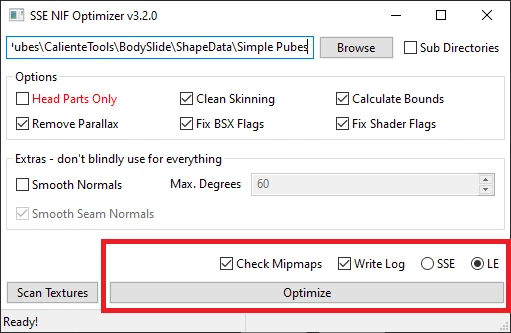
ScreenShot06:
ScreenShot07:
ScreenShot08:
ScreenShot09:
ScreenShot10:
ScreenShot11:
ScreenShot12:
ScreenShot13:
ScreenShot14:
ScreenShot15:
The End
0 comments