


0 of 0


About this mod
This tutorial will show you how to add LINK++ support to your mod as well as provide ready mod template that can be used as a starter for your new mods.
- Requirements
- Permissions and credits
- Changelogs
Overview
This was originally intended as a tutorial on how to add LINK++ support for your mod, but ended up being something bigger. I believe that a small piece of code is worth a thousand words, so most of the tutorial is implemented as a mod. This page only touches the surface. This mod, in addition to being an example of how to add LINK++ support, is also a template that can be used as a starter for new mods (and which I plan to use as the basis for my future mods). This template provides a solid architectural basis for easily adding new features and modifying existing ones. The code is very carefully commented. I also do not consider myself an absolute pro in Oblivion scripting and do not claim that all the solutions presented in the code are the most optimal and the only correct. If you find a bug, or think that some part is implemented incorrectly/not optimally, feel free to share your thoughts. Contents.
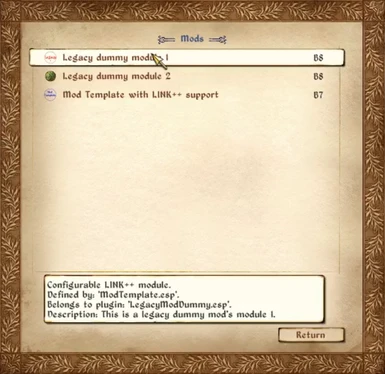
BAIN archive contains 2 modules: - 00_CORE - contains a mod template that implements LINK++ support, as well as a dummy legacy mod for which it is shown how to add LINK++ support externally.
- 01_MENU_INTEGRATION_DEMO - contains an example of using LINK++ API to integrate LINK++ menus into other mods.
General description
As stated in LINK++ mod page, it's fully compatible with mods with original LINK support. Thus, if you don't want to use any LINK++ specific features, you can refer to LINK's documentation and add support for LINK++ in your mod the same way as you would do it for regular LINK. If you want to use LINK++ features however, you'll need to understand some basics of how it works first. Before that, I'll shortly explain how original LINK works for those who don't know:- It creates a list of all loaded mods.
- Takes each mod's filename without extension and looks up a .cfg for that mod by following paths: "Data\<modName>.cfg", "Data\ini\<modName>.cfg" and "Data\cfg\<modName>.cfg".
- If .cfg file is present in any of those places, the mod is considered configurable, otherwise not.
- When you click on mod's entry in mods list menu, if it's configurable, LINK will read its .cfg file and build config menu from it.
- When you press "Defaults" button in mod's config menu, it'll search for mod's ini file by following paths: "Data\<modName>.ini" and "Data\ini\<modName>.ini". If it finds one, it runs it to set default values. Otherwise, it silently ignores it.
- Instead of just mods, LINK++ operates with an abstraction that I called just "module". A module is a logically isolated part of mod. Most mods will contain just one module, but some can contain multiple. This allows to define multiple configuration menus for single mod. Also, mods with LINK++ support can be merged together and the resulted mod will contain all of their modules, and thus each of merged mods would still be configurable with LINK++.
- Before scanning all loaded mods, it dispatches "LppModInfoRequest" event. All mods that are supposed to add LINK++ configuration menus must handle this event and dispatch an "LppModInfoResponse" event in response. Data send in this event must contain a list of modules configurations. Those configurations includes such data as: module's display name, path to .cfg file, paths to .ini files, path to custom icon, etc. You can find a full list in Mod Template's code. Some of them are optional.
- When it processes a list of loaded mods, it checks if anyone send a LINK++ configurations for each mod. If that's the case, it'll use that configurations and create entries for each defined module, otherwise it'll convert this mod to a single module and process it the same way as original LINK.
- When clicking on module's entry in modules list menu, if it's a LINK++ module, the .cfg defined in "LppModInfoResponse" will be used, otherwise, will be searched in the same locations where LINK search for them.
- When pressing "Defaults" button, it will run all .ini files specified for module in "LppModInfoResponse" (or .ini file from the paths where original LINK searches for them, if it's original LINK's module). If none was specified, this button will not even appear.
So in short, in order to add LINK++ support for you mod, you must:
- Define .cfg file and optionally any amount of .ini files for each of your modules.
- In your mod's initialization code check if LINK++ installed, if that's the case, read your ini files only once on first initialization and set up "LppModInfoResponse" event handler. Otherwise, handle configurations manually as you would do it without LINK/LINK++.
- In "LppModInfoResponse" handler respond with all necessary info about your mod.
All of this already implemented in ModTemplate.esp, you can just use it as a starter. More on that below.
CFG files
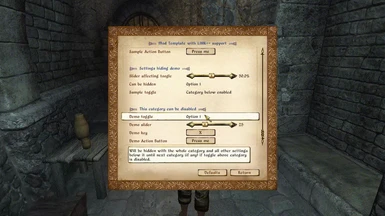
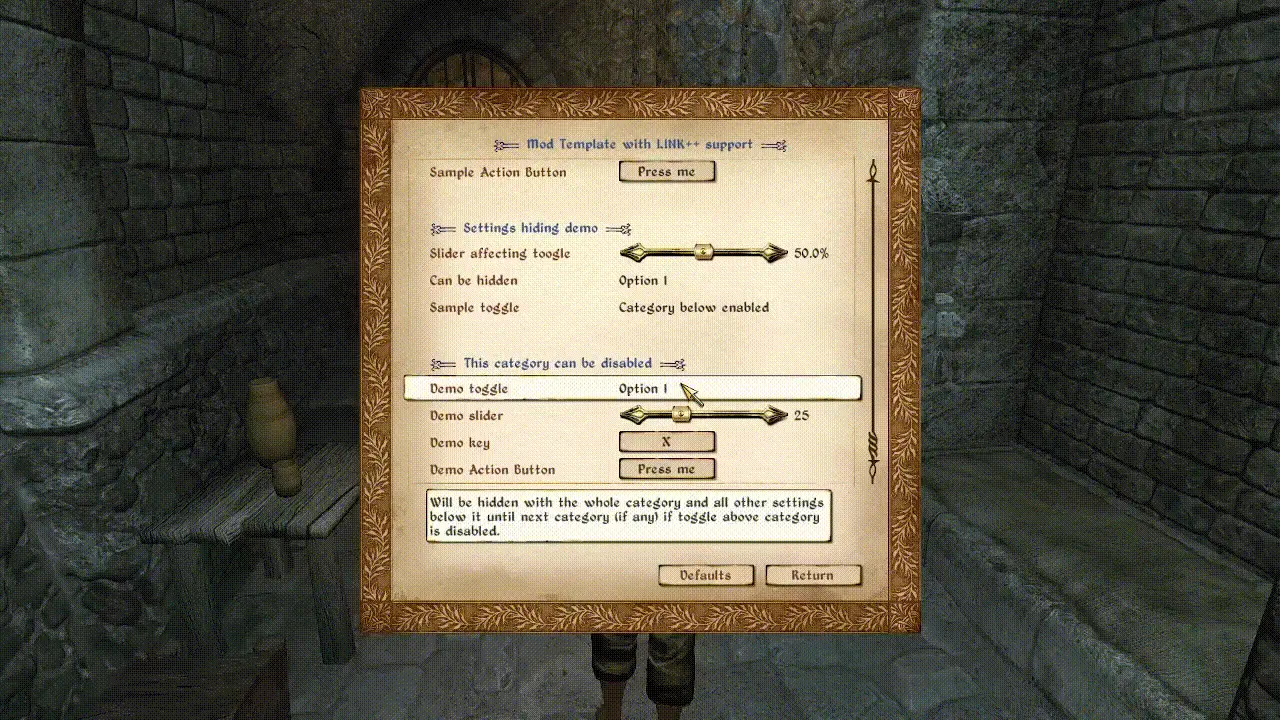
As mentioned above, both LINK and LINK++ use .cfg files to describe configurations. Each entry in .cfg file defines a specific module's menu setting. In addition to LINK's 5 setting types (toggles, sliders, keys, categories and undocumented empty lines) LINK++ adds a new one: action button.Toggles.
Toggle defines a setting that can take a fixed set of numeric values (basically a enum). This is how it looks in menu:

When pressing on option's value, it'll cycle to next available value. Here is a code example of how to define the above toggle in .cfg file:
Spoiler:
Show
    ; Sample toggle setting.
Set LINK.cfg_setting_name to sv_Construct "ModTemplate.sample_toggle_setting" ; Name of the underlying variable of this setting.
    Set LINK.cfg_setting_description to sv_Construct "Sample toggle setting description." ; Description that will be displayed on mousover.
    Set LINK.cfg_setting_title to sv_Construct "Sample toggle" ; Name on the left part of the setting
    Set LINK.cfg_setting_type to LINK.SETTING_TYPE_TOGGLE ; Setting type. It's recommended to use constants for them.
    Set LINK.cfg_setting_options to 2 ; Number of available values for this toggle.
    Set LINK.cfg_setting_option1_value to ModTemplate.SAMPLE_TOGGLE_OPTION1 ; Underlying value of the first option.
    Set LINK.cfg_setting_option2_value to ModTemplate.SAMPLE_TOGGLE_OPTION2 ; Underlying value of the second option.
    Set LINK.cfg_setting_option1_description to sv_Construct "Option 1" ; Display name of the first option
    Set LINK.cfg_setting_option2_description to sv_Construct "Option 2" ; Display name of the second option
    SetStage LINK 10 ; This line needed to register setting specified above.
Sliders.
Slider defines a setting that can take a specified range of numeric values. This is how it looks in menu:

You can move slider to change that setting. Here is a code example of how to define the above slider in .cfg file:
Spoiler:
Show
; Sample slider setting.
    ; First 4 configurations are the same as for toggle.
    Set LINK.cfg_setting_name to sv_Construct "ModTemplate.sample_slider_setting" ; --//--
    Set LINK.cfg_setting_description to sv_Construct "Sample slider setting description." ; --//--
    Set LINK.cfg_setting_title to sv_Construct "Sample slider" ; --//--
    Set LINK.cfg_setting_type to LINK.SETTING_TYPE_SLIDER ; Slider
    Set LINK.cfg_setting_decimals to 0 ; You can use this setting to specify how many decimals after dot to allow to configure. Currently supported max value is 3.
    Set LINK.cfg_setting_percent to 0 ; You can use this setting to specify whether to show '%' sign with your slider value or not.
    Set LINK.cfg_setting_min to 0 ; the value of this setting corresponding to slider's leftmost position.
    Set LINK.cfg_setting_max to 10 ; the value of this setting corresponding to slider's rightmost position.
    Set LINK.cfg_setting_step to 1 ; For how much one slider's step will change this option.
    SetStage LINK 10
Key binding.
Key binding defines a setting that can take any DirectX key's code value. This is how it looks in menu:

The mapped name of currently selected key is displayed on button. After pressing that button you can press any key to select a new value for that setting. Here is a code example of how to define the above key setting in .cfg file:
Spoiler:
Show
; Sample Key
    set LINK.cfg_setting_name to sv_Construct "ModTemplate.sample_key_setting" ; --//--
    set LINK.cfg_setting_description to sv_Construct "Sample key setting description." ; --//--
    set LINK.cfg_setting_title to sv_Construct "Sample key" ; --//--
    set LINK.cfg_setting_type to LINK.SETTING_TYPE_KEY ; --//--
    SetStage LINK 10
Action button.
Unlike many other settings, action buttons doesn't have any underlying variables. Instead, they can invoke any specified script upon pressing. You can look into ModTemplate's code to understand how you can define handlers for action buttons. This is how it looks in menu:

Keep in mind that action button settings are currently not exportable, so it's better not to use them for making changes that will be expected by user to be exportable. I may change that in later updates. Here is a code example of how to define the above action button in .cfg file:
Spoiler:
Show
; Sample Action button
    Set LINK.cfg_setting_description to sv_Construct "Sample action button setting description." ; --//--
    Set LINK.cfg_setting_title to sv_Construct "Sample Action Button" ; --//--
Set LINK.cfg_setting_action_button_name To sv_Construct "Press me" ; Text that will be displayed on button. Shouldn't be more than 6-8 symbols, otherwise will go outside button's boundaries.
Set LINK.cfg_setting_type to LINK.SETTING_TYPE_ACTION_BUTTON ; --//--
Set LINK.cfg_setting_action_button_handler To sv_Construct "sayHelloNTimes" ; Id of handler that will be invoked on button press. More info in comments in ModTemplateOnLppModInfoRequest and ModTemplateSayHelloNTimes scripts.
Set LINK.cfg_setting_action_button_args To sv_Construct "${ModTemplate.sample_slider_setting}:Num,I don't know you and I don't care to know you.:Str" ; Arguments that will be passed to handler. See ModTemplateSayHelloNTimes for more info.
    SetStage LINK 10
Category.
Unlike many other settings, categories doesn't have any underlying variables. In fact they don't configure anything at all, they are just used to group multiple settings together. This is how it looks in menu:

Upon clicking on category, all settings below it until the end or next category will be hidden/revealed. If category is hidden by condition, all settings below it until the end or next category will be hidden as well. Here is a code example of how to define the above category in .cfg file:
Spoiler:
Show
; Category
Set LINK.cfg_setting_title to sv_Construct "Sample category" ; Category title. Use it to group your settings. When clicking on category, all settings under it will be hidden. When clicking again will be revealed.
Set LINK.cfg_setting_type to LINK.SETTING_TYPE_CATEGORY
SetStage LINK 10
Empty line.
This is actually an original LINK's undocumented setting type. It just adds empty line, can be useful to visually separate parts of configurations within category. This is how it looks in menu:
Here is a code example of how to define the empty line in .cfg file:
Spoiler:
Show
; NEW LINE
set LINK.cfg_setting_type to LINK.SETTING_TYPE_EMPTY_LINE
SetStage LINK 10
Conditions.
For any setting type it's possible to specify condition. If that condition returns 0, this setting will not be displayed in menu. Here is an example how to do it:
set LINK.cfg_setting_condition to sv_Construct "${ModTemplate.demo_slider} >= 50"
The visibility of settings will change in real time:
Spoiler:
Show
IMPORTANT NOTE: It's highly recommended NOT to place your .cfg files under locations where original LINK searches for them. The recommended location for .cfg files is "Data\ini\LPP\*.cfg". If you want your mod to use some of LINK++ features and yet work with both LINK and LINK++, you can do it, but it's recommended that .cfg file will be installed in different places depending on whether LINK or LINK++ is used. You can make a BAIN wizard that will check, for example, if "Data\LINK.cfg" is present (a file that is specific for original LINK), and if so, install module with LINK's .cfg file, otherwise with LINK++'s .cfg file.
Handling configurations request
As it was mentioned above, your mod must set handler that will receive LINK++ modules configuration request and respond to it. Here is an example of the most basic handler implementation:
scn OnLppModInfoRequest

Array_var args
Array_var response ; StringMap used as data structure that contains response to LINK++ request.
Array_var config ; Temporary StringMap that is used for building response. Response can contain any non-zero amount of configs.

begin function { args }
Let response := ar_Construct StringMap
Let response->configs := ar_Construct Array

Let config := ar_Construct StringMap
Let config->cfgPath := "Data\ini\LPP\<cfg_file_name>.cfg"
ar_Append response->configs config

; Send response to LINK++.
DispatchEvent "LppModInfoResponse" response
end
A more advanced example with full list of fields can be found in ModTemplate's code.
LINK++ expression language
LINK++ expression language is a small scripting language extension that is used for specifying settings conditions and action buttons handler arguments. Before explaining it I'll explain the problem it solves first. The thing is, LINK++ only applies configurations after pressing "Return" button in module's configuration menu. Until that, all setting's underlying variable values stays intact. But when you are specifying conditions for settings or arguments for action button's handler, you often want to use values that user configured in menu. For that purpose, LINK++ expression language is used. It's a bit different for conditions and arguments, but the idea is that if you want to use some variable "MyQuest.MyVar" that is configurable in current menu, instead of, e.g. writing"MyQuest.MyVar == 42"
in your condition, you'll write
"${MyQuest.MyVar} == 42"This will replace ${MyQuest.MyVar} with currently configured value in this menu. For action button arguments you'll also need to explicitely specify expression type, e.g.:
"${MyQuest.MyFloatVar}:Num,Sample text:Str"
You can find more info on that in ModTemplate's code.
Integrating LINK++ menus into your mod
LINK++ provides simple API for showing its menus programmatically. This can be useful, for example, for integrating your mod's options button directly into your mod's UI. There is an example of how you can do this in archive (LppMenuIntegrationDemo.esp). It demonstrates this feature with simple message box menus, but you can of course use it with generic menus as well.Module's list menu integration (filtered):
Module's config menu integration:
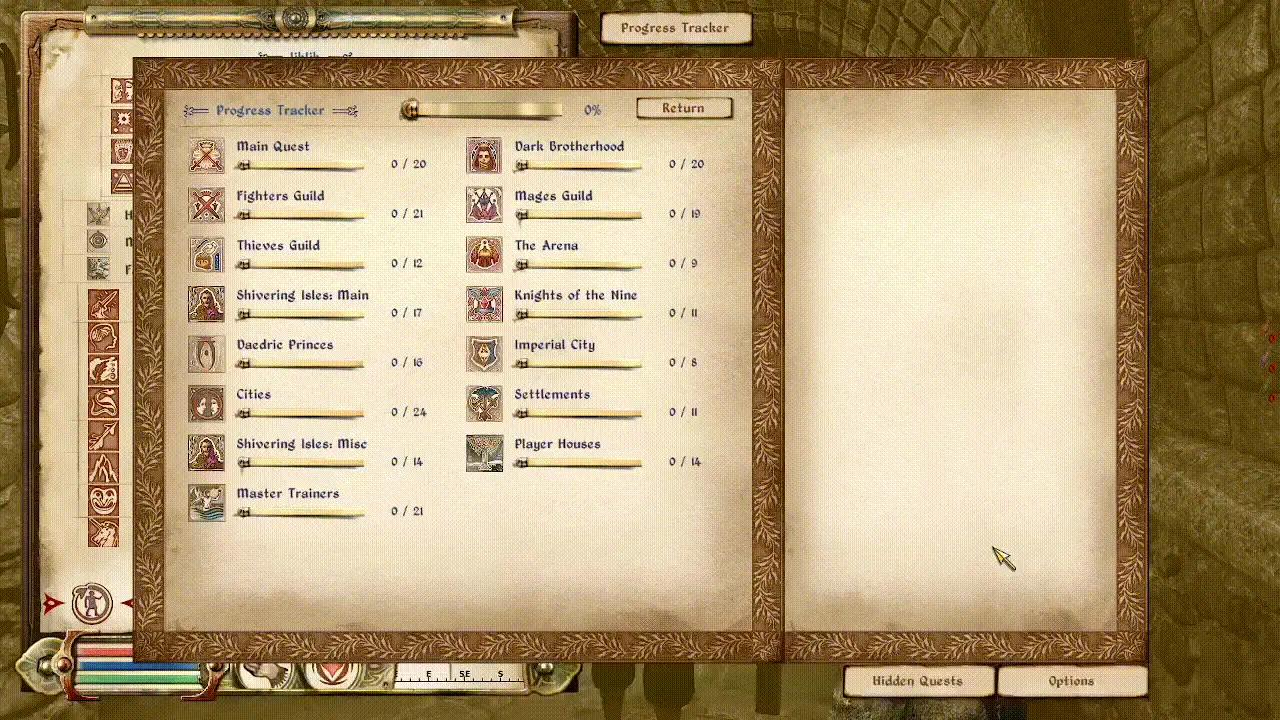
You can also see how Slowpard used it in his "Progress tracker" mod:
Troubleshooting
LINK++ adds many validations on all kinds of input data, so if you'll misuse something, you'll likely receive a notification about that. In order to get more info on what went wrong, you can also set LINK++ log level to debug or trace and enable batch scripts output either in LINK++ configuration menu, or in .ini file:Set LINK.logLevel To 0
Set LINK.suppressBatchScriptsOutput To 0
If batch scripts output is suppressed, all logs on all levels in scripts triggered by batch scripts (like reading .cfg files for example) will not appear.