Due to the description being too simple, I will be taking the liberty of completing it. The steps is actually so simple, it's better than using Special K imo. I cant use Special K because it clashes with my DSX (it emulates Dualshock 4/Xbox 360) since I owned a DualSense.
INSTRUCTIONS: 1. Download the latest ZIP of 3Dmigoto, in this case mine is 3Dmigoto-1.3.16.zip
2. Download the latest files of this mod, in this case mine is version 1.2
3. Extract both ZIP files of 3Dmigoto-1.3.16.zip and Replicant_PS_Buttons-8-1-2-1619838937.zip
4. Open Steam, go to Library -> Home then head over to your Nier Replicant and click it.
5. After opening Nier Replicant's Library Game Page,
click the Manage icon (resembling a Setting icon) -> Properties
then LOCAL FILES -> Browse...
* This will open a folder in your File Explorer, the path open in the File Explorer will resemble something like G:\Games\Steam\steamapps\common\NieR Replicant ver.1.22474487139 mine being G is because I install Nier Replicant in my G drive. Yours could be D, E or even C.
6. Open the x64 folder inside 3Dmigoto-1.3.16 folder then Select All and Copy everything of the content from this x64 folder
* Please don't mind the .zip, I'm just too lazy to extract it since I have already completed it
7. Head back to the folder that you have opened through Steam in STEP 5 then Paste it all inside that folder. It will resemble something like this:
* Note, it won't be 100% the same as me because the screenshot I showed you is the final result.
8. Now, open the Replicant_PS_Buttons folder. You can find it inside the Replicant_PS_Buttons-8-1-2-1619838937 folder
Select then Copy the ReplacementTextures folder
9. Paste it to the same folder as in the STEP 5, this is similar to what we did in STEP 7.
10. After we finished Pasting both of the content from the ZIP files we downloaded, we can now began to edit the d3dx.ini file. Began by opening the file in Notepad or Notepad+++. You can just simply Double-click it or Right-click -> Open With.
11. In Notepad+++, click Search -> Find... or CTRL+F and type hunting. Click Find Next until you found the hunting=0
Change the 1 hunting=1Into 0 hunting=0
If you are on Notepad, you can also search by clicking Edit -> Find or CTRL+F. Type hunting and hit enter until you find the hunting=1 then you can proceed to change it to hunting=0
12. Finally, scroll to the bottom of the file. Don't get confused, we are still inside the d3dx.ini file.
in my case, my final line is 1139. You can add a new line by hitting Enter
then add these codes to the bottom of the file [ResourcePSButtons] filename = ReplacementTextures\b8865b8c.dds
Then make sure to save your file by click the Save icon or CTRL+S
* this is a screenshot of Notepad+++
13. Done! You can now boot up the game and see the changes.
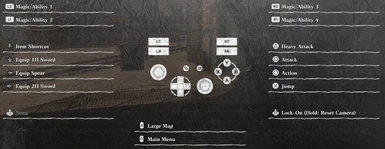
You can test it by opening Options in the Title Screen.
It will show a Playstation Prompt on top.
9-Nov-2022 1.0: Fixes some glitches contained in this post ("?" being everywhere) 1.1: Added some more images 1.2: Minor markup 1.3: Image reupload Old -> New
Thank you SO much! This really helped me. I had to download Notepad++ cause for some reason the game can't won't register the code "[ResourcePsButtons]" when using the regular notepad, and I had to make sure it looks exactly like yours.
Hey! Just a question. When a prompt to click on the Options button appears, the touchpad prompt appers instead. Is there a way to fix it? Cuz when I click on the touch pad, it shows the map.
Looking into this. I'm able to somewhat duplicate this but pinning it down is difficult. There are combinations of Steam Controller input (and disabling it) and/or the use of DS4Windows (or not) coupled with the 2 ways to setup Special K (dinput8.dll or dxgi.dll) Currently trying to figure out the myriad of combinations and what does and does not work.
Guess what I just found the cause of this issue after some years. It's so simple, the option and touch pad is inverted in the dds I believe cause within the button configuration I saw this two are exchanged.
Love the mod, but the directions are just god-awful. It's pretty bad when you have to go into the mod comments to get directions that actually make sense. It does work as of 9/14/2024 though!
1st: What exact folder does it go into for Steam installed copy of this game?
For example: C:\Program Files (x86)\Steam\steamapps\common\NieR Replicant ver.1.22474487139\
Do we copy the `ReplacementTextures` folder into there? Or some sub folder?
2nd: There is no d3dx.ini file in this folder. Where is it?
Or do we create it, and which specific folder does it go in?
NOTE: I read the description and it's ambiguous or incorrect for my use case.
There is no x64 folder under this path: - Extract and copy all contents of the x64 folder to the NieR Replicant ver.1.22474487139 folder
When I copy the `ReplacementTextures` to the steam install location, it doesn't do anything. C:\Program Files (x86)\Steam\steamapps\common\NieR Replicant ver.1.22474487139\
Edit, the other place it might be is under your user folder, e.g.: C:\Users\yourUserName\OneDrive\Documents\My Games\NieR Replicant ver.1.22474487139


60 comments
REQUIREMENTS:
1. 3Dmigoto
2. Replica PS Button Replacer Mod
INSTRUCTIONS:
1. Download the latest ZIP of 3Dmigoto, in this case mine is 3Dmigoto-1.3.16.zip
2. Download the latest files of this mod, in this case mine is version 1.2
3. Extract both ZIP files of 3Dmigoto-1.3.16.zip and Replicant_PS_Buttons-8-1-2-1619838937.zip
4. Open Steam, go to Library -> Home then head over to your Nier Replicant and click it.
5. After opening Nier Replicant's Library Game Page,
click the Manage icon (resembling a Setting icon) -> Properties
then LOCAL FILES -> Browse...
* This will open a folder in your File Explorer, the path open in the File Explorer will resemble something like
G:\Games\Steam\steamapps\common\NieR Replicant ver.1.22474487139
mine being G is because I install Nier Replicant in my G drive. Yours could be D, E or even C.6. Open the x64 folder inside 3Dmigoto-1.3.16 folder then Select All and Copy everything of the content from this x64 folder
* Please don't mind the .zip, I'm just too lazy to extract it since I have already completed it
7. Head back to the folder that you have opened through Steam in STEP 5 then Paste it all inside that folder. It will resemble something like this:
* Note, it won't be 100% the same as me because the screenshot I showed you is the final result.
8. Now, open the Replicant_PS_Buttons folder. You can find it inside the Replicant_PS_Buttons-8-1-2-1619838937 folder
Select then Copy the ReplacementTextures folder
9. Paste it to the same folder as in the STEP 5, this is similar to what we did in STEP 7.
10. After we finished Pasting both of the content from the ZIP files we downloaded, we can now began to edit the d3dx.ini file. Began by opening the file in Notepad or Notepad+++. You can just simply Double-click it or Right-click -> Open With.
11. In Notepad+++, click Search -> Find... or CTRL+F and type hunting. Click Find Next until you found the hunting=0
Change the 1
hunting=1Into 0hunting=0
If you are on Notepad, you can also search by clicking Edit -> Find or CTRL+F. Type hunting and hit enter until you find the hunting=1 then you can proceed to change it to hunting=0
12. Finally, scroll to the bottom of the file. Don't get confused, we are still inside the d3dx.ini file.
in my case, my final line is 1139. You can add a new line by hitting Enter
then add these codes to the bottom of the file
[ResourcePSButtons]
filename = ReplacementTextures\b8865b8c.dds

[ShaderOverride1]
Hash = 5370d8cdb9d41f35
checktextureoverride = ps-t0

[TextureOverride1]
Hash = 84ff92ef
ps-t0 = ResourcePSButtons
It will looks something like this afterward
Then make sure to save your file by click the Save icon or CTRL+S
* this is a screenshot of Notepad+++
13. Done! You can now boot up the game and see the changes.
You can test it by opening Options in the Title Screen.
It will show a Playstation Prompt on top.
9-Nov-2022
1.0: Fixes some glitches contained in this post ("?" being everywhere)
1.1: Added some more images
1.2: Minor markup
1.3: Image reupload Old -> New
Thanks!
Edit: Never mind, a shame there's no delete comment button.
For example:
C:\Program Files (x86)\Steam\steamapps\common\NieR Replicant ver.1.22474487139\
Do we copy the `ReplacementTextures` folder into there? Or some sub folder?
2nd: There is no d3dx.ini file in this folder. Where is it?
Or do we create it, and which specific folder does it go in?
NOTE: I read the description and it's ambiguous or incorrect for my use case.
There is no x64 folder under this path:
- Extract and copy all contents of the x64 folder to the NieR Replicant ver.1.22474487139 folder
When I copy the `ReplacementTextures` to the steam install location, it doesn't do anything.
C:\Program Files (x86)\Steam\steamapps\common\NieR Replicant ver.1.22474487139\
Edit, the other place it might be is under your user folder, e.g.:
C:\Users\yourUserName\OneDrive\Documents\My Games\NieR Replicant ver.1.22474487139
Edit: Never mind, I just found out.
Change:
hunting=1
To:
hunting=0