Loving all your classic armour replacers so far ;D For this one especially I had to make my own patch for Vigor and nerf the value of the reinforced bos CA. But otherwise had no issues whatsoever. I hope there would be an Enclave/Remnants variant someday
you have to download the the js file first then merge it with the other cause that one has all the meshes and textures and then you can delete the js esp if you want
Hello, I think your armor looks brilliant. I would like to be able to use it without the BoS disguises option so I don't immediately get shot on sight by the NCR in game. I tried to look at what could be changed in xEdit to prevent this, but I am at a loss at what to modify. Do you know if this change is possible in xEdit and if so what would I need to change? Thanks for any help in this.
- Don't know, try - should not crash your game (theoretically) - if the you are using a replacer: it will replace original armor record from New Vegas - if you are using a non-raplcer: it should be compatible, but you will fine the armor only in New Vegas.
The scripts don't seem to quite be working properly, for me. Using the JSUE version in a heavy load order and only the knights seem to have had the armor consistently and correctly applied. The light version/ones intended for initiates and scouts I've only seen work once, and only briefly, for Stanton. The scouts from Still in the Dark only have their helmets changed. I'm not quite sure what would conflict with scripts like this, if anything...
You would need to look at the mod in FNVEdit to know that. You can't hope to mod much without learning the basics of it. Not complicated since even me could do it. I recommend you learn to do that (if you don't know yet), for your own sake. To help you (and others) in this regard, here is what i found, which hopefully will guide you (or others) in your next modding efforts:
In FNVEdit, you will see a list of all the puglins you installed and enabled. This mod plugin is called zMCArmorCombatBOS_Vanilla.esp (i made my own DR rules and my own mod, and so i don't use Jsawyer's mod, hence the vanilla version). By clicking on the + next to zMCArmorCombatBOS_Vanilla.esp , a few categories appear. Amongst those you will find:
+Cell
Just in case you don't know, Cells are parts of the gameworld cut in squares. (better explain everything so that anyone can understand). Each square is called a Cell, and each Cell has its name. The important part is that any time you (for example) add a stimpack on a shelf somewhere in the gameworld, FNVEdit will add a +Cell category in the list. And by unfolding the Cell category, you will find every cell in which you added a stimpack. In this mod's case, the cells edited are "HiddenValley01", "HiddenValley02", and "SafehouseBOSINT". All are areas tied to the Brotherhood. And we see that armors have been added in these 3 locations. So, it is safe to assume that this mod didn't add directly any item to any other cells in the gameworld. Only those in the Brotherhood.
You can explore other categories that make sense to find armors in. For example... +Container
Where you find the containers the mod edited or added. In this case, we see that the only container listed here is Torres' trunk. The BOS merchant. Makes sense that she would have a few of those armors in said trunk.
We see no "Non-Player Character" category, meaning that this mod doesn't edit any NPC directly. This is probably an indication that the mod author knows his stuff and worked harder for the sake of making things easier for us, and for compatibility (let's thank him for it) since editing NPCs directly runs the risk of overwriting previous edits by other mods (i had to work out manually quite a lot of those things for NPCs that are edited by multiple mods. I don't hate doing that since i can actually choose precisely what outfit they wear, but this is time-consuming). Normally, if you add a party hat to Jackson, at the Mojave Outpost, FNVEdit will had a Jackson reference in a +NPC category, and you will find by looking on the right window that a hat was replaced in his outfit. But we see nothing of the sorts here. So, my guess is that he gives the armors through scripts. And here, we do have a...
+Scripts
I didn't look at it in details in GECK since i am not of a mind to do that right now... Still, a cursory exploration of its contents in FNVedit shows self explanatory editor IDs and names obviously tied to Brotherhood NPCs. So, even without digging too deep into the GECK, we can assume fairly safely that this mod shouldn't edit characters or locations outside of those tied to the Brotherhood faction in the base game. Here, it is nothing more than an educated guess, but from the looks of it, i suspect this mod gives brotherhood combat armors to some brotherhood NPCs that previously wore recon armors (indeed, that didn't make sense in Fallout lore. Fallout 1 showcases particularly clearly how things are meant be inside a Brotherhood bunker. Most NPCS there wore brotherhood combat armors).
Indeed. But since it was written (for JSawyer version) i prefered to look at the details in FNV edit, to be sure. Since i use the vanilla version and i don't remember the details of what JSawyer mod does. It is actually clearer and more detailed looking at it directly. Anyway, knowing to do that probably will be necessary for anyone who adds more than just a few mods. I have time on my hands, and so, i like to try to be useful when i can.
Still, i want to use this opportunity to convey to you my appreciation for your fantastic work. It is impressive that you grasped all these designs when all those american studios messed them up so hard... Maybe you should go teach them a few things. Make them pay good money for it, though, because they surely will find a way to profit from everything ^^.
Yes, you may ask. I am always grateful to people who ask and are willing to try stuff. Here we go (inside the spoiler tag).
Spoiler:
Show
Since i don't know what you know or don't know about modding New Vegas (and since i have no way to know the circumstances of whoever may read this in the future and find a use for it), I will go into (many, maybe useless to some) details, as always, but it is actually a pretty fast process. Try and you will see.
1) First, open FNVEdit et load your plugins. 2) In the left window, find the plugin that contains the armor you want to edit. 3)Unfold the contents of the plugin by pressing the + button. 4) Find the "Armor" tab, and then same as above, unfold it by pressing the + button. 5) There you should have a list of all the armors contained in this particular .esp (or .esm). Select one by clicking on it. 6) On the right side, in the window, you will see various entries, with FormIDs, Full Names, Model IDs and such... At the very bottom, you should see 2 lines: DR and DT. Normally, you can edit either line with right click >> edit, or with a double click. But to edit that cleanly and not mess up your original plugins, we will create a patch that will load after. Or... actually, a mod. And for that... 7)right-click on an entry you want to modify on the left window (an armor, like "NVDLC04HelmetRiotGearCustom"). Then select "copy as override" in the menu that opened. 8) Then, in the window that poped up, listing all the plugins you loaded, scroll to the very bottom and check one of the <new file.esp> checkboxes. You don't need an .esm for that, so make sure you selected an .esp. .Esm load before .esp, so it is a pretty bad option for a patch, since the plugin that wins a conflict is the one that loads last, and so, instead of overwritting entries, an .esm will be the one being overwritten. Which defeats the purpose of making a patch in the first place. And then there is the fact .esm are generally used for massive modifications. 9) xEdit will ask you if you really want to make your new plugin a children of whatever plugin you copied from. Since you are going to edit an entry already existing in another plugin, you NEED your new plugin to have the original plugin as a master. So, click "Yes". And then, name your own plugin, without the .esp extension (it will be added automatically). I named mine "Classic Armor DR". I like to call "classic" all the things i take from original Fallout, since it makes it easier to just throw it all together in plugin lists (ordered alphabetically. You can order alphabetically in xEdit like in the GECK by clicking on the "name" tab at the top of your plugin list). 10) Now that you have your own plugin, select it in the left window. Unfold it by clicking on the + tab as i explained earlier. Then unfold the "Armor" tab, and find the entry you copied. There should be only one since you copied only one line ("NVDLC04HelmetRiotGearCustom" in my example). You can actually copy plenty of lines at the same time by selecting more than one line, but let's keep it simple for now. 11)Click on this entry in the left window, and see its details appearing on the right window, as mentionned in 6). Scroll to the bottom to find the DR and DT entries, and edit them as you wish, as i explained above. This time, you can do it without fear. It is a patch. If you mess up or are unsatisfied, you can just delete it in your game's folder, and start over. So, you can experiment and learn to your heart's content. 12) Don't forget to save (top left of the screen). When closing xEdit, it will automatically ask if you want to save whatever plugins you edited. If you mistakenly edited some you didn't mean to edit, you can simply uncheck their boxes before clicking "Ok". 13) Repeat that for every armor for the base game and all mods (unless you want to edit only one for whatever reason). It will take a few hours, probably. 14) Once you are satisfied, activate your mod. You can check its box when loading xEdit or do it in your mod manager. It is now time to test it in game. It will automatically be loaded after all the plugins you patched through it, since they will all be masters to your plugin. So, the load order should sort itself all alone.
I personnally advise to lower the DT if you are going to add DR. And to consider the difficulty you are going to play in. I personnally was annoyed by the fact that power armors made you almost immune to most hand guns, but were hardly of any help again Deathclaws in very hard difficulty (stopping 25 damage is not very useful or meaningful when they hit for 150+ damage. Hence why DR is the key to somewhat flatten the curves of damage taken). Maybe you have the same reasons as me to edit DR, but i can't tell.
To go further (and probably easier):
If you have plenty of plugins like me (like 200+) it may become a pain to find all your armors in xEdit. I personnally made my mod in the GECK. I first created basic rules on paper for the modification (like remove 1DT every 5 DT and adding 3 to 40% DR depending on the armor). I have yet to test all this enough to find out if it is the balance i was looking for. What is more, i use the iStewie Tweak option to differentiate DT and DR on the body and on the head part, making headshots much more deadly. And so, it s a different balance to achieve in both cases. Once you have set your personal rules, just skim through the armor's IDs list in the right window you get after clicking on "Items" > "Armor" tab on the left side. You will have plenty of armors there, including many non playable ones. But for balance purpose, editing the non playable ones is advisable, since you want to play by the same rules as the NPCs. Even if you don't know what the heck an armor is, just edit it anyway, unless you know what it is and know that it is pointless to do so (like in the case of an unlootable armor found on a corpse. Doesn't hurt to edit it, but going through the hassle is useless). With your guideline made on paper, it will become much faster to edit everything coherently and fine tune over time. And obviously, your guideline is not absolute. You should be able to edit and fine tune stuff over time, this time in FNVEdit, using the method i described above, since you will create one new plugin that will contain everything.
If you opt to do that in the GECK and do not know how to reach this point, tell me, i will try to go into more details. But to use the GECK you first need to prepare it if you want it to work. You will find what you need while reading the GECK: how to get started and configure it page. Ah, and probably, using the GECK Extender won't hurt... Better to have it and not need it, than to need it and not knowing you do.
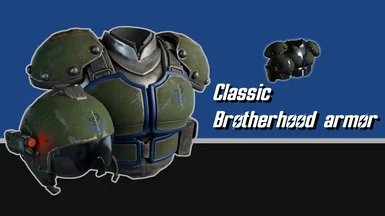
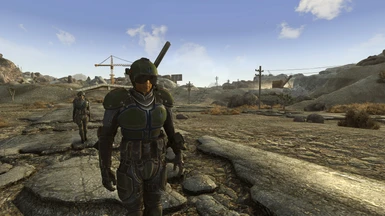
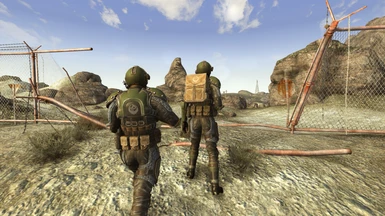
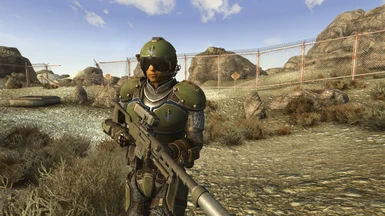
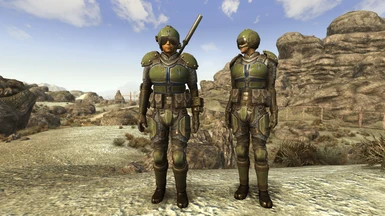
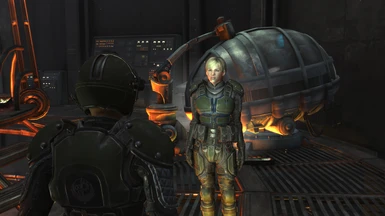
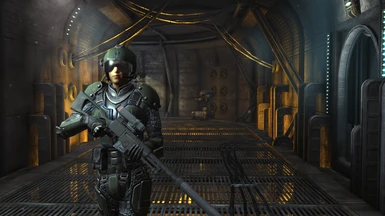
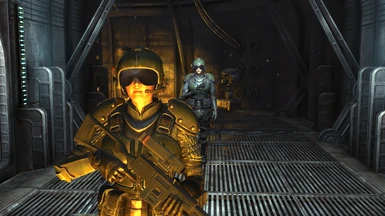
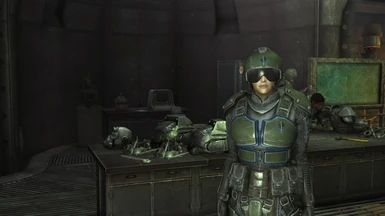
This amor is designed for a project to remake Fallout 2 in a 3D engine. The Chosen's Way Project from the Molten Clouds team. Fallout never had grey combat armors in the first place. Meaning... they won't make one since they don't need one. So, if you want one, it is probably going to be a "do it yourself" kind of job. Overall, they only upload here some of the promising stuff they do for their project. And nothing more.
Quite frankly, simply opening the textures in some software, and playing with the saturation, brightness, contrast and color curves should be enough to do the trick somewhat decently, since the base textures are so good already.
For some reasons it doesn't work for me. The Armor is all just a huge redmark error. Edit: Nevermind I found the error. The armor is amazing, looks really cool!
This bug appears because the game doesn't find the files for the armor. No meshes. Meaning he didn't install the mod properly. Here is the right way. If you use the vanilla version, you need to download everything manually. Not by using the "download with manager" button. If you do use this DL with manager link, the installation definitely won't work unless you have the Jsawyer mod installed. Here we go, for the vanilla install...
1) First, download manually the Main version, which contains the .esp made compatible with the JSawyer mod (which you won't need if you don't use it) + the meshes and textures for the armor (which you definitely need and which this guy didn't install). 2) Then, download manually the optional version, which contains only the .esp for the vanilla version (if you don't use the JSawyer mod). 3) Extract both archives wherever is convenient for you. 4) Delete the .esp from the main version, since it is meant for compatibility with the JSawyer mod. 5) Replace it with the one you found in the optional download archive. Be careful to put the .esp in the same place you found the original one you deleted, and make sure you only have ONE .esp in the folder. If you have two, it is likely that your head will split and that the world will end by tomorrow morning. Don't do that. 6) compress the whole folder with the new .esp again and give it whatever name you want. I use the same naming standards for all his mods, in order to remember where i found it. In my case, i called it "Classic Fallout Combat Armor - Brotherhood". 7) Add the new archive to your mod manager. I use Vortex and Vortex makes this very easy, through a mere drag and drop. I don't know for other managers, so find out yourself. But anyway, use a manager. if you don't, your arms will likely explode before midnight and you will have to eat like a dog for the rest of your life. You don't want that. 8) Activate the mod in your manager. Handle the load order accordingly to tools found in your manager of choice, whatever. If you don't see a prompt that tells you that you are going to overwrite files or that the .esp conflicts with another .esp, then you probably don't need to care too much about where you load it. Even with a 200 plugins install, i hadn't much problems. Still, check for conflicts in FNVEdit. If you don' know how, it is not too hard, and you will have to learn anyway, so look for the short tutorial on their website. If you do it properly, you will be able to uninstall the mod as any other, all in one go, cleanly, without messing with anything else. 9) Playtest. 10) And the most important part: remember what you just did and make sure you undersand why you did it. Because you will need to do that kind of stuff A LOT if you are serious about modding. Understanding what you do so that you can do it again is more important than making it work by chance.
Is it possible that not only this one but everyone of your classic combat armor lines that the helmets can be used with the balaclava from dragonskin tactical it's the only good balaclava mod and I would love to see all the classic combat armor helmets working with it


114 comments
For this one especially I had to make my own patch for Vigor and nerf the value of the reinforced bos CA. But otherwise had no issues whatsoever. I hope there would be an Enclave/Remnants variant someday
- Don't know, try
- should not crash your game (theoretically)
- if the you are using a replacer: it will replace original armor record from New Vegas
- if you are using a non-raplcer: it should be compatible, but you will fine the armor only in New Vegas.
In FNVEdit, you will see a list of all the puglins you installed and enabled. This mod plugin is called zMCArmorCombatBOS_Vanilla.esp (i made my own DR rules and my own mod, and so i don't use Jsawyer's mod, hence the vanilla version). By clicking on the + next to zMCArmorCombatBOS_Vanilla.esp , a few categories appear. Amongst those you will find:
+Cell
Just in case you don't know, Cells are parts of the gameworld cut in squares. (better explain everything so that anyone can understand). Each square is called a Cell, and each Cell has its name. The important part is that any time you (for example) add a stimpack on a shelf somewhere in the gameworld, FNVEdit will add a +Cell category in the list. And by unfolding the Cell category, you will find every cell in which you added a stimpack. In this mod's case, the cells edited are "HiddenValley01", "HiddenValley02", and "SafehouseBOSINT". All are areas tied to the Brotherhood. And we see that armors have been added in these 3 locations. So, it is safe to assume that this mod didn't add directly any item to any other cells in the gameworld. Only those in the Brotherhood.
You can explore other categories that make sense to find armors in. For example...
+Container
Where you find the containers the mod edited or added. In this case, we see that the only container listed here is Torres' trunk. The BOS merchant. Makes sense that she would have a few of those armors in said trunk.
We see no "Non-Player Character" category, meaning that this mod doesn't edit any NPC directly. This is probably an indication that the mod author knows his stuff and worked harder for the sake of making things easier for us, and for compatibility (let's thank him for it) since editing NPCs directly runs the risk of overwriting previous edits by other mods (i had to work out manually quite a lot of those things for NPCs that are edited by multiple mods. I don't hate doing that since i can actually choose precisely what outfit they wear, but this is time-consuming). Normally, if you add a party hat to Jackson, at the Mojave Outpost, FNVEdit will had a Jackson reference in a +NPC category, and you will find by looking on the right window that a hat was replaced in his outfit. But we see nothing of the sorts here. So, my guess is that he gives the armors through scripts. And here, we do have a...
+Scripts
I didn't look at it in details in GECK since i am not of a mind to do that right now... Still, a cursory exploration of its contents in FNVedit shows self explanatory editor IDs and names obviously tied to Brotherhood NPCs. So, even without digging too deep into the GECK, we can assume fairly safely that this mod shouldn't edit characters or locations outside of those tied to the Brotherhood faction in the base game. Here, it is nothing more than an educated guess, but from the looks of it, i suspect this mod gives brotherhood combat armors to some brotherhood NPCs that previously wore recon armors (indeed, that didn't make sense in Fallout lore. Fallout 1 showcases particularly clearly how things are meant be inside a Brotherhood bunker. Most NPCS there wore brotherhood combat armors).
Or just read the mod description
Still, i want to use this opportunity to convey to you my appreciation for your fantastic work. It is impressive that you grasped all these designs when all those american studios messed them up so hard... Maybe you should go teach them a few things. Make them pay good money for it, though, because they surely will find a way to profit from everything ^^.
How do you change the DR in xedit for the vanilla version if I may ask since you mentioned you already did it for yourself?
1) First, open FNVEdit et load your plugins.
2) In the left window, find the plugin that contains the armor you want to edit.
3) Unfold the contents of the plugin by pressing the + button.
4) Find the "Armor" tab, and then same as above, unfold it by pressing the + button.
5) There you should have a list of all the armors contained in this particular .esp (or .esm). Select one by clicking on it.
6) On the right side, in the window, you will see various entries, with FormIDs, Full Names, Model IDs and such... At the very bottom, you should see 2 lines: DR and DT. Normally, you can edit either line with right click >> edit, or with a double click. But to edit that cleanly and not mess up your original plugins, we will create a patch that will load after. Or... actually, a mod. And for that...
7) right-click on an entry you want to modify on the left window (an armor, like "NVDLC04HelmetRiotGearCustom"). Then select "copy as override" in the menu that opened.
8) Then, in the window that poped up, listing all the plugins you loaded, scroll to the very bottom and check one of the <new file.esp> checkboxes. You don't need an .esm for that, so make sure you selected an .esp. .Esm load before .esp, so it is a pretty bad option for a patch, since the plugin that wins a conflict is the one that loads last, and so, instead of overwritting entries, an .esm will be the one being overwritten. Which defeats the purpose of making a patch in the first place. And then there is the fact .esm are generally used for massive modifications.
9) xEdit will ask you if you really want to make your new plugin a children of whatever plugin you copied from. Since you are going to edit an entry already existing in another plugin, you NEED your new plugin to have the original plugin as a master. So, click "Yes". And then, name your own plugin, without the .esp extension (it will be added automatically). I named mine "Classic Armor DR". I like to call "classic" all the things i take from original Fallout, since it makes it easier to just throw it all together in plugin lists (ordered alphabetically. You can order alphabetically in xEdit like in the GECK by clicking on the "name" tab at the top of your plugin list).
10) Now that you have your own plugin, select it in the left window. Unfold it by clicking on the + tab as i explained earlier. Then unfold the "Armor" tab, and find the entry you copied. There should be only one since you copied only one line ("NVDLC04HelmetRiotGearCustom" in my example). You can actually copy plenty of lines at the same time by selecting more than one line, but let's keep it simple for now.
11) Click on this entry in the left window, and see its details appearing on the right window, as mentionned in 6). Scroll to the bottom to find the DR and DT entries, and edit them as you wish, as i explained above. This time, you can do it without fear. It is a patch. If you mess up or are unsatisfied, you can just delete it in your game's folder, and start over. So, you can experiment and learn to your heart's content.
12) Don't forget to save (top left of the screen). When closing xEdit, it will automatically ask if you want to save whatever plugins you edited. If you mistakenly edited some you didn't mean to edit, you can simply uncheck their boxes before clicking "Ok".
13) Repeat that for every armor for the base game and all mods (unless you want to edit only one for whatever reason). It will take a few hours, probably.
14) Once you are satisfied, activate your mod. You can check its box when loading xEdit or do it in your mod manager. It is now time to test it in game. It will automatically be loaded after all the plugins you patched through it, since they will all be masters to your plugin. So, the load order should sort itself all alone.
I personnally advise to lower the DT if you are going to add DR. And to consider the difficulty you are going to play in. I personnally was annoyed by the fact that power armors made you almost immune to most hand guns, but were hardly of any help again Deathclaws in very hard difficulty (stopping 25 damage is not very useful or meaningful when they hit for 150+ damage. Hence why DR is the key to somewhat flatten the curves of damage taken). Maybe you have the same reasons as me to edit DR, but i can't tell.
To go further (and probably easier):
If you have plenty of plugins like me (like 200+) it may become a pain to find all your armors in xEdit. I personnally made my mod in the GECK. I first created basic rules on paper for the modification (like remove 1DT every 5 DT and adding 3 to 40% DR depending on the armor). I have yet to test all this enough to find out if it is the balance i was looking for. What is more, i use the iStewie Tweak option to differentiate DT and DR on the body and on the head part, making headshots much more deadly. And so, it s a different balance to achieve in both cases. Once you have set your personal rules, just skim through the armor's IDs list in the right window you get after clicking on "Items" > "Armor" tab on the left side. You will have plenty of armors there, including many non playable ones. But for balance purpose, editing the non playable ones is advisable, since you want to play by the same rules as the NPCs. Even if you don't know what the heck an armor is, just edit it anyway, unless you know what it is and know that it is pointless to do so (like in the case of an unlootable armor found on a corpse. Doesn't hurt to edit it, but going through the hassle is useless). With your guideline made on paper, it will become much faster to edit everything coherently and fine tune over time. And obviously, your guideline is not absolute. You should be able to edit and fine tune stuff over time, this time in FNVEdit, using the method i described above, since you will create one new plugin that will contain everything.
If you opt to do that in the GECK and do not know how to reach this point, tell me, i will try to go into more details. But to use the GECK you first need to prepare it if you want it to work. You will find what you need while reading the GECK: how to get started and configure it page. Ah, and probably, using the GECK Extender won't hurt... Better to have it and not need it, than to need it and not knowing you do.
Quite frankly, simply opening the textures in some software, and playing with the saturation, brightness, contrast and color curves should be enough to do the trick somewhat decently, since the base textures are so good already.
For some reasons it doesn't work for me. The Armor is all just a huge redmark error.
Edit:Nevermind I found the error.
The armor is amazing, looks really cool!
1) First, download manually the Main version, which contains the .esp made compatible with the JSawyer mod (which you won't need if you don't use it) + the meshes and textures for the armor (which you definitely need and which this guy didn't install).
2) Then, download manually the optional version, which contains only the .esp for the vanilla version (if you don't use the JSawyer mod).
3) Extract both archives wherever is convenient for you.
4) Delete the .esp from the main version, since it is meant for compatibility with the JSawyer mod.
5) Replace it with the one you found in the optional download archive. Be careful to put the .esp in the same place you found the original one you deleted, and make sure you only have ONE .esp in the folder. If you have two, it is likely that your head will split and that the world will end by tomorrow morning. Don't do that.
6) compress the whole folder with the new .esp again and give it whatever name you want. I use the same naming standards for all his mods, in order to remember where i found it. In my case, i called it "Classic Fallout Combat Armor - Brotherhood".
7) Add the new archive to your mod manager. I use Vortex and Vortex makes this very easy, through a mere drag and drop. I don't know for other managers, so find out yourself. But anyway, use a manager. if you don't, your arms will likely explode before midnight and you will have to eat like a dog for the rest of your life. You don't want that.
8) Activate the mod in your manager. Handle the load order accordingly to tools found in your manager of choice, whatever. If you don't see a prompt that tells you that you are going to overwrite files or that the .esp conflicts with another .esp, then you probably don't need to care too much about where you load it. Even with a 200 plugins install, i hadn't much problems. Still, check for conflicts in FNVEdit. If you don' know how, it is not too hard, and you will have to learn anyway, so look for the short tutorial on their website. If you do it properly, you will be able to uninstall the mod as any other, all in one go, cleanly, without messing with anything else.
9) Playtest.
10) And the most important part: remember what you just did and make sure you undersand why you did it. Because you will need to do that kind of stuff A LOT if you are serious about modding. Understanding what you do so that you can do it again is more important than making it work by chance.